If you want to see the current version of this post enter here
Intermediate level
What do I have to know for this post?
Having ever programmed an Arduino, knowing how to declare digital inputs and outputs.
Know how to use Serial and SoftwareSerial.
Know basic SQL (INSERT and SELECT).
Know how to configure and create a MySQL or MariaDB database (I'm not going to explain it).
—————————————
For everything there is a first time. You know that in my blog I never made a post using Arduino, but not using it in this example would imply a mountain of work and many hours of trial and error. Therefore, to show a concept this example seems ideal to me. To begin with, although I supposed so, I did not know that there was a library (yes, it says library, not library ) that had the interface ready to query a MySQL (or MariaDB) database, but by chance I saw a project using the MySQL Connector contributed by Dr. Charles Bell. My sincere respect and thanks for the work of the gift.
What I need?
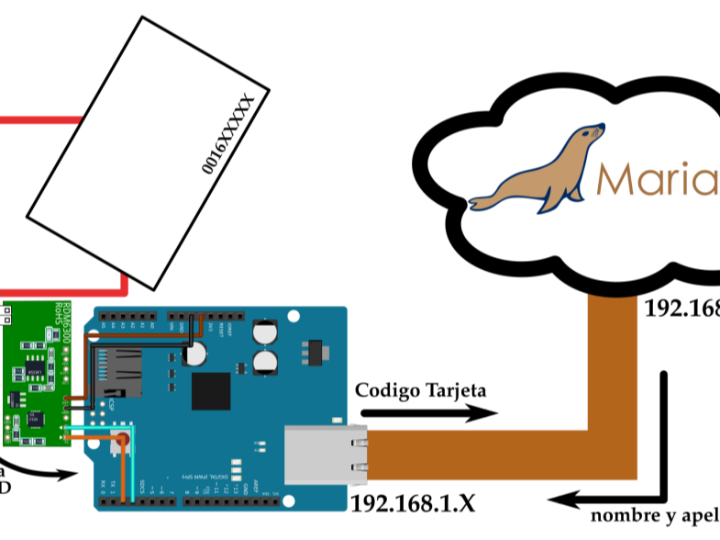
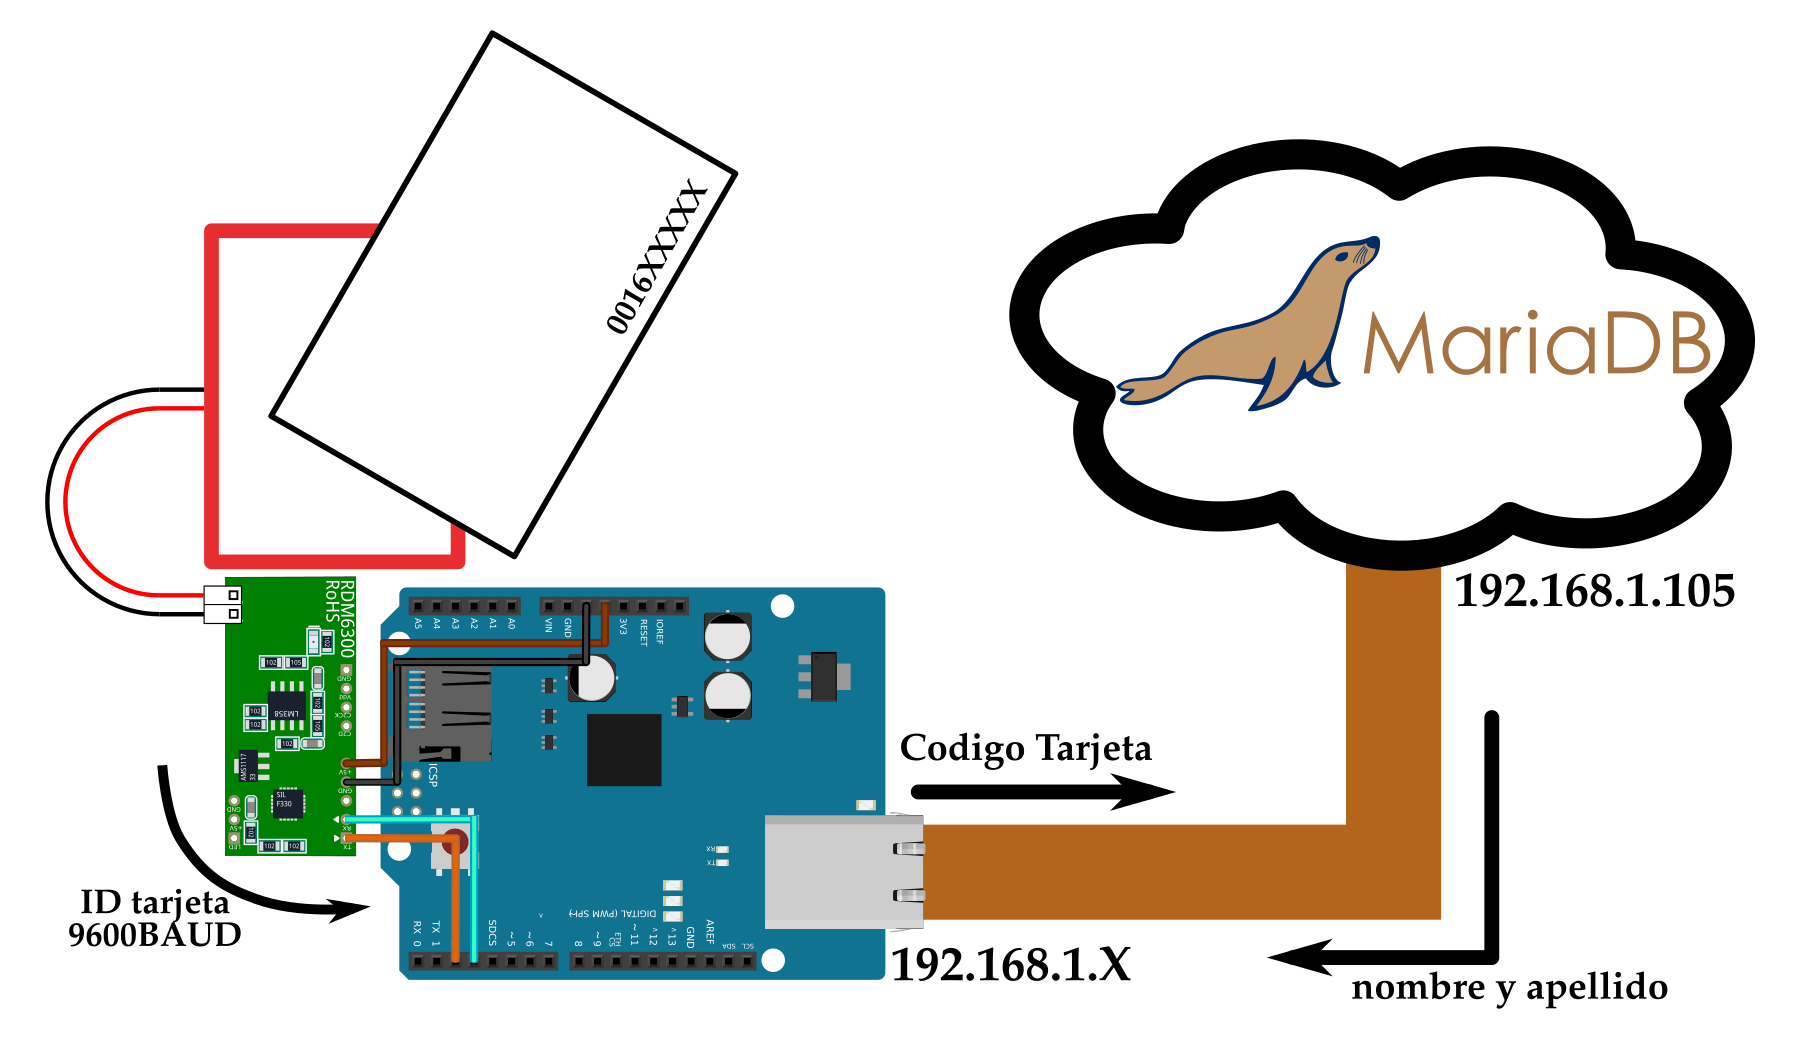
To be able to use this library, you need the Ethernet Shield or WiFi (I didn't try that's why I don't show any shield) and it is also compatible with ESP32 giving concrete examples with this board. I would also recommend using an Arduino Mega , although I did the example with an UNO , but the space I had left is very marginal for a more complex implementation. Also I used a RDM6300 125KHz RFID card reader module , although it's trivial, you can use whatever else you have on hand. I also used 2 LEDs, a push button and resistors. I leave you the connection diagram made with Fritzing:
Regarding Software, they need to have a MySQL or MariaDB database. If you are on Windows I feel sorry for you you can use XAMPP or similar, if you are on GNU/Linux you are no further from doing a simple installation with apt, yum, pacman or Docker. But you must take into account configuring your DB to be able to access it remotely, which I am not going to cover in this post. You can also use some free online testing service (eg Free Remote MySQL , there are others), but for that you need to modify the example to use the dnsclient .
The database is called arduino and it has a single table called people . Here I leave the dump . To manage the database, if you don't have much idea, you can use phpMyAdmin or DBeaver . As for the programming environment, I used PlatformIO , but the Arduino IDE wouldn't involve any code changes.
One
2
3
4
5
6
7
8
9
10
11
CREATEDATABASE`arduino`;
USE `arduino`;
DROPTABLEIF EXISTS `personas`;
CREATETABLE`personas` (
`id` varchar(12) NOTNULL,
`nombre` varchar(50) DEFAULTNULL,
`apellido` varchar(50) DEFAULTNULL,
PRIMARYKEY(`id`)
) ENGINE=InnoDB DEFAULTCHARSET=utf8mb4;
How does it work and what does it do?
The example itself is quite simple. I think it took me more time to apply the card validation protocol than the connection to the database itself. The scheme is simple, the Arduino reads the card using the RDM6300 and connected by a SoftwareSerial connected to pins 2 (Rx) and 3 (Tx) that transmits the 14 bytes of the RFID card protocol. Then a query is made through the ethernet cable to the IP of the MariaDB Server (in my case 192.168.1.105) that if it finds that card code it will return the name and surname of the person, and otherwise it will return an empty response.
When the card passes through the reader it arrives through the RFID object and it is checked that the reading is correct. These cards have 5-byte codes that are transmitted in ASCII format starting with a Start of Text (0x02) and ending with an End of Text (0x03), the bytes are transmitted in hexadecimal characters (therefore they will be 10 bytes) and then a checksum (2 more bytes) being a total of 14 bytes transmitted from the RDM6300 to the Arduino.
Each time a card found in the database is read, the green LED lights up and the person's name is displayed on the Serial Monitor . If the card is not found in the database, the red LED will blink twice.
In addition, I programmed a registration mode for new cards, for that is the button in the diagram at the beginning. Once pressed we have 5 seconds (indicated by the red LED) to pass the new card. Every time there is a correct reading of a card, the green LED lights up, and if there is an incorrect reading or if it is not possible to register, the red LED will blink twice. At the time of registration, only the 5-byte ID of the card remains in the DB, leaving the first and last name column with a NULL value . That means that we must complete it by hand in the DB (or it could be another software application that manages tokens, for example).
Go! Give me the damn code!
The full code on gitlab . Next I am going to make a couple of clarifications, to make it a little more digestible, or at least I am going to try. The first thing to do is change the database configuration to match yours:
IPAddress server_addr(192, 168, 1, 105); // IP del MySQL *server*
constcharuser[] = "root"; // MySQL login username
constcharpassword[] = "admin"; // MySQL login password
There the obvious is completed, the IP where the server is running, the username and password to access the database with the correct permissions. In it, setup()the attempt to connect to the database will be made, and in the serial port you should see the name of your server and its version:
} else{ // Si no se puede conectar a la base muere ahí
Serial.println(F("No se pudo conectar"));
while(true); // halt
}
In case the connection with the DB has not been established, the program remains "hung" in it while(true)until the Arduino is reset.
In the "normal" state (if the button was not pressed), we simply wait for a card to arrive through the RFID serial port. If a card arrives, we will make the query to find out if it is registered or not, which is nothing more than a simple SELECT:
String query = "SELECT apellido,nombre FROM arduino.personas WHERE id='"+tarjeta_leida+"'";
if(cur_mem->execute(query.c_str())) {
row_values *row = NULL;
column_names *columns = cur_mem->get_columns();
row = cur_mem->get_next_row();
if(row != NULL) {
Serial.print(row->values[0]);
Serial.print(", ");
Serial.println(row->values[1]);
show_ok();
while((row = cur_mem->get_next_row()) != NULL);
} else{
show_error();
}
} else{ // si hubo un error en la query:
show_error();
}
deletecur_mem;
}
In line 6, we must necessarily read the name of the columns, even if we are not going to use them. And then on line 13 we consume any other rows that might have returned the query, otherwise the program breaks. If the row arrived empty then the red LED blinks 2 times indicating that the card is not registered ( show_error()), this also happens if there is an error when executing the query. If the card has been found in the database, we show the name and surname of the person on the Serial monitor and turn on the green LED ( show_ok()).
Now let's see what happens if someone presses the button to register a new card. In that case we must do a simple INSERT:
uint32_ttime_out = now+5000; // 5 segundos para el time_out
digitalWrite(led_error, HIGH); // Se mantiene prendido el LED rojo...
while(now < time_out) {
if(check_rfid()) {
digitalWrite(led_error, LOW);
MySQL_Cursor *cur_mem = newMySQL_Cursor(&conn);
String query = "INSERT INTO arduino.personas (id) VALUES ('"+tarjeta_leida+"')";
if(cur_mem->execute(query.c_str()))
show_ok(); // Se registró con éxito
else
show_error(); // sino titila el rojo 2 veces.
deletecur_mem;
break;
}
now = millis();
}
digitalWrite(led_error, LOW); // Si se llegó al time_out se apaga el LED rojo
As can be seen, the function is simply allowed to run for a time millis()that lasts 5 seconds, unless a card is read, where regardless of whether it could be registered or not, the loop ends with a break.
There are some details that have to do with the implementation itself, but they are beside the point, you can analyze it in the full code on gitlab . But I also leave you the video of the test that I did, which I have already shared on other social networks:
If you want to see the current version of this post enter here
Intermediate level
What do I have to know for this post?
Having ever programmed an Arduino, knowing how to declare digital inputs and outputs.
Know how to use Serial and SoftwareSerial.
Know basic SQL (INSERT and SELECT).
Know how to configure and create a MySQL or MariaDB database (I'm not going to explain it).
—————————————
For everything there is a first time. You know that in my blog I never made a post using Arduino, but not using it in this example would imply a mountain of work and many hours of trial and error. Therefore, to show a concept this example seems ideal to me. To begin with, although I supposed so, I did not know that there was a library (yes, it says library, not library ) that had the interface ready to query a MySQL (or MariaDB) database, but by chance I saw a project using the MySQL Connector contributed by Dr. Charles Bell. My sincere respect and thanks for the work of the gift.
What I need?
To be able to use this library, you need the Ethernet Shield or WiFi (I didn't try that's why I don't show any shield) and it is also compatible with ESP32 giving concrete examples with this board. I would also recommend using an Arduino Mega , although I did the example with an UNO , but the space I had left is very marginal for a more complex implementation. Also I used a RDM6300 125KHz RFID card reader module , although it's trivial, you can use whatever else you have on hand. I also used 2 LEDs, a push button and resistors. I leave you the connection diagram made with Fritzing:
Regarding Software, they need to have a MySQL or MariaDB database. If you are on Windows I feel sorry for you you can use XAMPP or similar, if you are on GNU/Linux you are no further from doing a simple installation with apt, yum, pacman or Docker. But you must take into account configuring your DB to be able to access it remotely, which I am not going to cover in this post. You can also use some free online testing service (eg Free Remote MySQL , there are others), but for that you need to modify the example to use the dnsclient .
The database is called arduino and it has a single table called people . Here I leave the dump . To manage the database, if you don't have much idea, you can use phpMyAdmin or DBeaver . As for the programming environment, I used PlatformIO , but the Arduino IDE wouldn't involve any code changes.
One
2
3
4
5
6
7
8
9
10
11
CREATEDATABASE`arduino`;
USE `arduino`;
DROPTABLEIF EXISTS `personas`;
CREATETABLE`personas` (
`id` varchar(12) NOTNULL,
`nombre` varchar(50) DEFAULTNULL,
`apellido` varchar(50) DEFAULTNULL,
PRIMARYKEY(`id`)
) ENGINE=InnoDB DEFAULTCHARSET=utf8mb4;
How does it work and what does it do?
The example itself is quite simple. I think it took me more time to apply the card validation protocol than the connection to the database itself. The scheme is simple, the Arduino reads the card using the RDM6300 and connected by a SoftwareSerial connected to pins 2 (Rx) and 3 (Tx) that transmits the 14 bytes of the RFID card protocol. Then a query is made through the ethernet cable to the IP of the MariaDB Server (in my case 192.168.1.105) that if it finds that card code it will return the name and surname of the person, and otherwise it will return an empty response.
When the card passes through the reader it arrives through the RFID object and it is checked that the reading is correct. These cards have 5-byte codes that are transmitted in ASCII format starting with a Start of Text (0x02) and ending with an End of Text (0x03), the bytes are transmitted in hexadecimal characters (therefore they will be 10 bytes) and then a checksum (2 more bytes) being a total of 14 bytes transmitted from the RDM6300 to the Arduino.
Each time a card found in the database is read, the green LED lights up and the person's name is displayed on the Serial Monitor . If the card is not found in the database, the red LED will blink twice.
In addition, I programmed a registration mode for new cards, for that is the button in the diagram at the beginning. Once pressed we have 5 seconds (indicated by the red LED) to pass the new card. Every time there is a correct reading of a card, the green LED lights up, and if there is an incorrect reading or if it is not possible to register, the red LED will blink twice. At the time of registration, only the 5-byte ID of the card remains in the DB, leaving the first and last name column with a NULL value . That means that we must complete it by hand in the DB (or it could be another software application that manages tokens, for example).
Go! Give me the damn code!
The full code on gitlab . Next I am going to make a couple of clarifications, to make it a little more digestible, or at least I am going to try. The first thing to do is change the database configuration to match yours:
IPAddress server_addr(192, 168, 1, 105); // IP del MySQL *server*
constcharuser[] = "root"; // MySQL login username
constcharpassword[] = "admin"; // MySQL login password
There the obvious is completed, the IP where the server is running, the username and password to access the database with the correct permissions. In it, setup()the attempt to connect to the database will be made, and in the serial port you should see the name of your server and its version:
} else{ // Si no se puede conectar a la base muere ahí
Serial.println(F("No se pudo conectar"));
while(true); // halt
}
In case the connection with the DB has not been established, the program remains "hung" in it while(true)until the Arduino is reset.
In the "normal" state (if the button was not pressed), we simply wait for a card to arrive through the RFID serial port. If a card arrives, we will make the query to find out if it is registered or not, which is nothing more than a simple SELECT:
String query = "SELECT apellido,nombre FROM arduino.personas WHERE id='"+tarjeta_leida+"'";
if(cur_mem->execute(query.c_str())) {
row_values *row = NULL;
column_names *columns = cur_mem->get_columns();
row = cur_mem->get_next_row();
if(row != NULL) {
Serial.print(row->values[0]);
Serial.print(", ");
Serial.println(row->values[1]);
show_ok();
while((row = cur_mem->get_next_row()) != NULL);
} else{
show_error();
}
} else{ // si hubo un error en la query:
show_error();
}
deletecur_mem;
}
In line 6, we must necessarily read the name of the columns, even if we are not going to use them. And then on line 13 we consume any other rows that might have returned the query, otherwise the program breaks. If the row arrived empty then the red LED blinks 2 times indicating that the card is not registered ( show_error()), this also happens if there is an error when executing the query. If the card has been found in the database, we show the name and surname of the person on the Serial monitor and turn on the green LED ( show_ok()).
Now let's see what happens if someone presses the button to register a new card. In that case we must do a simple INSERT:
uint32_ttime_out = now+5000; // 5 segundos para el time_out
digitalWrite(led_error, HIGH); // Se mantiene prendido el LED rojo...
while(now < time_out) {
if(check_rfid()) {
digitalWrite(led_error, LOW);
MySQL_Cursor *cur_mem = newMySQL_Cursor(&conn);
String query = "INSERT INTO arduino.personas (id) VALUES ('"+tarjeta_leida+"')";
if(cur_mem->execute(query.c_str()))
show_ok(); // Se registró con éxito
else
show_error(); // sino titila el rojo 2 veces.
deletecur_mem;
break;
}
now = millis();
}
digitalWrite(led_error, LOW); // Si se llegó al time_out se apaga el LED rojo
As can be seen, the function is simply allowed to run for a time millis()that lasts 5 seconds, unless a card is read, where regardless of whether it could be registered or not, the loop ends with a break.
There are some details that have to do with the implementation itself, but they are beside the point, you can analyze it in the full code on gitlab . But I also leave you the video of the test that I did, which I have already shared on other social networks: