
Ethernet Mouse
Mouse cursor control using TCP communication

Raspberry Pi - Raspberry Pi Pico
x 1
WIZnet - WIZnet PICO PoE
x 1
In a previous project, we implemented a TCP Client using two cores of PICO, with Core0 responsible for TCP communication and Core1 responsible for implementing a 2.2" LCD.
Using that project, we implemented an Ethernet Mouse using a joystick.
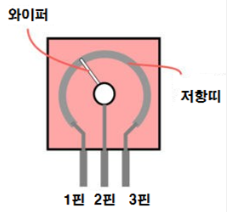
A typical trimmer rheostat connects power and GND to pins 1 and 3, respectively, and due to the law of voltage distribution, the voltage value read on pin 2 will vary depending on the position of the trimmer.
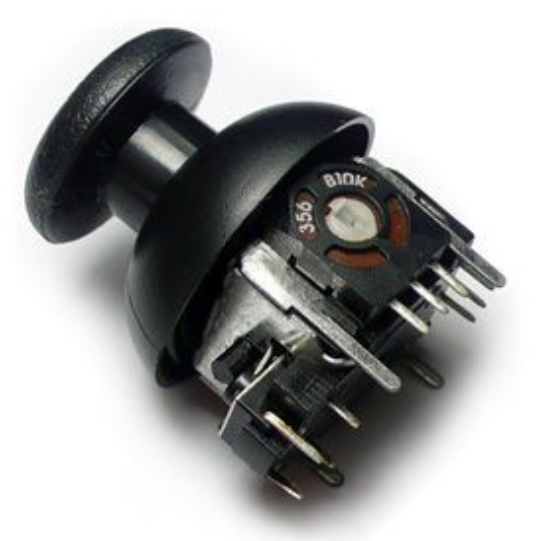
Joysticks can utilize this to represent the position of the stick with a rheostat on each of the X and Y axes.
It will read the corresponding ADC values into ADC0 and ADC1 of the Rpi PICO and pass those values back to the TCP server (PC in this project) via the W5100S.
#include <stdio.h>
#include "pico/multicore.h"
#include <string.h>
#include "hardware/adc.h"
#include "pico/stdlib.h"
#include "hardware/adc.h"
#include "mode0/mode0.h"
#include "port_common.h"
#include "wizchip_conf.h"
#include "w5x00_spi.h"
#include "socket.h"
#include "ili9341.h"


#define SERVER_IP {192, 168, 11, 197} // 서버 IP 주소
#define SERVER_PORT 5000 // 서버 포트 번호
#define CLIENT_SOCKET 1 // 클라이언트 소켓 번호
#define PLL_SYS_KHZ (133 * 1000)
#define ETHERNET_BUF_MAX_SIZE (1024 * 2)
#define MAX_TEXT 100  // 최대 문자 수

static wiz_NetInfo g_net_info = {
    .mac = {0x00, 0x08, 0xDC, 0x12, 0x34, 0x57},
    .ip = {192, 168, 11, 3},
    .sn = {255, 255, 255, 0},
    .gw = {192, 168, 11, 1},
    .dns = {8, 8, 8, 8},
    .dhcp = NETINFO_STATIC
};

static void set_clock_khz(void) {
    set_sys_clock_khz(PLL_SYS_KHZ, true);
    clock_configure(
        clk_peri,
        0,
        CLOCKS_CLK_PERI_CTRL_AUXSRC_VALUE_CLKSRC_PLL_SYS,
        PLL_SYS_KHZ * 1000,
        PLL_SYS_KHZ * 1000
    );
}


static uint8_t g_buf[1024] = {0,};

// core1에서 실행될 함수
static void display_received_data_core1() {
    ili9341_init(); // Initialize the mode0 library
    mode0_set_cursor(0, 0);
    mode0_set_foreground(MODE0_WHITE);  // Set default text color to white
    mode0_set_background(MODE0_BLACK);  // Set default background color to black

    while (true) {
        char* received_data = (char*)multicore_fifo_pop_blocking();

        // 받은 데이터를 LCD에 출력
        mode0_print(received_data);
        mode0_print("\n");
    }
}

static void send_message_to_core1(const char* message) {
    multicore_fifo_push_blocking((uint32_t)message);
}

void adc_init_pins() {
    adc_init();
    adc_gpio_init(26); // GP26을 ADC0으로 초기화
    adc_gpio_init(27); // GP27을 ADC1으로 초기화
}

// ADC 값을 읽고 서버로 전송하는 함수
void send_adc_values_to_server(uint8_t sn, uint8_t* buf) {
    adc_select_input(0); // ADC0 선택
    uint16_t adc_value0 = adc_read(); // ADC0 값 읽기

    adc_select_input(1); // ADC1 선택
    uint16_t adc_value1 = adc_read(); // ADC1 값 읽기

    // 값 포매팅 및 버퍼에 저장
    int len = snprintf((char*)buf, ETHERNET_BUF_MAX_SIZE, "ADC0: %u, ADC1: %u\n", adc_value0, adc_value1);

    // 서버로 데이터 전송
    send(sn, buf, len);
}

static void connect_to_server(uint8_t sn, uint8_t* buf, uint8_t* server_ip, uint16_t port) {
    int32_t ret;
    static bool isConnected = false;

    switch(getSn_SR(sn)) {
        case SOCK_INIT:
            if ((ret = connect(sn, server_ip, port)) != SOCK_OK) {
                if (!isConnected) {
                    send_message_to_core1("No connection\n");
                    isConnected = false;
                }
                return;
            }
            break;
        case SOCK_ESTABLISHED:
            if (!isConnected) {
                send_message_to_core1("Server Connected\n");
                isConnected = true;
            }

            while (isConnected) { // 서버 연결이 유지되는 동안 반복
                send_adc_values_to_server(sn, buf);

                // 서버로 데이터 전송
                if ((ret = send(sn, buf, strlen((char*)buf))) <= 0) {
                    close(sn);
                    isConnected = false;
                    break;
                }
                sleep_ms(5); // 데이터 전송 간격 (1초)
            }
            break;
        case SOCK_CLOSED:
            if (isConnected) {
                send_message_to_core1("Lost connection\n");
                isConnected = false;
            }
            if ((ret = socket(sn, Sn_MR_TCP, port, 0x00)) != sn) {
                return;
            }
            break;
    }
}

int main() {
    set_clock_khz();
    stdio_init_all();
	adc_init_pins();
    // Core1에서 display_received_data_core1 함수 실행
    multicore_launch_core1(display_received_data_core1);
    send_message_to_core1("IP : 192.168.11.3\n");
    sleep_ms(10);
    memset(g_buf, 0, sizeof(g_buf)); // g_buf 초기화
    send_message_to_core1("PORT : 5000\n");
    sleep_ms(10);
    memset(g_buf, 0, sizeof(g_buf)); // g_buf 초기화

    wizchip_spi_initialize();
    wizchip_cris_initialize();
    wizchip_reset();
    wizchip_initialize();
    wizchip_check();

    network_initialize(g_net_info);


    uint8_t server_ip[] = SERVER_IP;

    while (1) {

        connect_to_server(CLIENT_SOCKET, g_buf, server_ip, SERVER_PORT);
		send_adc_values_to_server(CLIENT_SOCKET, g_buf);
    }
}
Core0 is responsible for TCP communication, using the connect_to_server function and the send_adc_values_to_server function to read the ADC values, format them, and send them to the TCP server.
It also calls the send_message_to_core1 function to send data to Core1. This function uses multicore_fifo_push_blocking internally to send the message to Core1's FIFO queue.(The multicore_fifo_push_blocking function is responsible for sending data to Core1's FIFO queue. When you call this function on Core0, it puts the data to be sent into Core1's FIFO queue. If there's no space in the queue, Core0 waits until there is. At this point, Core0's work stops temporarily, which can lead to poor program performance).
Core1 is primarily responsible for updating the display. This is done through the display_received_data_core1 function. Core1 receives the data sent by Core0 via multicore_fifo_pop_blocking and displays it on the LCD.
The TCP server (PC), which received the data sent by the PICO and W5100S, parsed that data using Python and implemented the mouse control logic based on the parsed data.
from PyQt5.QtWidgets import QApplication, QWidget, QVBoxLayout, QLineEdit, QPushButton, QLabel
from PyQt5.QtCore import pyqtSignal
import sys
import socket
import pyautogui
import threading

def move_mouse_relative(adc0, adc1, dead_zone_start, dead_zone_end, smooth_factor=0.05):
    screen_width, screen_height = pyautogui.size()

    if dead_zone_start <= adc0 <= dead_zone_end and dead_zone_start <= adc1 <= dead_zone_end:
        return

    scale_factor = 0.1

    if adc0 < dead_zone_start:
        y_move = (adc0 - dead_zone_start) * scale_factor
    elif adc0 > dead_zone_end:
        y_move = (adc0 - dead_zone_end) * scale_factor
    else:
        y_move = 0

    if adc1 > dead_zone_end:
        x_move = -(adc1 - dead_zone_end) * scale_factor
    elif adc1 < dead_zone_start:
        x_move = -(adc1 - dead_zone_start) * scale_factor
    else:
        x_move = 0

    pyautogui.moveRel(x_move, -y_move, duration=smooth_factor)

class NetmouseApp(QWidget):
    update_status_signal = pyqtSignal(str)

    def __init__(self):
        super().__init__()
        self.server_thread = None
        self.server_running = [False]
        self.initUI()

    def initUI(self):
        self.setWindowTitle('Netmouse Server Configuration')
        layout = QVBoxLayout()

        self.statusLabel = QLabel(self)
        layout.addWidget(self.statusLabel)

        self.ipInput = QLineEdit(self)
        self.ipInput.setPlaceholderText("Enter Server IP")
        self.ipInput.setText("192.168.11.197")  # 기본 IP 설정
        layout.addWidget(self.ipInput)

        self.portInput = QLineEdit(self)
        self.portInput.setPlaceholderText("Enter Server Port")
        self.portInput.setText("5000")  # 기본 포트 설정
        layout.addWidget(self.portInput)

        self.startButton = QPushButton("Start Server", self)
        self.startButton.clicked.connect(self.startServer)
        layout.addWidget(self.startButton)

        self.stopButton = QPushButton("Stop Server", self)
        self.stopButton.clicked.connect(self.stopServer)
        layout.addWidget(self.stopButton)

        self.exitButton = QPushButton("EXIT", self)
        self.exitButton.clicked.connect(self.close)
        layout.addWidget(self.exitButton)

        self.setLayout(layout)
        self.update_status_signal.connect(self.updateStatusLabel)

    def startServer(self):
        if self.server_thread and self.server_thread.is_alive():
            return

        ip = self.ipInput.text()
        port = int(self.portInput.text())
        self.server_running[0] = True
        self.server_thread = threading.Thread(target=self.run_netmouse_server, args=(ip, port))
        self.server_thread.start()

    def stopServer(self):
        if self.server_thread and self.server_thread.is_alive():
            self.server_running[0] = False
            self.server_thread.join()
            self.update_status_signal.emit("Server stopped")

    def updateStatusLabel(self, message):
        self.statusLabel.setText(message)

    def closeEvent(self, event):
        self.stopServer()
        event.accept()

    def run_netmouse_server(self, ip, port):
        try:
            with socket.socket(socket.AF_INET, socket.SOCK_STREAM) as s:
                s.bind((ip, port))
                s.listen()
                self.update_status_signal.emit("Waiting for connection...")

                conn, addr = s.accept()
                with conn:
                    self.update_status_signal.emit(f"Connected by {addr}")

                    buffer = ""
                    while self.server_running[0]:
                        data = conn.recv(1024)
                        if not data:
                            break

                        buffer += data.decode()

                        # 메시지 분리
                        while "\n" in buffer:
                            message, buffer = buffer.split("\n", 1)
                            # 버퍼의 나머지 부분은 버림
                            buffer = ""
                            try:
                                adc0_val, adc1_val = [int(value.split(":")[1].strip()) for value in message.split(",")]
                                move_mouse_relative(adc0_val, adc1_val, 2000, 2100)
                            except (IndexError, ValueError, AttributeError):
                                print("Invalid data format")

                    self.update_status_signal.emit("Client disconnected")

        except Exception as e:
            self.update_status_signal.emit(f"Server error: {e}")

if __name__ == '__main__':
    app = QApplication(sys.argv)
    ex = NetmouseApp()
    ex.show()
    sys.exit(app.exec_())
Set up a TCP server and wait for connections: A TCP server is set up in the run_netmouse_server function. The server waits for clients to connect on the specified IP address and port.
Handle client connections: When a client connects, it prints out the address information of the connected client and starts receiving data.
Receive data and manage buffers: The server receives data from the client and stores it in a buffer. This data is expected in the format "ADC0: xxxx, ADC1: xxxx\n".
Parsing the data: The received data is separated into messages based on the newline character (\n). Each message has a comma-separated value, which is used as the value for ADC0 and ADC1.
Calculate and execute mouse movement: The parsed values of ADC0 and ADC1 are passed to the move_mouse_relative function. This function moves the mouse relative to the ADC values. The amount of movement is scaled by scale_factor, and the actual movement of the mouse is performed via the pyautogui.moveRel function.
Error handling: Any exceptions that may occur during data parsing (invalid format, conversion errors, etc.) are handled with appropriate error messages.
This project can be used as a basis for a project to control motors or other equipment depending on the application.
I will update the plan in the future with the goal of controlling other devices other than PCs.
Thank you.
이전 프로젝트에서 PICO의 2개의 코어를 사용하여 Core0는 TCP 통신을 담당하고 Core1은 2.2" LCD 구현을 담당하여 TCP Client를 구현하였습니다.
해당 프로젝트를 활용하여 조이스틱을 사용하여 Ethernet Mouse를 구현하였습니다.
일반적인 트리머 가변저항은 1핀과 3핀에 각각 전원과 GND를 연결하면 전압분배 법칙에 따라 2핀에서 읽히는 전압 값이 트리머의 위치에 따라 달라지게 됩니다.
조이스틱은 이를 활용하여 X축과 Y축 각각 가변저항으로 스틱의 위치를 나타낼 수 있습니다.
해당 ADC 값을 Rpi PICO의 ADC0,ADC1으로 읽고 해당 값들을 다시 W5100S를 통해 TCP 서버(본 프로젝트 에서는 PC)로 전달하게 됩니다.
#include <stdio.h>
#include "pico/multicore.h"
#include <string.h>
#include "hardware/adc.h"
#include "pico/stdlib.h"
#include "hardware/adc.h"
#include "mode0/mode0.h"
#include "port_common.h"
#include "wizchip_conf.h"
#include "w5x00_spi.h"
#include "socket.h"
#include "ili9341.h"


#define SERVER_IP {192, 168, 11, 197} // 서버 IP 주소
#define SERVER_PORT 5000 // 서버 포트 번호
#define CLIENT_SOCKET 1 // 클라이언트 소켓 번호
#define PLL_SYS_KHZ (133 * 1000)
#define ETHERNET_BUF_MAX_SIZE (1024 * 2)
#define MAX_TEXT 100  // 최대 문자 수

static wiz_NetInfo g_net_info = {
    .mac = {0x00, 0x08, 0xDC, 0x12, 0x34, 0x57},
    .ip = {192, 168, 11, 3},
    .sn = {255, 255, 255, 0},
    .gw = {192, 168, 11, 1},
    .dns = {8, 8, 8, 8},
    .dhcp = NETINFO_STATIC
};

static void set_clock_khz(void) {
    set_sys_clock_khz(PLL_SYS_KHZ, true);
    clock_configure(
        clk_peri,
        0,
        CLOCKS_CLK_PERI_CTRL_AUXSRC_VALUE_CLKSRC_PLL_SYS,
        PLL_SYS_KHZ * 1000,
        PLL_SYS_KHZ * 1000
    );
}


static uint8_t g_buf[1024] = {0,};

// core1에서 실행될 함수
static void display_received_data_core1() {
    ili9341_init(); // Initialize the mode0 library
    mode0_set_cursor(0, 0);
    mode0_set_foreground(MODE0_WHITE);  // Set default text color to white
    mode0_set_background(MODE0_BLACK);  // Set default background color to black

    while (true) {
        char* received_data = (char*)multicore_fifo_pop_blocking();

        // 받은 데이터를 LCD에 출력
        mode0_print(received_data);
        mode0_print("\n");
    }
}

static void send_message_to_core1(const char* message) {
    multicore_fifo_push_blocking((uint32_t)message);
}

void adc_init_pins() {
    adc_init();
    adc_gpio_init(26); // GP26을 ADC0으로 초기화
    adc_gpio_init(27); // GP27을 ADC1으로 초기화
}

// ADC 값을 읽고 서버로 전송하는 함수
void send_adc_values_to_server(uint8_t sn, uint8_t* buf) {
    adc_select_input(0); // ADC0 선택
    uint16_t adc_value0 = adc_read(); // ADC0 값 읽기

    adc_select_input(1); // ADC1 선택
    uint16_t adc_value1 = adc_read(); // ADC1 값 읽기

    // 값 포매팅 및 버퍼에 저장
    int len = snprintf((char*)buf, ETHERNET_BUF_MAX_SIZE, "ADC0: %u, ADC1: %u\n", adc_value0, adc_value1);

    // 서버로 데이터 전송
    send(sn, buf, len);
}

static void connect_to_server(uint8_t sn, uint8_t* buf, uint8_t* server_ip, uint16_t port) {
    int32_t ret;
    static bool isConnected = false;

    switch(getSn_SR(sn)) {
        case SOCK_INIT:
            if ((ret = connect(sn, server_ip, port)) != SOCK_OK) {
                if (!isConnected) {
                    send_message_to_core1("No connection\n");
                    isConnected = false;
                }
                return;
            }
            break;
        case SOCK_ESTABLISHED:
            if (!isConnected) {
                send_message_to_core1("Server Connected\n");
                isConnected = true;
            }

            while (isConnected) { // 서버 연결이 유지되는 동안 반복
                send_adc_values_to_server(sn, buf);

                // 서버로 데이터 전송
                if ((ret = send(sn, buf, strlen((char*)buf))) <= 0) {
                    close(sn);
                    isConnected = false;
                    break;
                }
                sleep_ms(5); // 데이터 전송 간격 (1초)
            }
            break;
        case SOCK_CLOSED:
            if (isConnected) {
                send_message_to_core1("Lost connection\n");
                isConnected = false;
            }
            if ((ret = socket(sn, Sn_MR_TCP, port, 0x00)) != sn) {
                return;
            }
            break;
    }
}

int main() {
    set_clock_khz();
    stdio_init_all();
	adc_init_pins();
    // Core1에서 display_received_data_core1 함수 실행
    multicore_launch_core1(display_received_data_core1);
    send_message_to_core1("IP : 192.168.11.3\n");
    sleep_ms(10);
    memset(g_buf, 0, sizeof(g_buf)); // g_buf 초기화
    send_message_to_core1("PORT : 5000\n");
    sleep_ms(10);
    memset(g_buf, 0, sizeof(g_buf)); // g_buf 초기화

    wizchip_spi_initialize();
    wizchip_cris_initialize();
    wizchip_reset();
    wizchip_initialize();
    wizchip_check();

    network_initialize(g_net_info);


    uint8_t server_ip[] = SERVER_IP;

    while (1) {

        connect_to_server(CLIENT_SOCKET, g_buf, server_ip, SERVER_PORT);
		send_adc_values_to_server(CLIENT_SOCKET, g_buf);
    }
}Core0은 connect_to_server 함수와 send_adc_values_to_server 함수를 사용하여 TCP 통신을 담당하고 ADC 값을 읽고 이를 포매팅하여 TCP 서버에 전송합니다.
또한, Core1으로 데이터를 전송하기 위해 send_message_to_core1 함수를 호출합니다. 이 함수는 내부적으로 multicore_fifo_push_blocking을 사용하여 Core1의 FIFO 큐에 메시지를 전송합니다.(multicore_fifo_push_blocking 함수는 데이터를 Core1의 FIFO 큐에 전송하는 역할을 합니다. Core0에서 이 함수를 호출하면, 전송할 데이터를 Core1의 FIFO 큐에 넣습니다. 만약 큐에 여유 공간이 없다면, Core0는 큐에 공간이 생길 때까지 대기합니다. 이 때 Core0의 작업이 일시적으로 멈추게 되며, 이는 프로그램의 성능 저하로 이어질 수 있습니다.)
Core1은 주로 디스플레이 업데이트를 담당합니다. 이는 display_received_data_core1 함수를 통해 수행됩니다. Core1은 Core0에서 보낸 데이터를 multicore_fifo_pop_blocking을 통해 받아와 LCD에 표시합니다.
PICO와 W5100S에서 보낸 데이터를 받은 TCP 서버(PC)는 해당 데이터를 파이썬을 사용하여 파싱하고 파싱된 데이터를 기반으로 마우스 컨트롤 로직을 구현하였습니다.
from PyQt5.QtWidgets import QApplication, QWidget, QVBoxLayout, QLineEdit, QPushButton, QLabel
from PyQt5.QtCore import pyqtSignal
import sys
import socket
import pyautogui
import threading

def move_mouse_relative(adc0, adc1, dead_zone_start, dead_zone_end, smooth_factor=0.05):
    screen_width, screen_height = pyautogui.size()

    if dead_zone_start <= adc0 <= dead_zone_end and dead_zone_start <= adc1 <= dead_zone_end:
        return

    scale_factor = 0.1

    if adc0 < dead_zone_start:
        y_move = (adc0 - dead_zone_start) * scale_factor
    elif adc0 > dead_zone_end:
        y_move = (adc0 - dead_zone_end) * scale_factor
    else:
        y_move = 0

    if adc1 > dead_zone_end:
        x_move = -(adc1 - dead_zone_end) * scale_factor
    elif adc1 < dead_zone_start:
        x_move = -(adc1 - dead_zone_start) * scale_factor
    else:
        x_move = 0

    pyautogui.moveRel(x_move, -y_move, duration=smooth_factor)

class NetmouseApp(QWidget):
    update_status_signal = pyqtSignal(str)

    def __init__(self):
        super().__init__()
        self.server_thread = None
        self.server_running = [False]
        self.initUI()

    def initUI(self):
        self.setWindowTitle('Netmouse Server Configuration')
        layout = QVBoxLayout()

        self.statusLabel = QLabel(self)
        layout.addWidget(self.statusLabel)

        self.ipInput = QLineEdit(self)
        self.ipInput.setPlaceholderText("Enter Server IP")
        self.ipInput.setText("192.168.11.197")  # 기본 IP 설정
        layout.addWidget(self.ipInput)

        self.portInput = QLineEdit(self)
        self.portInput.setPlaceholderText("Enter Server Port")
        self.portInput.setText("5000")  # 기본 포트 설정
        layout.addWidget(self.portInput)

        self.startButton = QPushButton("Start Server", self)
        self.startButton.clicked.connect(self.startServer)
        layout.addWidget(self.startButton)

        self.stopButton = QPushButton("Stop Server", self)
        self.stopButton.clicked.connect(self.stopServer)
        layout.addWidget(self.stopButton)

        self.exitButton = QPushButton("EXIT", self)
        self.exitButton.clicked.connect(self.close)
        layout.addWidget(self.exitButton)

        self.setLayout(layout)
        self.update_status_signal.connect(self.updateStatusLabel)

    def startServer(self):
        if self.server_thread and self.server_thread.is_alive():
            return

        ip = self.ipInput.text()
        port = int(self.portInput.text())
        self.server_running[0] = True
        self.server_thread = threading.Thread(target=self.run_netmouse_server, args=(ip, port))
        self.server_thread.start()

    def stopServer(self):
        if self.server_thread and self.server_thread.is_alive():
            self.server_running[0] = False
            self.server_thread.join()
            self.update_status_signal.emit("Server stopped")

    def updateStatusLabel(self, message):
        self.statusLabel.setText(message)

    def closeEvent(self, event):
        self.stopServer()
        event.accept()

    def run_netmouse_server(self, ip, port):
        try:
            with socket.socket(socket.AF_INET, socket.SOCK_STREAM) as s:
                s.bind((ip, port))
                s.listen()
                self.update_status_signal.emit("Waiting for connection...")

                conn, addr = s.accept()
                with conn:
                    self.update_status_signal.emit(f"Connected by {addr}")

                    buffer = ""
                    while self.server_running[0]:
                        data = conn.recv(1024)
                        if not data:
                            break

                        buffer += data.decode()

                        # 메시지 분리
                        while "\n" in buffer:
                            message, buffer = buffer.split("\n", 1)
                            # 버퍼의 나머지 부분은 버림
                            buffer = ""
                            try:
                                adc0_val, adc1_val = [int(value.split(":")[1].strip()) for value in message.split(",")]
                                move_mouse_relative(adc0_val, adc1_val, 2000, 2100)
                            except (IndexError, ValueError, AttributeError):
                                print("Invalid data format")

                    self.update_status_signal.emit("Client disconnected")

        except Exception as e:
            self.update_status_signal.emit(f"Server error: {e}")

if __name__ == '__main__':
    app = QApplication(sys.argv)
    ex = NetmouseApp()
    ex.show()
    sys.exit(app.exec_())
TCP 서버 설정 및 연결 대기: run_netmouse_server 함수에서 TCP 서버가 설정됩니다. 이 서버는 지정된 IP 주소와 포트에서 클라이언트의 연결을 기다립니다.
클라이언트 연결 처리: 클라이언트가 연결되면, 연결된 클라이언트의 주소 정보를 출력하고, 데이터 수신을 시작합니다.
데이터 수신 및 버퍼 관리: 서버는 클라이언트로부터 데이터를 받아 버퍼에 저장합니다. 이 데이터는 "ADC0: xxxx, ADC1: xxxx\n" 형식으로 예상됩니다.
데이터 파싱: 수신된 데이터는 개행 문자(\n)를 기준으로 메시지로 분리됩니다. 각 메시지는 쉼표로 구분된 값을 가지고 있으며, 이 값들은 ADC0와 ADC1의 값으로 사용됩니다.
마우스 움직임 계산 및 실행: 파싱된 ADC0와 ADC1의 값은 move_mouse_relative 함수에 전달됩니다. 이 함수는 ADC 값에 따라 마우스를 상대적으로 움직입니다. 이동량은 scale_factor에 의해 조정되며, 마우스의 실제 이동은 pyautogui.moveRel 함수를 통해 수행됩니다.
오류 처리: 데이터 파싱 과정에서 발생할 수 있는 모든 예외(잘못된 형식, 변환 오류 등)는 적절한 오류 메시지와 함께 처리됩니다.
본 프로젝트는 활용에 따라 모터나 기타 장비들을 제어하는 프로젝트의 기반이 될 수 있는 프로젝트입니다.
이후 플렌에는 PC가 아닌 타 장비와 연동하여 제어하는 것을 목표로 하여 업데이트 하도록 하겠습니다.
감사합니다.
-
Source code
PICO code, python code(NetMouse_GUI)
