
Arduino sensor box made by ChatGPT
Arduino project created by chatgpt

Arduino - Arduino Mega 2560
x 1

DFRobot - Gravity: DHT11 Temperature Humidity Sensor For Arduino
x 1
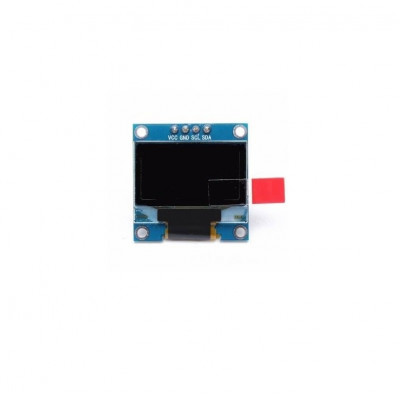
SOLOMON SYSTECH - Monochrome 0.96" 128x64 OLED Graphic Display
x 1

Arduino - Arduino Ethernet Shield 2
x 1
Hey everyone!
I'm really excited to share my first experience with open source hardware! I recently decided to give it a try and built a simple project using an Arduino Mega, an Ethernet shield with Sivertel's AG9700 POE module, an OLED display, and a DHT11 temperature and humidity sensor. The goal was to create a basic TCP server that shows its IP address and port on the OLED screen and sends temperature and humidity data to connected clients.
Before diving into the project, I had to install a few libraries. Here's how to install them using the Arduino IDE:
Open the Arduino IDE.
- Open the Arduino IDE.
Click on Sketch in the menu bar.
- Click on
Sketchin the menu bar.
Select Include Library > Manage Libraries....
- Select
Include Library>Manage Libraries....
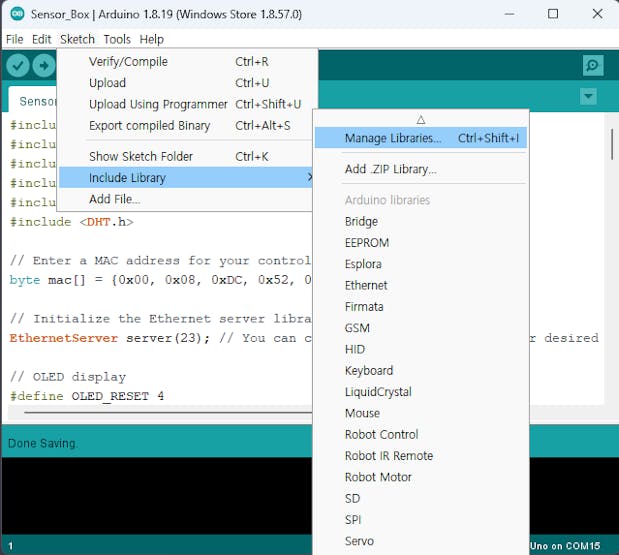
- In the Library Manager, search for each of the following libraries and click
Install: - Adafruit_GFX
- Ethernet2
- Adafruit_SSD1306
- DHT sensor library by Adafruit

With the necessary libraries installed, I defined a MAC address for the Ethernet controller and set up the Ethernet server with a specific port number (I used port 23, but you can change it to any other port you prefer).
// OLED display
#define OLED_RESET 4
Adafruit_SSD1306 display(OLED_RESET);
// DHT sensor
#define DHTPIN 2
#define DHTTYPE DHT11
DHT dht(DHTPIN, DHTTYPE);
int cursorX = 0;
int cursorY = 0;
void setup() {
// Initialize the OLED display
display.begin(SSD1306_SWITCHCAPVCC, 0x3C);
display.clearDisplay();
display.setTextSize(1);
display.setTextColor(WHITE);
display.setCursor(cursorX, cursorY);
display.println("Connecting...");
display.display();
// Start the Ethernet connection
if (Ethernet.begin(mac) == 0) {
display.clearDisplay();
display.setTextSize(1);
display.setTextColor(WHITE);
display.setCursor(cursorX, cursorY);
display.println("Failed to configure Ethernet");
display.display();
while (1);
}
// Start the server
server.begin();
// Initialize the DHT sensor
dht.begin();
// Display IP address and server port on OLED
IPAddress ip = Ethernet.localIP();
uint16_t port = 23; // Replace with the port number you used to initialize the server
display.clearDisplay();
display.setTextSize(1);
display.setTextColor(WHITE);
display.setCursor(cursorX, cursorY);
display.print("IP: ");
display.print(ip);
display.print(":");
display.print(port);
display.display();
}

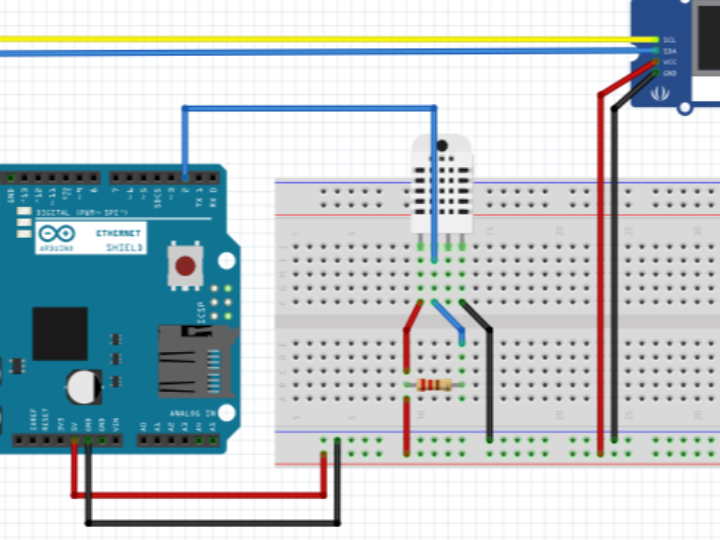
Next, I connected the OLED display (Adafruit_SSD1306) and the DHT11 sensor to the Arduino Mega and defined the necessary pins and variables in the code. In the setup() function, I initialized the OLED display and showed a "Connecting..." message. I also started the Ethernet connection using the MAC address I provided. I had some trouble at first, but after double-checking my connections, everything worked out!
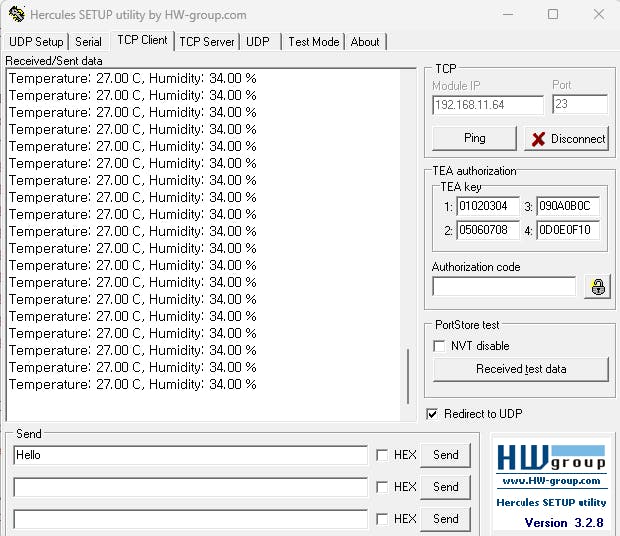
With the Ethernet connection established, I started the server and initialized the DHT sensor. I was thrilled to see the IP address and server port displayed on the OLED screen!
void loop() {
// Check if a client is connected
EthernetClient client = server.available();
if (client) {
// A client is connected
display.clearDisplay();
display.setTextSize(1);
display.setTextColor(WHITE);
display.setCursor(cursorX, cursorY);
display.println("Client connected");
cursorY += 8; // Move the cursor to the next line
display.display();
// Send a welcome message to the client
client.println("Welcome to the TCP server!");
// Send temperature and humidity values from DHT11 sensor every 10 seconds
unsigned long lastDHTCheck = 0;
while (client.connected()) {
unsigned long currentMillis = millis();
if (currentMillis - lastDHTCheck >= 10000) {
lastDHTCheck = currentMillis;
// Read temperature and humidity from DHT11
float humidity = dht.readHumidity();
float temperature = dht.readTemperature();
// Send data to the client
client.print("Temperature: ");
client.print(temperature);
client.print(" C, Humidity: ");
client.print(humidity);
client.println(" %");
}
if (client.available()) {
char c = client.read();
client.write(c);
}
}
// Reset cursor position
cursorX = 0;
cursorY = 0;
display.clearDisplay();
display.setTextSize(1);
display.setTextColor(WHITE);
display.setCursor(cursorX, cursorY);
display.println("Client disconnected");
display.display();
// Reset cursor position
cursorX = 0;
cursorY = 0;
}
}
In the loop() function, I wrote code to check for connected clients. When a client connects, the OLED screen shows a "Client connected" message, and a welcome message is sent to the client. The Arduino Mega then reads the temperature and humidity values from the DHT11 sensor every 10 seconds and sends the data to the connected client. If the client sends any data, the code just echoes it back.
Finally, when a client disconnects, the OLED screen displays a "Client disconnected" message.
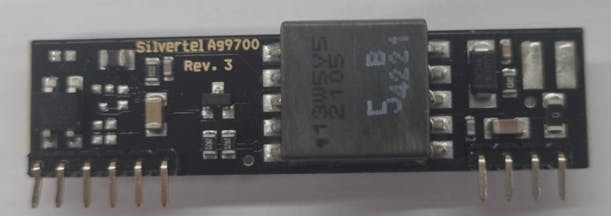

Using the Ethernet Shield 2 with Sivertel's AG9700 POE module allowed me to power the Arduino Mega and Ethernet shield using a single Ethernet cable, which I found to be super convenient!
I must say, working with open source hardware for the first time was an amazing experience! I learned so much, and I'm looking forward to diving deeper into more projects with my Arduino Mega. In my next project, I plan to graph the received temperature and humidity data, giving us a visual representation of the sensor's readings. Stay tuned for that one, and as always, if you have any questions or suggestions, please feel free to share them in the comments below. Happy building!
-
Sensor_Box
