
Monitoring light value using W5100S-EVB-Pico & Arduino IDE!
Monitoring light value using W5100S-EVB-Pico & Arduino IDE!

WIZnet - W5100S-EVB-Pico
x 1

AdaFruit - Photo cell (CdS photoresistor)
x 1
1. Introduction
This content provides a guide on how to set up the W5100S-EVB-Pico board in the Arduino IDE. It explains the process of connecting a photoregistor to the board and reading the light intensity values. Additionally, it demonstrates how to publish MQTT messages to the Beebotte Cloud, enabling real-time monitoring of the light intensity values.
1.1. What is Photoregistor?
A photoregistor, also known as a light-dependent resistor (LDR) or a photoresistor, is a passive component that changes its resistance based on the amount of light falling on it. It is made of a semiconductor material that exhibits a decrease in resistance as the intensity of light increases. This property allows the photoregistor to be used as a sensor for detecting light levels in various applications.
In the context of this content, a photoregistor is used to measure the ambient light or brightness in the environment. By connecting a photoregistor to the W5100S-EVB-Pico board, you can obtain real-time readings of the light intensity, enabling you to monitor and respond to changes in brightness.
1.2. What is Beebotte Cloud?
Beebotte is a cloud-based platform that provides services for connecting and managing IoT (Internet of Things) devices and applications. It offers various features and protocols for data collection, storage, and communication, making it easier to develop and deploy IoT projects.
In this content, Beebotte Cloud is utilized as a platform to publish MQTT (Message Queuing Telemetry Transport) messages with the light intensity data obtained from the photoregistor. MQTT is a lightweight and widely used messaging protocol for IoT applications. By using Beebotte's MQTT support, you can send the light intensity data to the cloud in real-time, allowing you to monitor and analyze the data remotely.
2. Hardware
2.1. Component
- W5100S-EVB-Pico
- Photoresistor
- 10k ohm Resistor
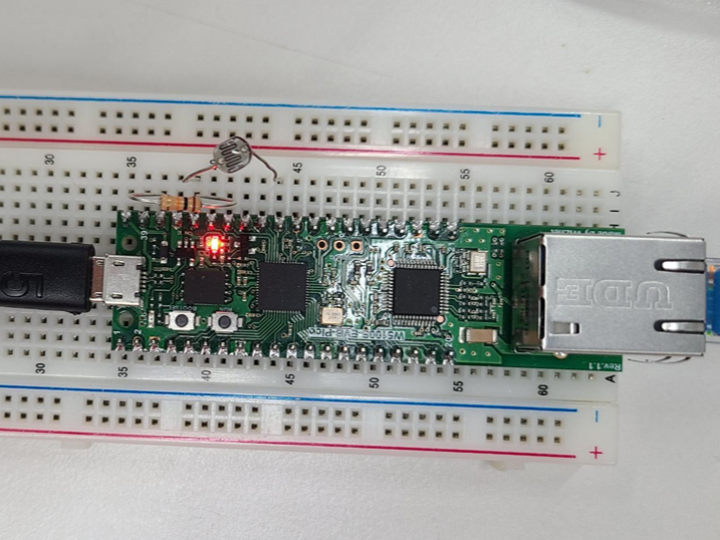
2.2. Wiring
Connect the photoresistor and a 10k ohm resistor in series to GPIO26V pin. Connect one side of the sensor to VCC and the resistor to GND.

3. Beebotte Cloud
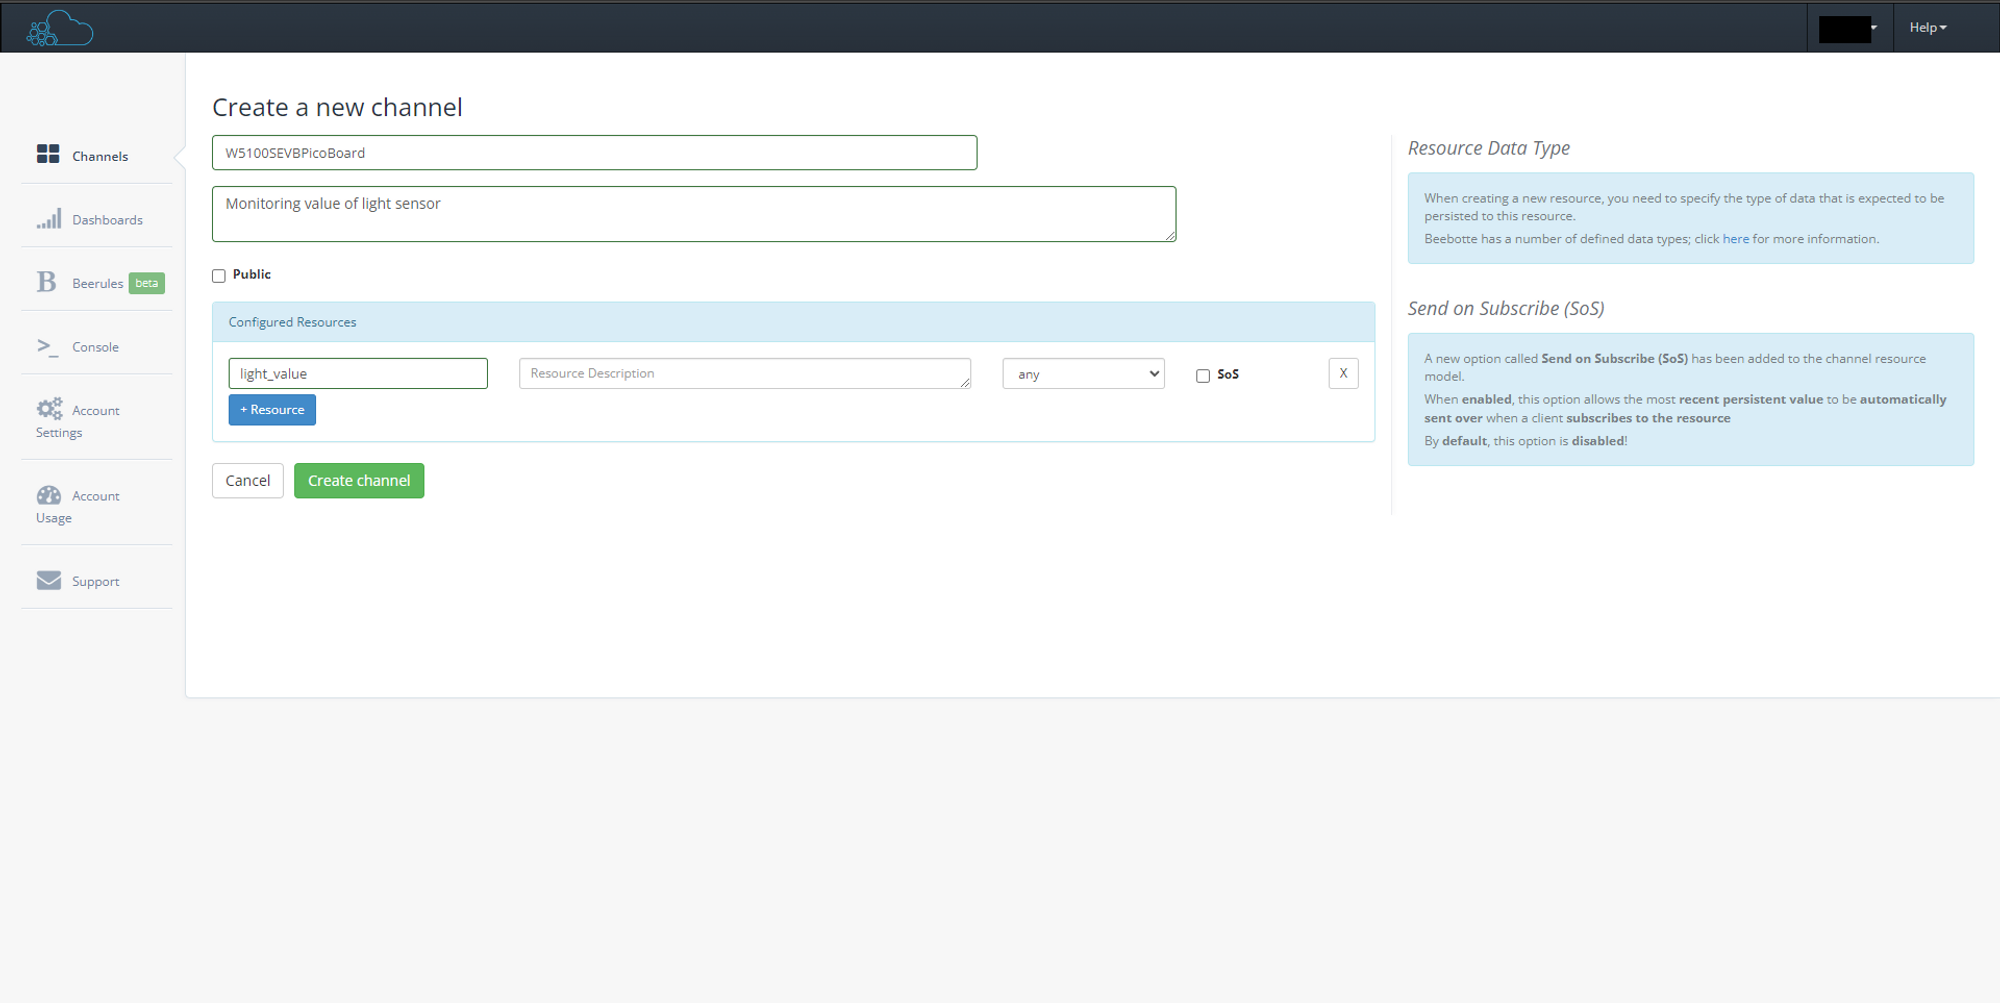
3.1. Creating a Channel
Access Beebotte cloud, log in, and create a channel. Add sensor resources under the channel.
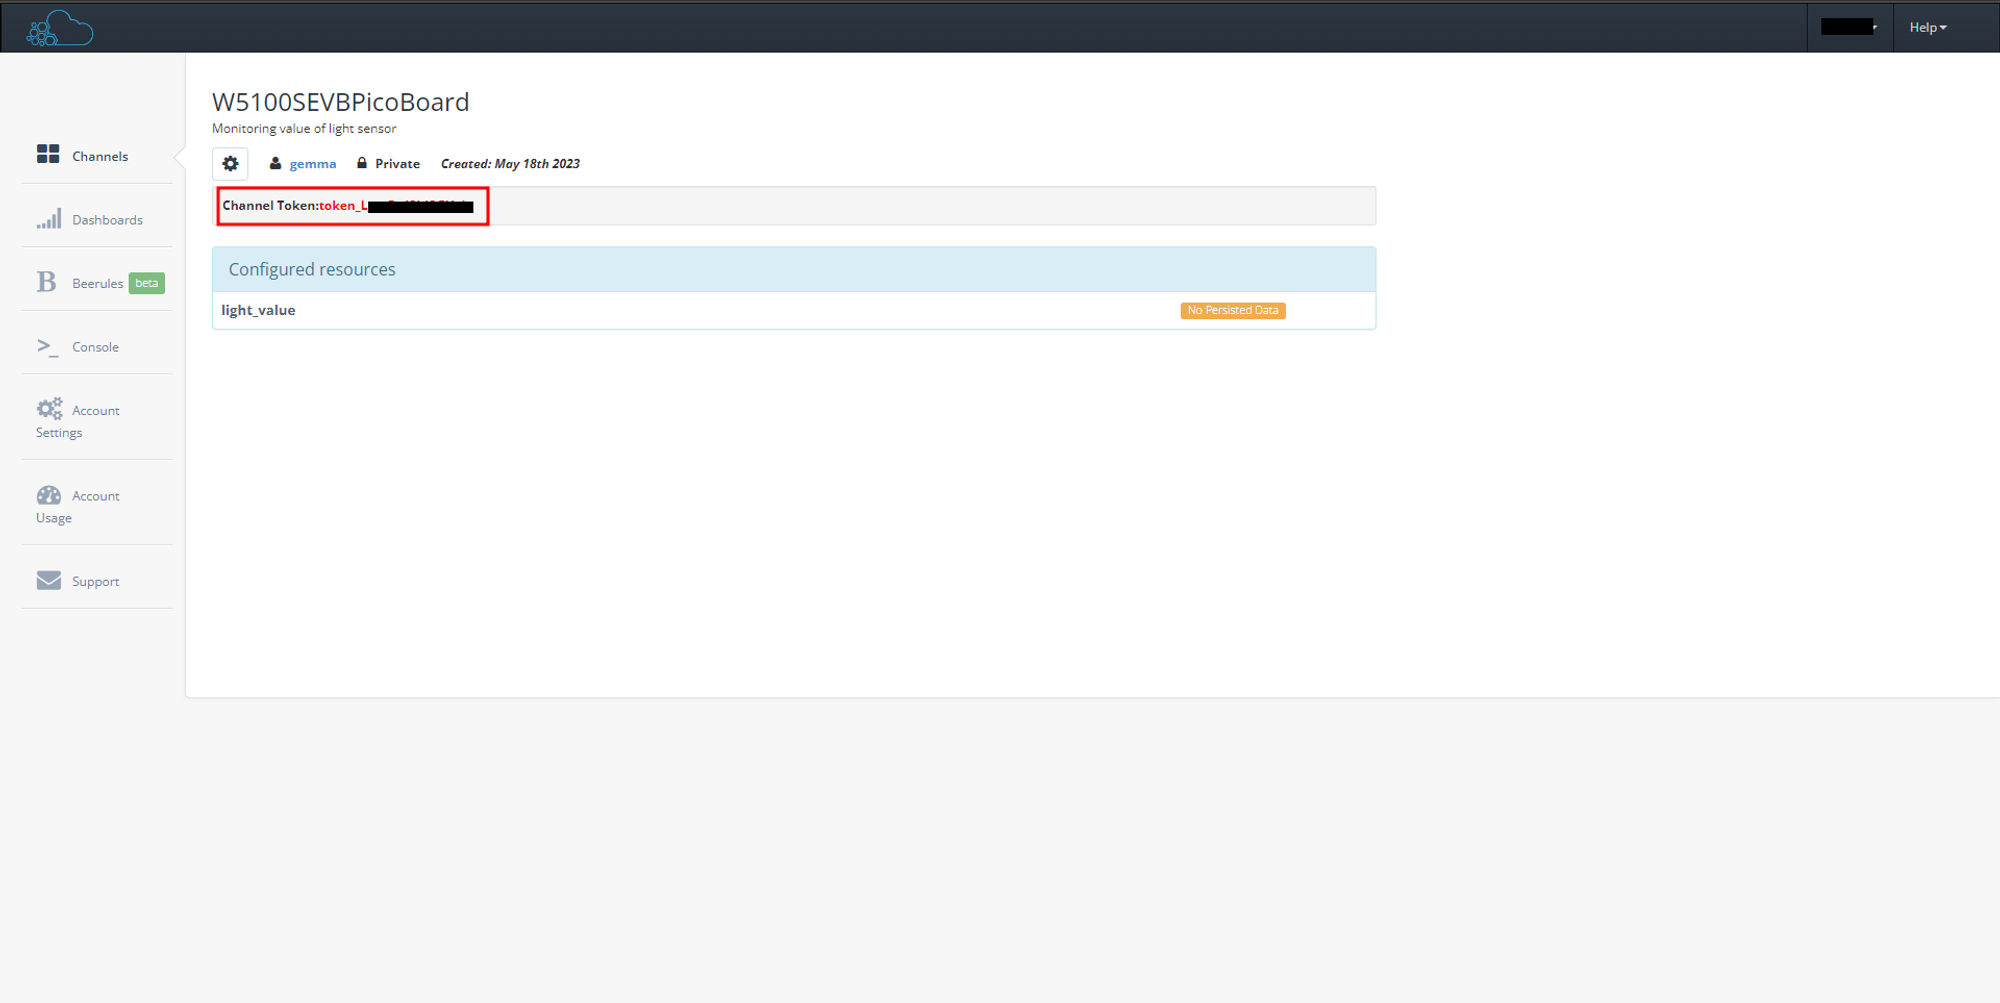
After creating the channel, a token will be issued. You can use this token to send data to the cloud.
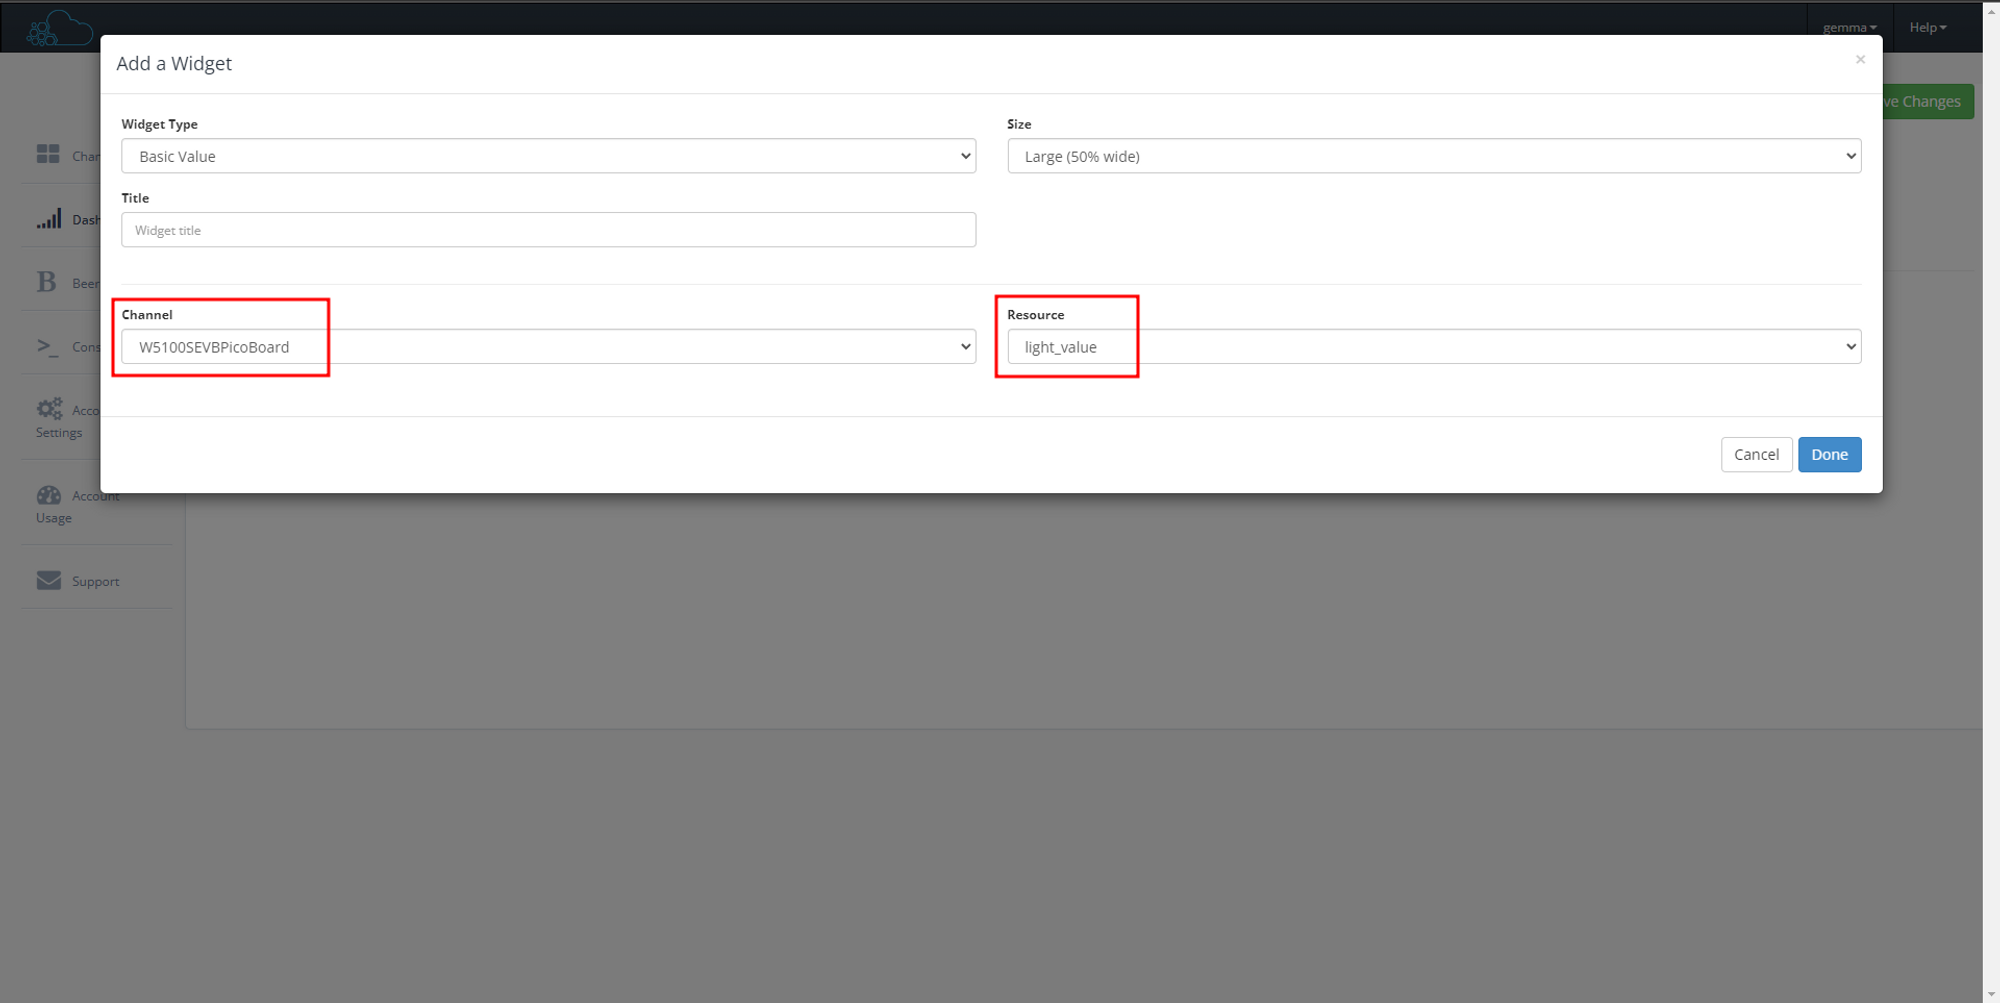
3.2. Creating a Dashboard
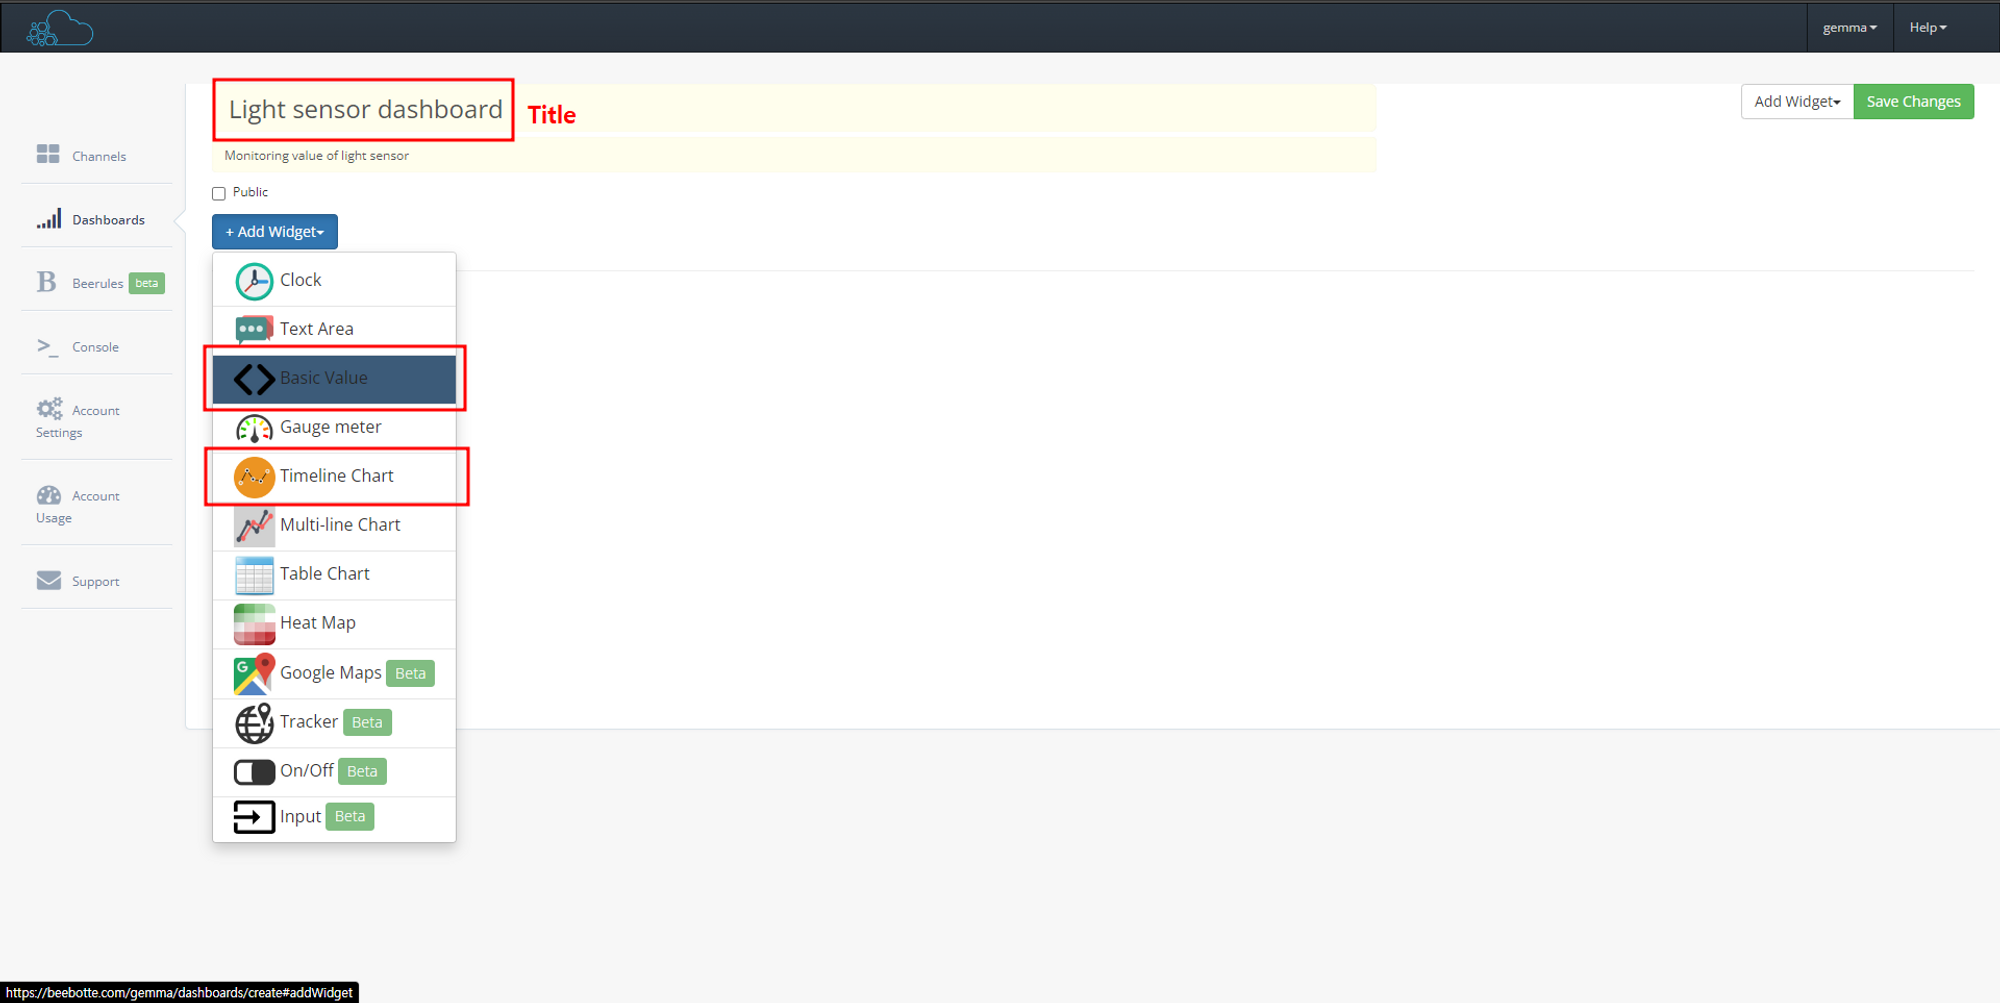
Go to the Dashboard menu, create a new dashboard, and select Basic Value widget and Timeline Chart widget. Add the resources from the created channel by selecting them, and add the widgets to the dashboard.
4. Arduino IDE
4.1. Configure Arduino IDE
Install the Arduino IDE on the Arduino IDE to use the W5100S-EVB-PICO board.
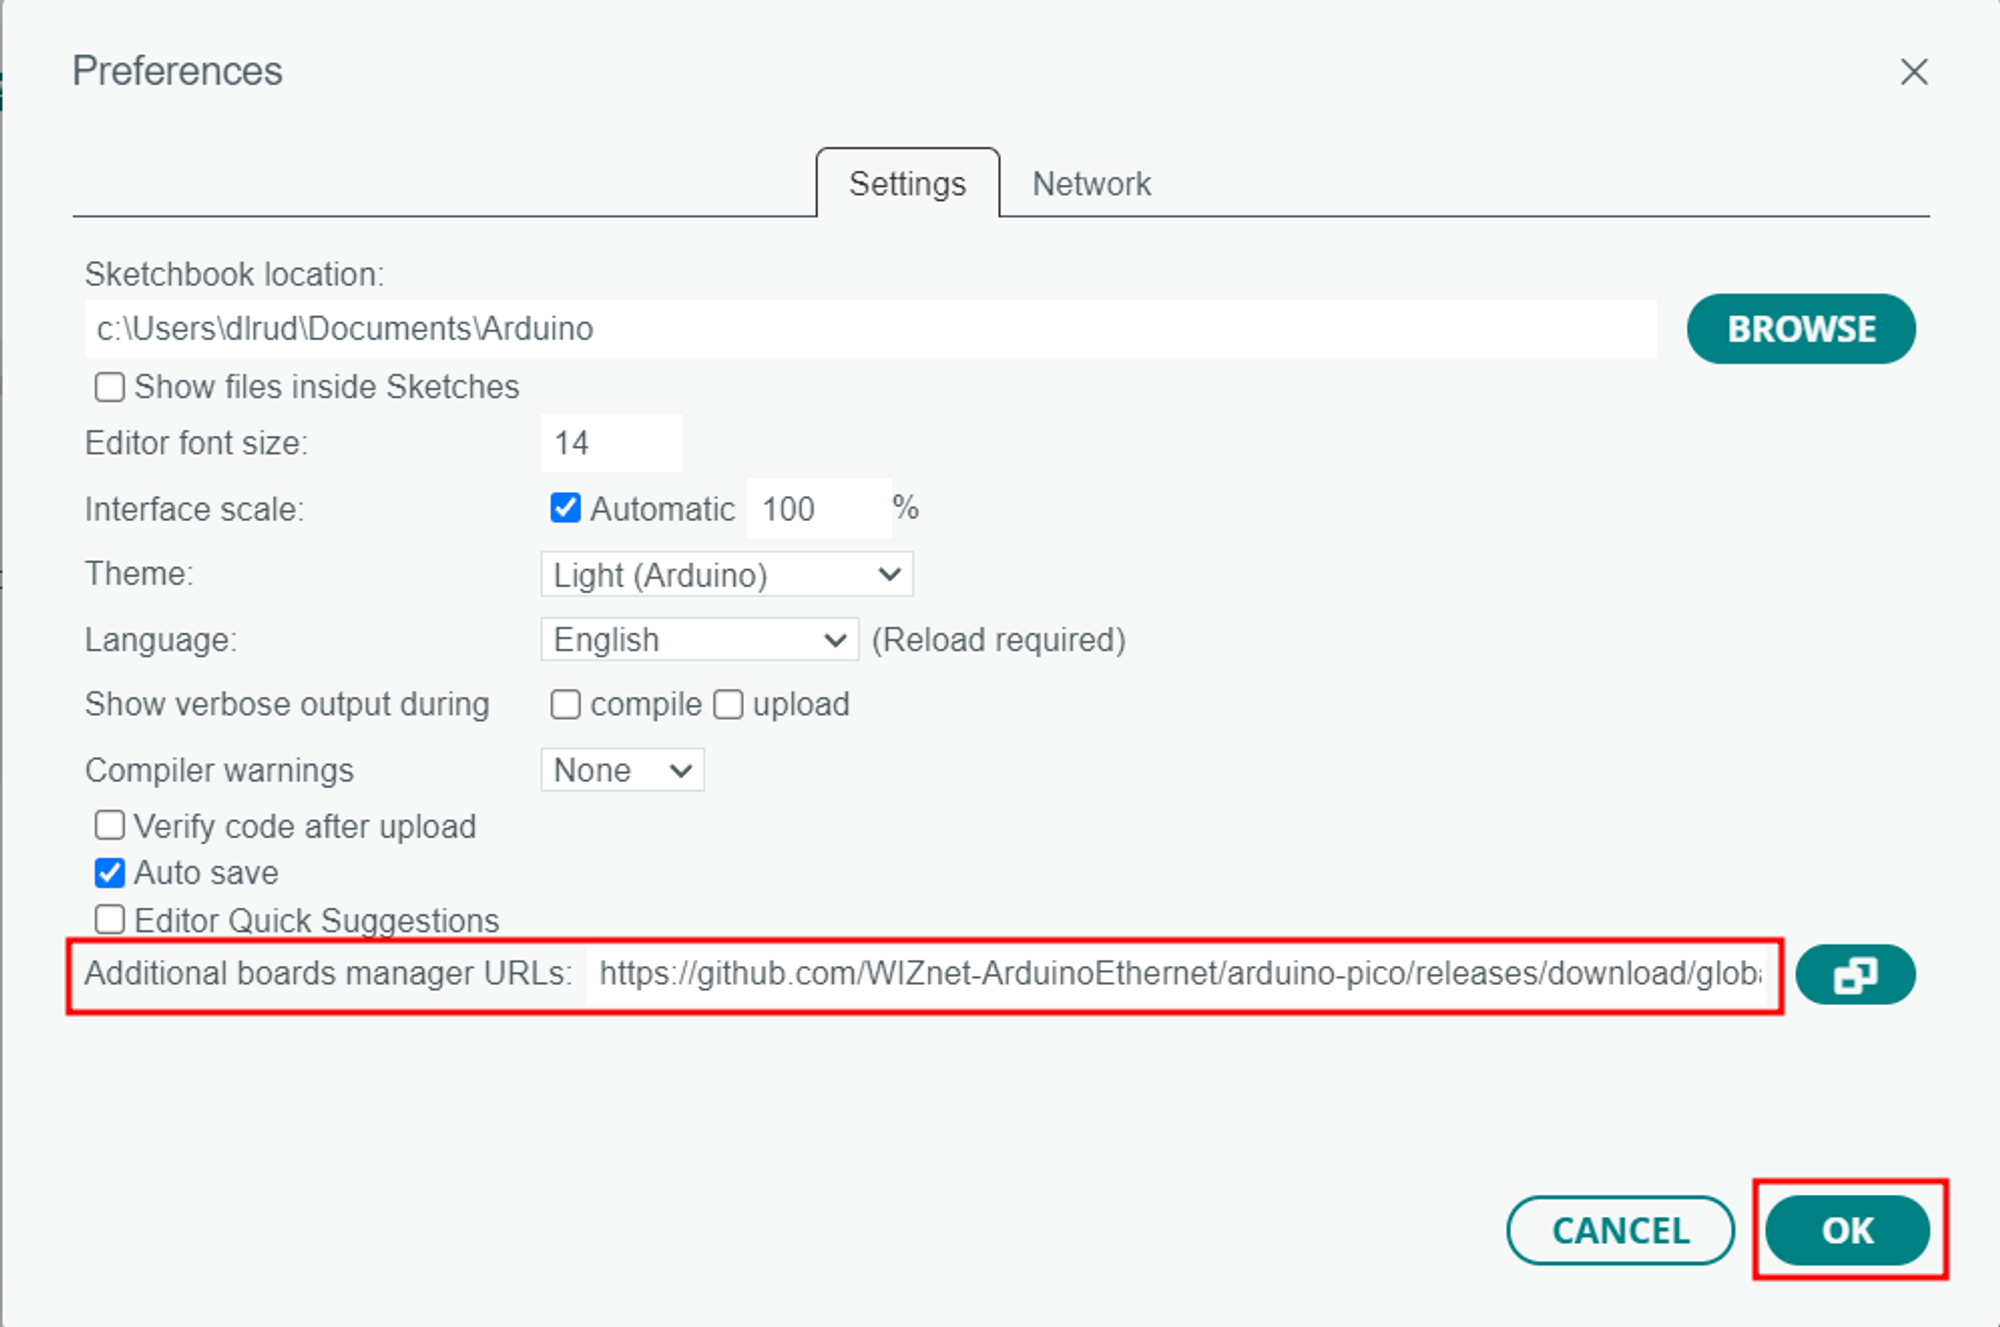
4.1.1. Add board manager URLs
Go to File -Preference in Arduino IDE and add the following link to the Additional Board Manger URLS.
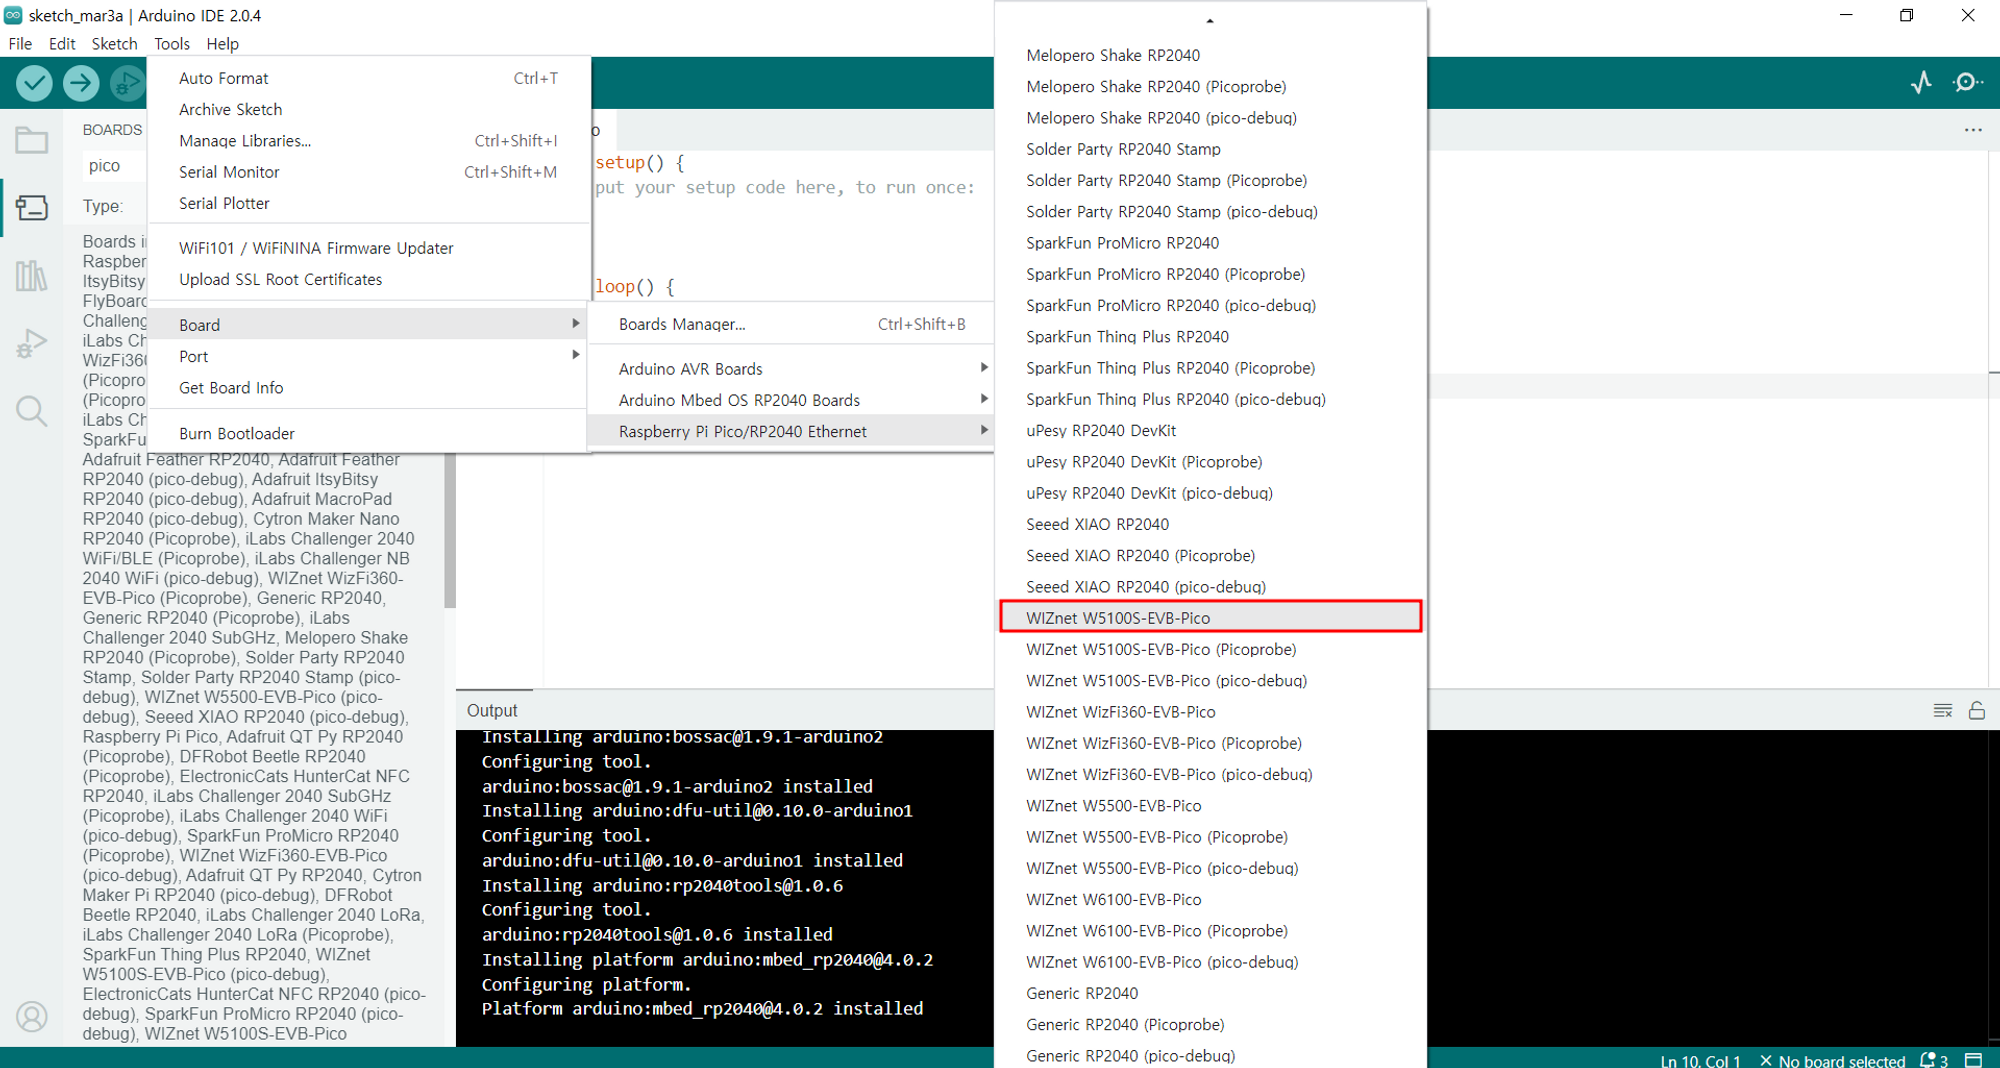
4.1.2. Add Board Manager
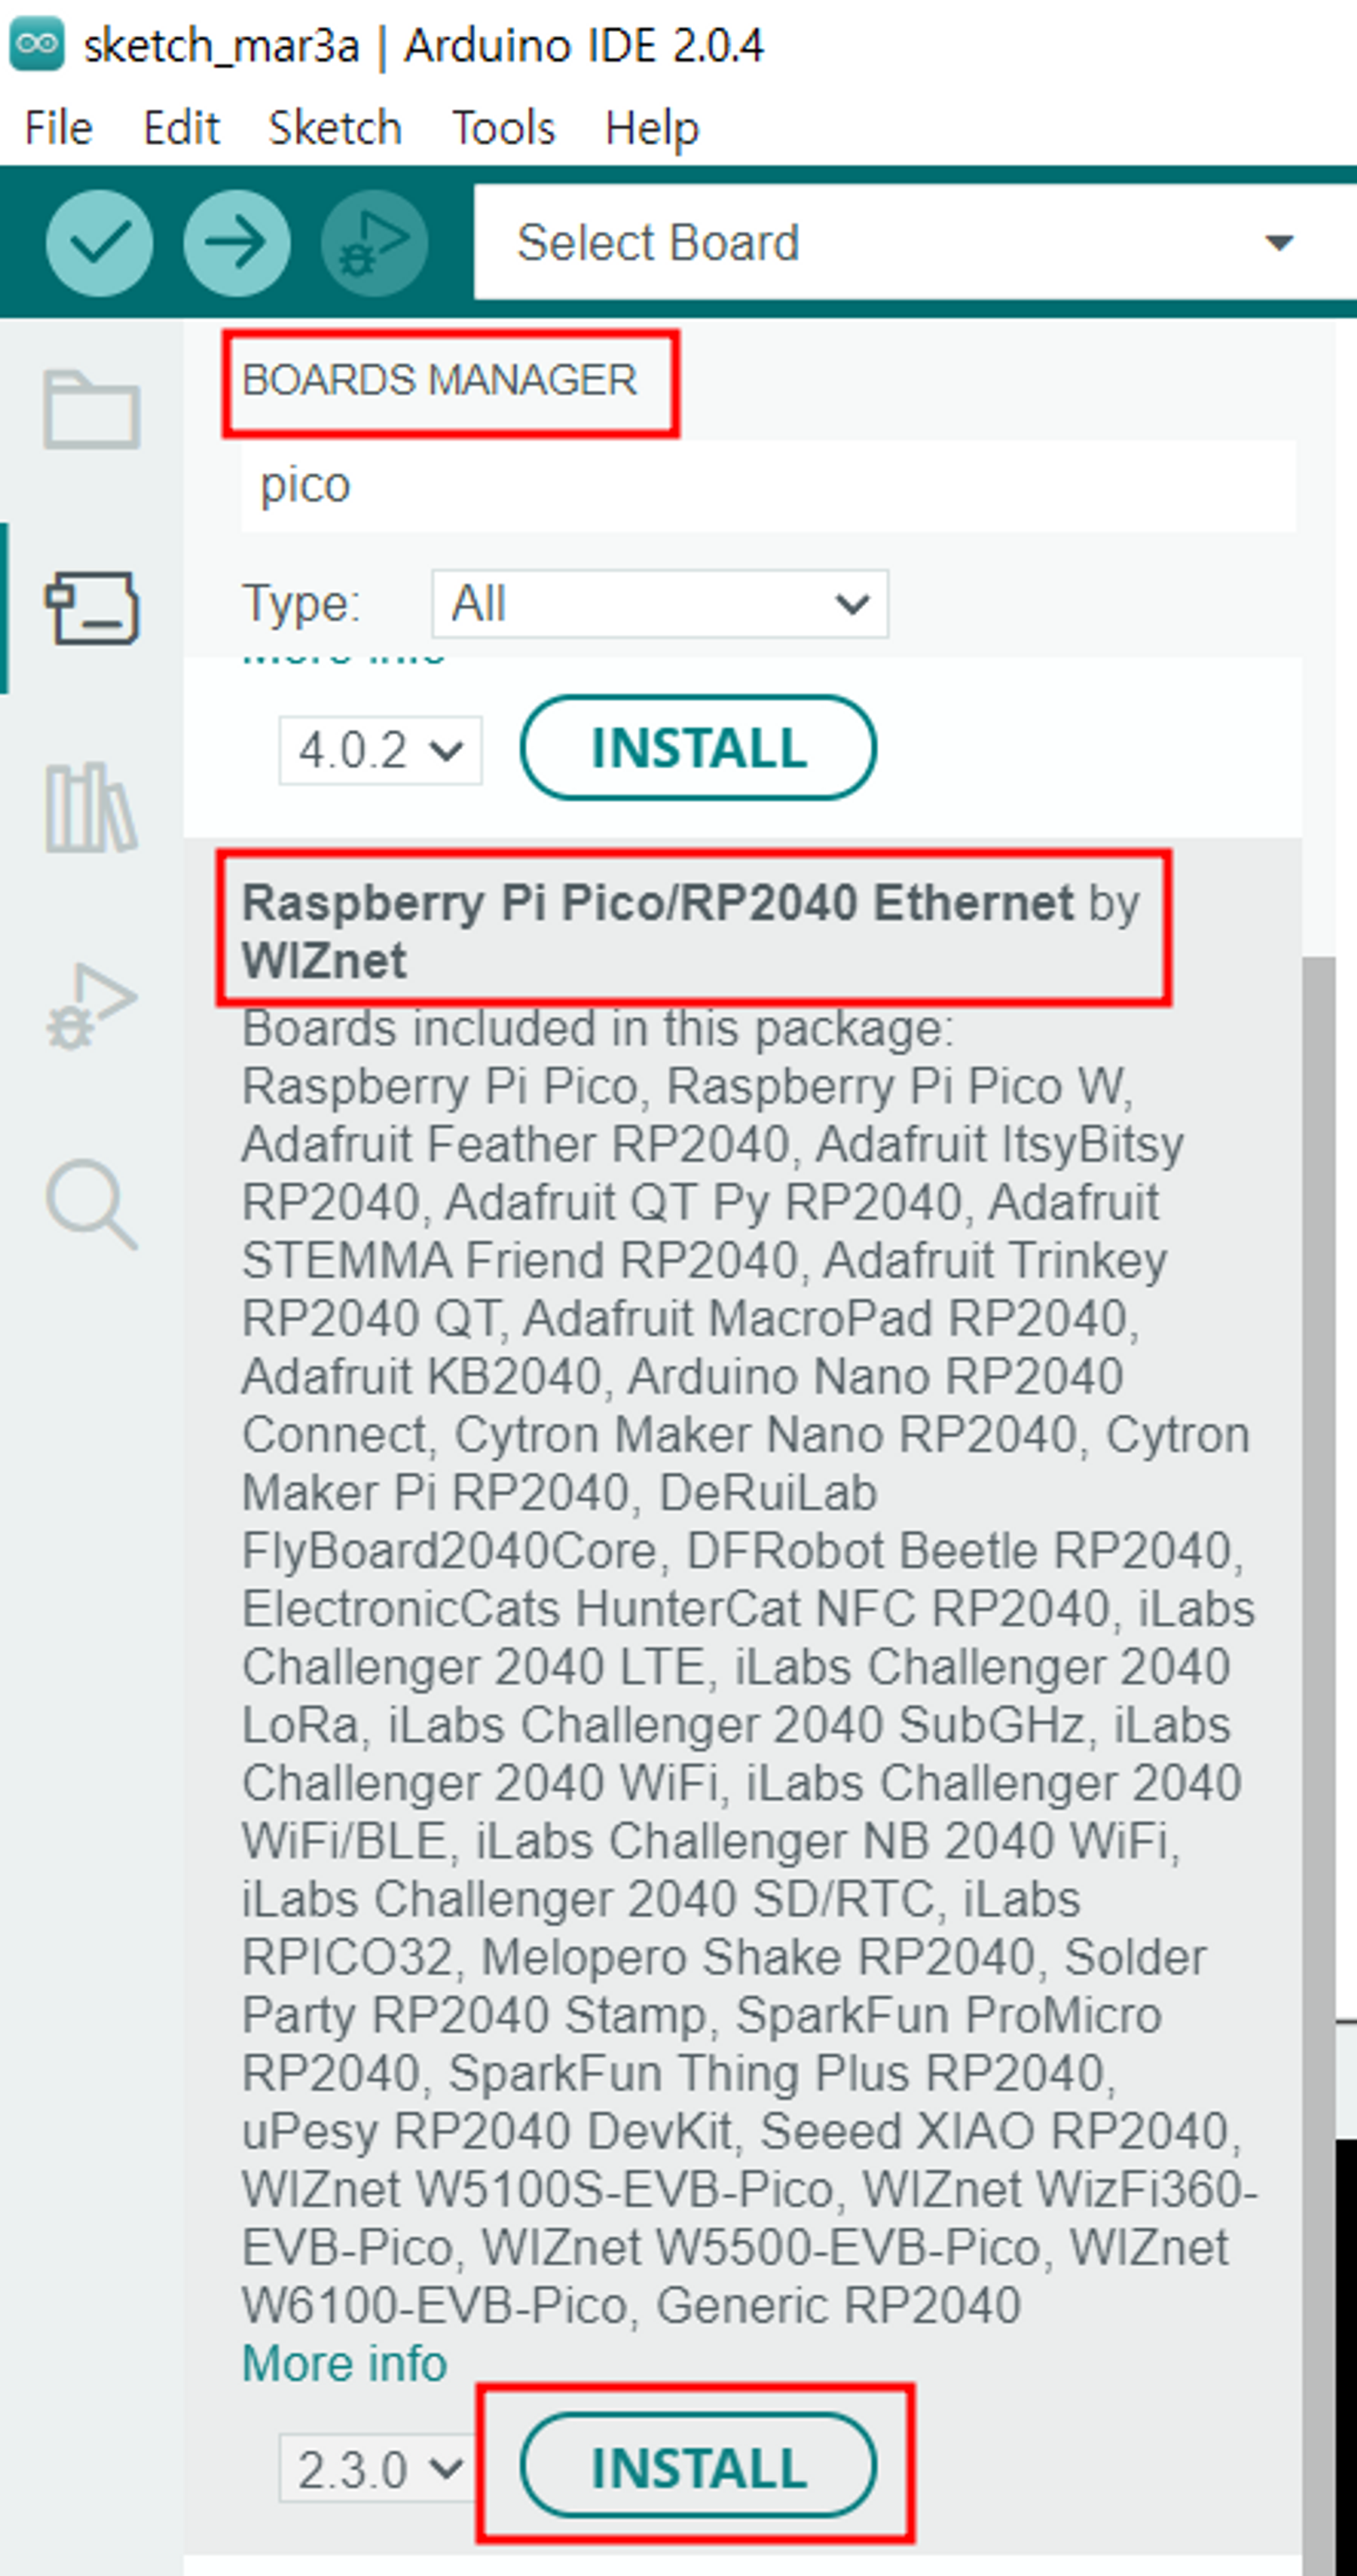
Go to Board Manager to search for PICO and install Raspberry PI PICO/RP2040 Ethernet by Wiznet.
Go to Tools -Board, you can see that Raspberry PI PICO/RP2040 Ethernet is added. Now you can use the W5100S-EVB-PICO on the Arduino IDE.
4.1.3. Install Library
You need to install 3 libraries. Go to Library Manager in Arduino IDE and install each of the following:
- PubSubClient - MQTT Arduino library
- ArduinoJson - An elegant and efficient JSON library for embedded systems.
- DHT - Arduino library for DHT11
4.2. Code
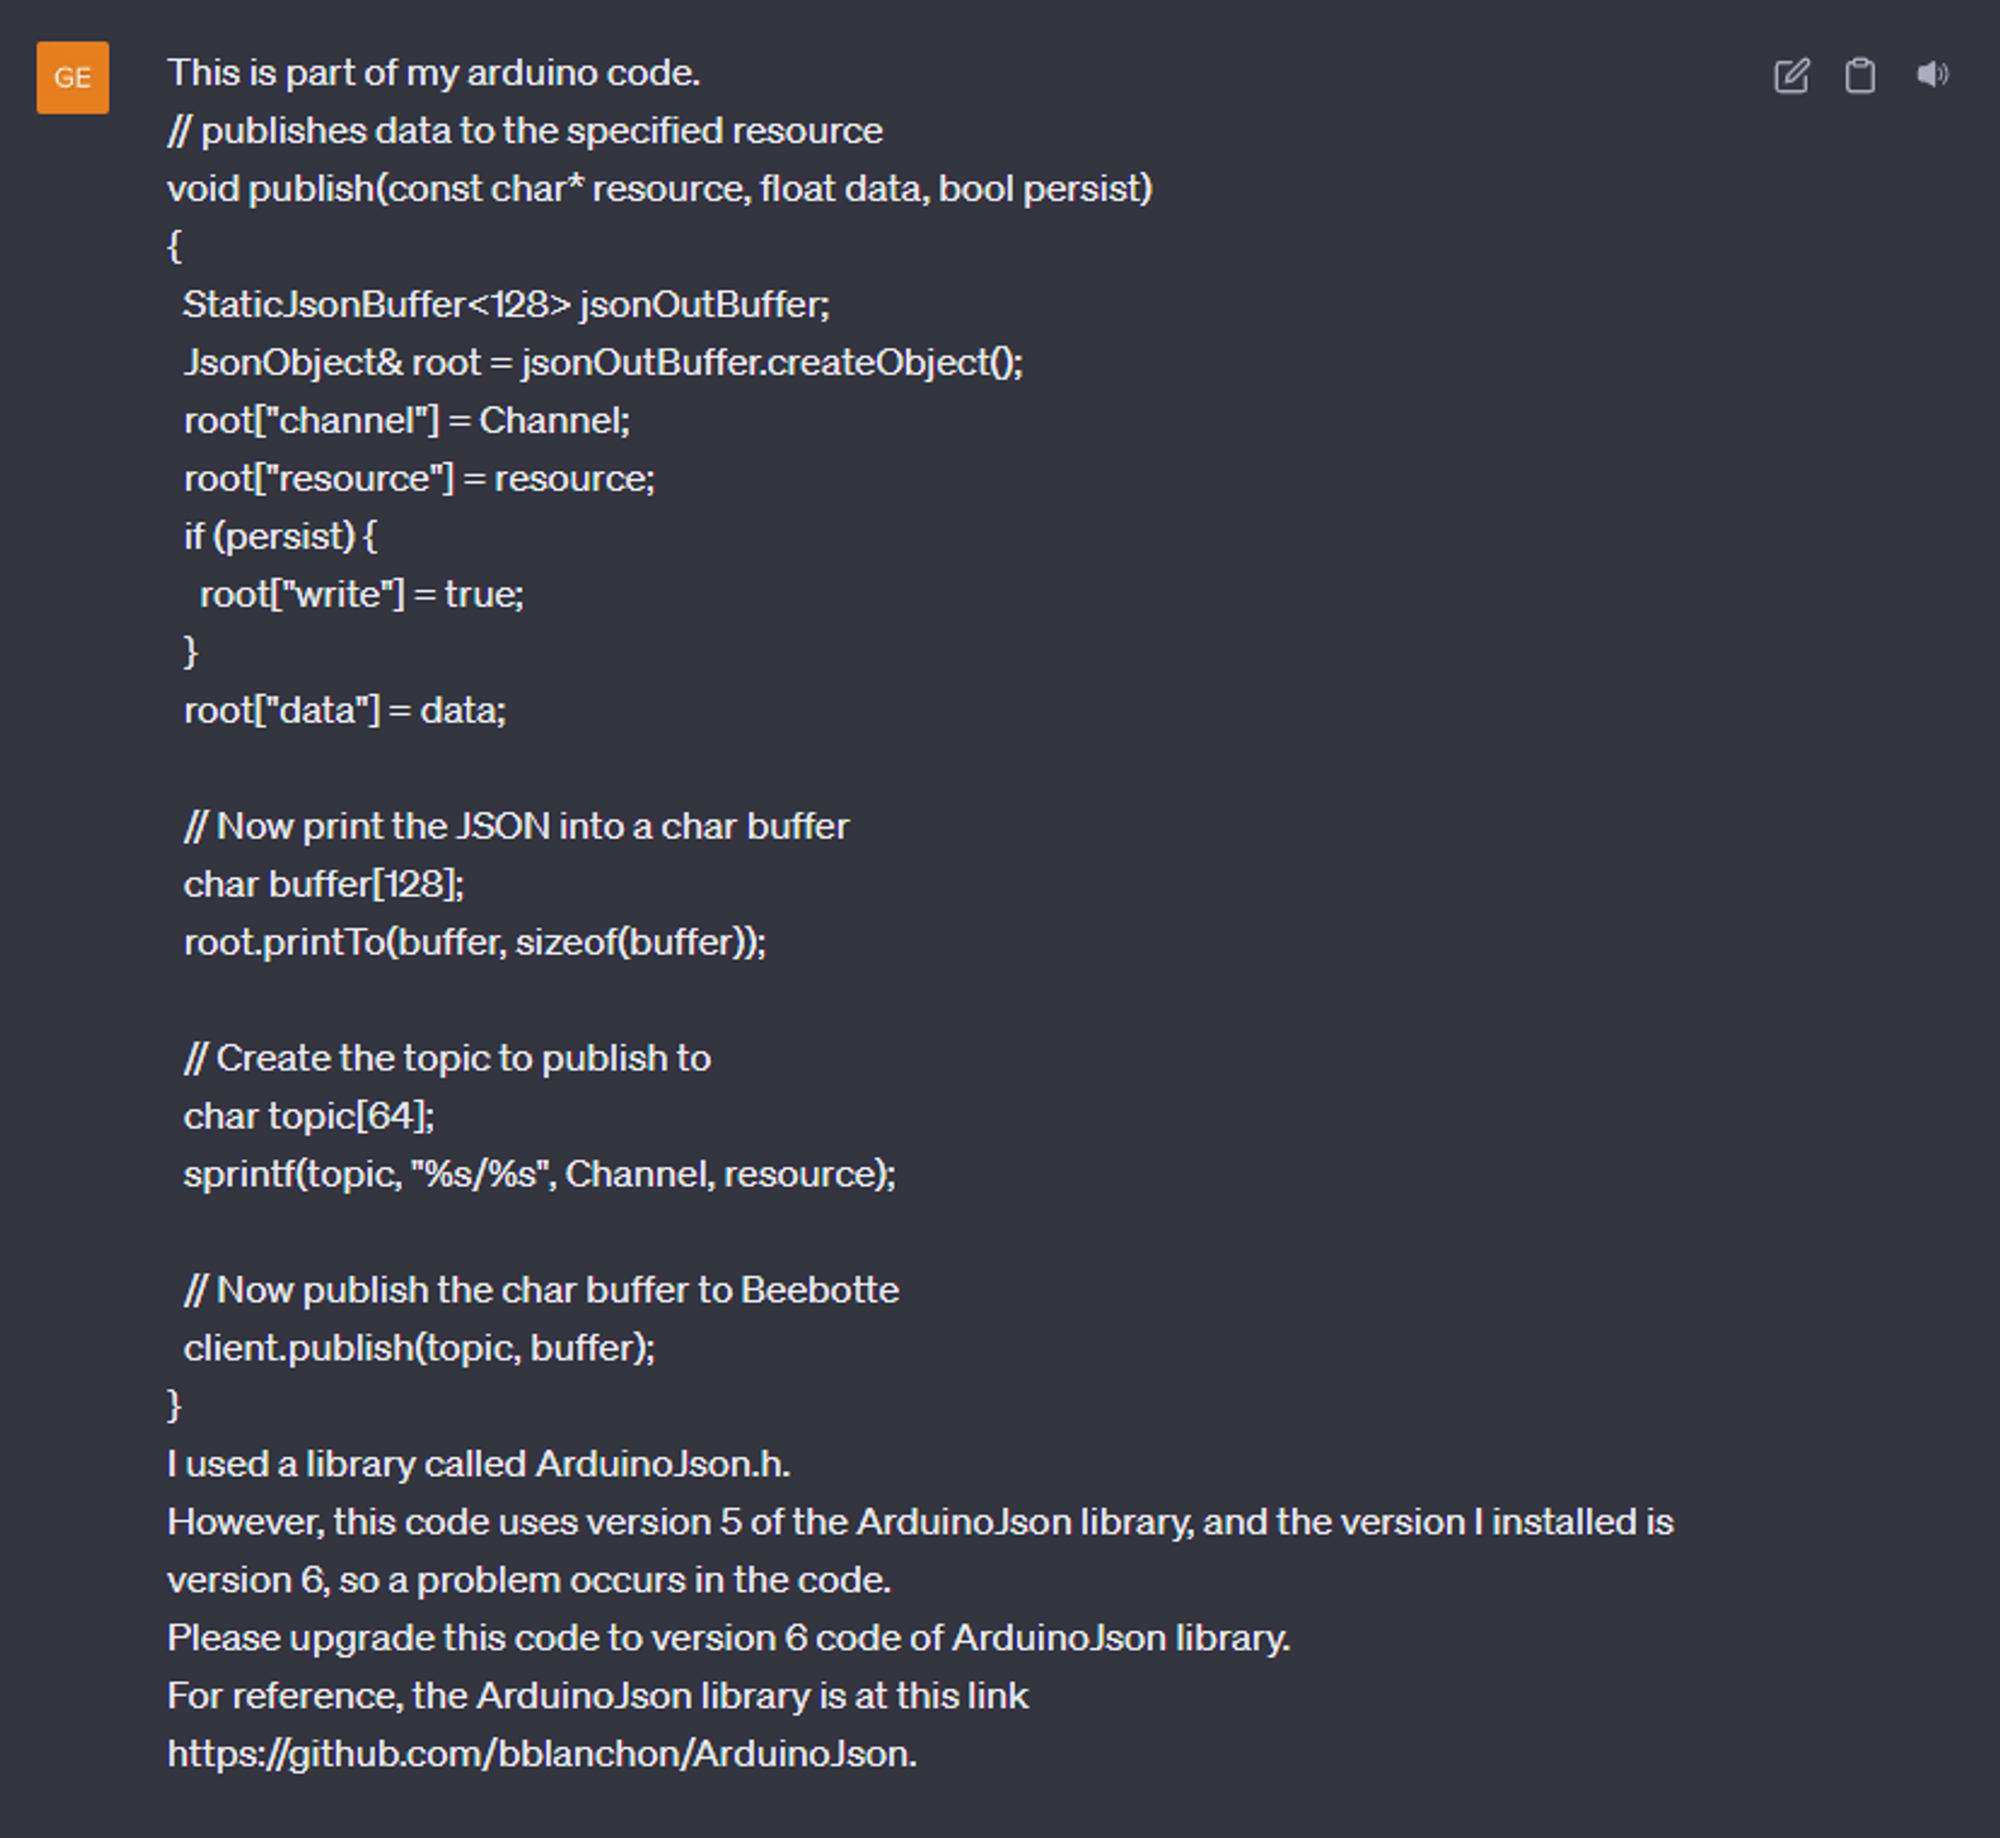
The code was used by referring to the Ethernet-related example of Beebotte Cloud. However, the code file used a very old version of the library, so it was necessary to upgrade the version of the library. I wrote the code using ChatGPT here. In the existing code, version 5 of the ArduinoJson library was used, and the code for version 6 of the ArduinoJson library was written using ChatGPT.
As shown below, we showed the code of the part that needs to be modified, informed the name of the library to be upgraded and the link of the library, and asked to write the code with the version modified.
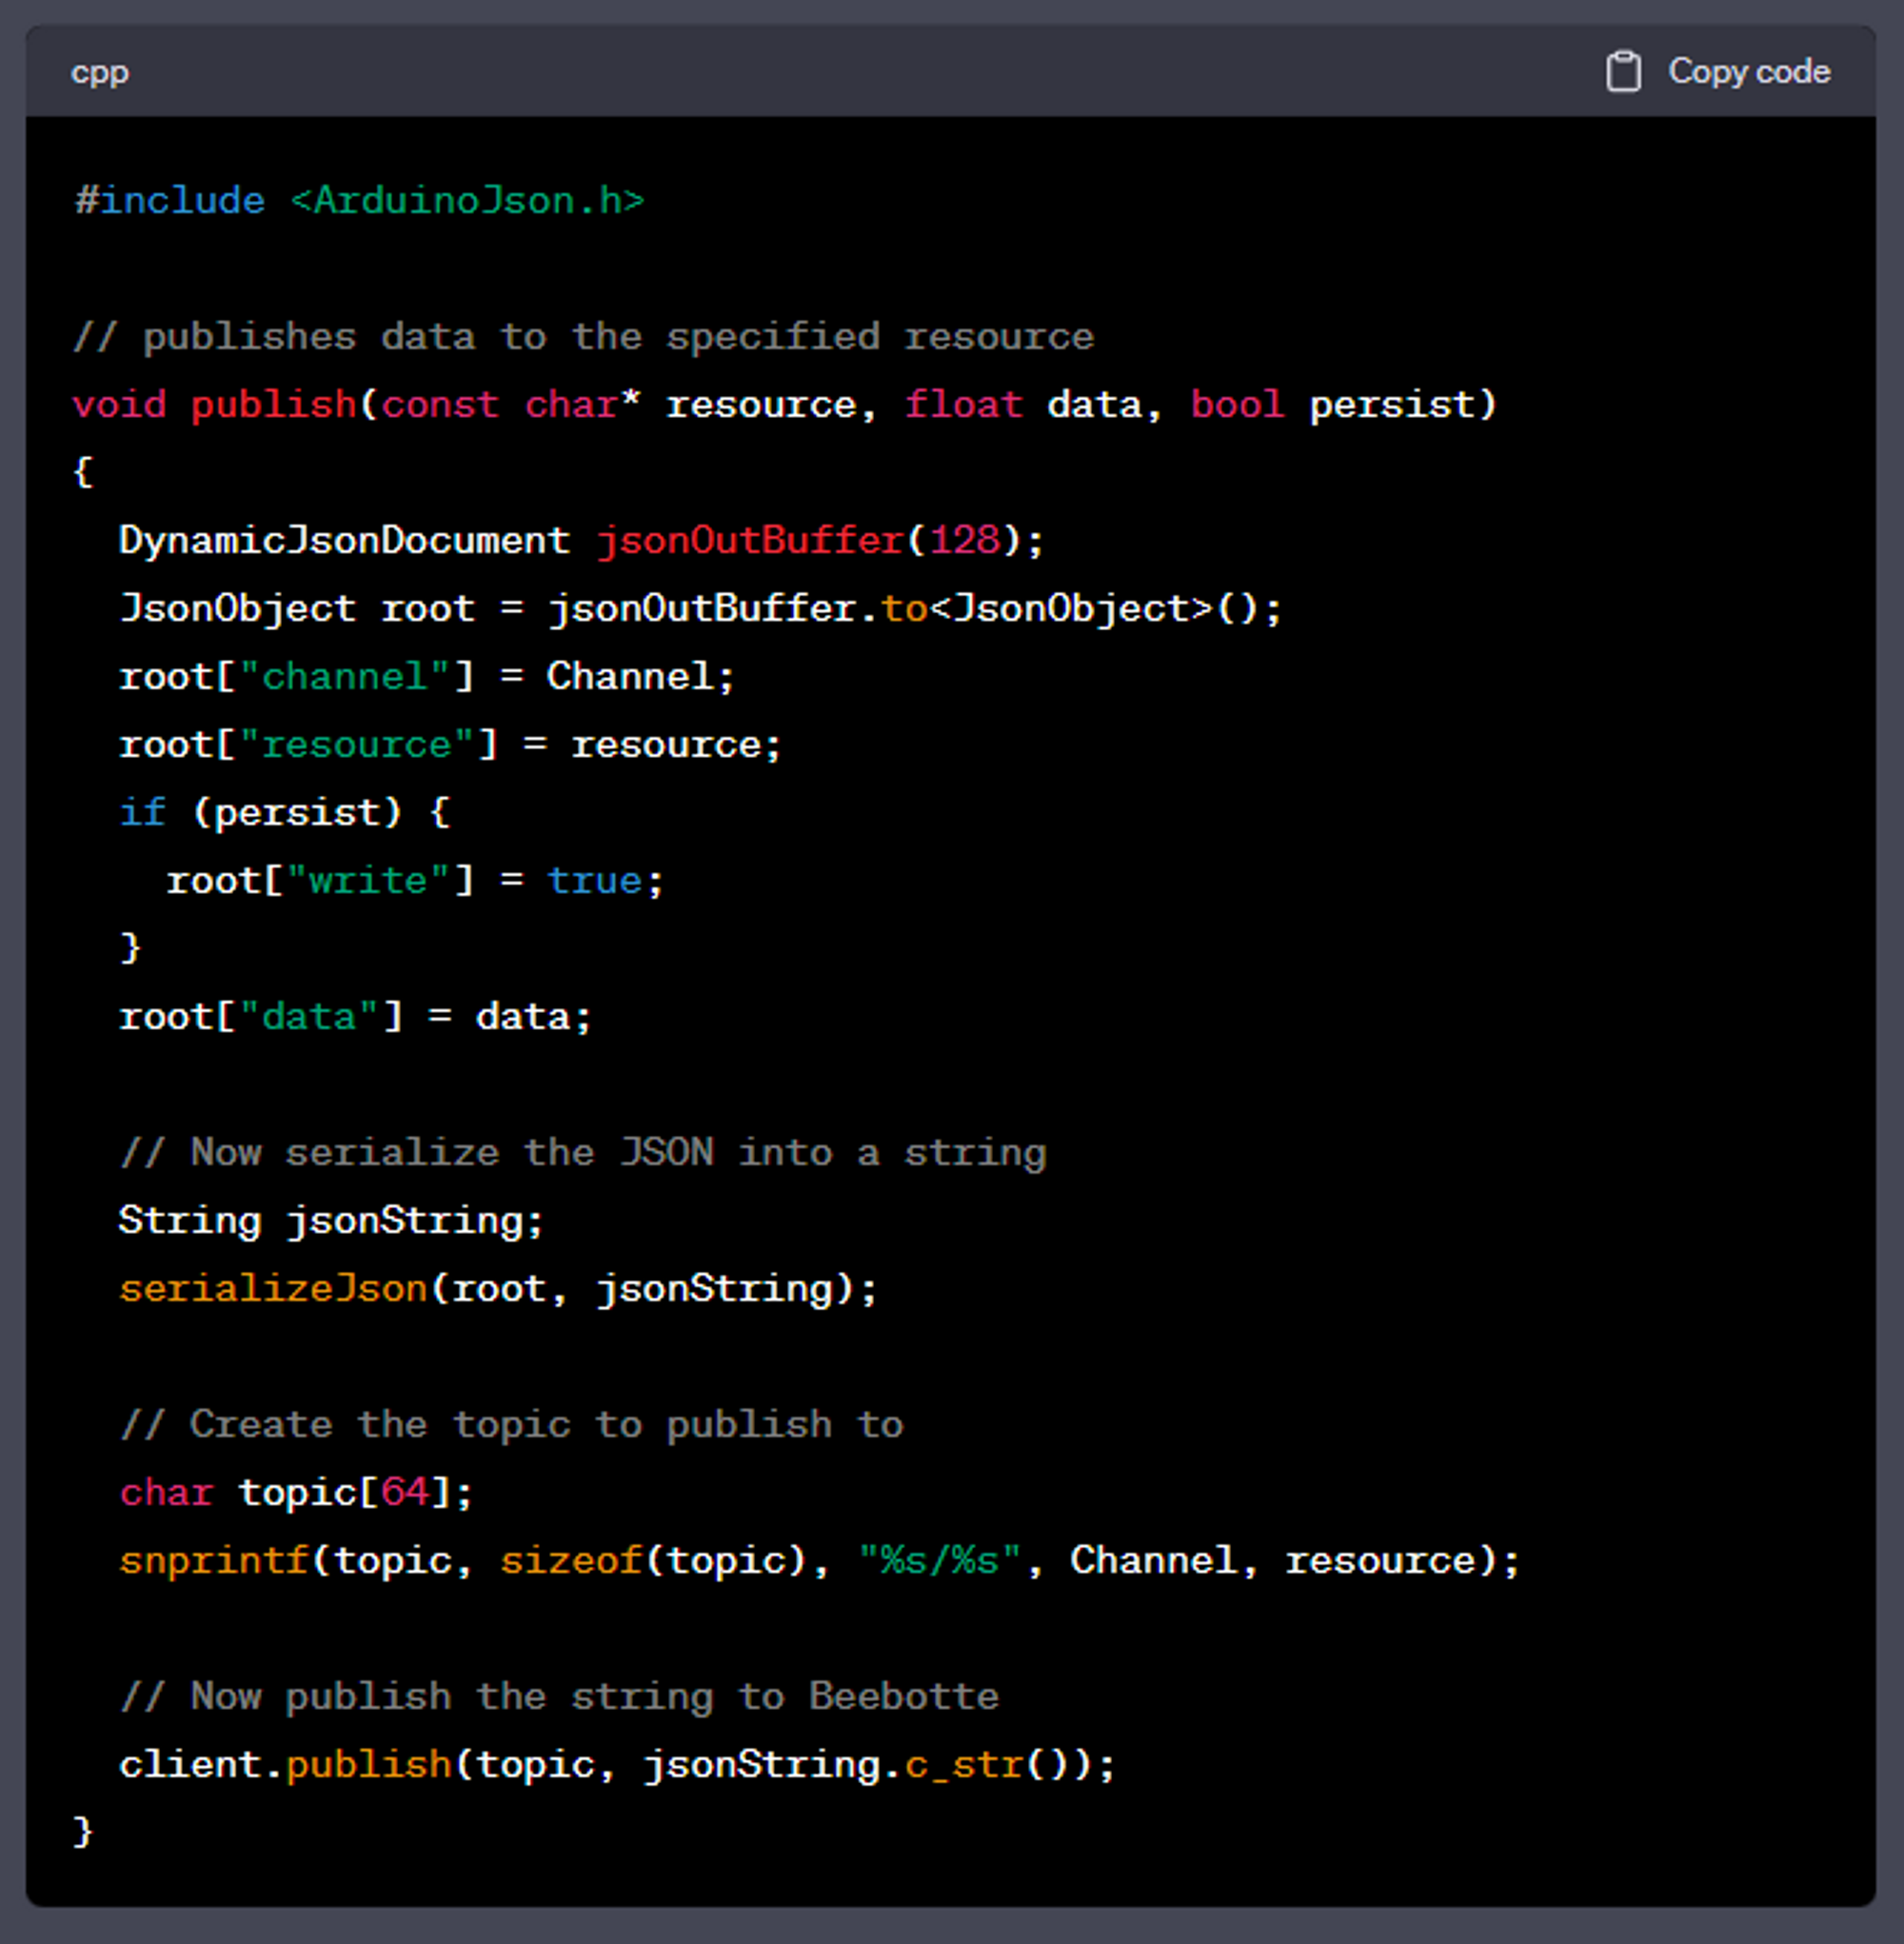
I wrote the code for version 6 as below. I wrote the entire code to reflect this code.
The function that reads sensor data and sends it to the cloud is as follows.
void readSensorData()
{
  int analogValue = analogRead(LIGHT_SENSOR_PIN);

  Serial.print("Analog reading: ");
  Serial.println(analogValue);   // the raw analog reading

  // Check if any reads failed and exit early (to try again).
  if (isnan(analogValue)) {
    Serial.println(F("Failed to read from light sensor!"));
    return;
  }

  if (!isnan(analogValue)) {
    publish(LIGHT_RESOURCE, analogValue, WRITE);
  }
}
Please refer to github for the full code.
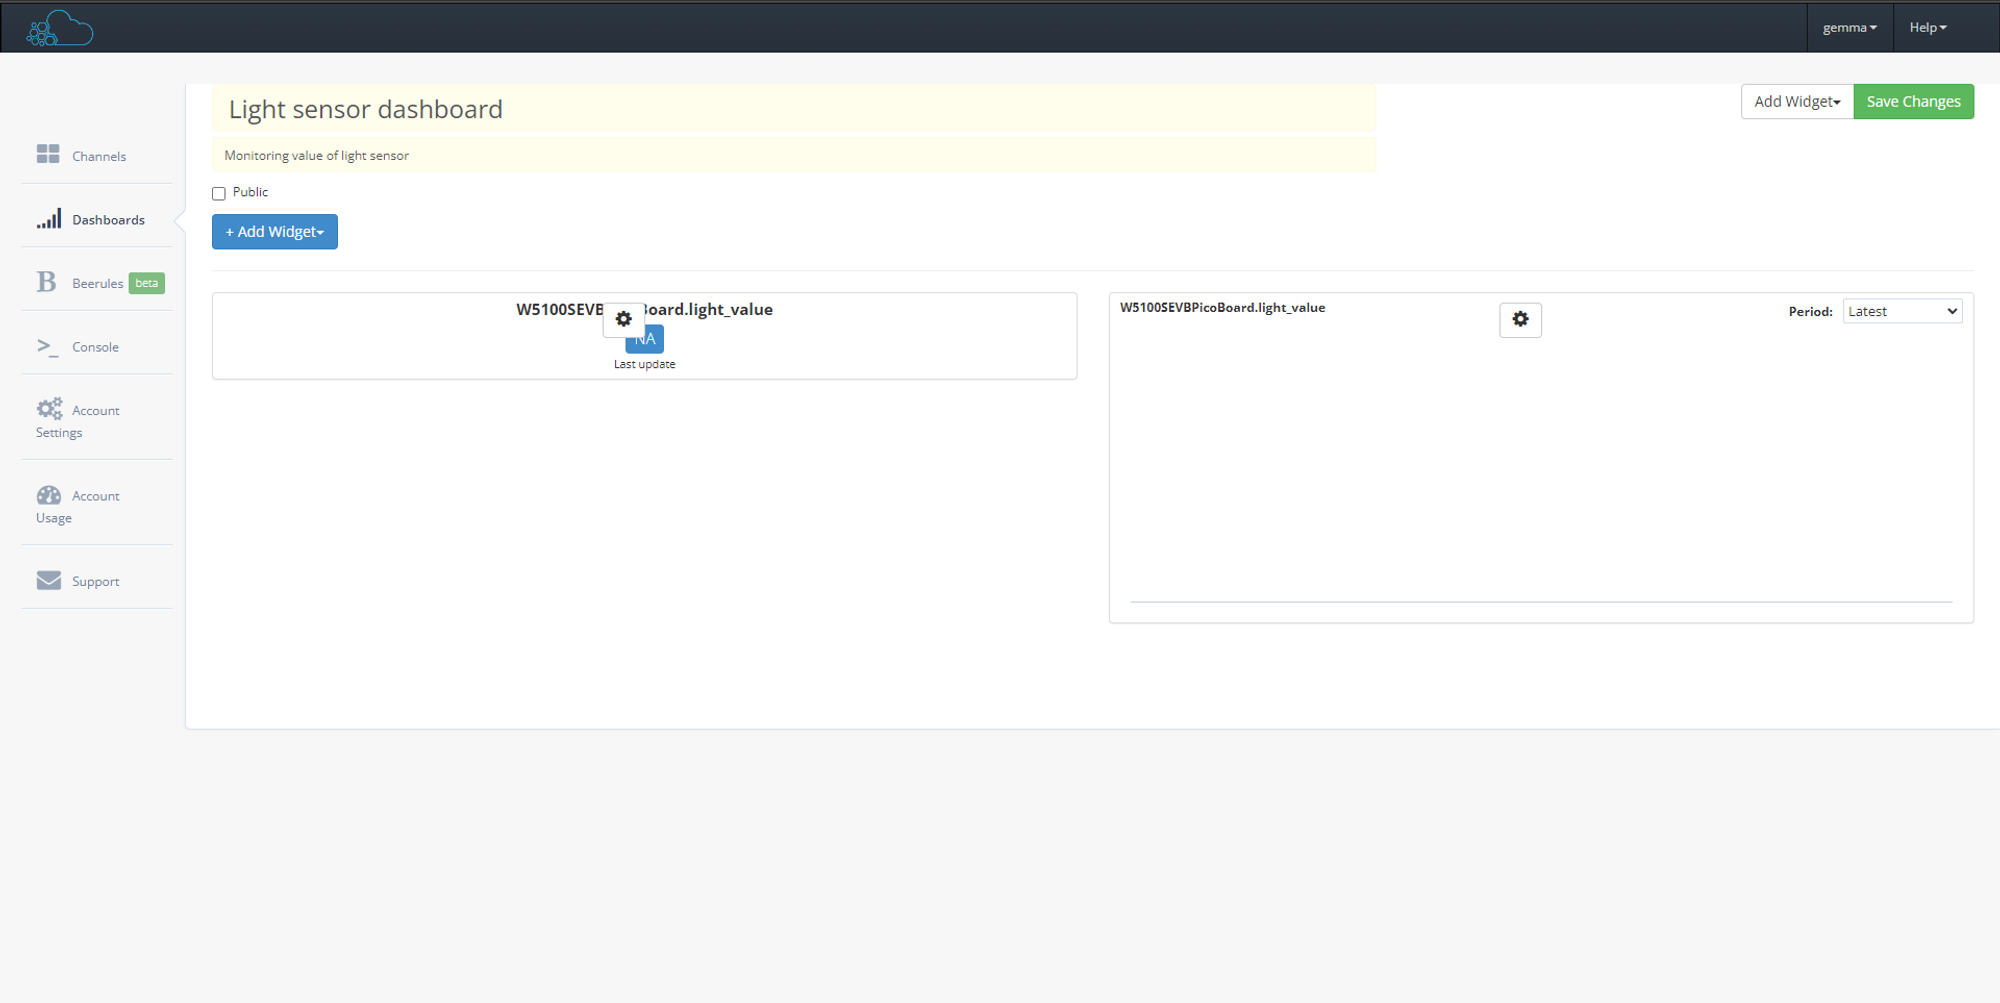
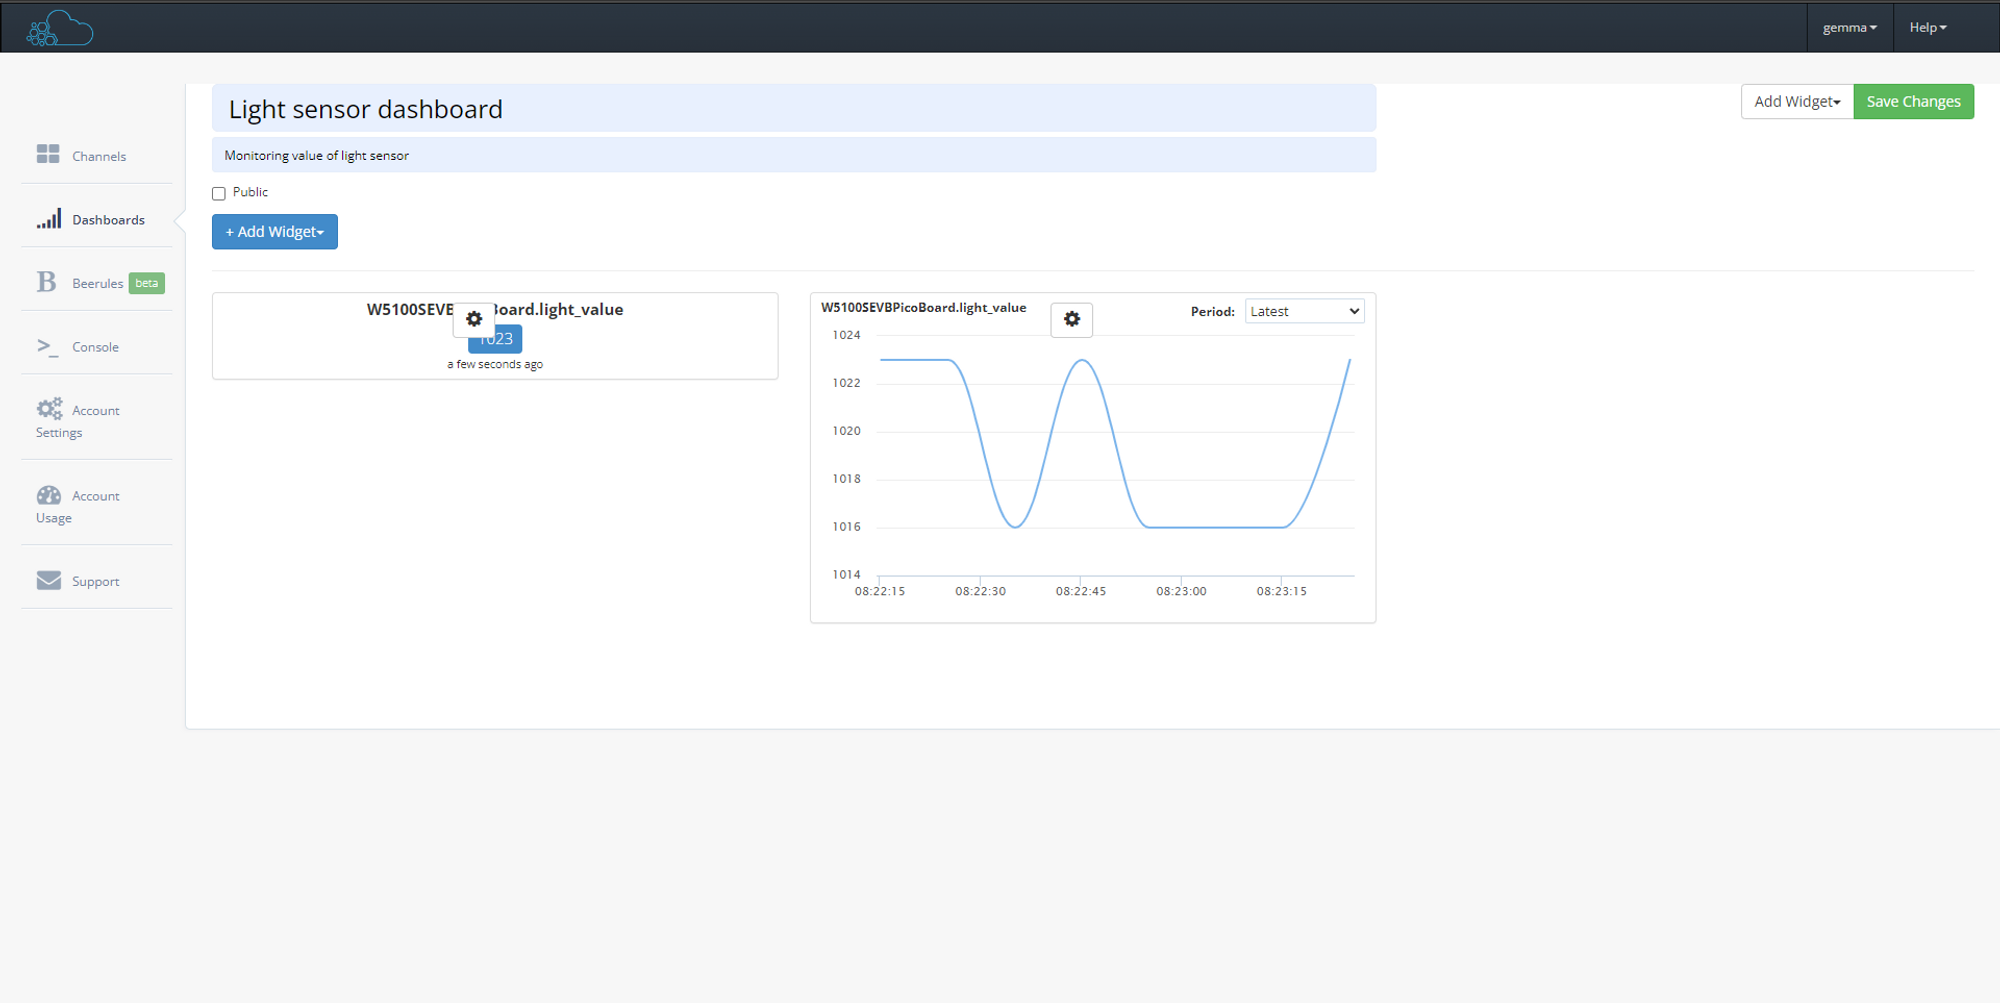
5. Monitoring Data on Beebotte Dashboard
After uploading the code to the W5100S-EVB-Pico board, you can monitor the real-time light value data on the Beebotte Dashboard.
The Basic Value widget displays the current light values, and the Timeline Chart widget shows the historical data in a graphical format.
That's it! You have successfully set up and configured the W5100S-EVB-Pico board with the light sensor to send light data to the Beebotte cloud and monitor it on the dashboard.
Reference
http://scipia.co.kr/cms/blog/151
https://arduinogetstarted.com/tutorials/arduino-light-sensor
https://github.com/beebotte/bbt_arduino_examples/blob/master/examples/COMonitoring.ino
-
MonitoringLightSensor.ino
