
RP2040-ETH-DVI-ZERO: AnyView ( HDMI Mode )
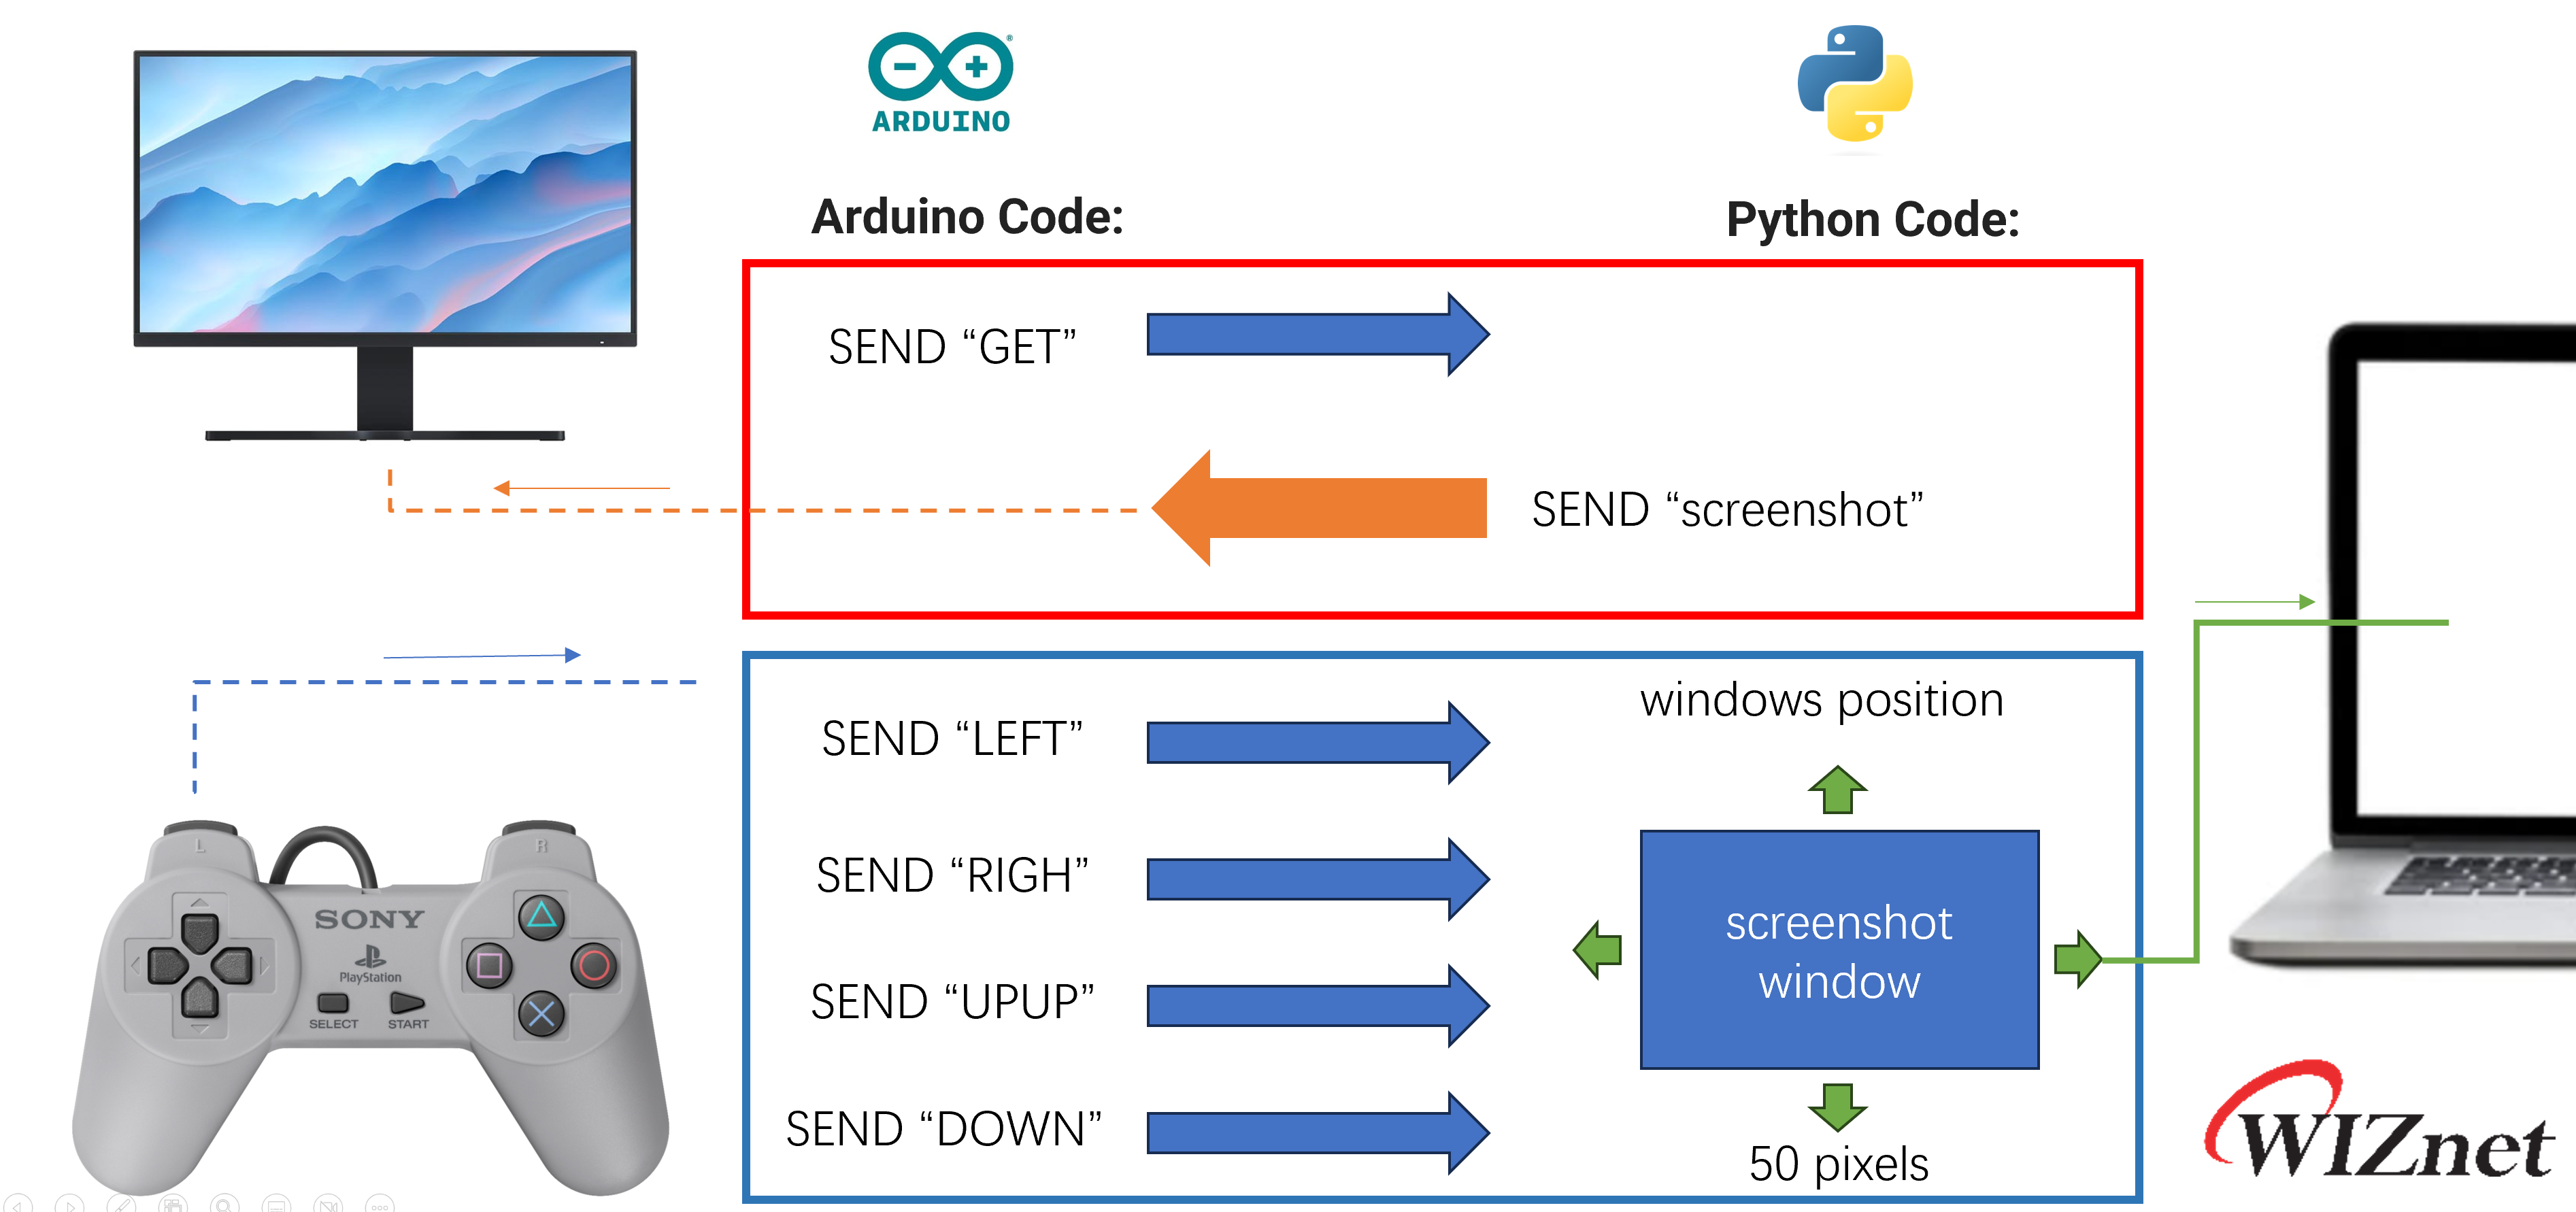
Continuously screenshot the image of a specific window on the PC and send it to another monitor by network, this monitor receive and display them.

Raspberry Pi - RP2040
x 1
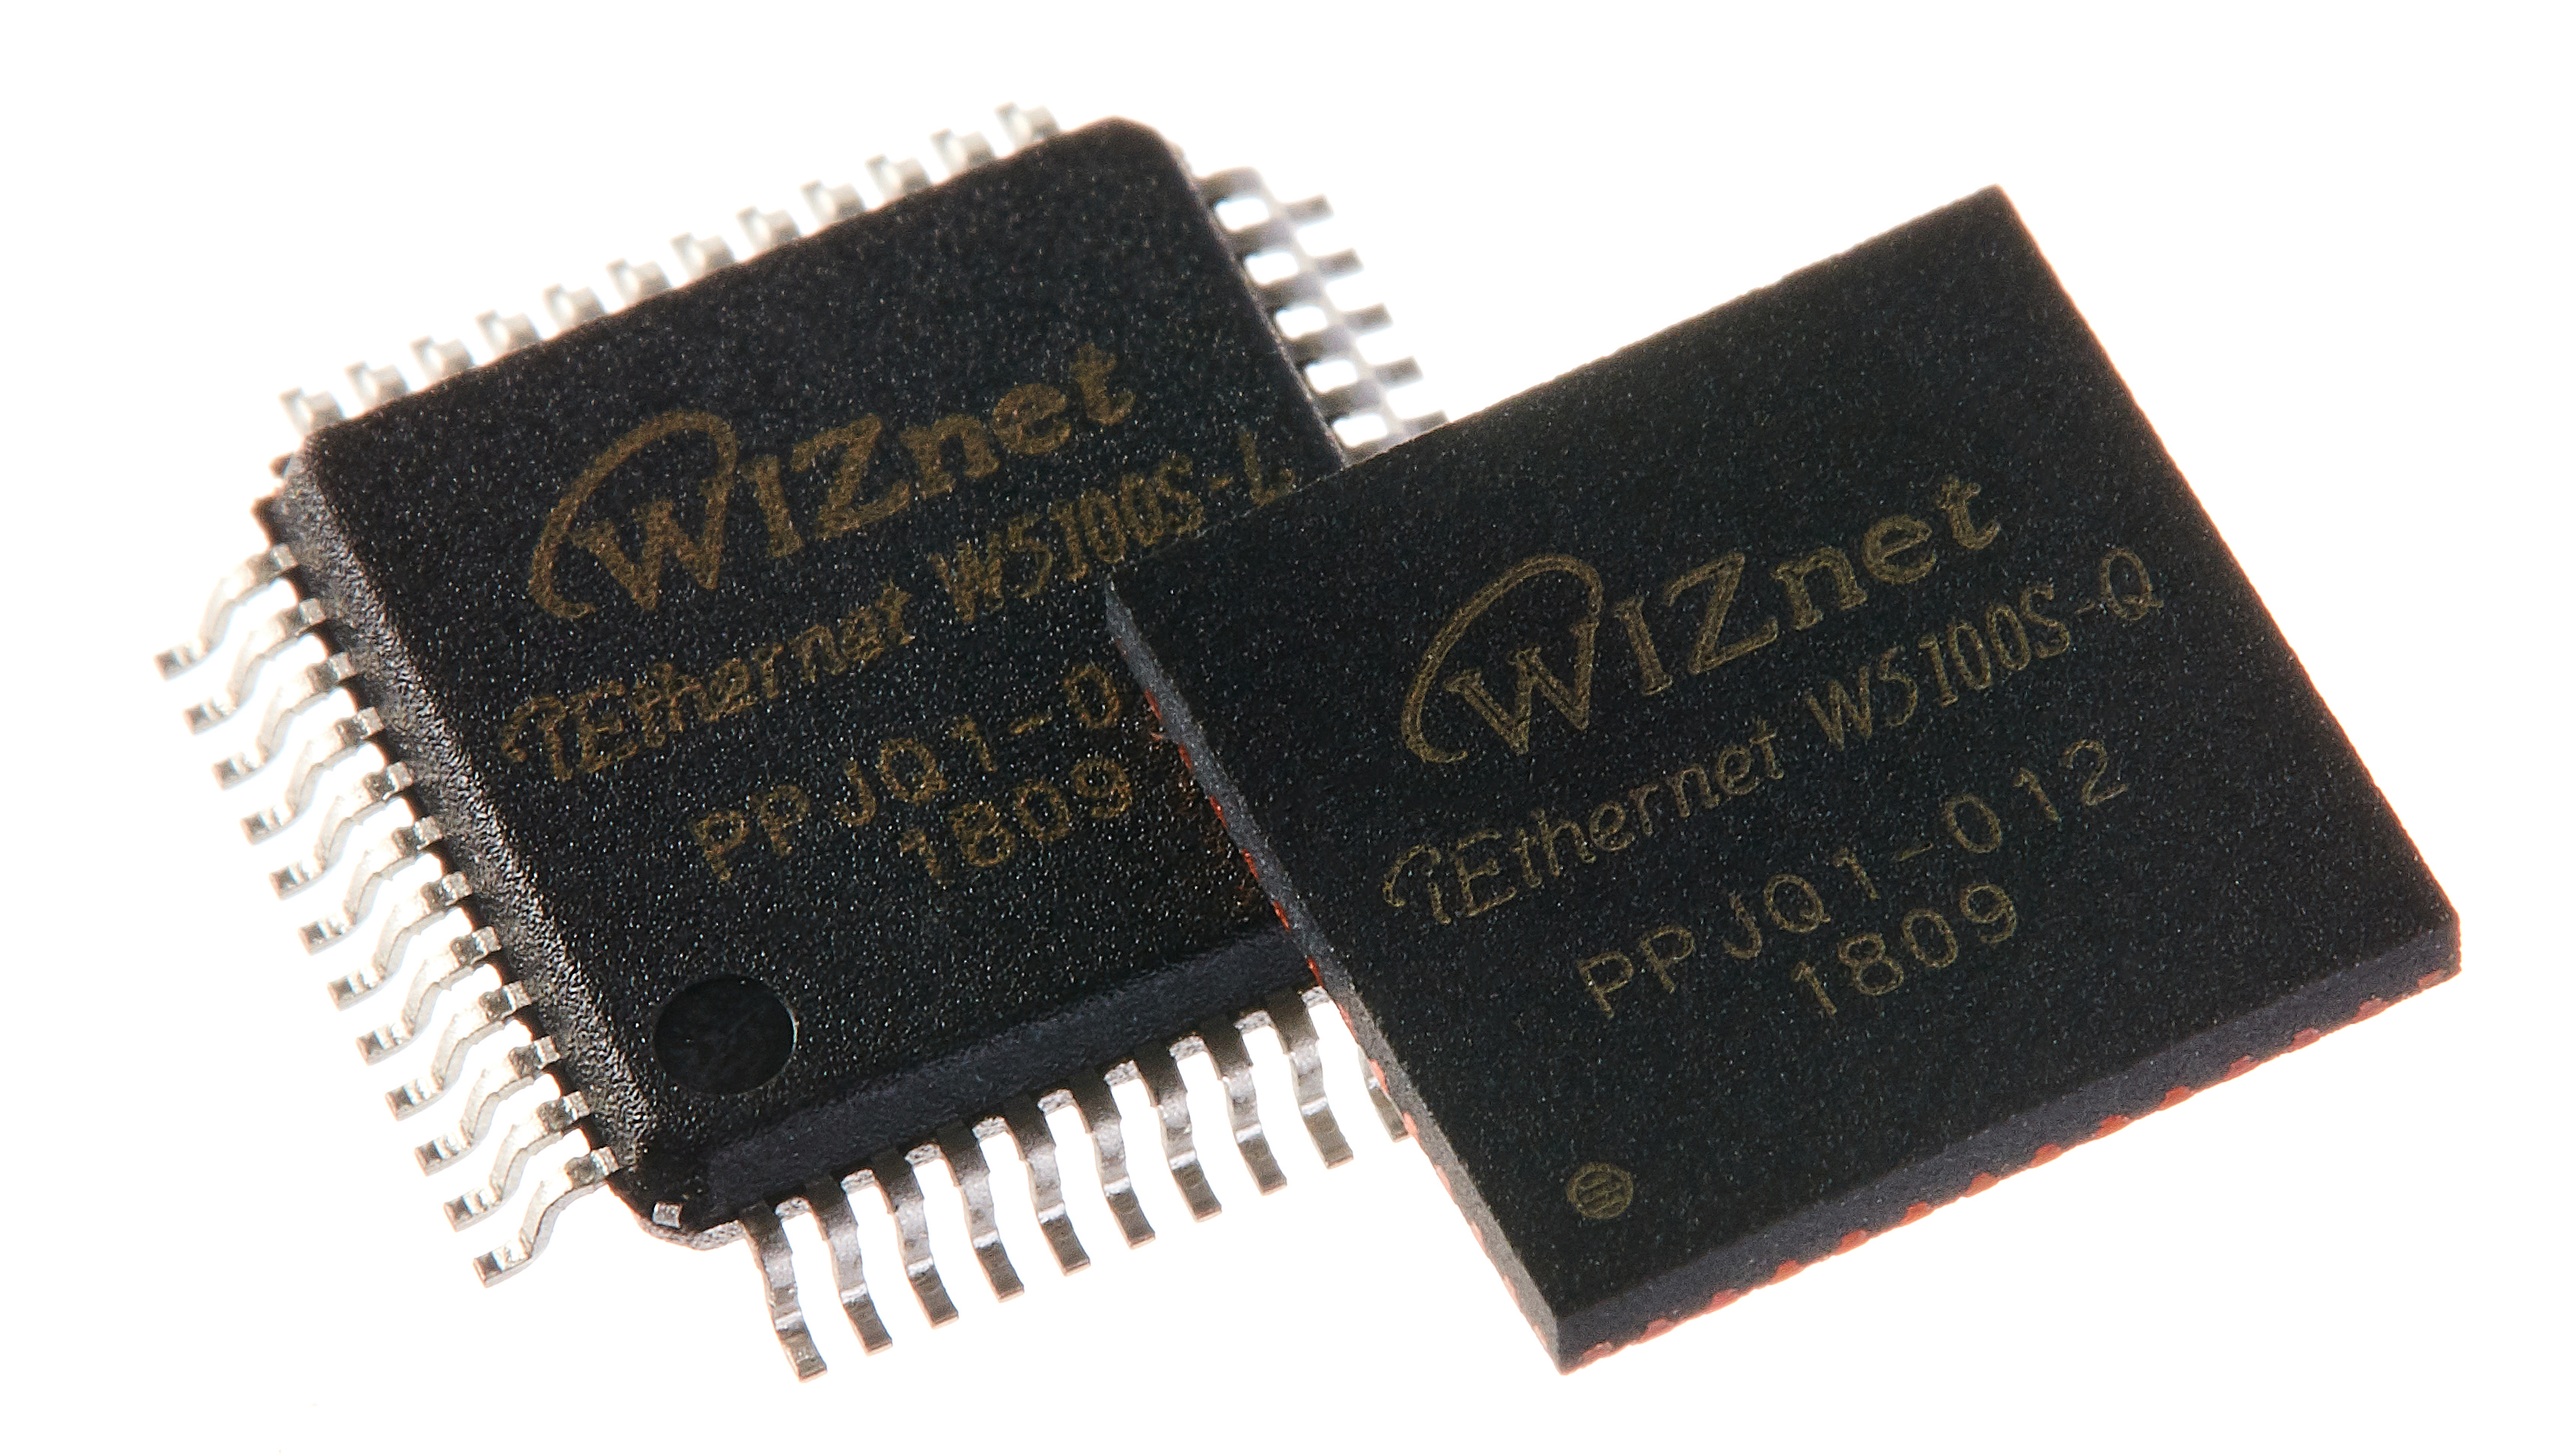
WIZnet - W5100S
x 1

Arduino - Arduino IDE
x 1
Python - Python
x 1
I developed a new application AnyView based on RP2040-ETH-DVI-ZERO. This application can transmit and display the PC screen image to another monitor through the network.
This application contains two parts:
The first part is a Python program running on the PC. It creates a translucent window. Long-pressing the window with the mouse can change the position of the window. After starting, it continuously takes screenshots of the window and sends the screenshots to RP2040-ETH-DVI-ZERO through the network;
The second part is the code of RP2040-ETH-DVI-ZERO. After receiving the screenshot, it displays the screenshot on the monitor through the HDMI interface; and connects a game controller to the USB OTG interface to control the position of the screenshot window on the PC.
Workflow:
Demo Video:
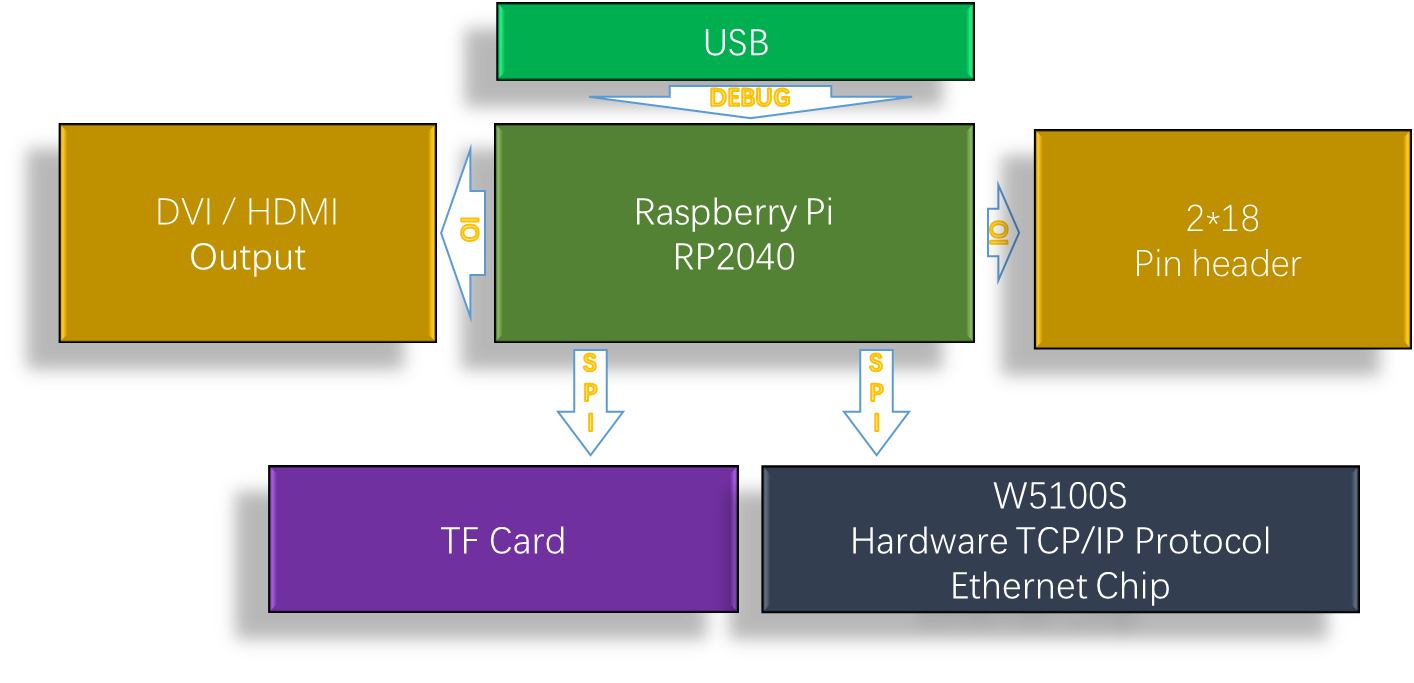
This project is developed based on RP2040-ETH-DVI-ZERO, which is a development board using Raspberry Pi RP2040 as MCU, with DVI interface, TF socket and W5100S-PORT.
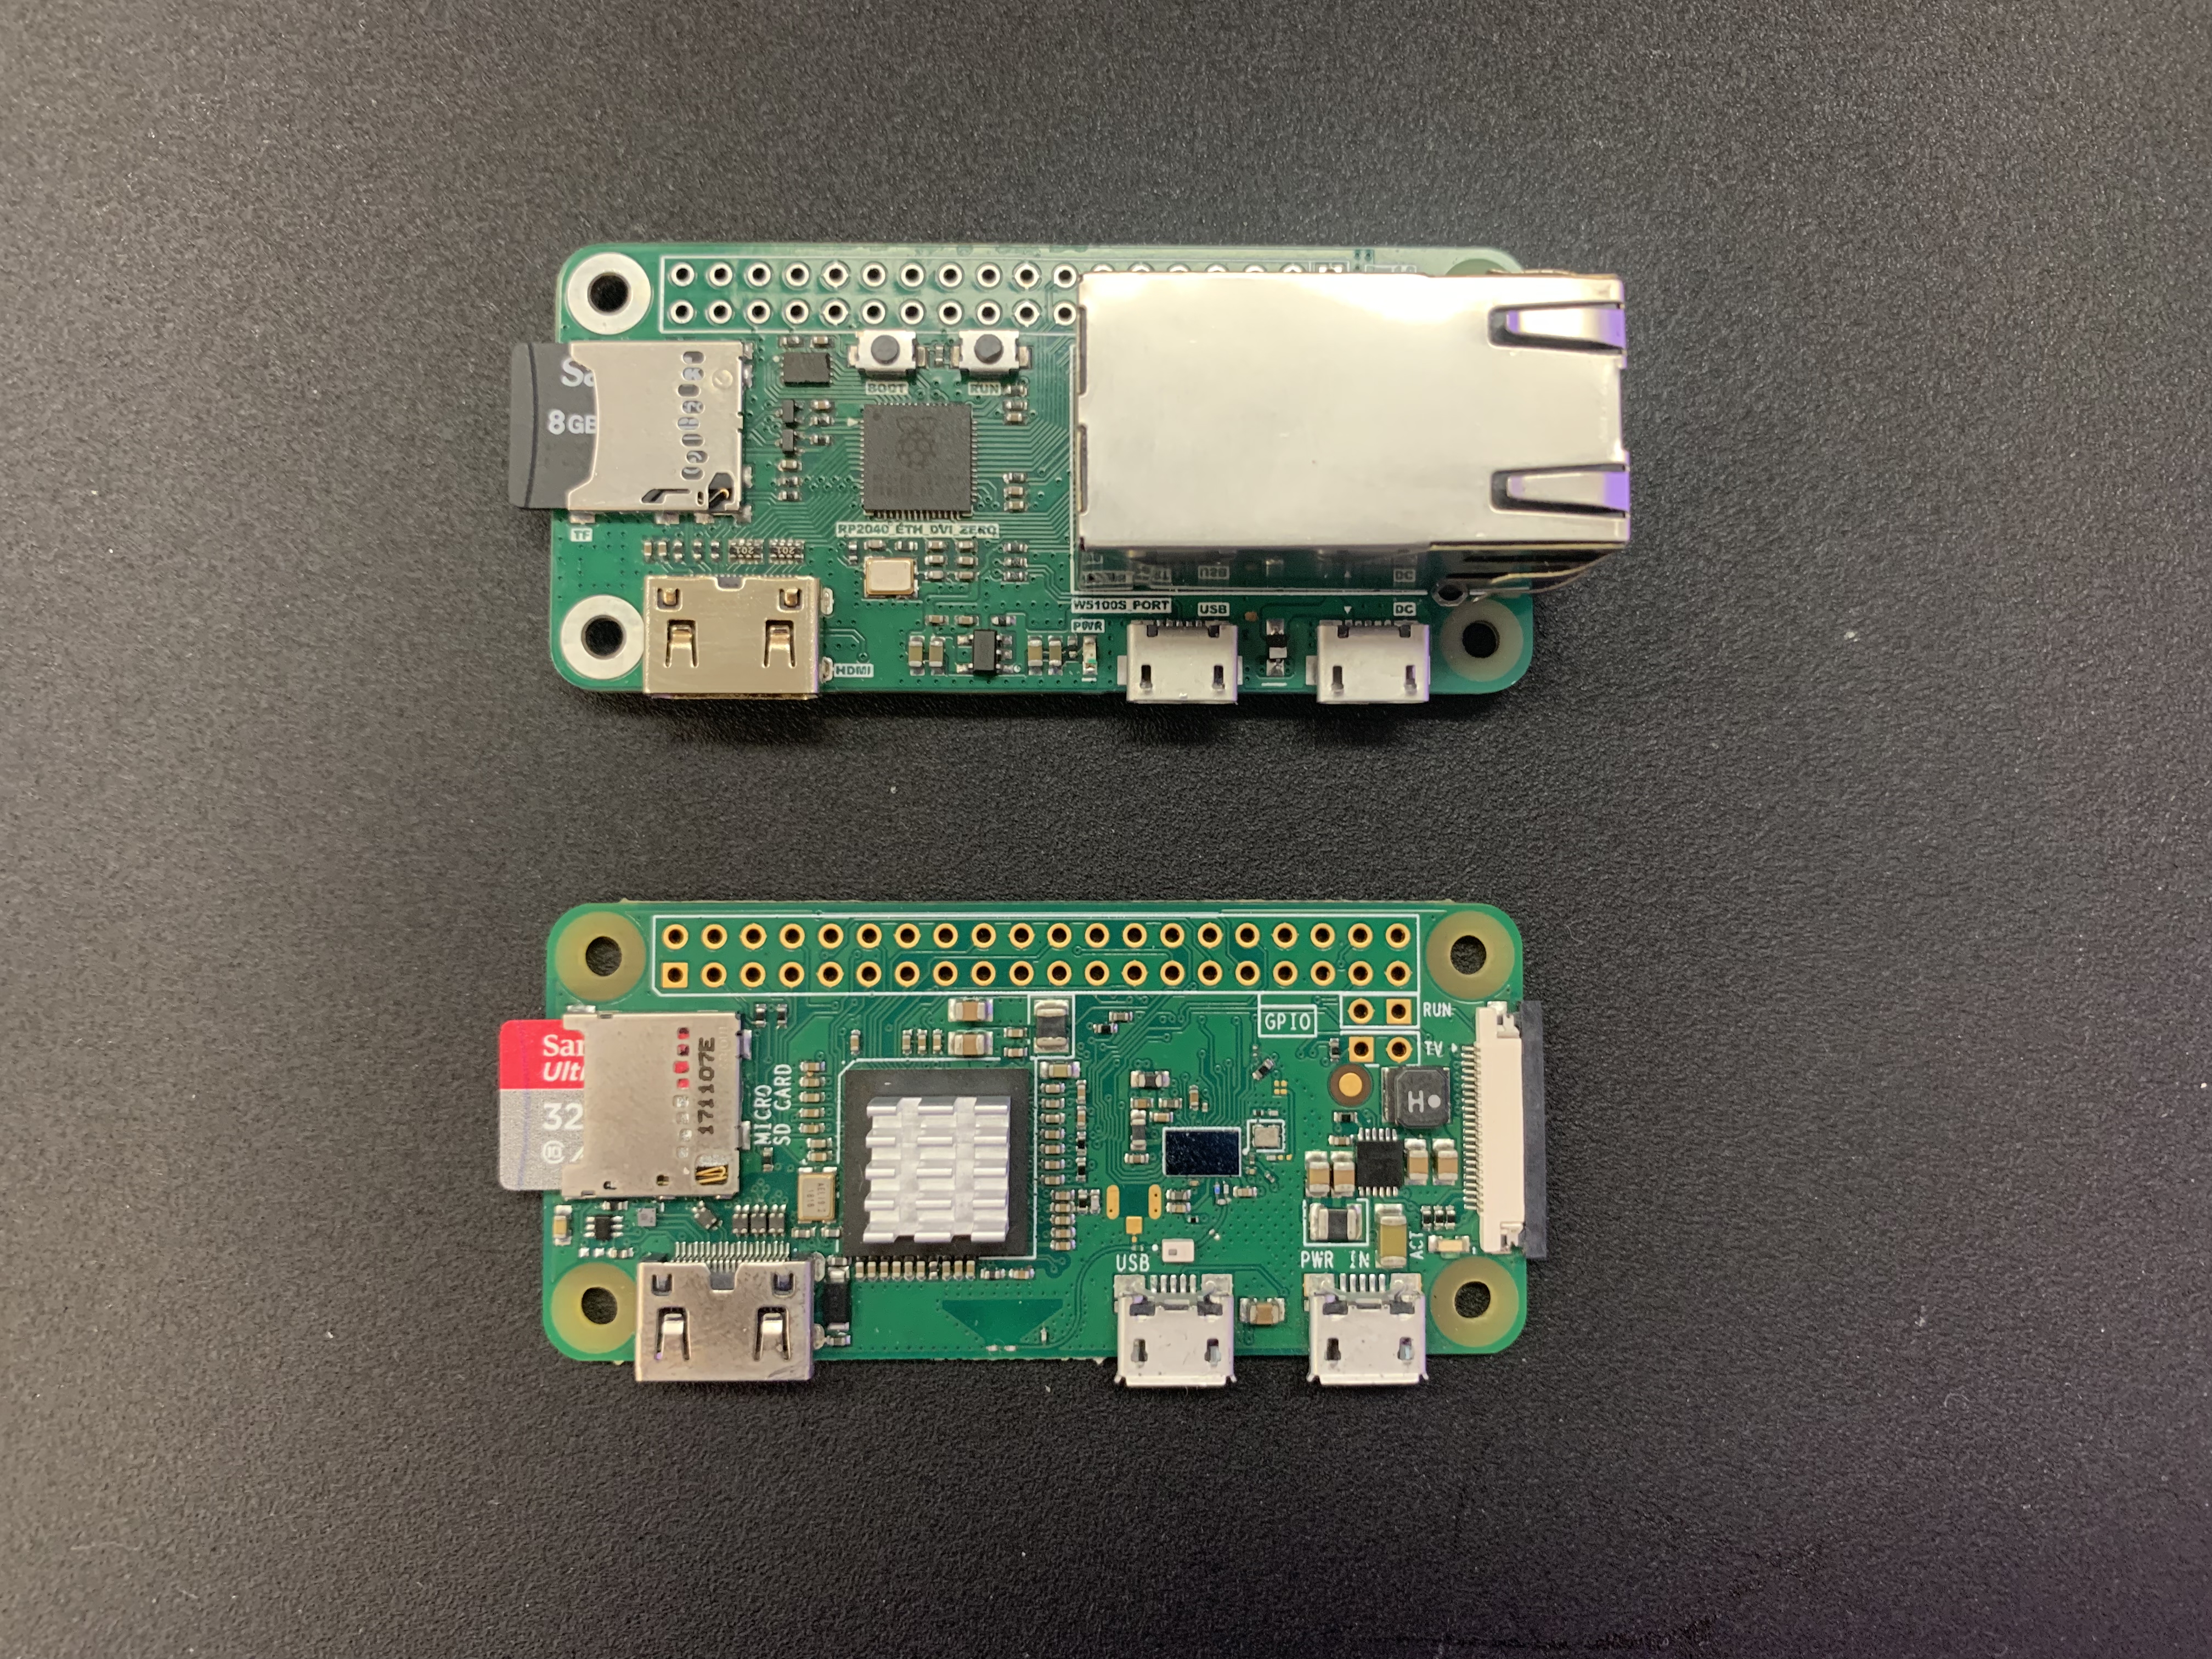
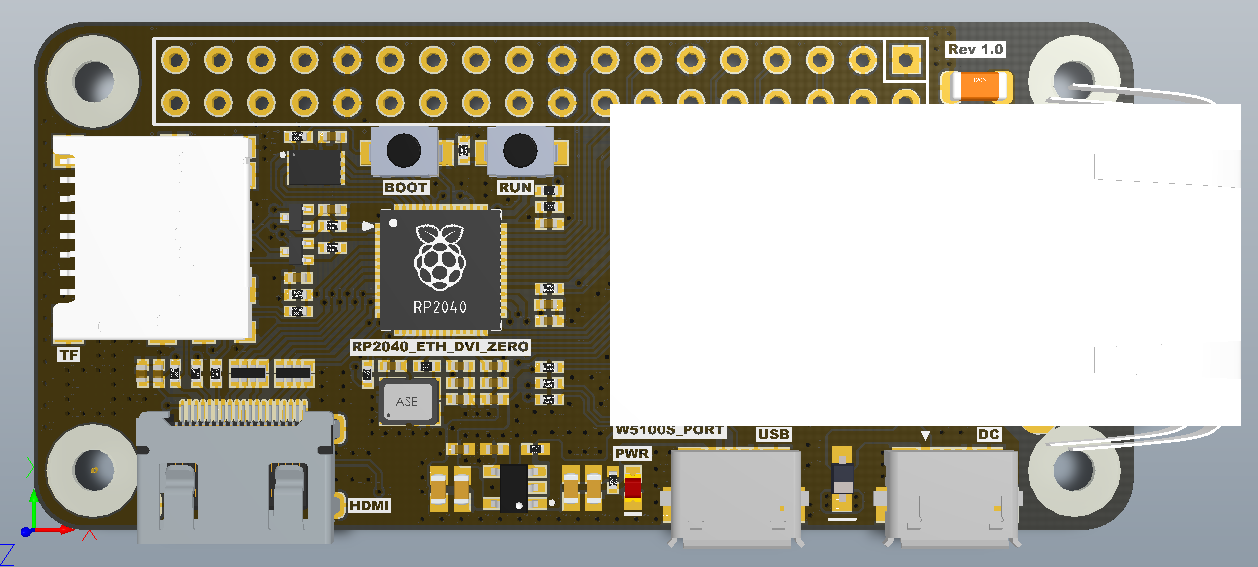
RP2040-ETH-DVI-ZERO to Rev1.0 Top view:
RP2040-ETH-DVI-ZERO to Rev1.0 Back view:
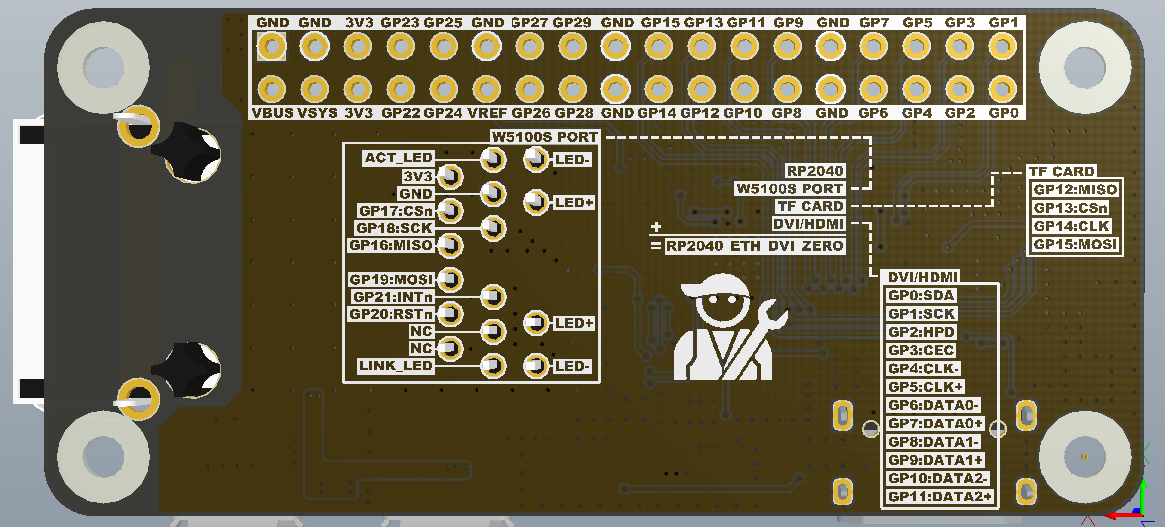
The GPIO used by all interfaces is displayed on the silk screen on the back of the PCB. During development, the GPIO number can be determined without looking at the schematic diagram.
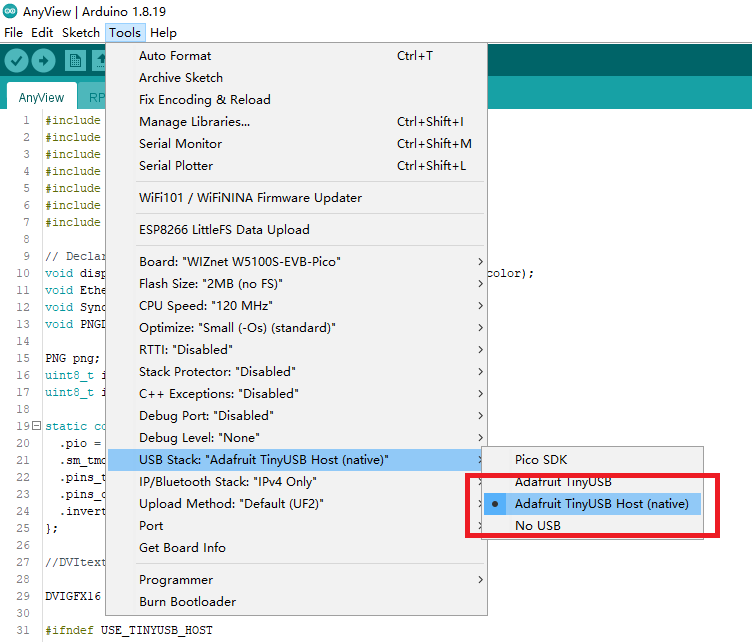
Initially, I tried to use the PIO of Raspberry Pi RP2040 to implement the USB OTG function, but unfortunately, the PIO mode OTG function and the DVI interface cannot coexist at the same time. In the end, USB OTG can only be realized through the original USB Host (native) interface of RP2040.Thanks to HisashiKato, I found inspiration in his open source project to achieve USB OTG and DVI coexistence.
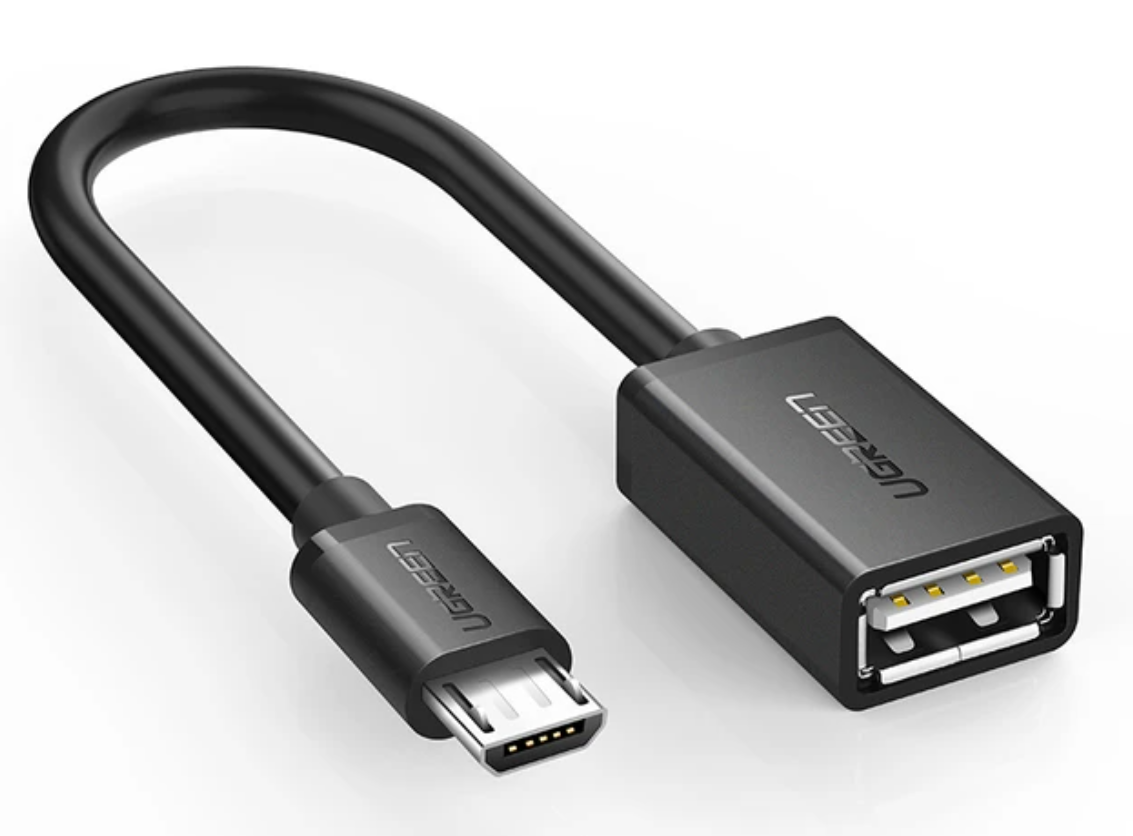
USB OTG can connect a USB device to the Micro USB of RP2040-ETH-DVI-ZERO through the above cable.
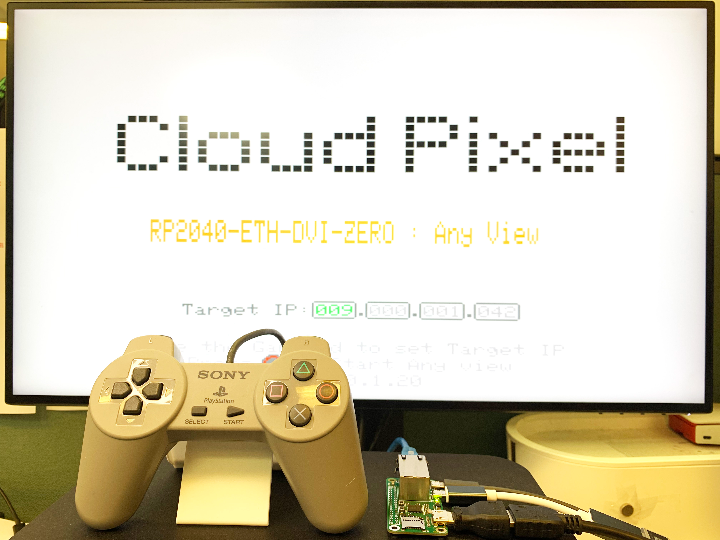
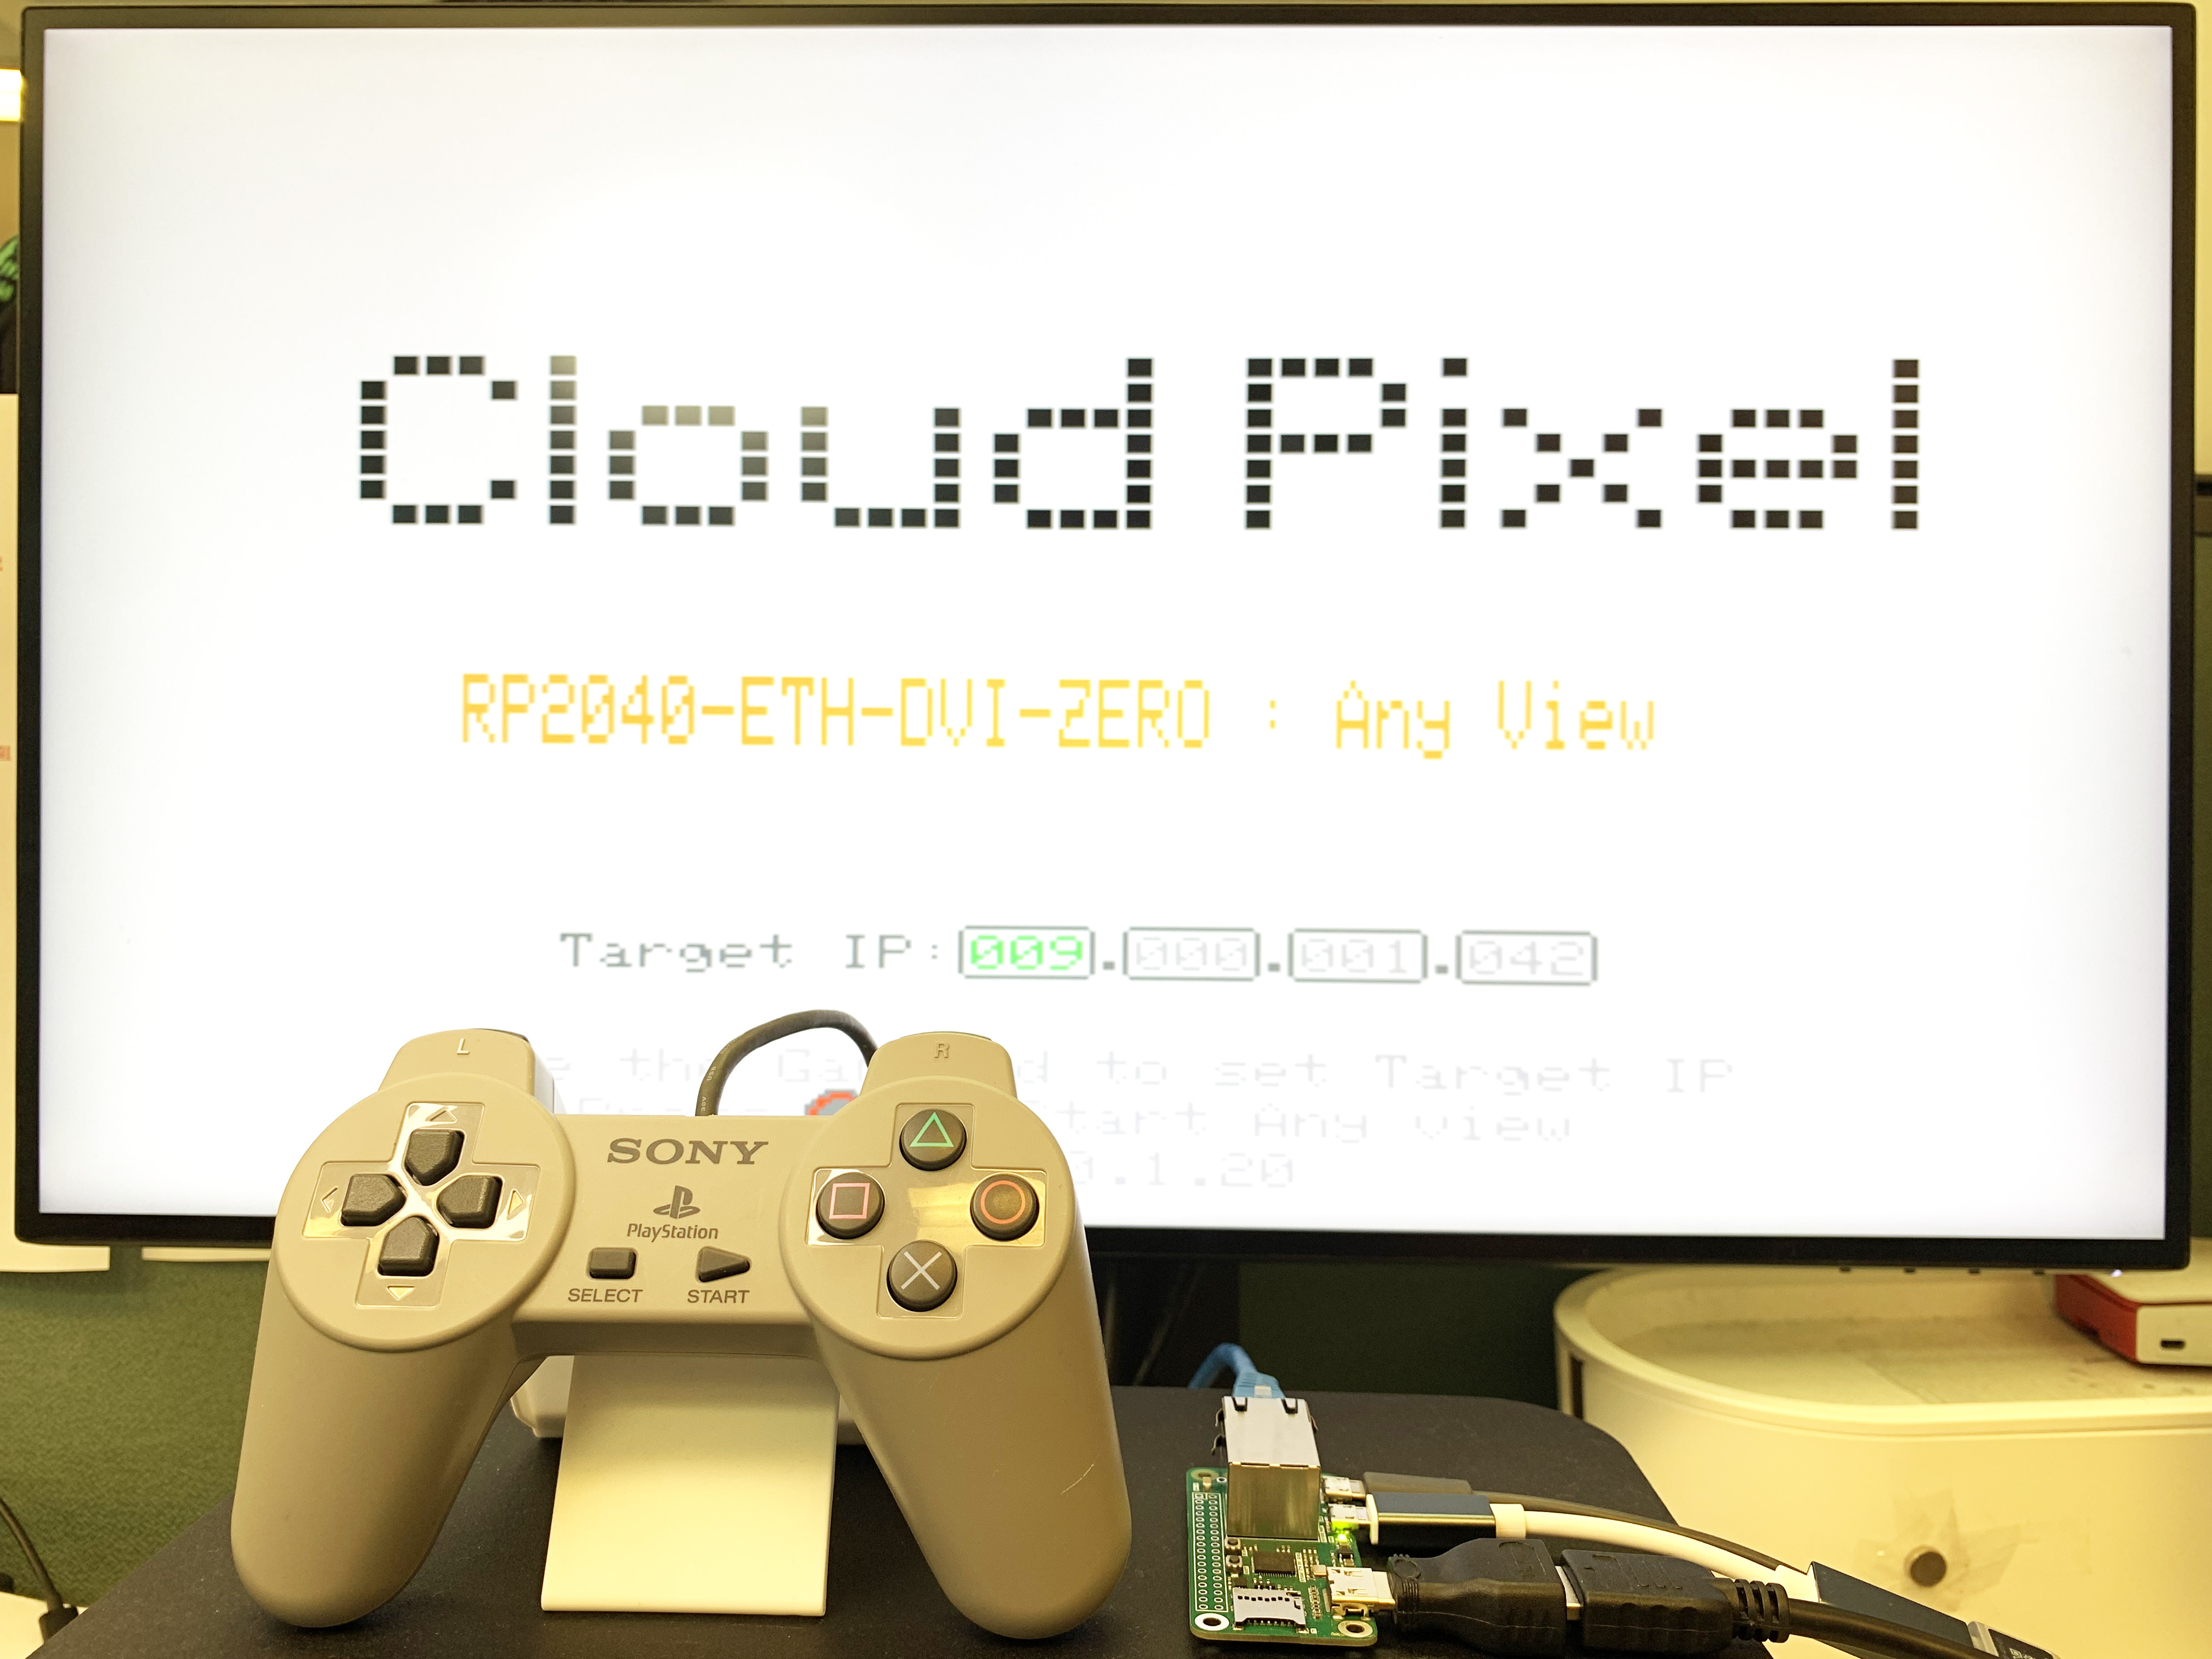
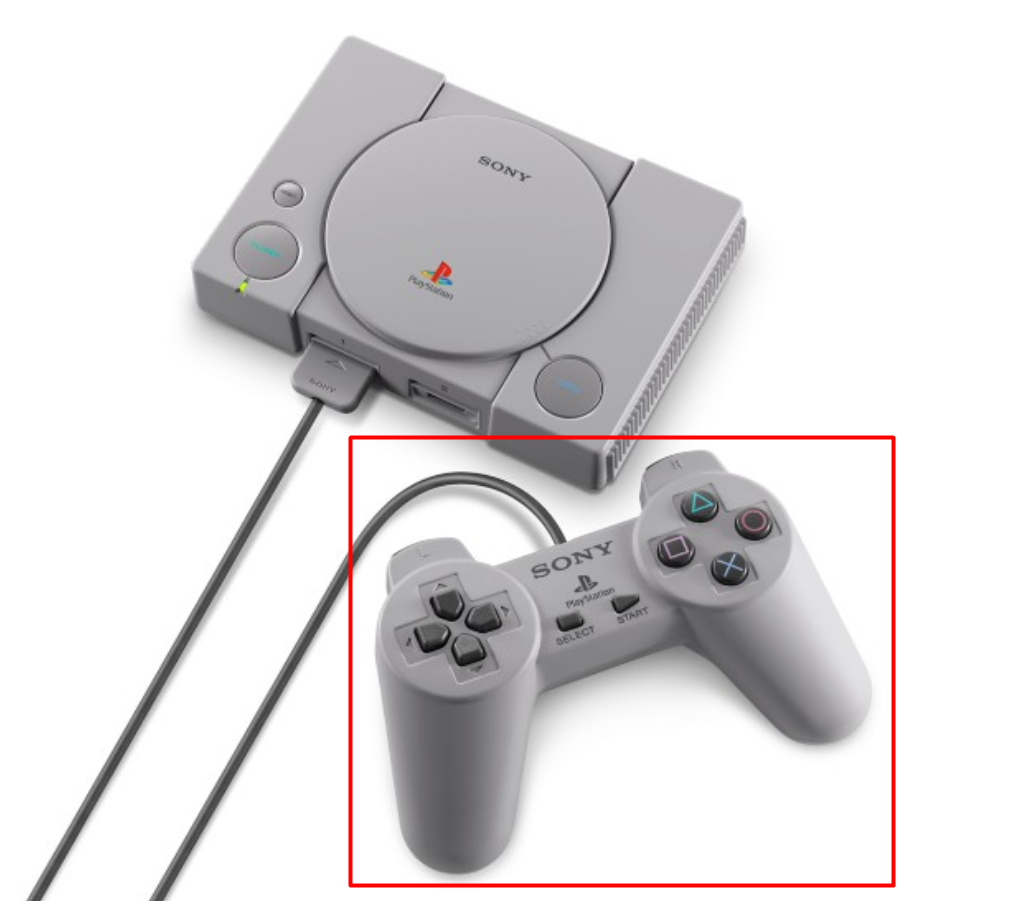
I am using the USB interface game controller on the PS Classic (PS Mini) launched by SONY in 2018.This game controller is used as a USB HID input device, and the direction keys are used to control and change the position of the screenshot window on the PC side.
Cable Connection:

Arduino code:
//Supports the DVI output by RP2040
#include <PicoDVI.h>

//Support USB Host interface
#include <Adafruit_TinyUSB.h>

//Support W5100S-PORT
#include <Ethernet.h>

//Arduino graphics library
#include <Arduino_GFX_Library.h>

//Storage running parameters
#include <EEPROM.h>

// PNG Decoder library
#include <PNGdec.h>
#include <PicoDVI.h> In this library, the unique PIO of Raspberry Pi is creatively used to realize DVI output. It can generate a 320*240 resolution image and output it to the monitor by expanding to 640*480(60Hz)
This is the definition part of the DVI interface.
static const struct dvi_serialiser_cfg rp2040_dvi_zero_cfg = {
  .pio = DVI_DEFAULT_PIO_INST,
  .sm_tmds = {0, 1, 2},
  .pins_tmds = {6, 8, 10},
  .pins_clk = 4,
  .invert_diffpairs = true
};


DVIGFX16 display(DVI_RES_320x240p60, rp2040_dvi_zero_cfg);
Compared with other RP2040 DVI development boards, RP2040-ETH-DVI-ZERO is unique in that it adds an Ethernet module W5100S-PORT. This is an Ethernet module I developed based on W5100S, which implements Ethernet in a very small Size. All circuits of the network.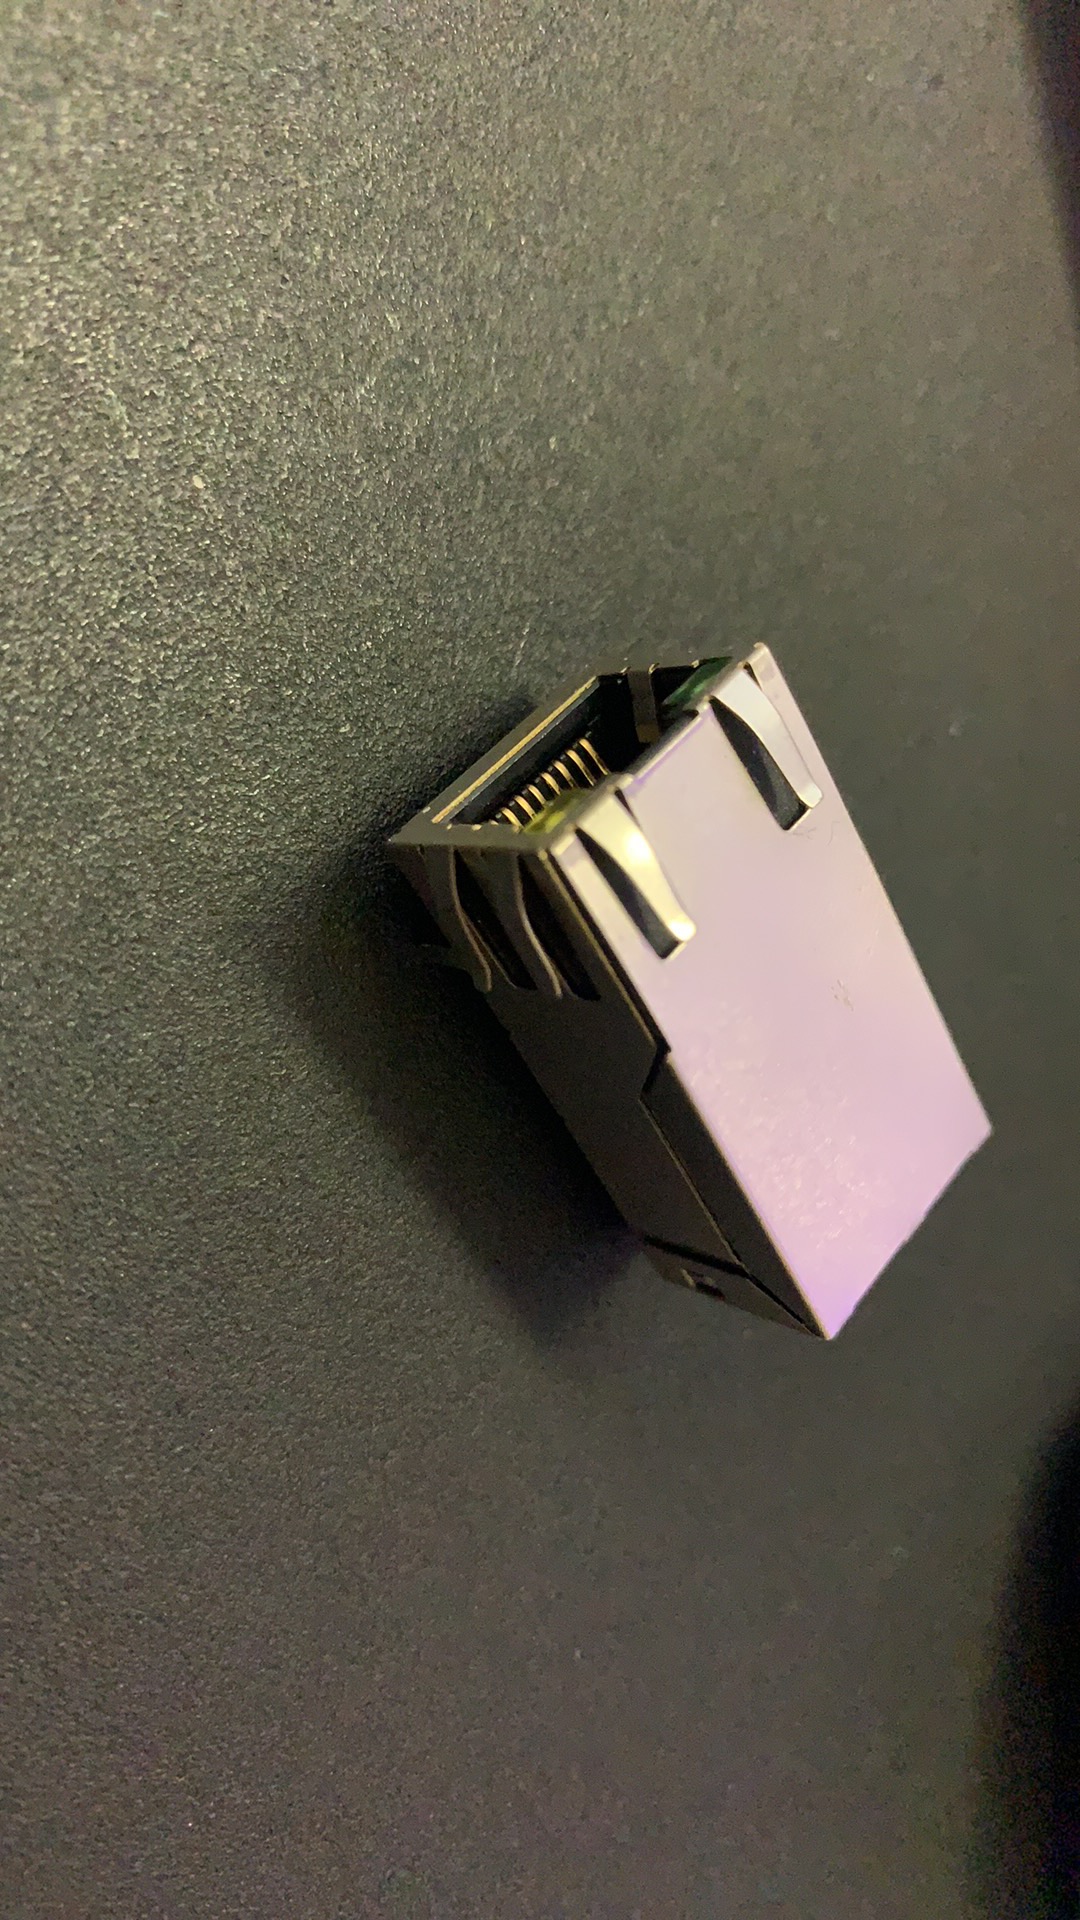
I use the same pin design as W5100S_EVB_PICO for the W5100S part, so I can use all the reference codes of W5100S_EVB_PICO.
void setup() {
  if (!display.begin()) {
    pinMode(LED_BUILTIN, OUTPUT);
    for (;;) digitalWrite(LED_BUILTIN, (millis() / 500) & 1);
  }
  USBHost.begin(0);
  // USB Host is executed by timer interrupt.
  add_repeating_timer_us( KBD_INT_TIME/*us*/, timer_callback, NULL, &rtimer );
  display_Cloud_Pixel_Icon(170,80,BLACK);
  Ethernet_check();
  EEPROM.begin(8);
  Sync_With_eeprom(0);
}
In the Ethernet_check function, I handled the abnormal situation where the network cable was not inserted.
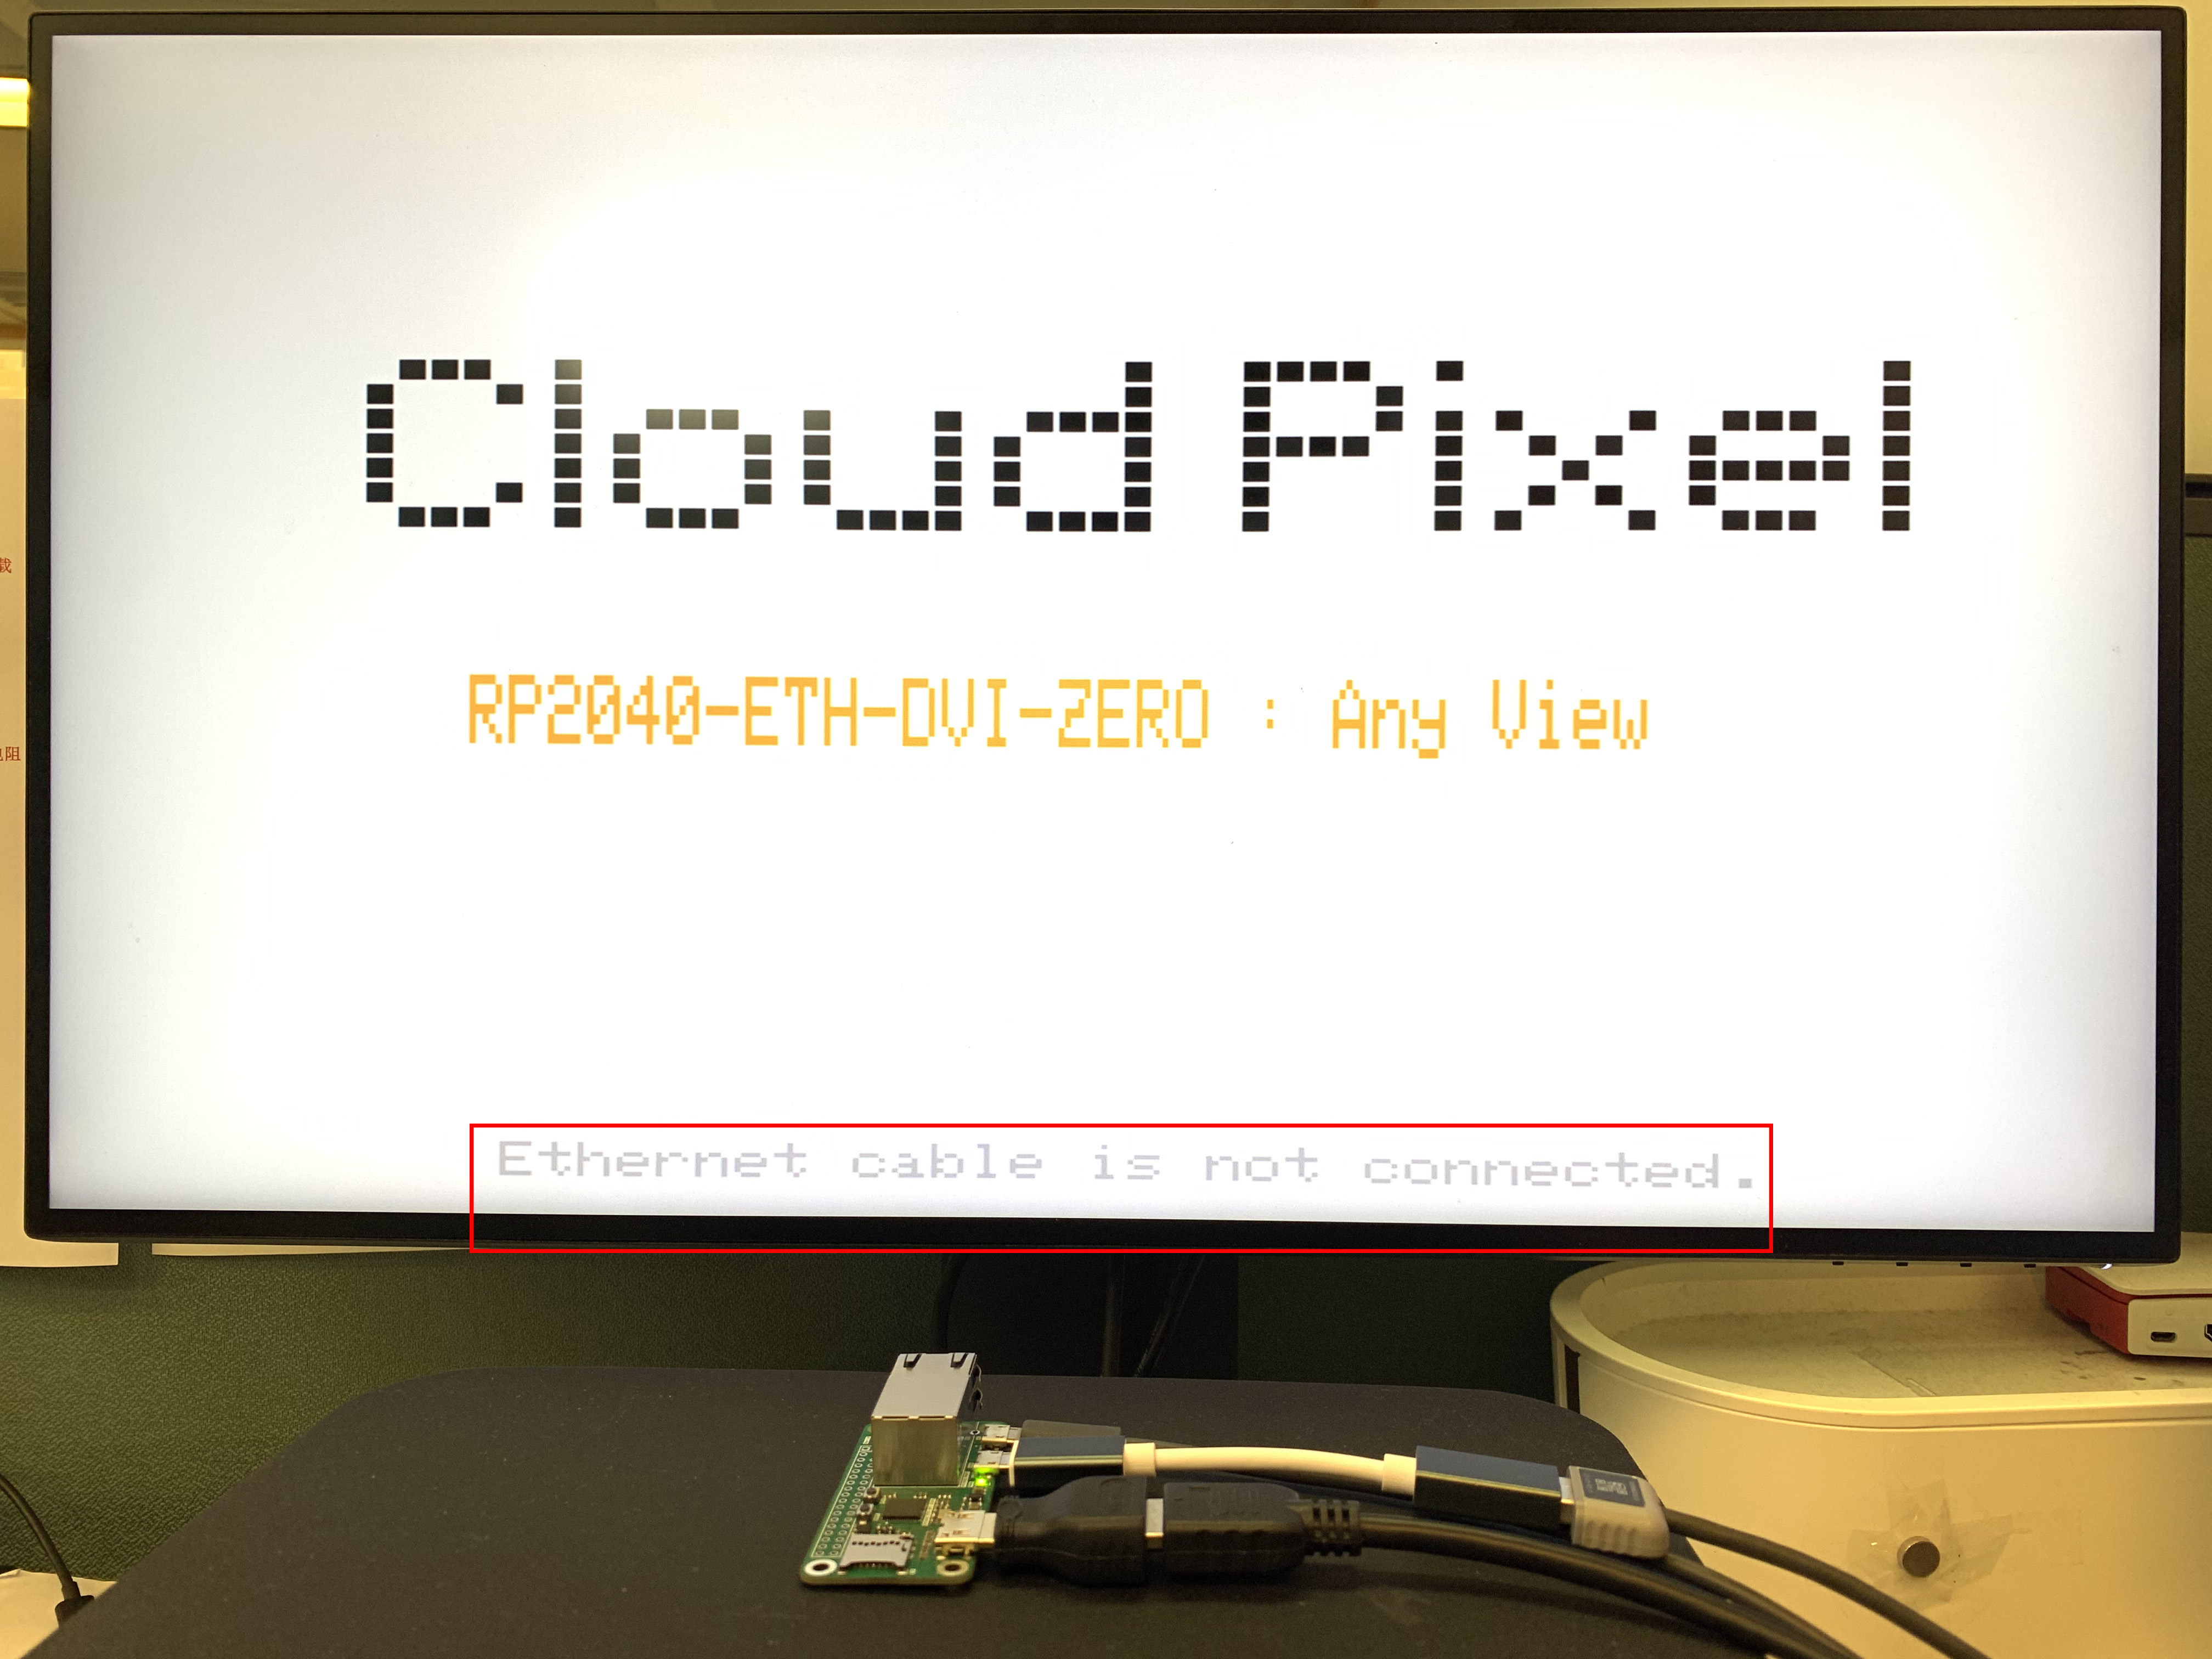
void Ethernet_check(void)
{
  Ethernet.init(17);
  while (Ethernet.linkStatus() == LinkOFF) {
    display.setCursor(70, 225);
    display.setTextSize(1);
    display.setTextColor(LIGHTGREY);
    display.print("Ethernet cable is not connected.");
    delay(500);
    display.setCursor(70, 225);
    display.setTextSize(1);
    display.setTextColor(WHITE);
    display.print("Ethernet cable is not connected.");
    delay(200);
  }
  Ethernet.begin(mac);
  display.setTextColor(LIGHTGREY);
  display.setTextSize(1);
  display.setCursor(120, 225);
  display.print("IP:");
  display.print(Ethernet.localIP());
  display.print(Ethernet.localIP()[4]);
}
After obtaining the IP address, displayed it at the bottom of the screen.
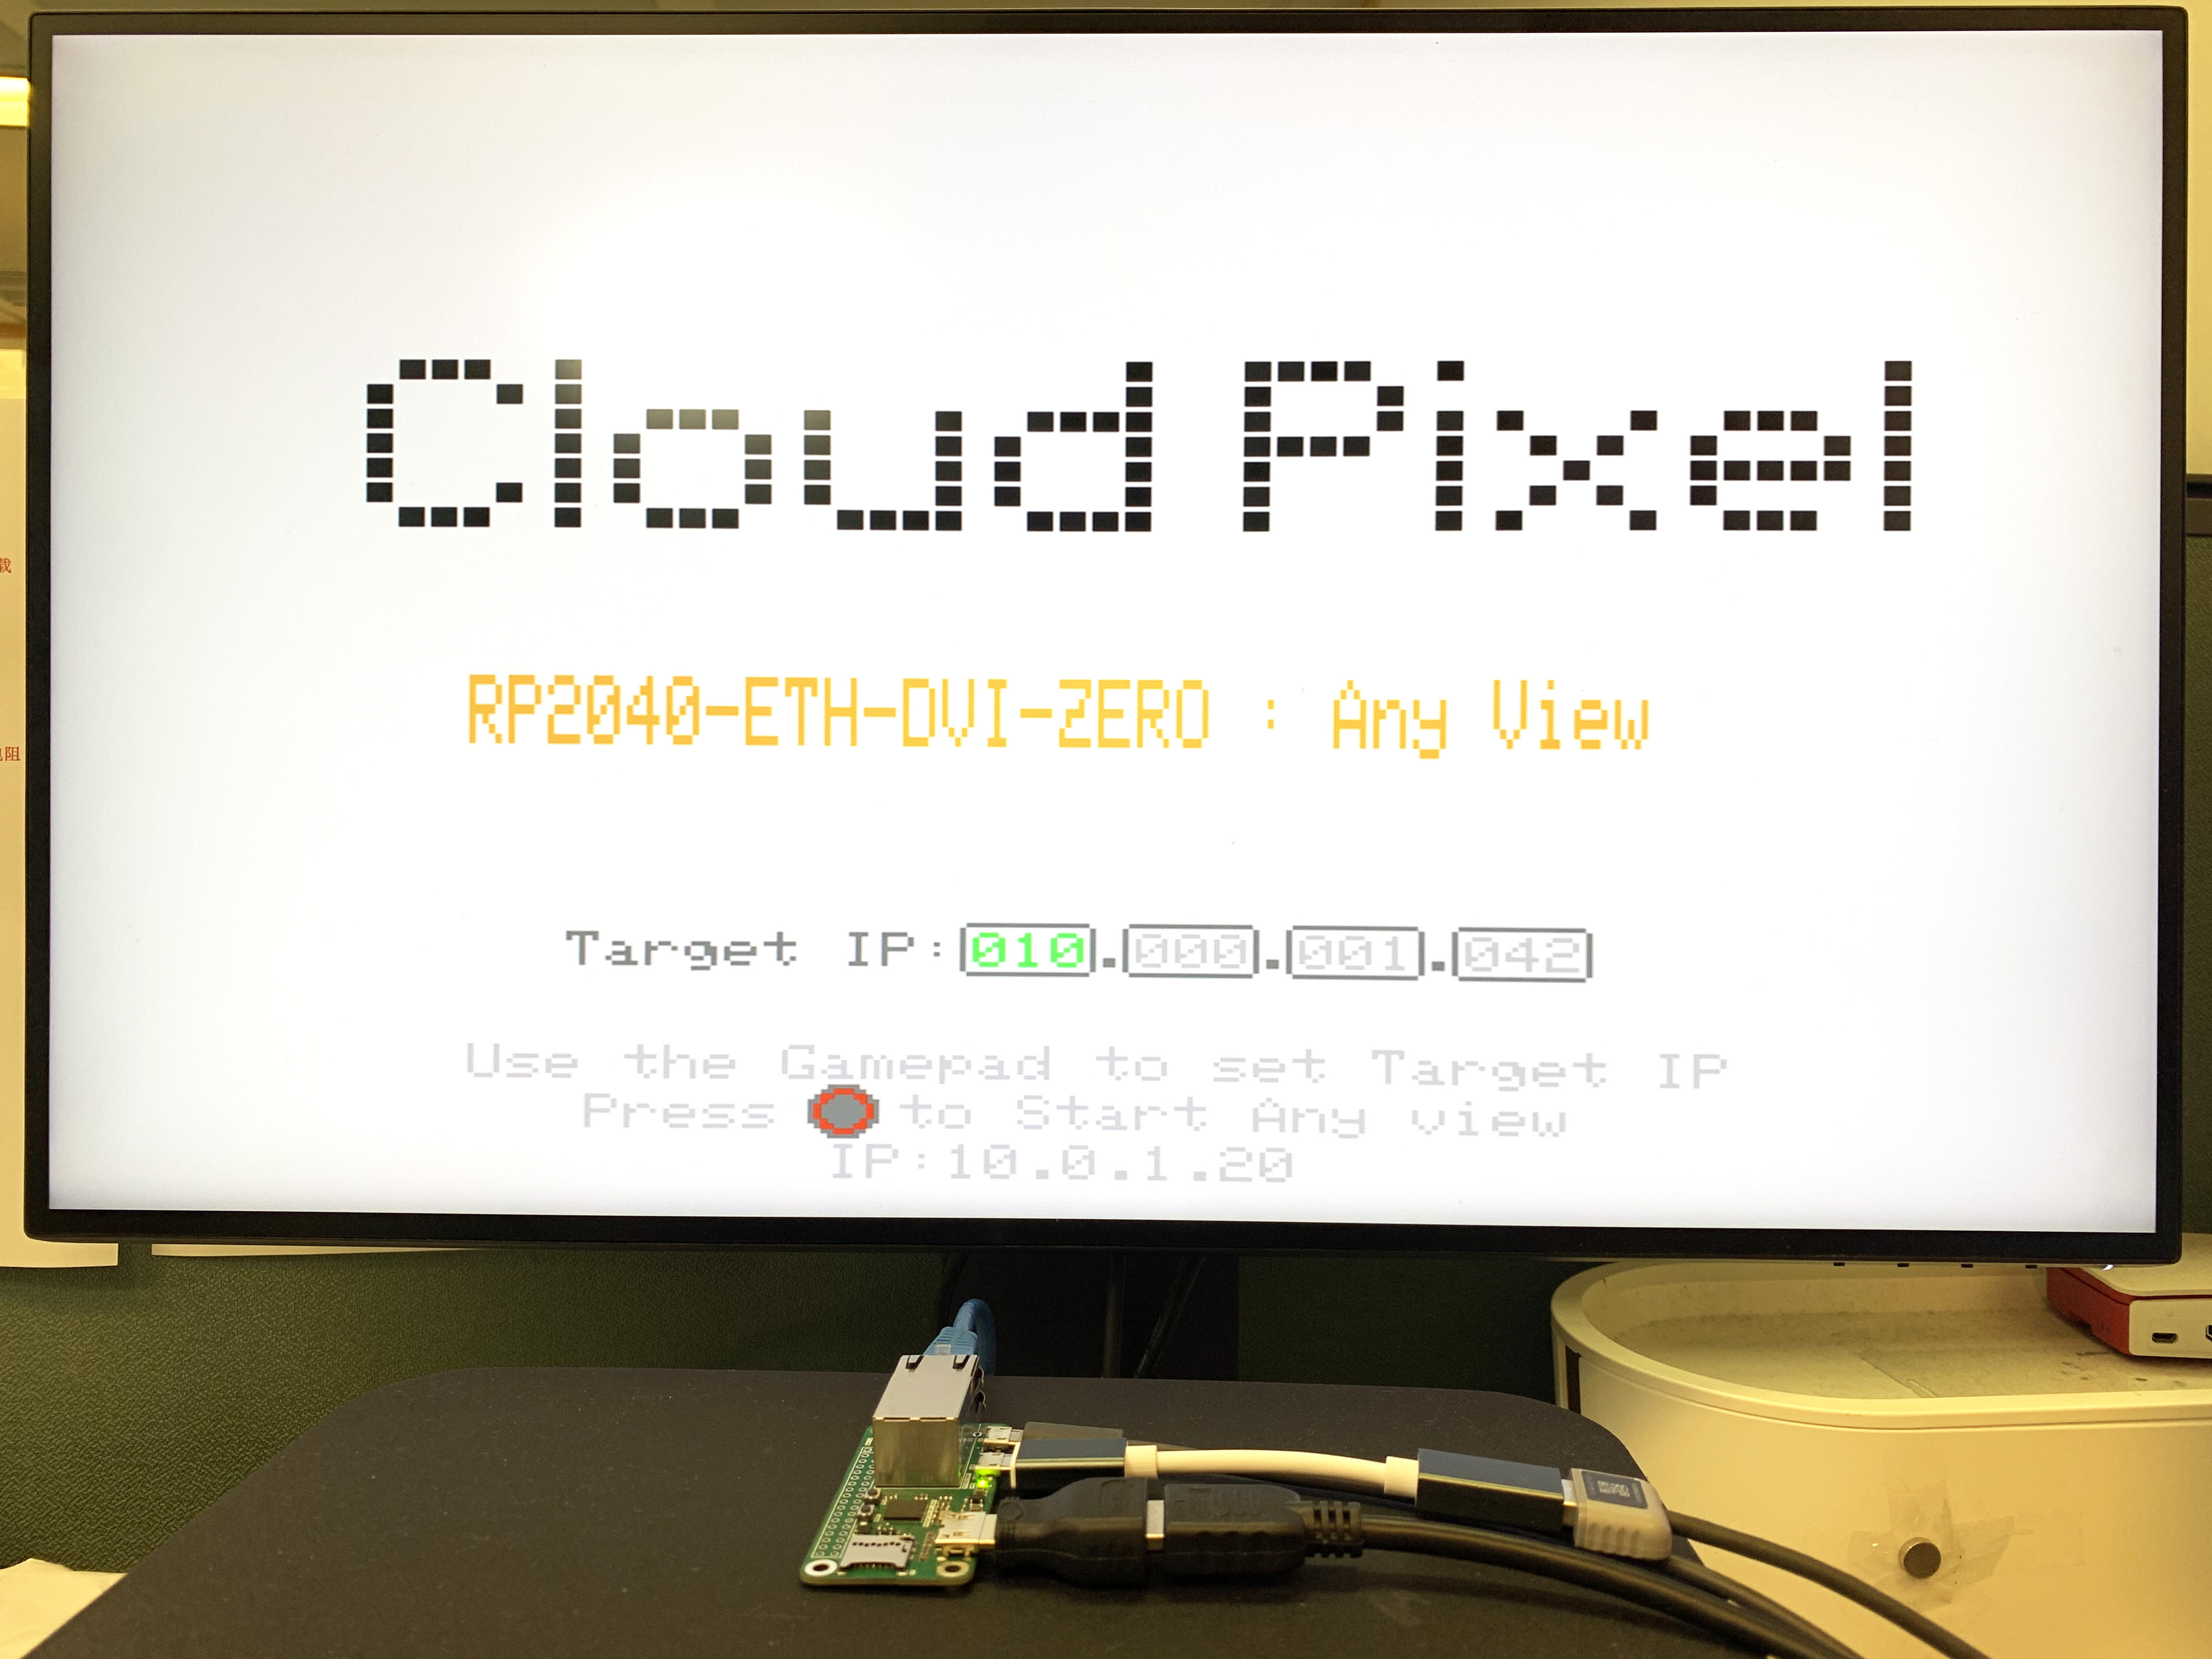
In this display screen, you can use the game controller to control the input of "Target IP". The left and right arrow keys select the location where the IP address needs to be changed, and the up and down arrow keys change the size of the IP value. After the settings are completed, press the "circle" button of the game controller to start the application of Any view.
    case show_first_screen:
    {
      display_Cloud_Pixel_Icon(170,80,BLACK);
      display.setTextColor(LIGHTGREY);
      display.setTextSize(1);
      display.setCursor(65, 205);
      display.print("Use the Gamepad to set Target IP");
      display.setCursor(83, 215);
      display.print("Press   to Start Any view");
      display.fillCircle(122,218,5,DARKGREY);
      display.drawCircle(122,218,4,0xf920);
      display.setCursor(120, 225);
      display.print("IP:");
      display.print(Ethernet.localIP());
      display.setTextColor(DARKGREY);
      display.setTextSize(1);
      display.setCursor(80, 182);
      display.print("Target IP:");
      for(uint8_t n = 0; n <4; n++)
      {
        display.drawRoundRect(140+n*25,180,21,11,2,DARKGREY);
        display.setTextColor(LIGHTGREY);
        display.setTextSize(1);
        display.setCursor(140+n*25+2, 182);
        display.printf("%03d",Dest_ip[n]);
        display.setTextColor(DARKGREY);
        if(n<3)
        {
          display.setCursor(140+n*25+20, 182);
          display.print(".");
        }
      }
      currentState = show_set_screen;
    }
    break;
Set the Target IP in "show_set_screen" of the state machine:
    case show_set_screen:
    {
      display.setTextColor(GREEN);
      display.setTextSize(1);
      display.setCursor(140+Dest_ip_num*25+2, 182);
      display.printf("%03d",Dest_ip[Dest_ip_num]);
      if(key_Right)
      {
        key_Right = 0;
        display.setTextColor(LIGHTGREY);
        display.setTextSize(1);
        display.setCursor(140+Dest_ip_num*25+2, 182);
        display.printf("%03d",Dest_ip[Dest_ip_num]);
        if(Dest_ip_num <3)
        {
          Dest_ip_num ++;
        }else{
          Dest_ip_num = 0;
        }
        delay(300);
        key_Right = 0;
      }
      if(key_Left)
      {
        display.setTextColor(LIGHTGREY);
        display.setTextSize(1);
        display.setCursor(140+Dest_ip_num*25+2, 182);
        display.printf("%03d",Dest_ip[Dest_ip_num]);
        if(Dest_ip_num >0)
        {
          Dest_ip_num --;
        }else{
          Dest_ip_num = 3;
        }
        delay(300);
        key_Left = 0;
      }
      if(key_Up)
      {
        display.setTextColor(WHITE);
        display.setTextSize(1);
        display.setCursor(140+Dest_ip_num*25+2, 182);
        display.printf("%03d",Dest_ip[Dest_ip_num]);
        if(Dest_ip[Dest_ip_num]<255)
        {
          Dest_ip[Dest_ip_num]++;
        }
        delay(300);
        key_Up = 0;
      }
      if(key_Down)
      {
        display.setTextColor(WHITE);
        display.setTextSize(1);
        display.setCursor(140+Dest_ip_num*25+2, 182);
        display.printf("%03d",Dest_ip[Dest_ip_num]);
        if(Dest_ip[Dest_ip_num]>0)
        {
          Dest_ip[Dest_ip_num]--;
        }
        delay(300);
        key_Down = 0;
      }
      if(key_Circle)
      {
        Sync_With_eeprom(1);
        currentState = Connect_Dest_ip;
        delay(300);
        key_Circle = 0;
      }
    }
    break;
At this time, it will be saved to the virtual EEPROM through the "Sync_With_eeprom" function. When the following parameter is 0, the value in eeprom is read; when it is 1, a new value is written; when it is 2, all parameter values are cleared.
void Sync_With_eeprom(uint8_t i)
{
int addr = 0;
if(i == 0)
{
if(EEPROM.read(0))
{
for(uint8_t n = 0; n<4; n++)
{
Dest_ip[n] = EEPROM.read(n+1);
}
}
}else if(i == 1){
EEPROM.write(addr,1);
for(uint8_t n = 0; n<4; n++)
{
EEPROM.write(n+1, Dest_ip[n]);
}
EEPROM.commit();
}
else if(i == 2)
{
for(int i =0; i< 4; i++){
EEPROM.write(i,0x00);
}
EEPROM.commit();
}
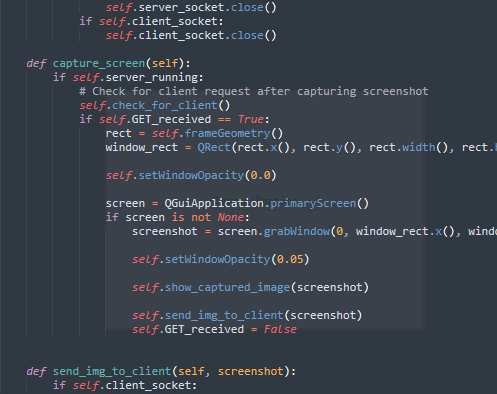
}After setting the Target IP in the setting interface, press the "circle" key on the game controller to start connecting to the "Target IP" server as a client. Afterwards, RP2040 will send a "GETT" message to the server to obtain a new screenshot. The acquisition step is to first obtain the four-byte length of the PC response message. Then based on this length, I request to receive the cache in the RAM of RP2040, and then receive the screenshot image immediately after it. In the Python program, I compressed the screenshot image into a PNG image. After the reception is completed, I call the PNG image decoding function to decode it. and displayed on the screen.
// Function to draw pixels to the display
void PNGDraw(PNGDRAW *pDraw)
{
  uint16_t usPixels[320];
  uint8_t usMask[320];
  png.getLineAsRGB565(pDraw, usPixels, PNG_RGB565_LITTLE_ENDIAN, 0x00000000);
  png.getAlphaMask(pDraw, usMask, 1);
  display.drawRGBBitmap(image_x, image_y + pDraw->y, usPixels, usMask, pDraw->iWidth,1);
}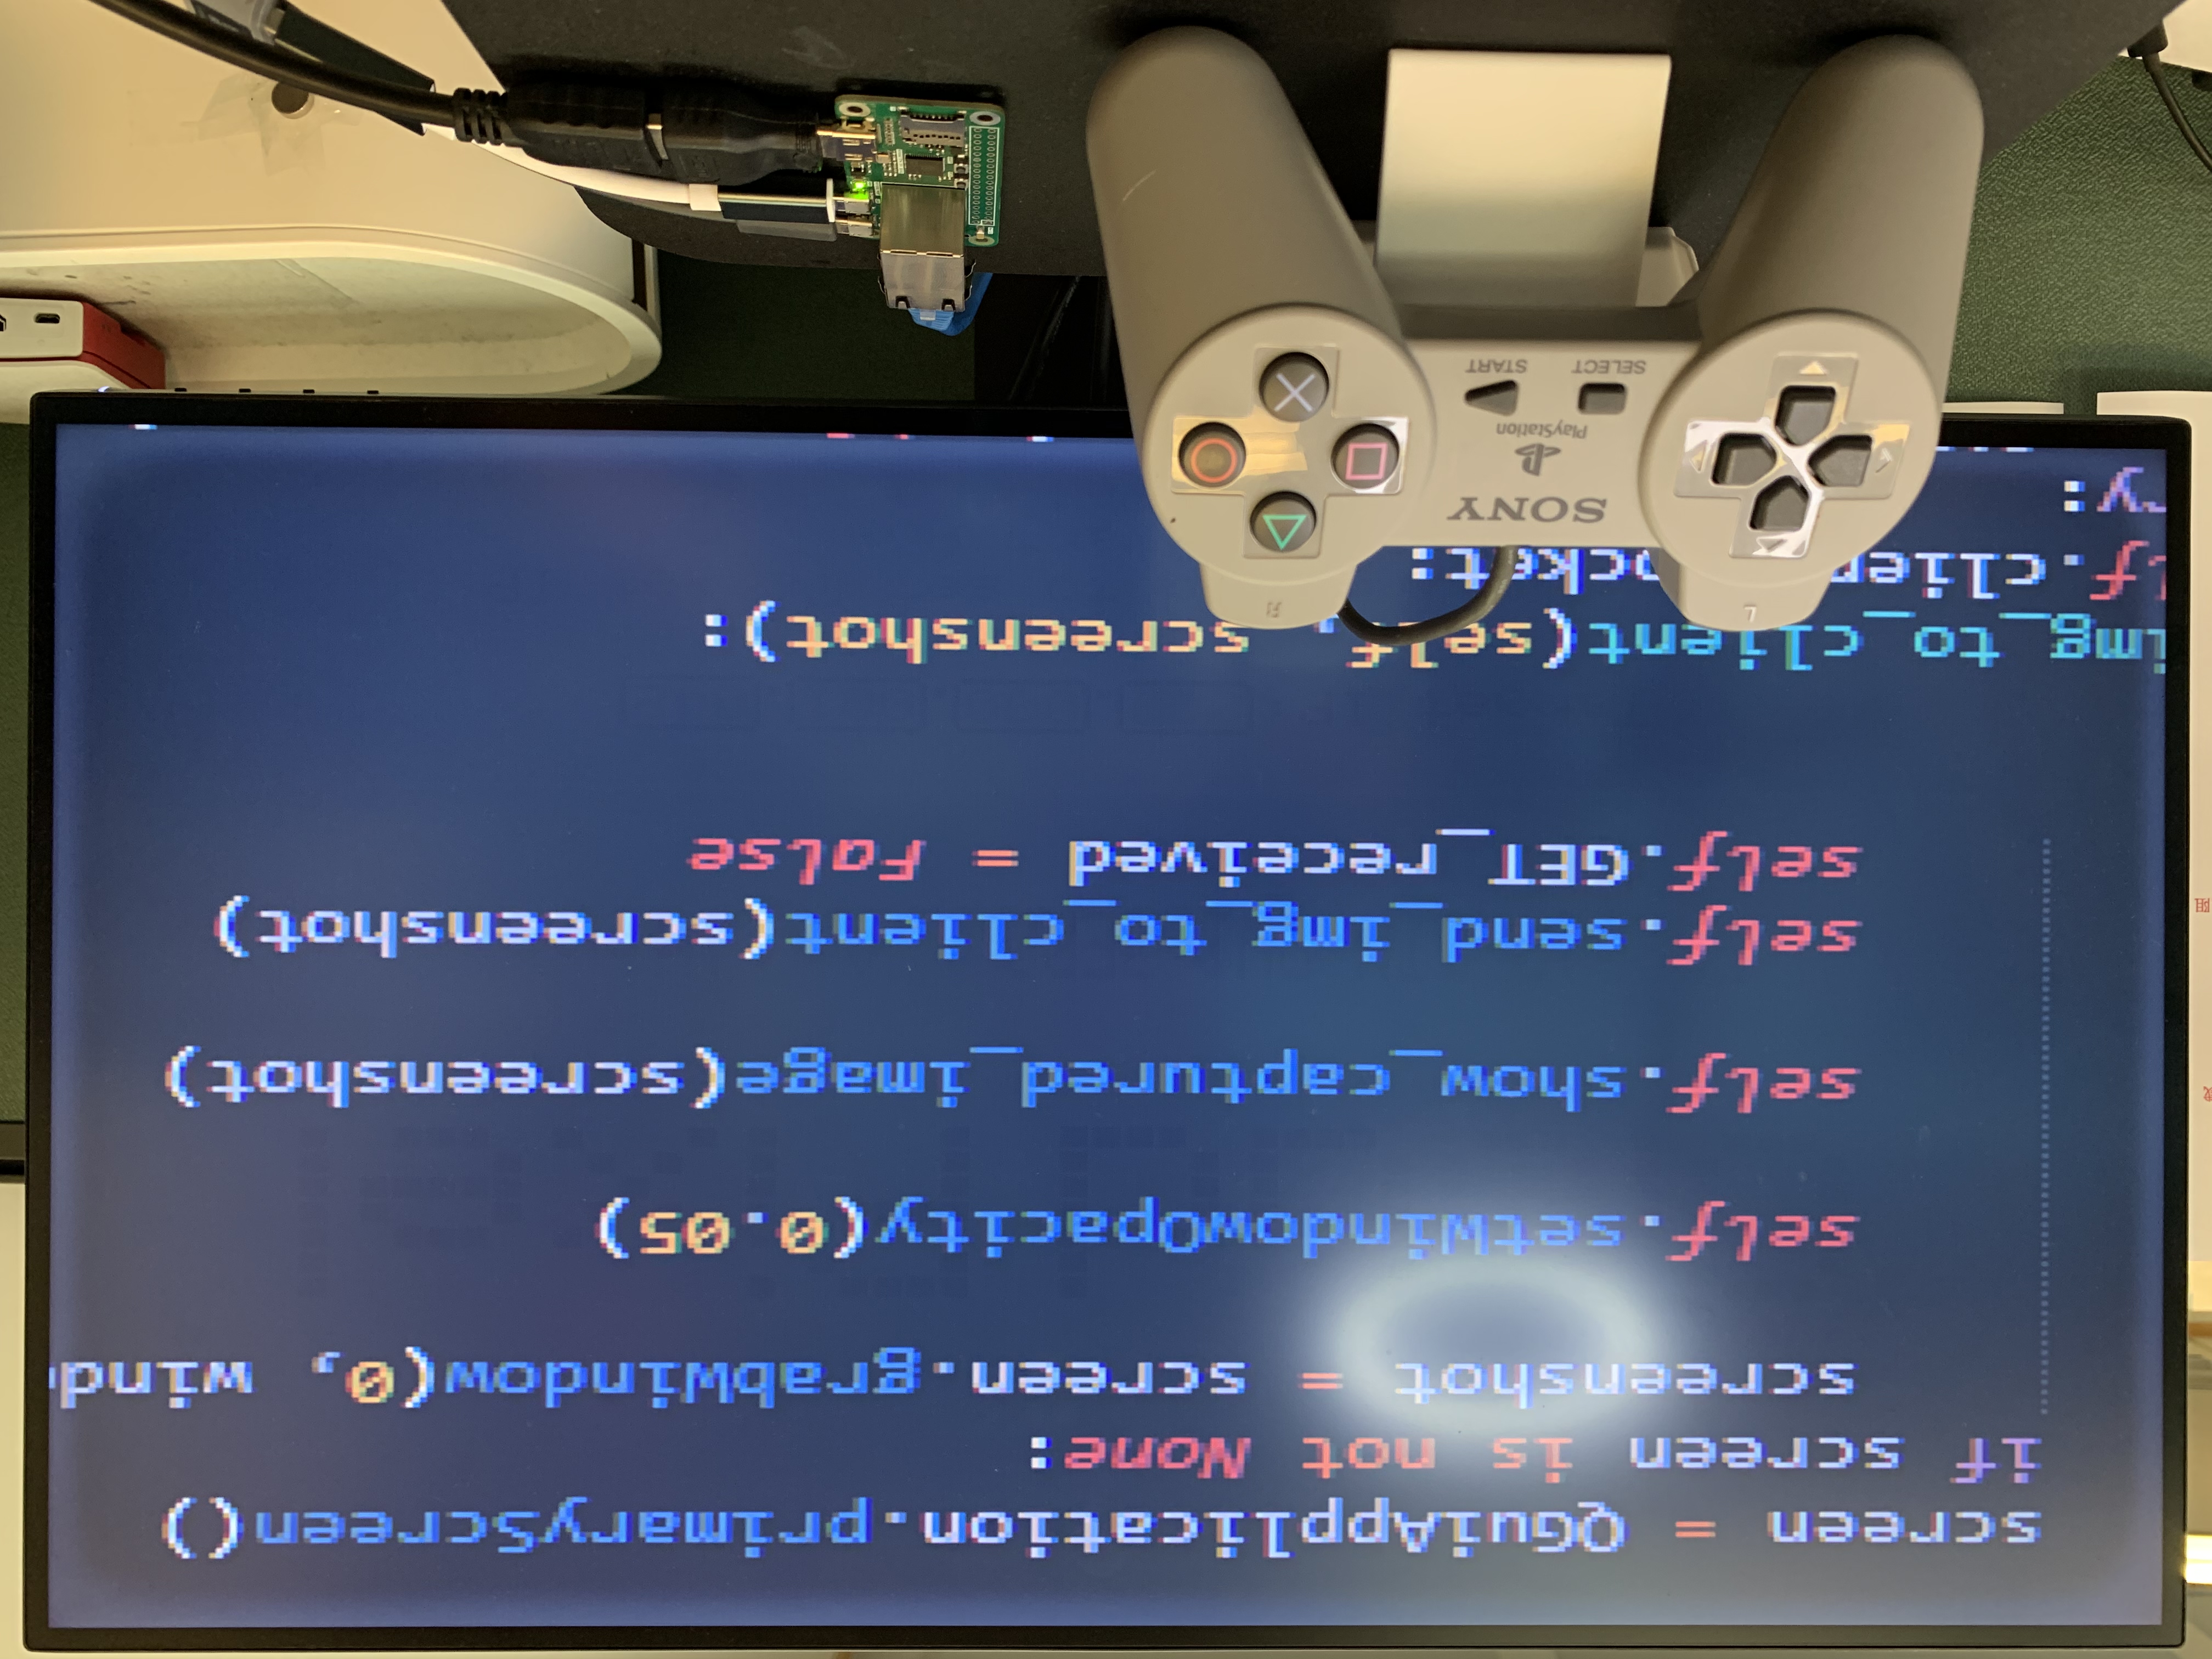
You can also use the USB game controller to control the position of the screenshot window on the PC. Press the left arrow key and the window will move 50 pixels to the left. Press the right arrow key and the window will move 50 pixels to the right. Press the up arrow key. , the window moves up 50 pixels, press the down arrow key, the window moves down 50 pixels, press the "cross" button to stop taking screenshots.
Python on PC side:
I am learning Python programming, but currently I can only make simple modifications, and I am not yet able to independently develop Python code. Fortunately, with the help of ChatGPT, everything has become much more convenient.
After the Python code is run, a 320*240 pixel translucent window will be displayed on the screen. You can long press the left mouse button to move the window position.
When the mouse is not on this window, I set the window to be almost transparent in order to reduce interference with our normal PC use.
When the mouse is on this window:
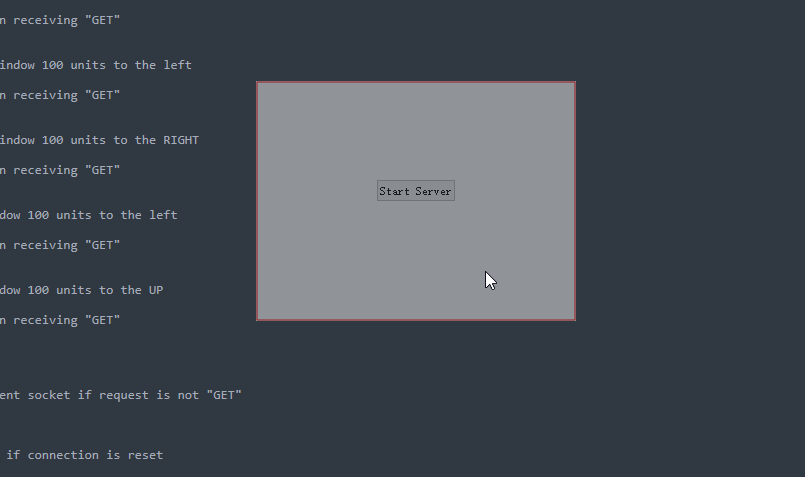
Click "Start Server" in the middle of the window to establish TCP server listening. Wait for RP2040-ETH-DVI-ZERO to establish a communication link.
This is the control part of the Python code, which receives the W5100S-PORT message and performs task processing.
    def check_for_client(self):
        if self.server_socket:
            try:
                self.server_socket.settimeout(0.2)  # Set a short timeout to keep the main loop responsive
                if self.client_socket is None:
                    self.client_socket, client_address = self.server_socket.accept()
                    print(f"Connection from {client_address}")
                else:
                    request = self.client_socket.recv(1024).decode()
                    print(request)
                    if request.strip() == "GETT":
                        print("GETT")
                        self.GET_received = True  # Set the flag upon receiving "GET"
                    elif request.strip() == "LEFT":
                        print("LEFT")
                        self.move(self.x() - 50, self.y())  # Move window 100 units to the left
                        time.sleep(0.1)
                        self.GET_received = True  # Set the flag upon receiving "GET"
                    elif request.strip() == "RIGH":
                        print("RIGHT")
                        self.move(self.x() + 50, self.y())  # Move window 100 units to the RIGHT
                        time.sleep(0.1)
                        self.GET_received = True  # Set the flag upon receiving "GET"
                    elif request.strip() == "UPUP":
                        print("UP")
                        self.move(self.x(), self.y()-50)  # Move window 100 units to the left
                        time.sleep(0.1)
                        self.GET_received = True  # Set the flag upon receiving "GET"
                    elif request.strip() == "DOWN":
                        print("DOWN")
                        self.move(self.x(), self.y()+50)  # Move window 100 units to the UP
                        time.sleep(0.1)
                        self.GET_received = True  # Set the flag upon receiving "GET"
                    else:
                        print(request.strip())
                    # else:
                        # self.client_socket.close()
                        # self.client_socket = None  # Reset the client socket if request is not "GET"
            except socket.timeout:
                pass
            except ConnectionResetError:
                self.client_socket = None  # Reset the client socket if connection is reset
This is the processing flow of screenshots image ==>PNG compression==>TCP Communication.
    def send_img_to_client(self, screenshot):
        if self.client_socket:
            try:
                filename = f"capture_{self.capture_count}.png"
                screenshot.save(filename, "PNG", 50)
                # self.capture_count += 1

                with open(filename, 'rb') as image_file:
                    image_data = image_file.read()
                    image_size = len(image_data)
                    size_bytes = image_size.to_bytes(4, 'big')
                    self.client_socket.sendall(size_bytes)  # Send image size
                    time.sleep(0.1)
                    self.client_socket.sendall(image_data)  # Send image data
                print("Image sent to client.")
            except socket.timeout:
                pass
Done.