1. Install library files and board support in the Arduino IDE
Add "WIZnet WizFi360-EVB-PICO" support to Arduino IDE
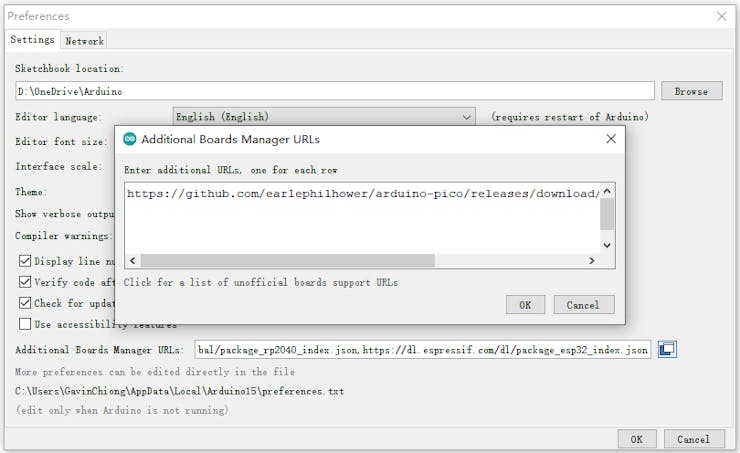
Open up the Arduino IDE and go to File->Preferences.
In the dialog that pops up, enter the following URL in the "Additional Boards Manager URLs" field:
https://github.com/earlephilhower/arduino-pico/releases/download/global/package_rp2040_index.json
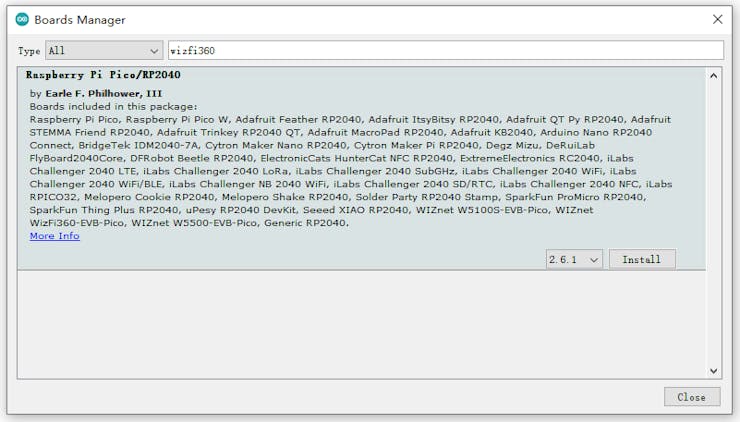
Search "WizFi360" and Install Board support by "Board Manager"
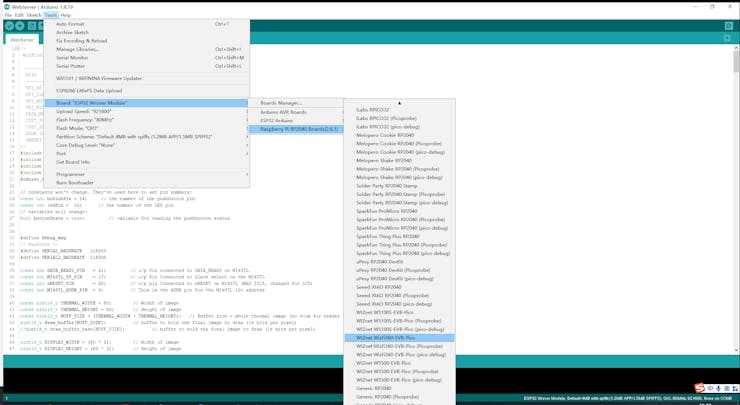
"Tools->Board:"***"-> Raspberry Pi RP2040 Boards(2.6.1) " Select “WIZnet WizFi360-EVB-PICO”.
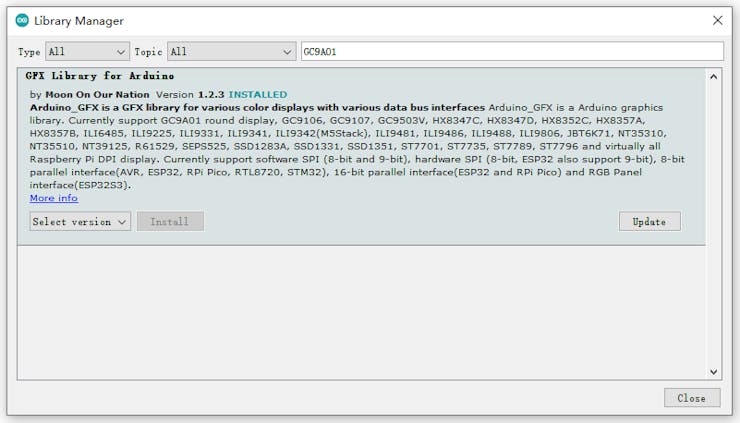
Add “GFX Library for rduino” , this library support the round screen GC9A01.
2. Thermography Carmera and Co-processor initialization and data processing

Thermography Camera and Co-processor interface and function pin initialization
#include <Wire.h>                     // i2c library (standard Arduino library)
#include <SPI.h>                      // SPI library (standard Arduino library)

const int THERMAL_DATA_READY_PIN   = 21;  //Pin connected to DATA_READY
const int THERMAL_CS_PIN           = 17;  //Pin Connected to CS
const int THERMAL_nRESET_PIN       = 20;  //pin Connected to nRESET
const int THERMAL_ADDR_PIN         = 3;   //The Thermography i2c address
uint16_t  THERMAL_Addr = 0x40;
/*i2c address for Thermography (0x40 if Thermography_ADDR_PIN =0 or 0x41 if Thermography_ADDR_PIN = 1 )*/
Thermography register address
// Now the addresses for each of the registers within the device
const uint16_t THERMAL_FRAME_MODE      = 0xB1; // Frame Mode register address
const uint16_t THERMAL_SW_VERSION      = 0xB2; // swVersion register address
const uint16_t THERMAL_BUILD           = 0xB3; // swVersion build register address
const uint16_t THERMAL_FRAME_RATE      = 0xB4; // Frame Rate register addres
const uint16_t THERMAL_POWER_DOWN      = 0xB5; // Power down register address
const uint16_t THERMAL_STATUS_ERROR    = 0xB6; // Status Error register address
const uint16_t THERMAL_SENSOR_TYPE     = 0xBA; // SenXor type register address
const uint16_t THERMAL_EMISSIVITY      = 0xCA; // emissivity register address
const uint16_t THERMAL_FILTER_CONTROL  = 0xD0; // filter control (bits 0-2 R_W)
const uint16_t THERMAL_FILTER_SETTINGS_LSB = 0xD1; // filter setting LSB (0x32 default, 0x80 rec)
const uint16_t THERMAL_FILTER_SETTINGS_MSB = 0xD2; // filter setting MSB (0x00 default)
const uint16_t THERMAL_ROLLING_AVG_SETTING = 0xD3; // rolling average setting (0x04 default)
I2C read and write Thermography register address
// =========================================================================
//  Function to write i2c register
// =========================================================================
void WriteI2c(int RegAddr, unsigned char RegData)
{
  Wire.beginTransmission(Addr);       // Begin transmission to the Sensor
  Wire.write (RegAddr);                     // Set the address for the requested register
  Wire.write (RegData);                     // Write the data for that register
  Wire.endTransmission(true);               // Release i2c bus - so others can use it (can have multiple slaves & masters connected
  return;
}

// =========================================================================
//  Function to read i2c register
// =========================================================================
unsigned char ReadI2c(int RegAddr)
{
  unsigned char Result;
  Wire.beginTransmission(Addr);       // Begin transmission to the Sensor
  Wire.write (RegAddr);                     // Set the address for the requested register
  Wire.endTransmission();                   // End tranmission We should have set the address of the register
  Wire.requestFrom(Addr, 1);          // Tell slave we need to read 1 byte from the current register
  Result = Wire.read();                     // read that Serial Number byte (register will auto increment)
  Wire.endTransmission(true);               // Release i2c bus - so others can use it
  return Result;
}
Get and set parameter through I2C BUS in the “void setup()”
THERMAL_FILTER_CONTROL: Setting this bit to 1 instructs operate in Continuous Capture Mode, whereby it continuously acquires data from the camera module and updates the readout buffer accessible through the SPI interface. Resetting this bit to 0 instructs to stop continuous data acquisition. This also resets to 0 the DATA_READY pin and the corresponding bit 4 of the STATUS register.
THERMAL_FRAME_RATE: The value of these bits establishes the rate at which the host controller can read out thermal data frame from the Output Frame Buffer through the SPI interface. The value must be an unsigned integer representing the frame rate divisor of the maximum frame rate, FPS_MAX, of the attached camera module: FPS = FPS_MAX / FRAME_RATE_DIVIDER. Exception is FRAME_RATE = 0, which yields FPS_MAX = 24FPS.
THERMAL_FRAME_MODE: Setting this bit to 1 eliminates the Header from the Thermal Data Frame transferred through the SPI interface. Resetting this bit to 0 includes the HEADER in the Thermal Data Frame,
Wire.begin();                               // Initialise and configure the i2C//
  Wire.setClock(400000);                      // use 400 kHz I2C//

  pinMode(THERMAL_DATA_READY_PIN, INPUT_PULLUP);
  pinMode (nRESET_PIN, OUTPUT);
  digitalWrite (nRESET_PIN, LOW);              // First put the THERMAL in reset - THIS NEEDS TO BE TIMED//
  pinMode (THERMAL_ADDR_PIN, OUTPUT);
  digitalWrite (THERMAL_ADDR_PIN, LOW);        // Set the THERMAL i2c addrees LOW = 0x40 HIGH = 0x41//
  pinMode(THERMAL_CS_PIN, OUTPUT);             // Configure CS pin for THERMAL
  digitalWrite (THERMAL_CS_PIN, HIGH);
  delay(200);                      // Wait 0.2 seconds //
  digitalWrite (nRESET_PIN, HIGH); // remove reset to the THERMAL - allow it to boot//
  delay(1000);                     // Wait 1 seconds for the THERMAL to boot
  SPI.begin();                     // Initialise the SPI

  // =========================================================================
  //  Read all the individual i2c registers
  //  Uses ReadI2c() routine
  // =========================================================================
  frameMode = ReadI2c(THERMAL_FRAME_MODE);
  swVersion = ReadI2c(THERMAL_SW_VERSION);
  build     = ReadI2c(THERMAL_BUILD);
  frameRate = ReadI2c(THERMAL_FRAME_RATE);
  powerDown = ReadI2c(THERMAL_POWER_DOWN);
  statusError = ReadI2c(THERMAL_STATUS_ERROR);
  senxorType = ReadI2c(THERMAL_SENSOR_TYPE);
  emissivity = ReadI2c(THERMAL_EMISSIVITY);

  // =========================================================================
  // Write any registers required beofre starting exitig setup
  // and starting Data aquisition
  // =========================================================================
  WriteI2c(THERMAL_FILTER_SETTINGS_LSB, 0x80);
  WriteI2c(THERMAL_FILTER_SETTINGS_MSB, 0x00);
  WriteI2c(THERMAL_FILTER_CONTROL, 0x02);
  delay(100);         // currently required after modifying filter values//
  WriteI2c(THERMAL_FRAME_RATE, 0x3);           // Write the Frame_rate register 0x1 = as fast as possible (24FPS)//
  WriteI2c(THERMAL_FRAME_MODE, 0x3);           // Write the Frame_mode register 0x3 = capture continuous with header)//
Get camera Header and data through SPI BUS in the “void loop()”
SPI clock is set to 40MHz, and The data from the sensor is flipped with respect to the screen so we have to draw the rows backwards.
void Get_sensor_data()
{
  dataReady = digitalRead(THERMAL_DATA_READY_PIN);
  // Read the state on THERMAL_DATA_READY_PIN line
  if ( digitalRead (THERMAL_DATA_READY_PIN) == HIGH) {
  // Wait for THERMAL_DATA_READY_PIN to assert
  Serial.println ("Data ready!!");
  //THERMAL_DATA_READY_PIN has been asserted so data is now available on SPI bus
  SPI.beginTransaction(SPISettings(40000000, MSBFIRST, SPI_MODE0));
  digitalWrite (THERMAL_CS_PIN, LOW);
  for (int i = 0; i < THERMAL_WIDTH; i++)
  {
    header_buffer[i] = SPI.transfer16(0x0);
    // write data to the header buffer
  }
  for (int j = 0; j < THERMAL_HEIGHT; j++)
  {
    for (int i = 0; i < THERMAL_WIDTH; i++)
    {
       THERMAL_SpiData = SPI.transfer16(0x0);
       // The data from the sensor is flipped with respect to the screen so we have to draw the rows backwards
       draw_buffer[((THERMAL_WIDTH - 1) - i) + (j * THERMAL_WIDTH)] = THERMAL_SpiData;
      }        // (finished a row)
    }
    // We have now read the entire frame of data
    digitalWrite (THERMAL_CS_PIN, HIGH);
    SPI.endTransaction();
  }
}
3. Display the thermal data on the screen(GC9A01).
#include <Arduino_GFX_Library.h>
Arduino_GFX *tft = create_default_Arduino_GFX();
define of pin which is used by GC9A01 in the "libraries\GFX_Library_for_Arduino\src\Arduino_GFX_Library.h"
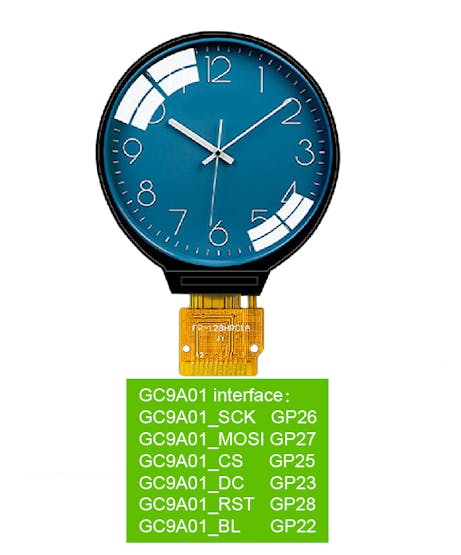
#elif defined(ARDUINO_RASPBERRY_PI_PICO)||defined(ARDUINO_WIZNET_WIZFI360_EVB_PICO)||defined(ARDUINO_WIZNET_5100S_EVB_PICO)
#define DF_GFX_SCK 26
#define DF_GFX_MOSI 27
#define DF_GFX_MISO GFX_NOT_DEFINED
#define DF_GFX_CS 25
#define DF_GFX_DC 23
#define DF_GFX_RST 28
#define DF_GFX_BL 22
Initialize the screen and open the backlight of the screen in the “void setup()”
tft->begin();
  tft->fillScreen(BLACK);
  pinMode(22, OUTPUT);
  digitalWrite(22, HIGH);
  Display_Begin();
Convert every pixel of thermal data to color(RGB565) by Find the corresponding color information in the colormap according to the relative position of the temperature value in minmax(temperature difference within the recognition range which in the thermal Header).
Display all temperature color information through the "DISPLAY_buffer" function.Because the camera resolution is only 80*62 and the GC9A01 screen resolution is 240*240, each temperature point is expanded to 3*3 display.
// =========================================================================
    // Colour conversion - one pixel at a time
    // The draw_buffer starts as 16 bit sensor data
    // At the end it is 16 bit RGB (5-6-5)
    // =========================================================================
    for (int j = 0; j < THERMAL_HEIGHT; j++) {
      for (int i = 0; i < THERMAL_WIDTH; i++) {
        pixelVal = draw_buffer[(i) + (j * THERMAL_WIDTH)];
        if (pixelVal <= THERMAL_MinVal) {
          lutIndex = 0;
        }
        else if (pixelVal >= THERMAL_MaxVal) {
          lutIndex = 255;
        }
        else {
          lutIndex = map (pixelVal, THERMAL_MinVal, THERMAL_MaxVal , 0, 0xff);
        }
        for(int m = 0; m<3; m++)
        {
            DISPLAY_buffer[(i*3)+m + (j*3) * DISPLAY_WIDTH]= palette[lutIndex];
            DISPLAY_buffer[(i*3)+m + ((j*3)+1) * DISPLAY_WIDTH]= palette[lutIndex];
            DISPLAY_buffer[(i*3)+m + ((j*3)+2) * DISPLAY_WIDTH]= palette[lutIndex];
        }
      }
    }
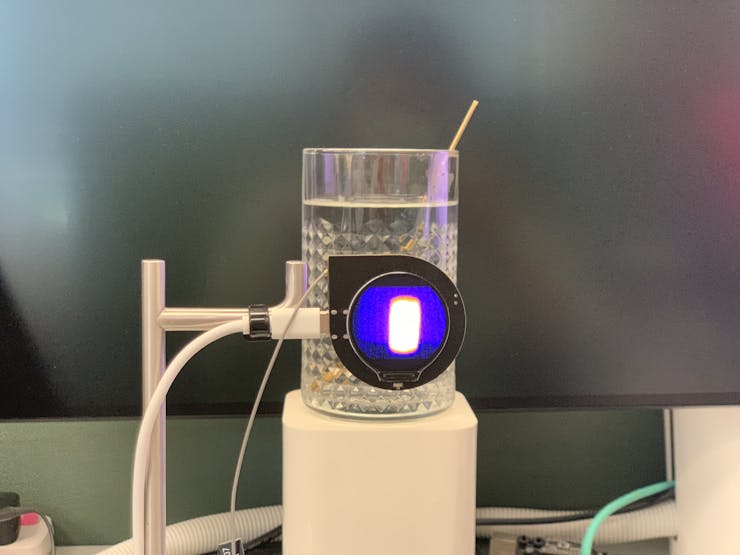
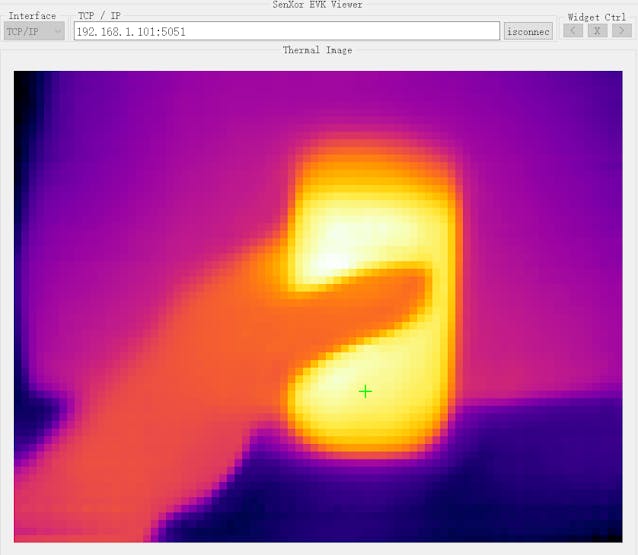
Then we get the first Thermography picture of hotwater in this project.
4. Communication with the thermal viewer software through WiFi by WizFi360.
Thermal viewer software works as a TCP client with port 5051.
#include "WizFi360.h"

// Wi-Fi info //
char ssid[] = "WIZNET_test";       // your network SSID (name)//
char pass[] = "********";          // your network password//
int status = WL_IDLE_STATUS;       // the Wifi radio's status//
WiFiServer server(5051);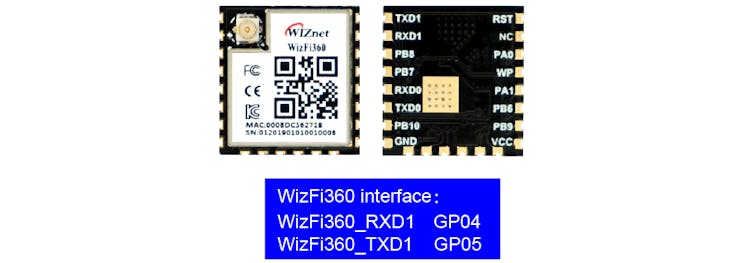
Initialize serial port for WizFi360 module and change the baudrate to 2000000bps(MAX baudrate for wizfi360).
The first initialization is 115200, and then setting the baud rate (2000000) is added to the initialization part of the WiZfi360 library, and the second time is changed to 2000000bps.
// initialize serial port for WizFi360 module//
#if defined(ARDUINO_WIZNET_WIZFI360_EVB_PICO)
  Serial2.begin(2000000);
  WiFi.init(&Serial2);
  Serial2.begin(2000000);
#endif
Check the wizfi360 Link status of wifi in the “void setup()”
// check for the presence of the shield//
  if (WiFi.status() == WL_NO_SHIELD) {
    Serial.println("WiFi shield not present");
    // don't continue//
    while (true);
  }
  // attempt to connect to WiFi network//
  while ( status != WL_CONNECTED) {
    Serial.print("Attempting to connect to WPA SSID: ");
    Serial.println(ssid);
    // Connect to WPA/WPA2 network//
    status = WiFi.begin(ssid, pass);
  }
  Serial.println("You're connected to the network");
When thermal viewer software connect to this server(WizFi360), then RP2040 read the thermal data "Get_sensor_data()" and post the data to the TCP Client(thermal viewer software).
Transmit the thermal header first,then send the thermal pixel data(80*62 16bits).
WiFiClient client;
if (client) {
      Serial.println("Connected");
      socket_status = client.connected();
      socket_status_cnt = 0;
      delay(1000);
      uint8_t i;
      while (socket_status&&!buttonState)
      {
          switch(socket_send_status)
          {
            case 0:
            {
              Get_sensor_data();
              socket_send_result = client.write((uint8_t*)header_buffer,160);
              socket_send_status = 1;
            }break;
            case 1:
            {
              if(socket_send_result == 160 ){
                  socket_sendnum = 9920; //80*62*2//
                  socket_send_status = 2;
                  i=0;
              }else if(socket_send_result == 0){
                  socket_send_status = 4;
              }
            }break;
            case 2:
            {
              if(socket_sendnum >=2048)
              {
                socket_send_result = client.write((uint8_t*)(draw_buffer+(i*1024)),2048);
              }
              else
              {
                socket_send_result = client.write((uint8_t*)(draw_buffer+(i*1024)),socket_sendnum);
              }
              socket_send_status = 3;
            }break;
            case 3:
            {
               if(socket_sendnum >= 2048)
               {
                  if(socket_send_result == 2048)
                  {
                    socket_sendnum -= 2048;
                    i++;
                    socket_send_status = 2;
                  }else if(socket_send_result == 0){
                    socket_send_status = 4;
                  }
               }
               else
               {
                  if(socket_send_result == socket_sendnum)
                  {
                    socket_sendnum = 0;
                    socket_send_status = 4;
                   }
               }
            }break;
            case 4:
            {
                socket_status_cnt ++;
                if(socket_status_cnt == 20)
                {
                  socket_status = client.connected();
                  if(socket_status == 0)
                  {
                    client.stop();
                  }
                  socket_status_cnt = 0;
                }
                socket_send_status = 0;
            }break;
          }
     }
    }
Thermal viewer software RCV the pixel data, it could display and show the max temperature of these pixel.
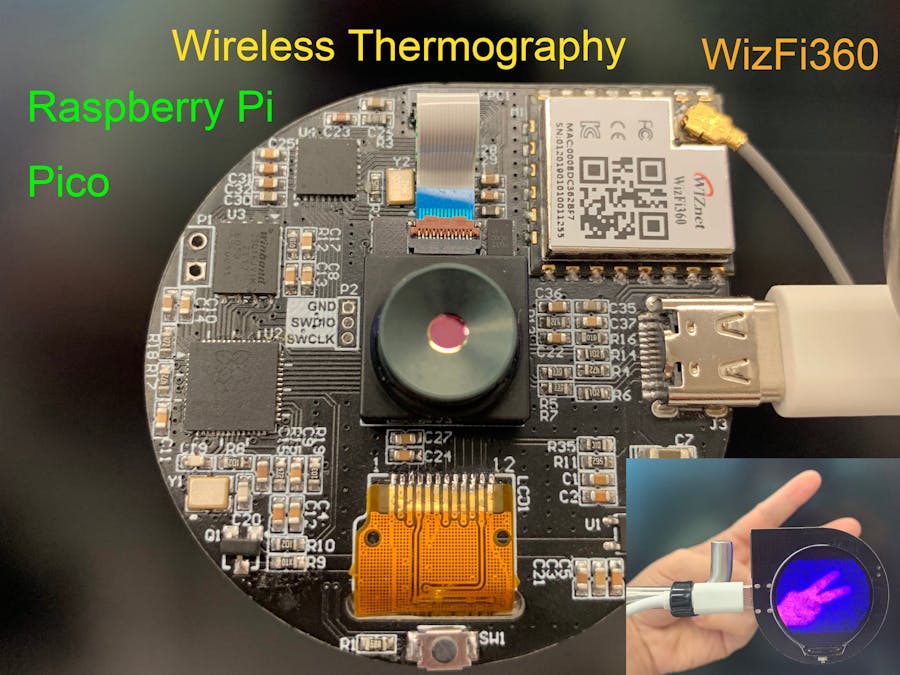
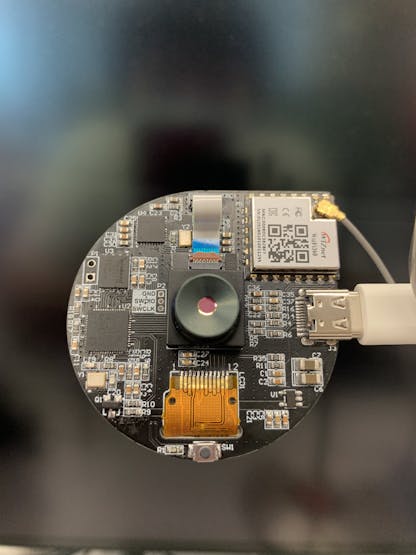
Hardware as shown below
Finish.
Note: Some details cannot be public due to a signed NDA.


