
Linux networking methods
The purpose and usage of W5500 keep-alive
The relationship between CDC, ECM, NCM, and RNDIS
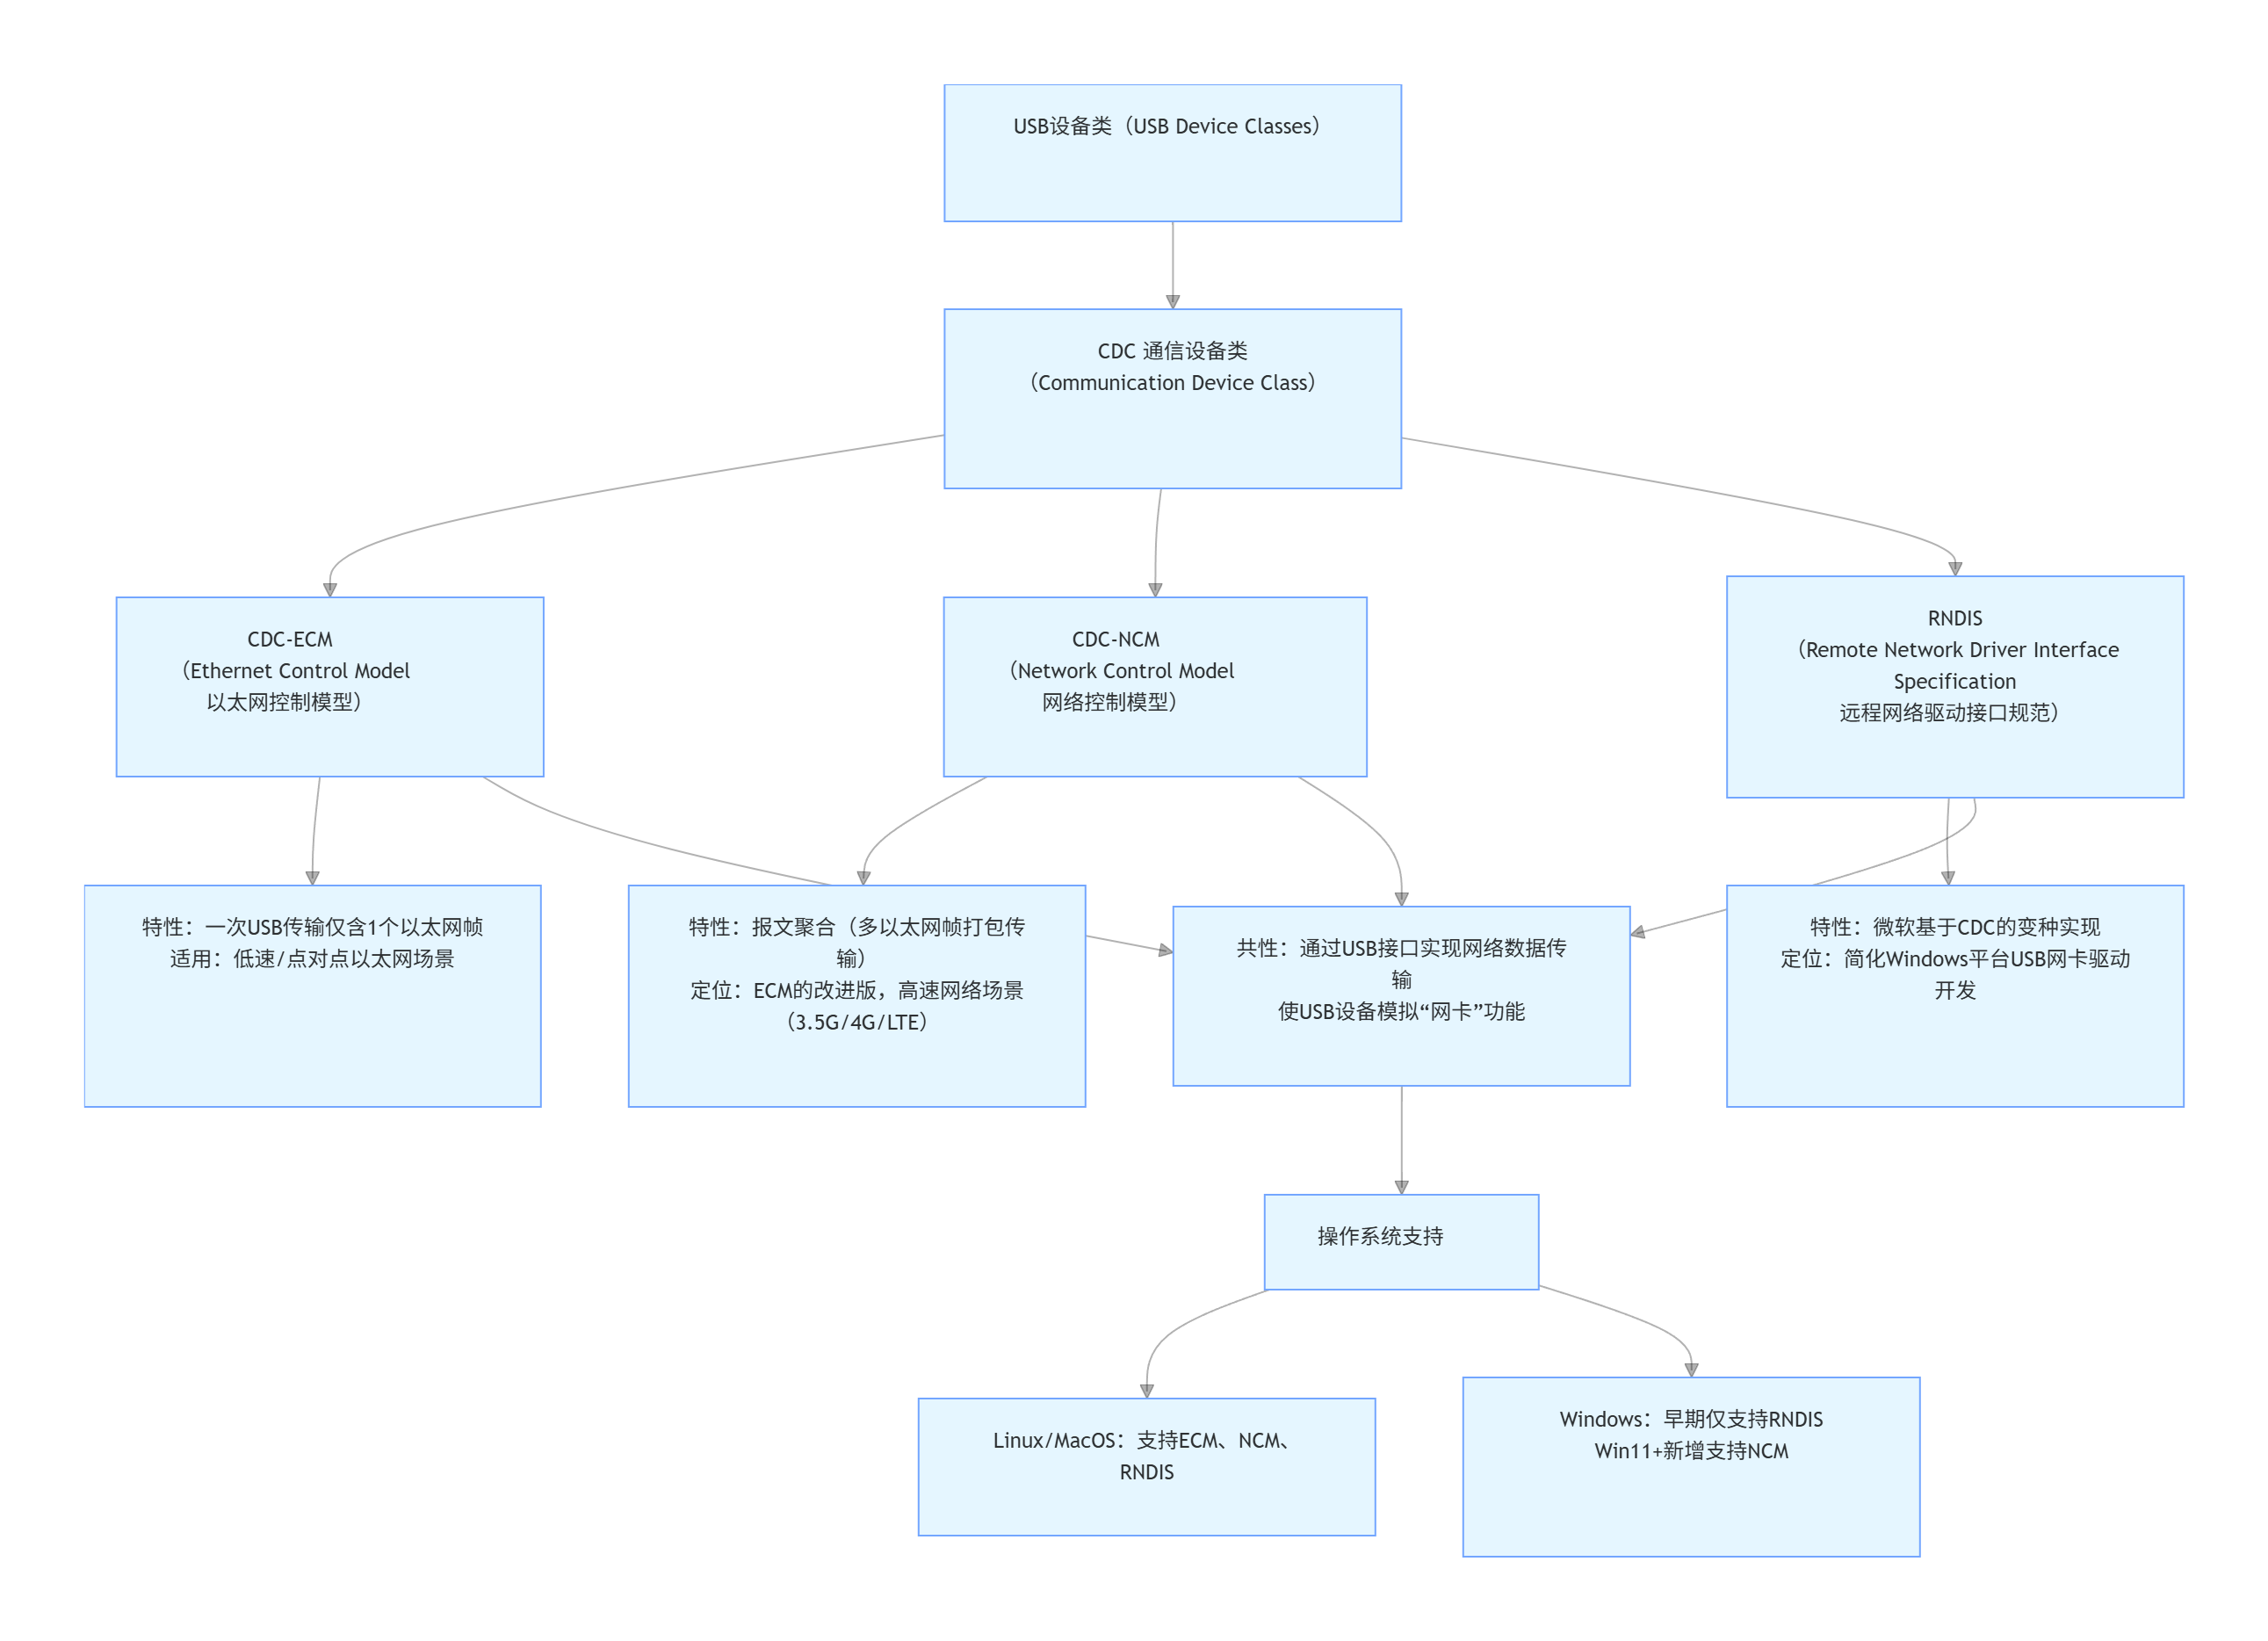
In summary, CDC is an abstract specification, ECM and NCM are concrete implementations, and RNDIS is a variant of CDC.
#DriveCompilation
##USB WIFI
MT7601U
-> Device Drivers
-> Network device support (NETDEVICES [=y])
-> Wireless LAN (WLAN [=y])
-> MediaTek devices (WLAN_VENDOR_MEDIATEK [=y])
-> MediaTek MT7601U (USB) support (MT7601U [=m])
RTL8188EU
-> Device Drivers
-> Network device support (NETDEVICES [=y])
> Wireless LAN (WLAN [=y])
-> Realtek devices (WLAN_VENDOR_REALTEK [=n])
-> Realtek 802.11n USB wireless chips support (RTL8XXXU [=n])
The SDIO WIFI
RTL8723BS is usually installed by default and does not require configuration.
##CDC
##OTG_RNDIS: Similar to ECM, RNDIS is also a way to share network connectivity between a device and a host via USB. However, RNDIS is more complex and is typically used on Windows systems: Network Adapter
-> Device Drivers
-> USB support (USB_SUPPORT [=y])
-> USB Gadget Support (USB_GADGET [=y])
-> USB Gadget functions configurable through configfs (USB_CONFIGFS [=m])
[*] RNDIS
##USB Ethernet Port (SR9900): The SR9900 USB to Ethernet chip uses the CDC (Communication Device Class) protocol and primarily implements network functions through ECM (Ethernet Control Model)
-> Device Drivers
-> Network device support (NETDEVICES [=y])
-> USB Network Adapters (USB_NET_DRIVERS [=m])
-> Multi-purpose USB Networking Framework (USB_USBNET [=m])
-> CDC EEM support (USB_NET_CDC_EEM [=m])
Wi-Fi module related
1. Remember to select the compilation method as a module, i.e., <m>, instead of compiling to the kernel <*>. Compiling to the kernel seems to fail to load, the reason for which is unknown.
2. After copying the kernel to the boot directory, you also need to install the driver module to the root directory: `sudo make ARCH=arm CROSS_COMPILE=arm-linux-gnueabi- INSTALL_MOD_PATH=/media/jeason/rootfs/ modules_install`
3. Since Wi-Fi modules generally do not have an EEPROM, meaning they don't have a place to store programs themselves, we need to obtain the Wi-Fi firmware from the official Wi-Fi website and then dynamically send it to the Wi-Fi module via the driver. The
default Linux firmware is stored in the `/lib/firmware/` directory. The driver will automatically read this file (e.g., `mt7601u.bin`) and send it to the Wi-Fi module. For a simpler approach, you can download the Raspberry Pi operating system
and copy it from the `/lib/firmware` directory on the Raspberry Pi. The Raspberry Pi operating system comes with firmware for many devices by default.
#Install the corresponding software on the root file system
## wireless tools
→ Target packages → Networking applications -> [*] wireless tools -> [*] Install shared library
## wpa_supplicant
→ Target packages → Networking applications -> [*] wpa_supplicant (Unsure whether the following options need to be enabled) ---> Enable nl80211 support | Enable AP mode | Enable Wi-Fi Display | Enable wired support | Enable WPS
## dhcp
→ Target packages → Networking applications -> [*] dhcpcd
## udev
→ System configuration -> /dev management (Dynamic using devtmpfs + eudev)
#Loading Network Drivers in System
# If udev (software that automatically detects connected devices) is installed in the root file system, the USB WIFI
will automatically recognize the device and load the corresponding USB WIFI driver. This step does not require manual intervention.
# SDIO WIFI
devices seem to lack automatic connection detection functionality? (To be tested). You can manually load the module using `insmod r8723bs.ko` or `modprobe r8723bs`.
If using `insmod`, dependencies won't be automatically loaded; ensure the drivers for these dependencies are also loaded. `modprobe` will automatically load dependencies, but ensure the driver .ko files are placed in `/lib/modules`:
`insmod libarc4.ko`
, `insmod cfg80211.ko`
, `insmod mac80211.ko`
, `insmod r8723bs.ko`.
#Network Connection Method
##Network Cable
#W5100/W5500
#USB Network Port (SR9900)
# The chip has a built-in network module; direct network connection
is possible. Simply install the eth driver, plug in the network cable, and it will be automatically recognized. Note that the device name of the network port is usually something like eth0.
##USB RNDIS
1. After connecting the USB device, use `ifconfig` to check if a new network device has appeared (usually starting with usb0, but it might not).
2. Go to nmtui -> Edit connection -> find the network adapter in wired connections -> change the IPv4 mode to Shared (share the network with other devices), and change the IP address to 192.168.137.1/24 (or another address you prefer; the 24 represents the subnet mask 255).
3. Enable the connection (if it's not enabled), go to nmtui -> Activate a connection -> select the adapter, and click Enable on the right
. 4. `echo 1 > /proc/sys/net/ipv4/ip_forward` to enable forwarding; otherwise, the network cannot be shared.
5. Remember, the PC firewall must be turned off; otherwise, the device can only ping the router (PC) but cannot access the external network. On Linux, disable the firewall: `sudo ufw disable`
##WIFI
### Using wpa_supplicant
1. Set the Wi-Fi password
# vi /etc/wpa_supplicant/wpa_supplicant.conf or vi /etc/wpa_supplicant.conf
Add:
network={
ssid="YourWiFiSSID"
psk="YourWiFiPassword"
}
2. Connect to Wi-Fi using the configuration: wpa_supplicant -B -i wlan0 -c /etc/wpa_supplicant.conf
#Set the IP address and connect to the network
to ensure the network device is successfully driven. Use `lsmod` or `dmesg` to check if there is a corresponding driver loading process. Then use `ip a` to check if there are any new network devices. If it's an RNDIS device, it will be something like `usb0`; if it's a Wi-Fi device, it will be something like `wlan0`.
##The following are the methods for obtaining a dynamic IP address:
1. Enable network devices (eth0, usb0, wlan0, etc.): ifconfig wlan0 up (or ip link set wlan0 up)
2. Enable DHCP to automatically obtain IP address and DNS: dhcpcd wlan0 (or dhclient wlan0)
## The following is the method for using a static IP:
1. `ifconfig network device desired static IP` `netmask 255.255.255.0 up`
For example: `ifconfig wlan0 172.20.10.3 netmask 255.255.255.0 up` (or `ip addr add 172.20.10.3/24 dev wlan0`)
Note: When using an iPhone to create a hotspot, for some reason, the static IP cannot be set too high. For example, 172.20.10.30 fails, but 172.20.10.4 works.
2. Use the command `route add default gw gateway`.
For example: `route add default gw 172.20.10.1` (or `ip route add default via 172.20.10.1`).
After setting the default gateway, you will see:
# route
Kernel IP routing table
Destination Gateway Genmask Flags Metric Ref Use Iface
default 172.20.10.1 0.0.0.0 UG 0 0 0 wlan0
172.20.10.0 * 255.255.255.0 U 0 0 0 wlan0
## Setting up DNS: At this point, pinging Baidu will fail because there is no DNS resolution yet. Set the DNS server:
`echo "nameserver 114.114.114.114" | sudo tee /etc/resolv.conf`
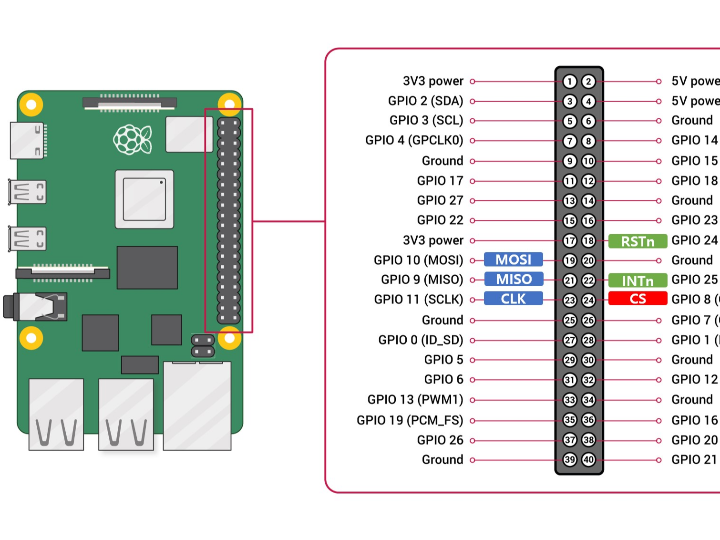
Added W5500 SPI Ethernet module
Reference: RPi-w5500/RPi4-w5500/Getting Start Ethernet Driver.md at main · Wiznet-OpenHardware/RPi-w5500
The latest Raspberry Pi system already has the W5500 driver and device tree, located at: /boot/firmware/overlays/w5500.dtbo. You can enable it manually.
The device tree source code is located at: ~/raspberry-linux/arch/arm/boot/dts/overlays/w5500-overlay.dts. You can see the hardware interface definitions there, and it shows that SPI0 is used by default.
The Linux mainline kernel also contains the source code for the W5500, which is located alongside the W5100 driver.

root@Raspberry ~/l/d/n/e/wiznet (master)# pwd
/root/linux/drivers/net/ethernet/ wiznet
root@Raspberry ~/l/d/n/e/wiznet (master)# ls
Kconfig Makefile w5100.c w5100.h w5100 - spi.c w5300.c
root@Raspberry ~/l/d/n/e/wiznet (master)# grep -r " 5500 " ./
. /w5100-spi.c: * Ethernet driver for the WIZnet W5100/W5200/ W5500 chip.
./w5100-spi.c : * http: // wizwiki.net/wiki/lib/exe/fetch.php?media=products:w5500:w5500_ds_v106e_141230.pdf
./w5100-spi.c: #define W5500_SPI_BLOCK_SELECT(addr) (((addr) >> 16) & 0x1f)
Hardware connection method:
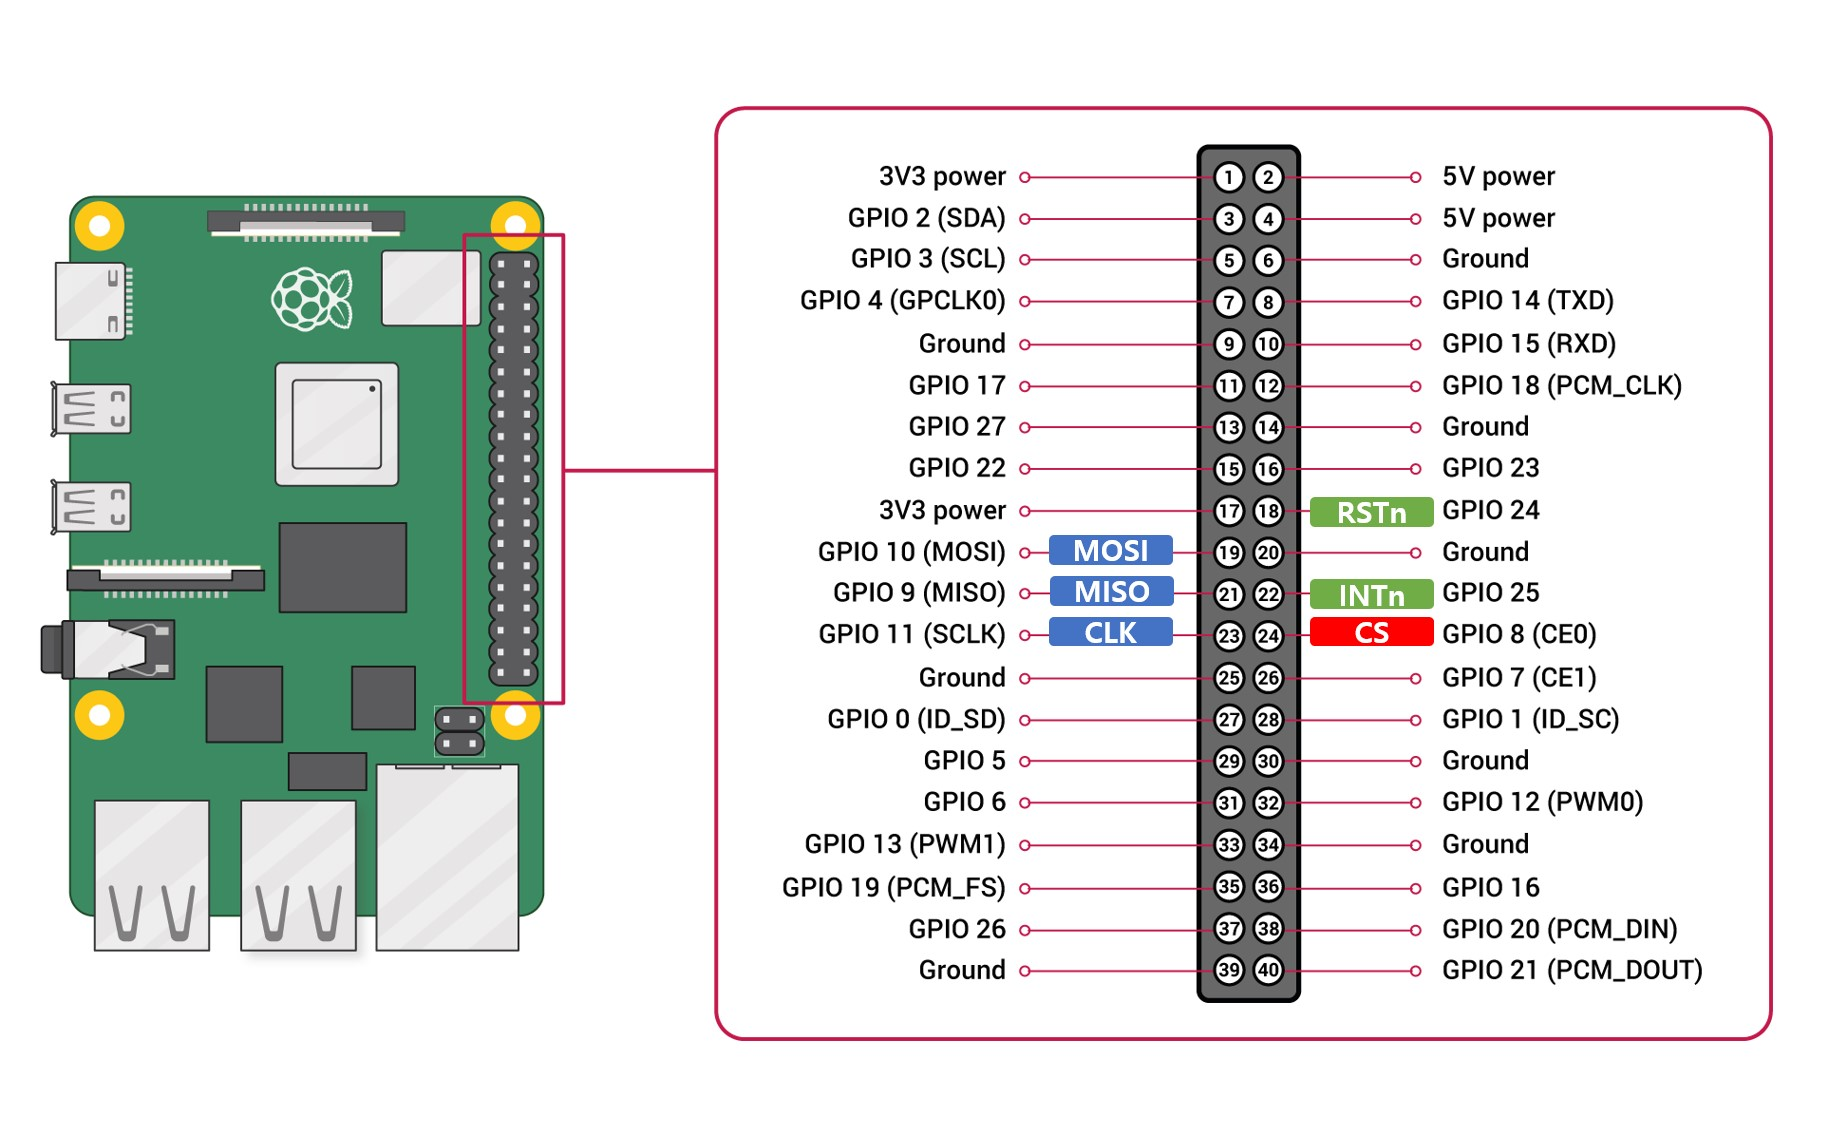
Enable device tree:
sudo nano /boot/firmware/config.txt
Add to:dtoverlay=w5500
Note: The name in the tutorial linked above is... dtoverlay=w5500-driver,但新版的树莓派自带的那个dtbo名字是 w5500
Alternatively, you can specify the interrupt pin, SPI frequency, and CS pin.
# I haven't actually tested the dynamically modifiable parameters inferred from the DTS file above by AI.
dtoverlay =w5500 cs=1 int_pin= 23 speed= 15000000   # Use GPIO24 as the interrupt, SPI frequency 15MHz
After restarting the system, ifconfig will detect the eth1 network interface (if it's a Raspberry Pi A+, which doesn't have a network port, it will probably be eth0).
pi@raspberrypi ~> sudo  ifconfig
eth0: flags = 4099 <UP,BROADCAST,MULTICAST> mtu 1500
        ether dc:a6: 32 : 95 :b6:9f txqueuelen 1000   (Ethernet)
        RX packets 0   bytes 0 ( 0.0 B)
        RX errors 0   dropped 0   overruns 0   frame 0
        TX packets 0   bytes 0 ( 0.0 B)
        TX errors 0   dropped 0 overruns 0   carrier 0   collisions 0

eth1: flags = 4163 <UP,BROADCAST,RUNNING,MULTICAST> mtu 1500
        ether ea: 37 :ab:b6:4f:e2 txqueuelen 1000   (Ethernet)
        RX packets 0   bytes 0 ( 0.0 B)
        RX errors 0   dropped 0   overruns 0   frame 0
        TX packets 1352   bytes 231768 ( 226.3 KiB)
        TX errors 0   dropped 0 overruns 0   carrier 0   collisions 0
You'll find that there's no IP address. It seems the Raspberry Pi only added DHCP to the built-in eth0. We need to manually add DHCP to the newly added eth1 so it can automatically obtain an IP address.
sudo nano /etc/dhcpcd.conf
Add
interface eth1
dhcp
After restarting, you will find that eth1 has an IP address, and you can then access the Internet normally.
However, the speed is not fast. Speed test results:
w5500
Download: 4.66 Mbit/ s
Upload: 11.34 Mbit/ s

network port
Download: 50.80 Mbit/ s
Upload: 11.23 Mbit/s