
Digital QR Scanner (QR Code Recorder & QR Code Classify & Chip Counter all in one )
Digital QR Scanner (QR Code Recorder & QR Code Classify & Chip Counter all in one )

Raspberry Pi - RP2040
x 1
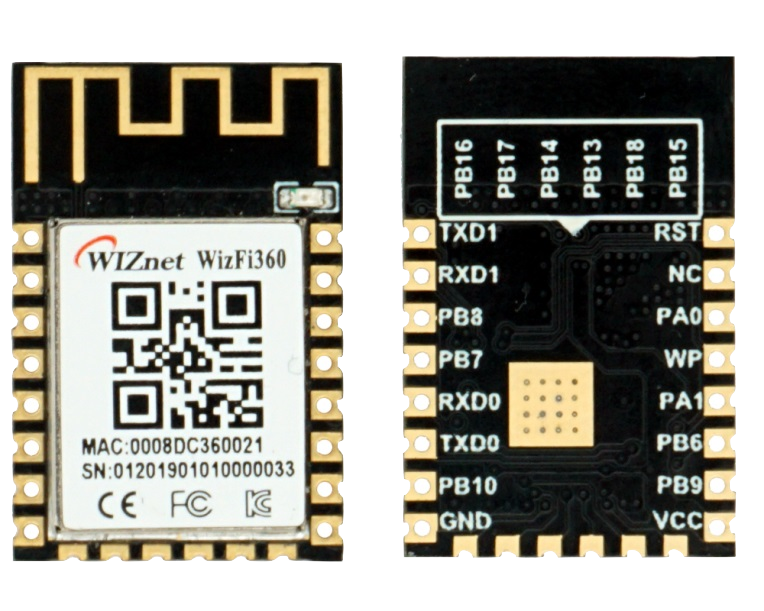
WIZnet - WizFi360
x 1

dfrobot - Gravity I2C OLED-2864 Display
x 1
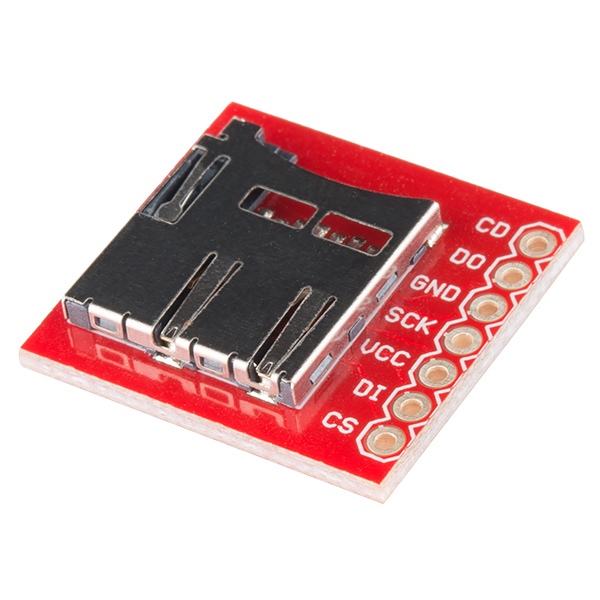
sparkfun - SparkFun microSD Transflash Breakout
x 1

Arduino - Arduino IDE
x 1
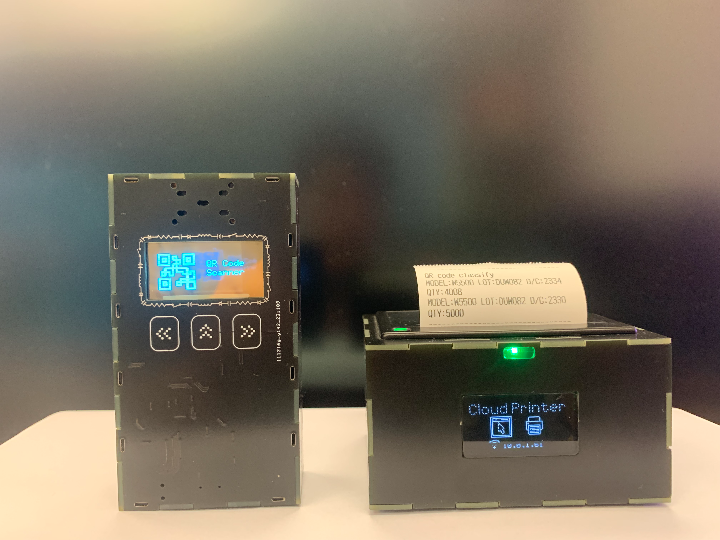
I developed a handheld device that can scan barcodes and QR codes. I call it “Digital QR Scanner”. After it scans the barcode, it can be stored directly in TF, or all the barcodes scanned this time can be classified according to the "Model/Lot/DateCode/Quantity" of the goods. The sorted results can be printed out by connecting to Cloud Printer through the WiFi module. And chip counting is possible.
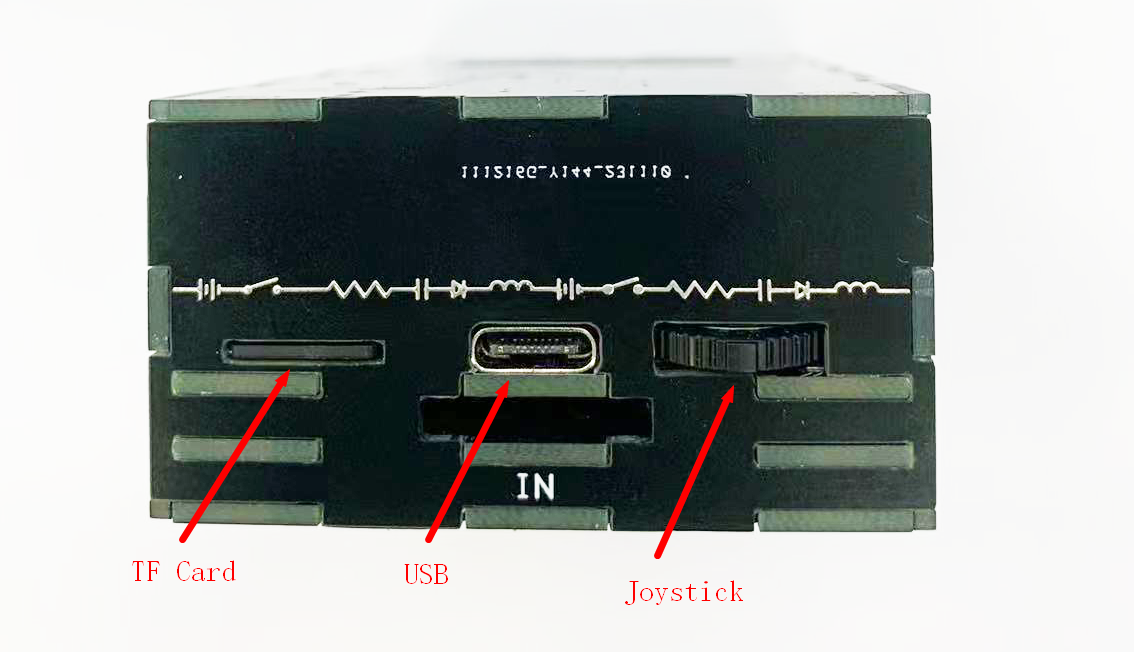
I used the Raspberry Pi's RP2040 as the MCU and the WiFi module WizFi360 to connect to the network printer; as a handheld device, I designed a key switch circuit with a built-in rechargeable lithium battery; a TF card is used to store the scanned barcode The result; a transparent OLED screen (SSD1309) for status display; a QR code scanning module that could Uart output , 3 touch buttons and a Joystick...
New devices and new application circuits are used more often, and hardware debugging takes a long time.
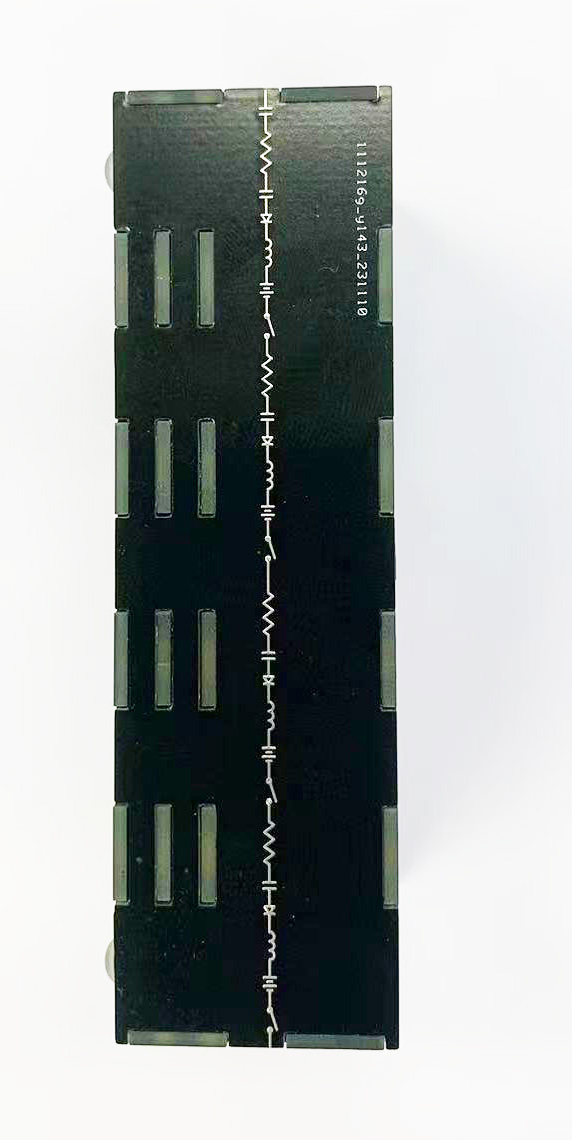
I used PCB as the material to design this device. The 4-layer PCB sandwich structure contains all the modules and devices, which not only enhances the structural strength, but also acts as a tunnel for chip counting.
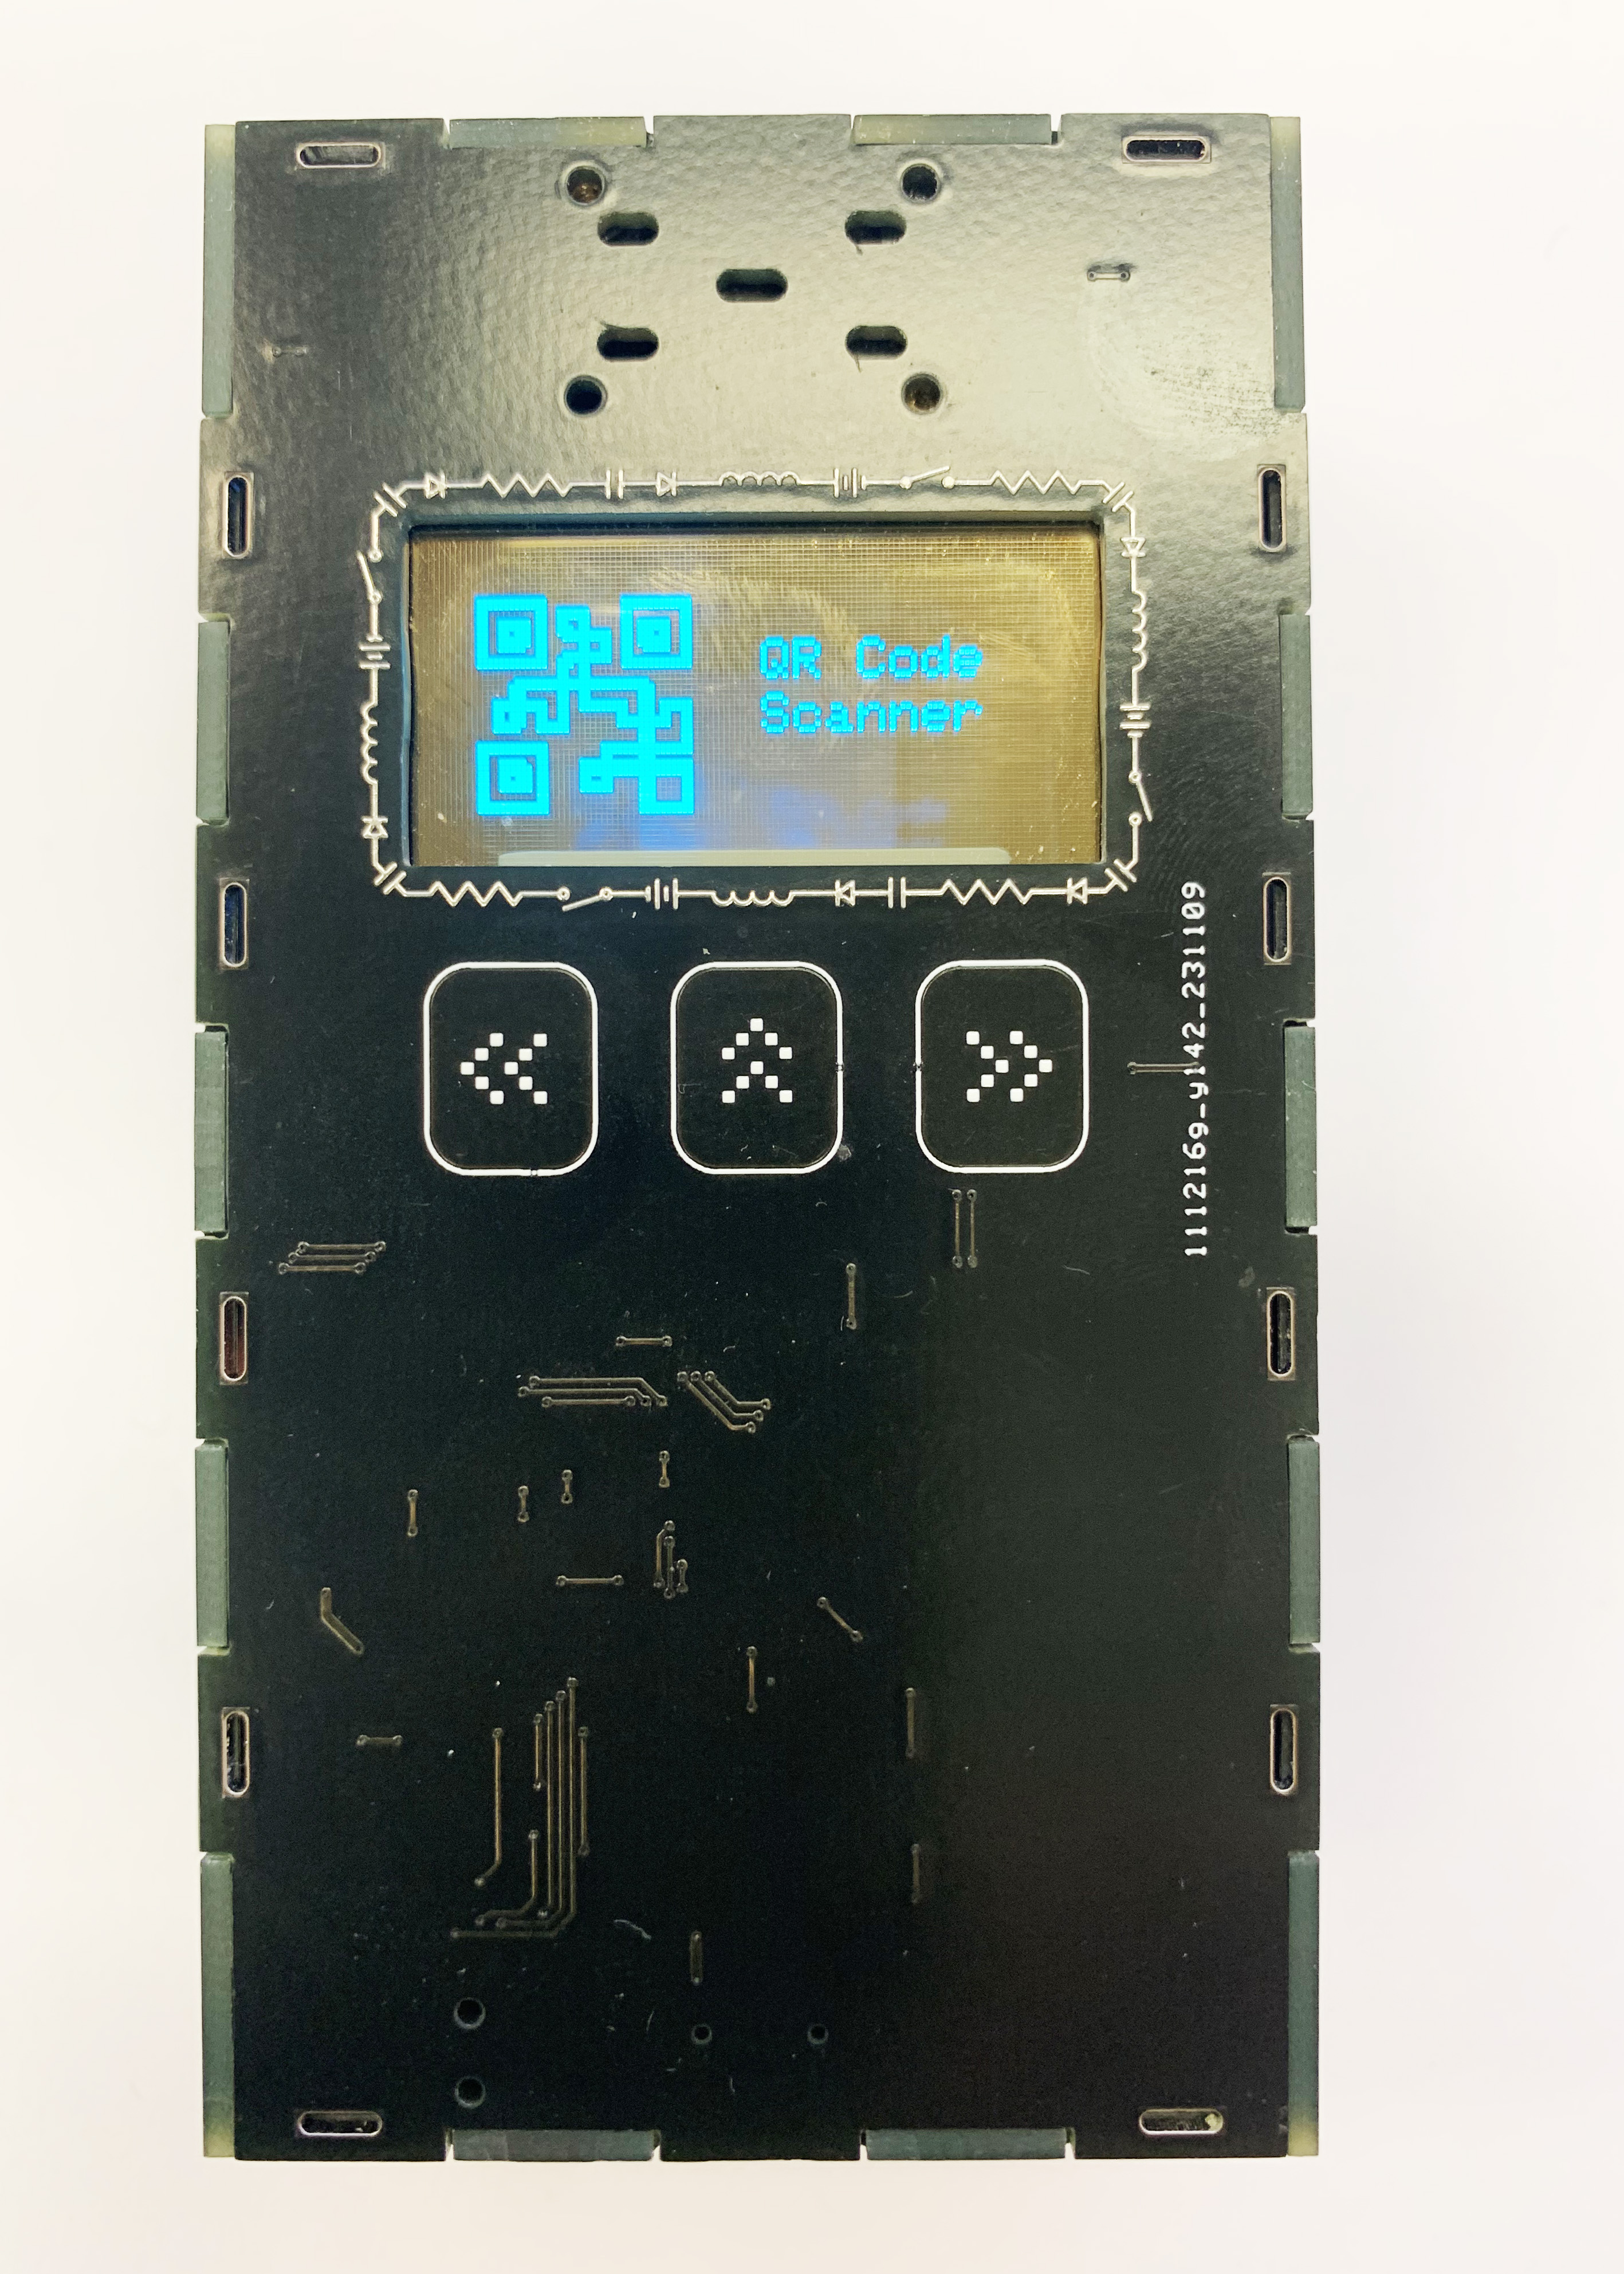
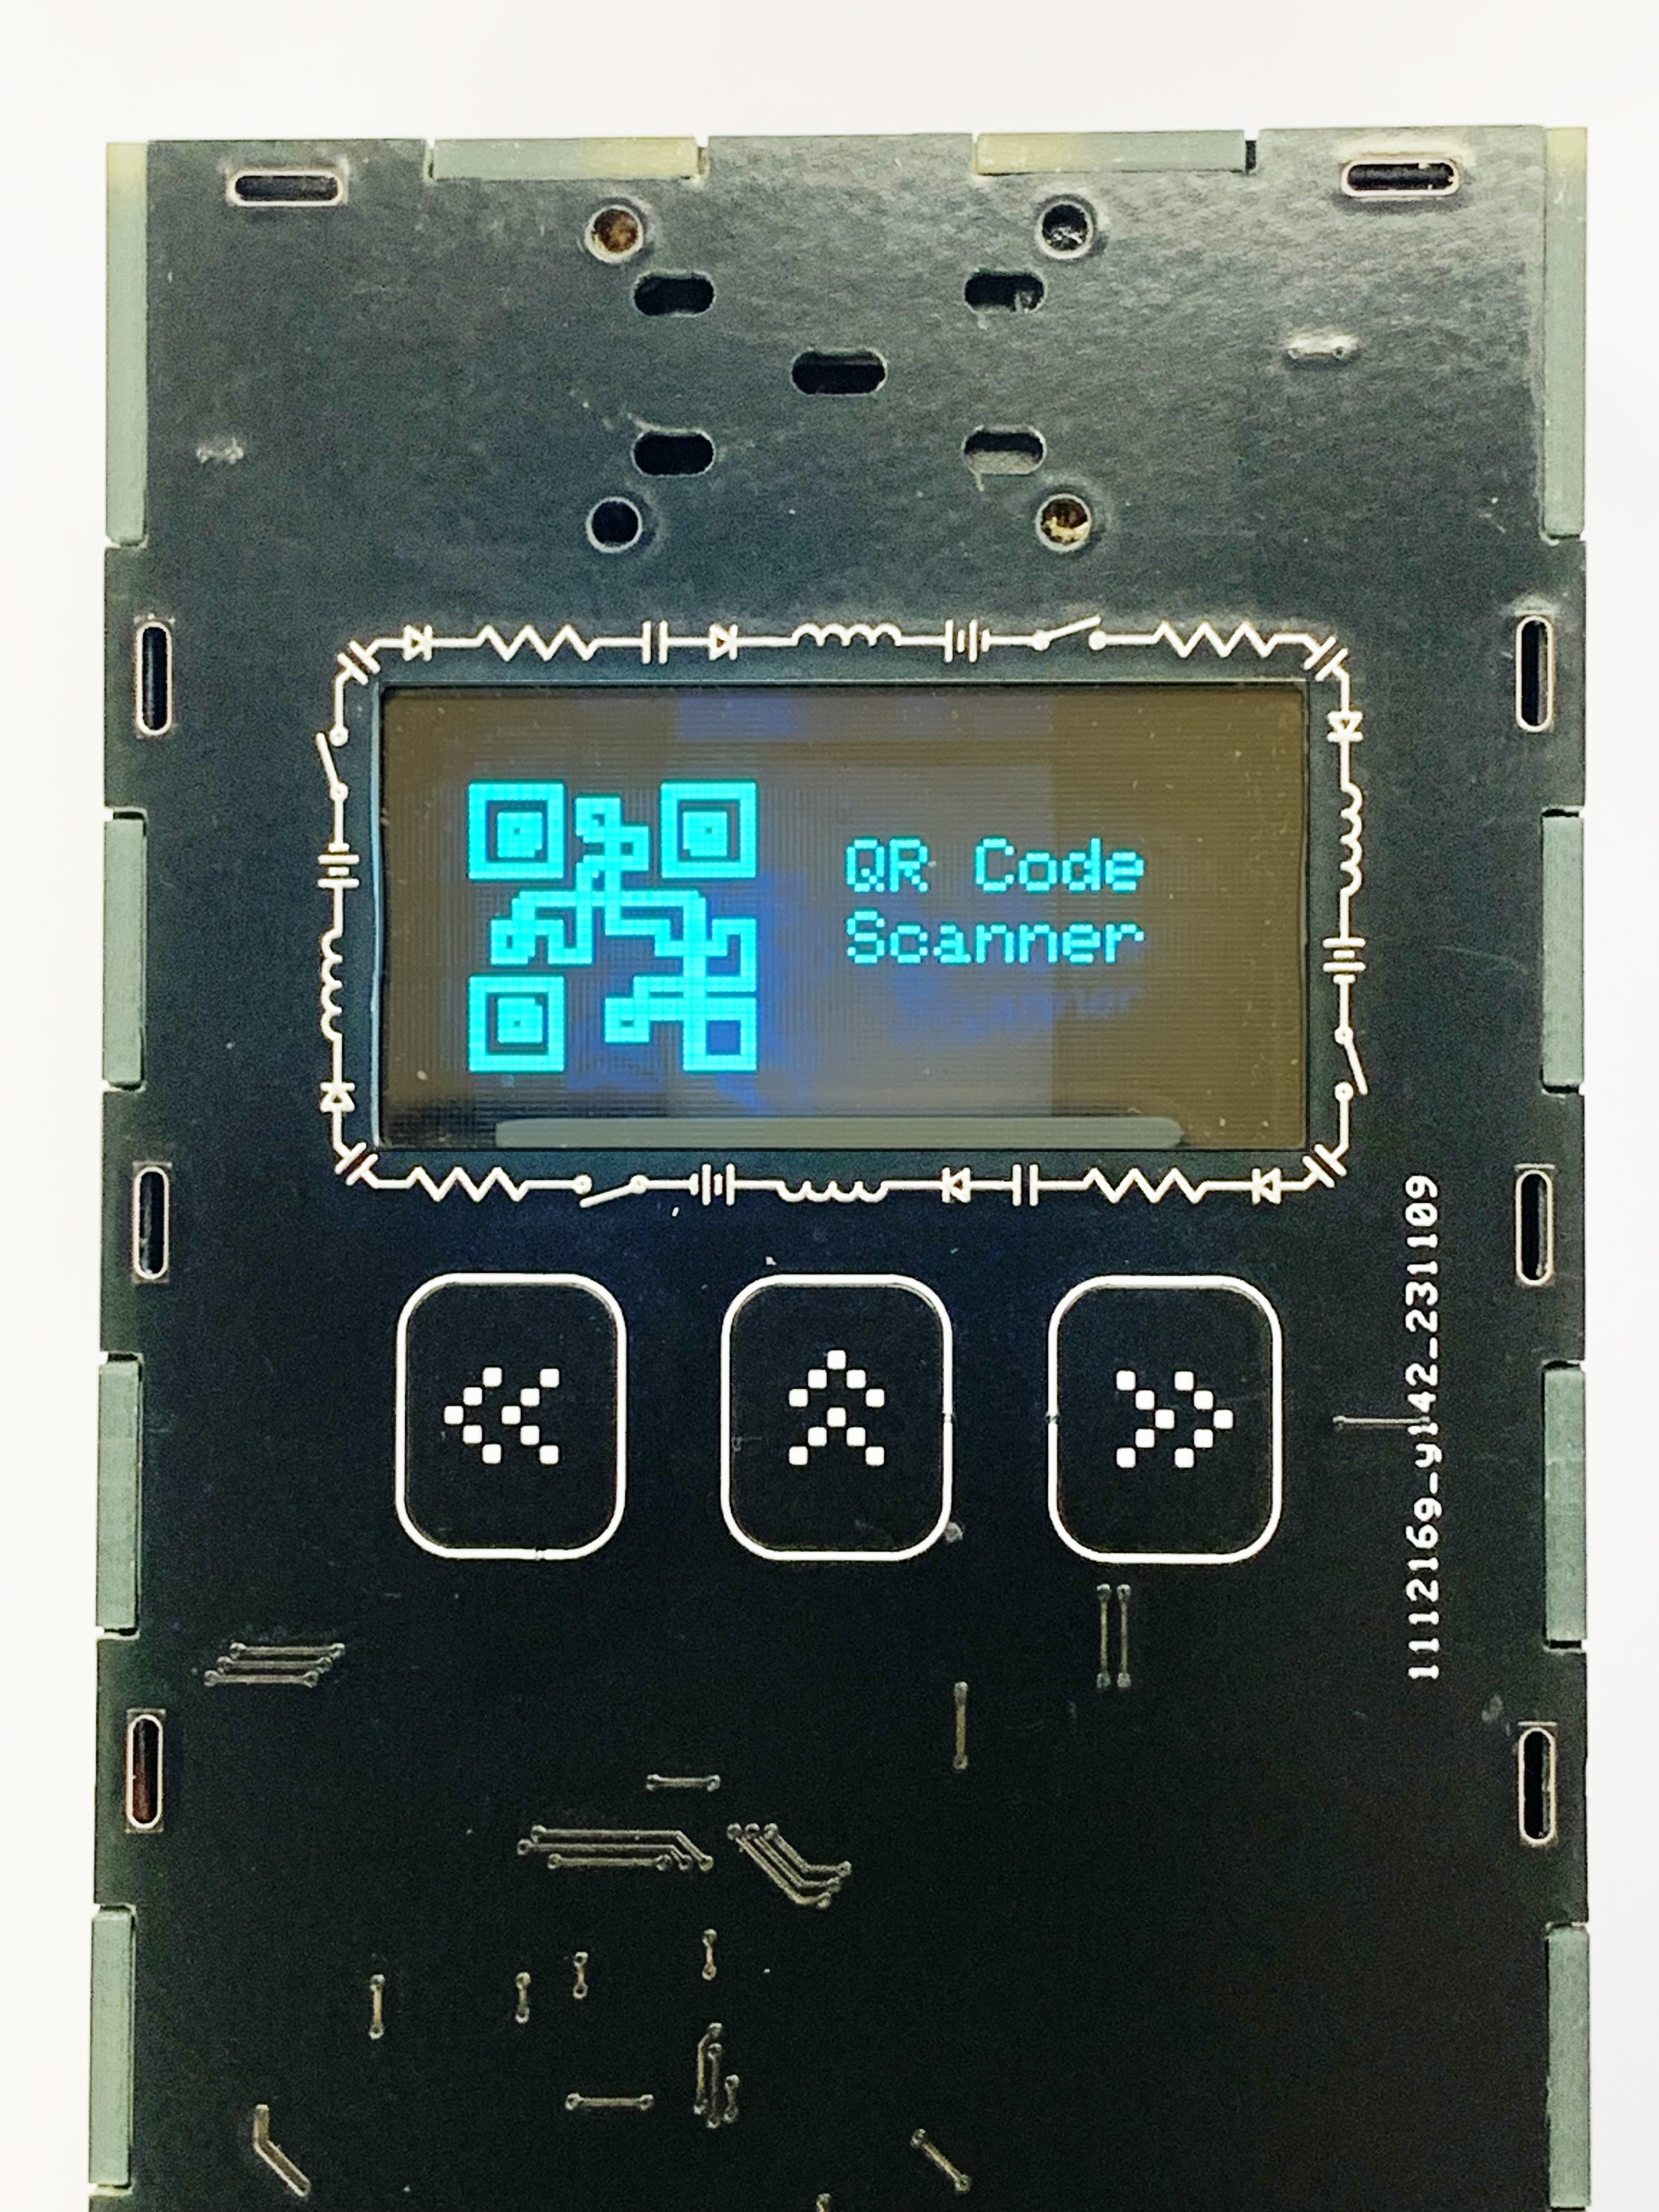
Based on this transparent OLED screen, I used a new animated menu this time, and each function has a corresponding animation effect. As follows:
In Loop() of arduino, I designed a state machine to switch tasks and functions, as shown below:
typedef enum
{
  DO_Menu = 0,
  DO_QR_Scan,
  DO_QR_Classify,
  DO_Chip_Counter,
  DO_Setting,
  DO_QR_Classify_Print
}STATE_;
STATE_ CurrentState;
To display the main menu in “DO_Menu”, click the left button of the touch button and Touch_Key_Num will increase. Click the right button of the touch button and Touch_Key_Num will decrease. Then the corresponding menu and icon will be displayed according to the value of Touch_Key_Num.
  case DO_Menu:
     {
        display.clearDisplay();
        if(Touch_Key_Num%4 == 0)
        {
          display.drawBitmap(8, 8, frames_QR[frame], FRAME_WIDTH, FRAME_HEIGHT, 1);
          display.setTextColor(SSD1306_WHITE);
          display.setTextSize(1);
          display.setCursor(65, 20);
          display.print("QR Code");
          display.setCursor(65, 30);
          display.print("Scanner");
          display.display();
          frame = (frame + 1) % FRAME_COUNT_QR;
          delay(FRAME_DELAY);
          Touch_handling();
          delay(FRAME_DELAY);
          if(Touch_Key_Enter)
          {
            CurrentState = DO_QR_Scan;
            display.clearDisplay();
            display.setTextColor(SSD1306_WHITE);
            display.setTextSize(1);
            display.setCursor(18, 1);
            display.print("QR Code Scanner");
            display.drawBitmap(4, 8, frames_tick[0], FRAME_WIDTH, FRAME_HEIGHT, 1);
            display.fillRect(0, 55, 128, 8, SSD1306_WHITE);
            Touch_Key_Enter = false;
          }
        }
        else if(Touch_Key_Num%4 == 1)
        {
          display.drawBitmap(8, 8, frames_Classify[frame], FRAME_WIDTH, FRAME_HEIGHT, 1);
          display.setTextColor(SSD1306_WHITE);
          display.setTextSize(1);
          display.setCursor(65, 20);
          display.print("QR Code");
          display.setCursor(65, 30);
          display.print("Classify");
          display.display();
          frame = (frame + 1) % FRAME_COUNT_Classify;
          delay(FRAME_DELAY);
          Touch_handling();
          delay(FRAME_DELAY);
          if(Touch_Key_Enter)
          {
            CurrentState = DO_QR_Classify;
            display.clearDisplay();
            display.setTextColor(SSD1306_WHITE);
            display.setTextSize(1);
            display.setCursor(16, 1);
            display.print("QR Code Classify");
            display.drawBitmap(4, 8, frames_tick[0], FRAME_WIDTH, FRAME_HEIGHT, 1);
            display.drawRect(56, 12, 68, 11, SSD1306_WHITE);
            display.drawRect(56, 22, 68, 11, SSD1306_WHITE);
            display.drawRect(56, 32, 68, 11, SSD1306_WHITE);
            display.drawRect(56, 42, 68, 11, SSD1306_WHITE);
            display.setTextColor(SSD1306_WHITE);
            display.setCursor(58, 14);
            display.print("MODEL");
            display.setCursor(58, 24);
            display.print("Lot");
            display.setCursor(58, 34);
            display.print("D/C");
            display.setCursor(58, 44);
            display.print("Qty");
            display.drawRoundRect(92, 14, 22,7,7,SSD1306_WHITE);
            display.drawRoundRect(92, 24, 22,7,7,SSD1306_WHITE);
            display.drawRoundRect(92, 34, 22,7,7,SSD1306_WHITE);
            display.drawRoundRect(92, 44, 22,7,7,SSD1306_WHITE);
            display.fillRect(0, 55, 128, 8, SSD1306_WHITE);
            Touch_Key_Enter = false;
          }
        }
        else if(Touch_Key_Num%4 == 2)
        {
          display.clearDisplay();
          display.drawBitmap(8, 8, frames_Counter[frame], FRAME_WIDTH, FRAME_HEIGHT, 1);
          display.setTextColor(SSD1306_WHITE);
          display.setTextSize(1);
          display.setCursor(65, 20);
          display.print("Chip");
          display.setCursor(65, 30);
          display.print("Counter");
          display.display();
          frame = (frame + 1) % FRAME_COUNT_Counter;
          delay(FRAME_DELAY);
          if(Touch_Key_Enter)
          {
            CurrentState = DO_Chip_Counter;
            display.clearDisplay();
            display.setTextColor(SSD1306_WHITE);
            display.setTextSize(1);
            display.setCursor(32, 1);
            display.print("Chip Counter");
            display.drawBitmap(8, 8, frames_CountX[0], FRAME_WIDTH, FRAME_HEIGHT, 1);
            display.display();
            Touch_Key_Enter = false;
          }
        }
        else if(Touch_Key_Num%4 == 3)
        {
          display.clearDisplay();
          display.drawBitmap(8, 8, frames_setting[frame], FRAME_WIDTH, FRAME_HEIGHT, 1);
          display.setTextColor(SSD1306_WHITE);
          display.setTextSize(1);
          display.setCursor(65, 25);
          display.print("Setting");
          display.display();
          frame = (frame + 1) % FRAME_COUNT_setting;
          delay(FRAME_DELAY);
          if(Touch_Key_Enter)
          {
            CurrentState = DO_Setting;
            Touch_Key_Enter = false;
          }
        }
     }
    break;
I will introduce the development process of "Digital QR Scanner" based on the 3 main functions.
The three main functions are:
1. QR code Scan and record;
2. QR code classification and printing;
3. Chip counting;
1,QR code Scan and record;
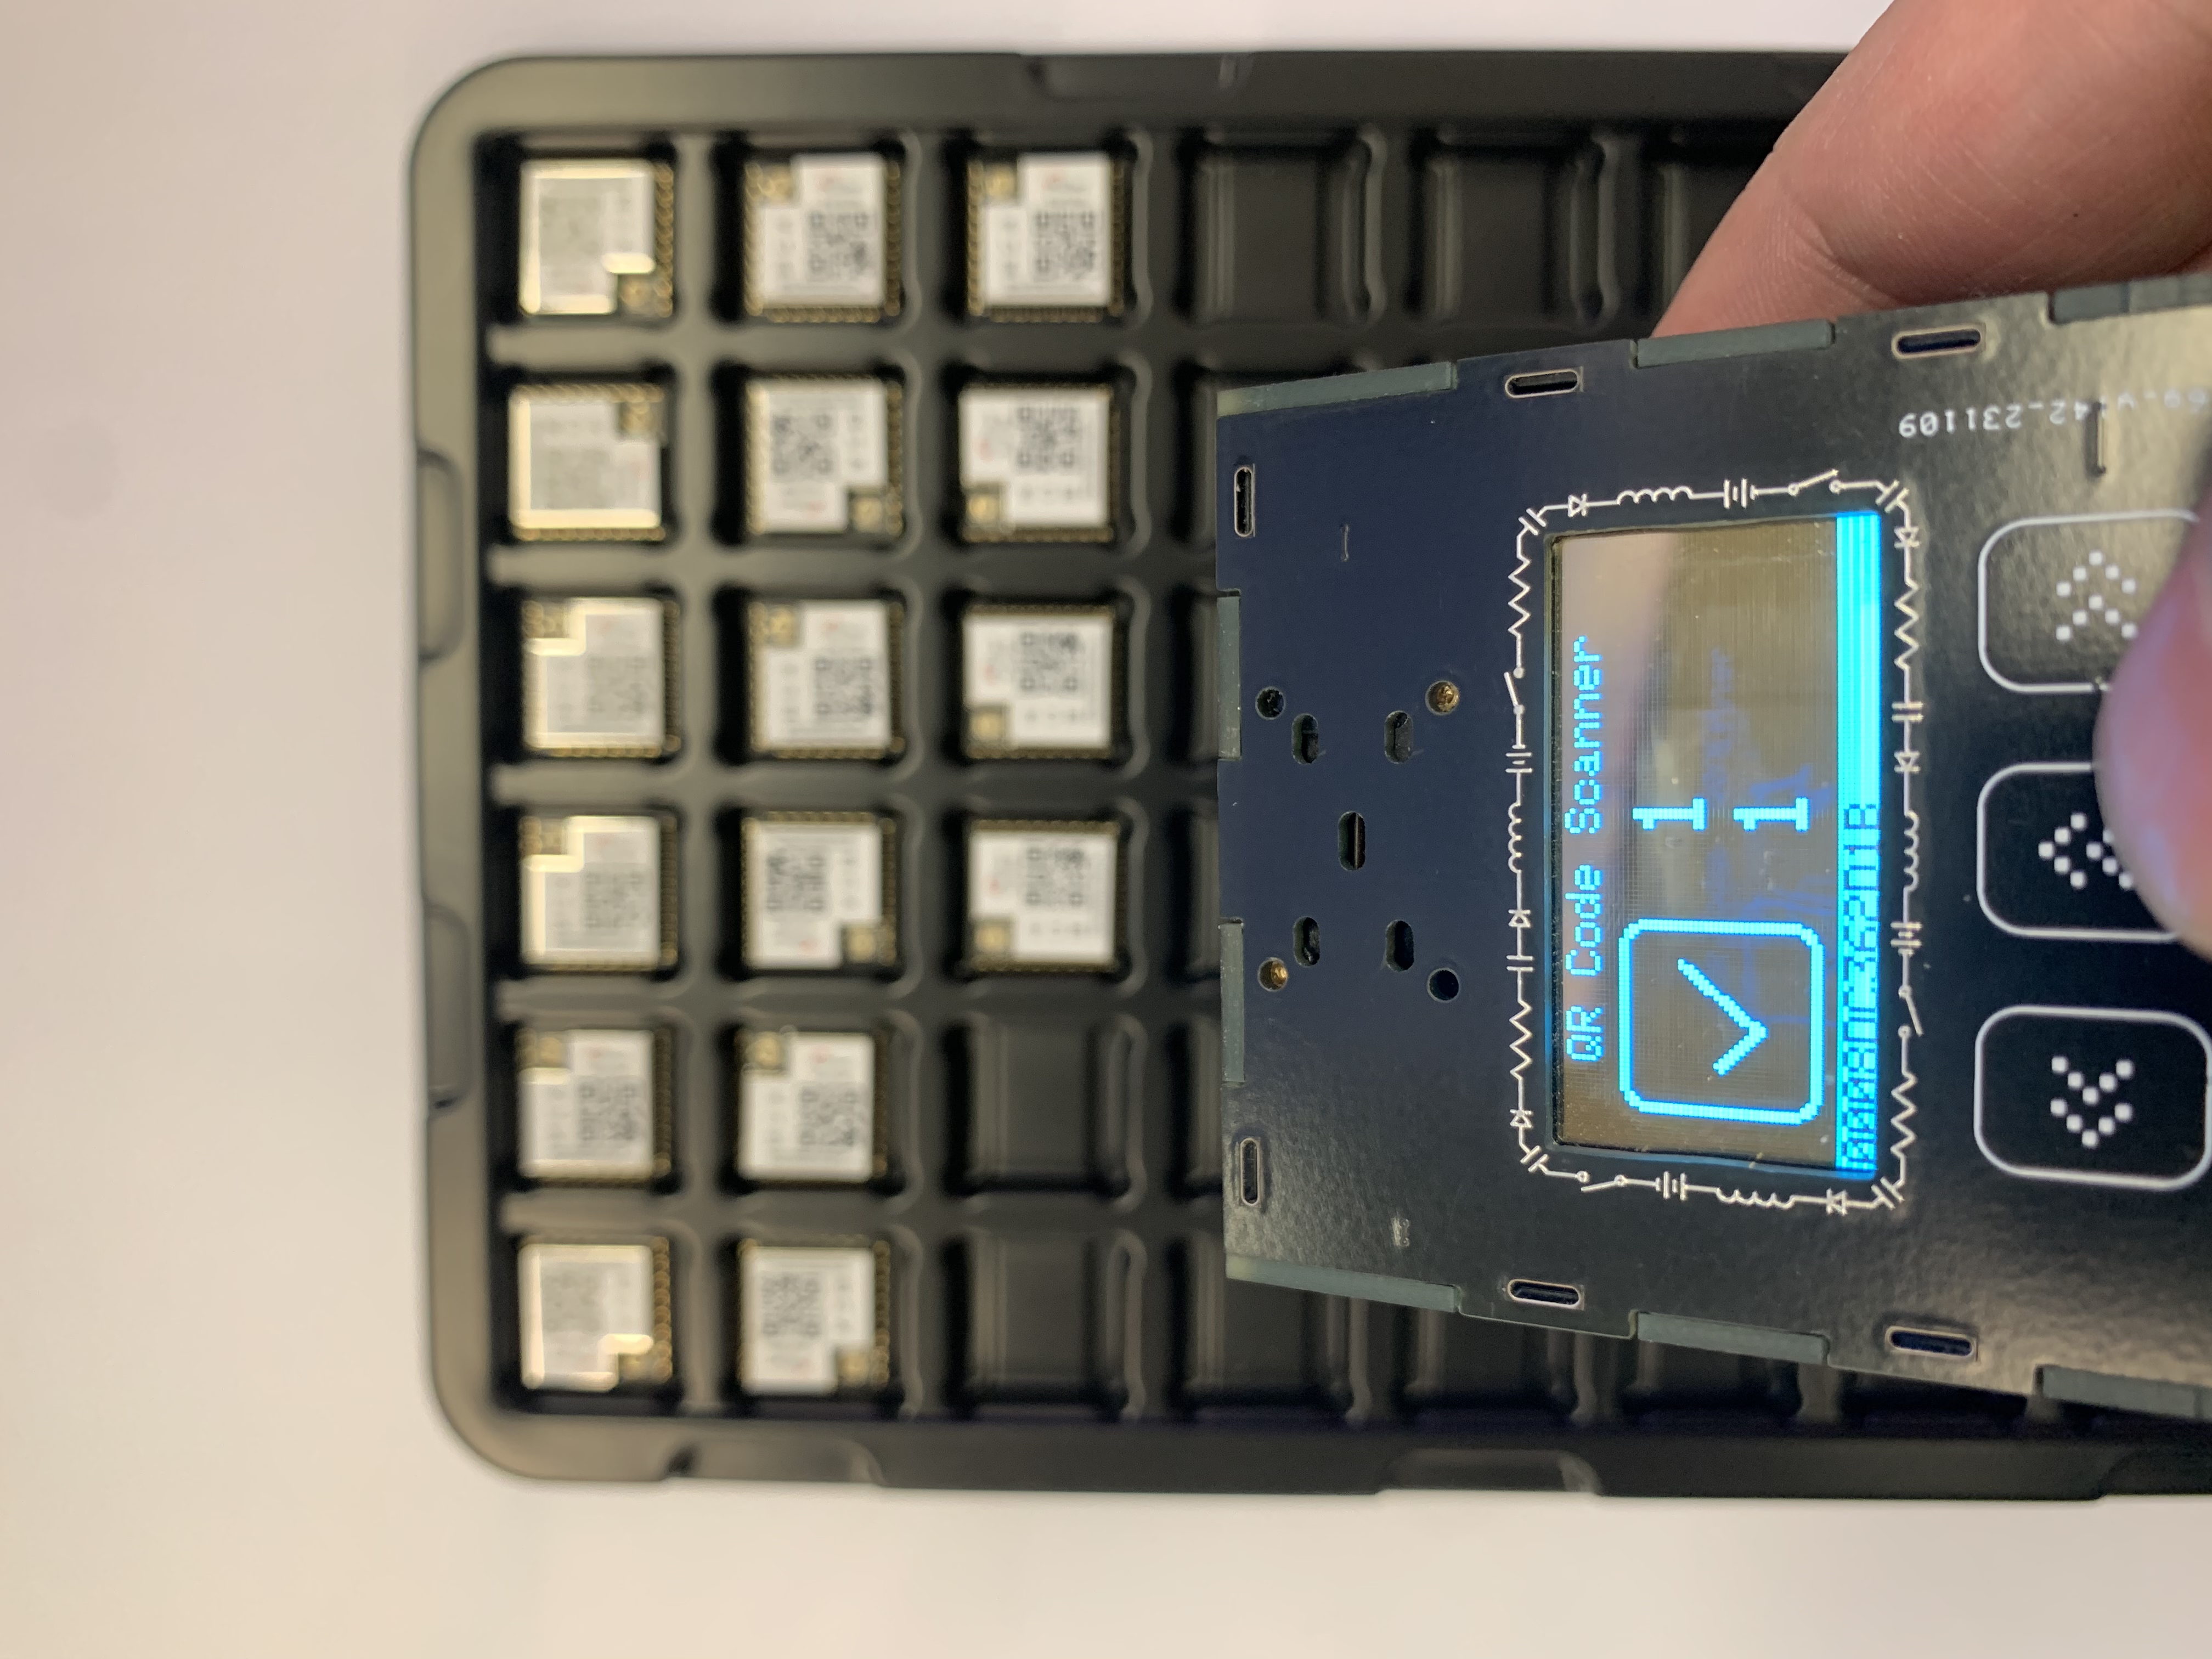
Select "QR Code Scanner" on the MENU and click the middle button of the touch button to enter "QR Code Scanner mode".
In the QR Code Scanner mode, click the middle button to scan the QR Code. If successful, the square box on the left will be checked, then the number on the right will be incremented by one, and the result of this scan will be displayed at the bottom of the screen.
The two numbers on the right side of the screen display the scan count, the upper one is the current count, and the lower one is the total count. You can clear the current count by right-clicking, and long-press to clear the total count.
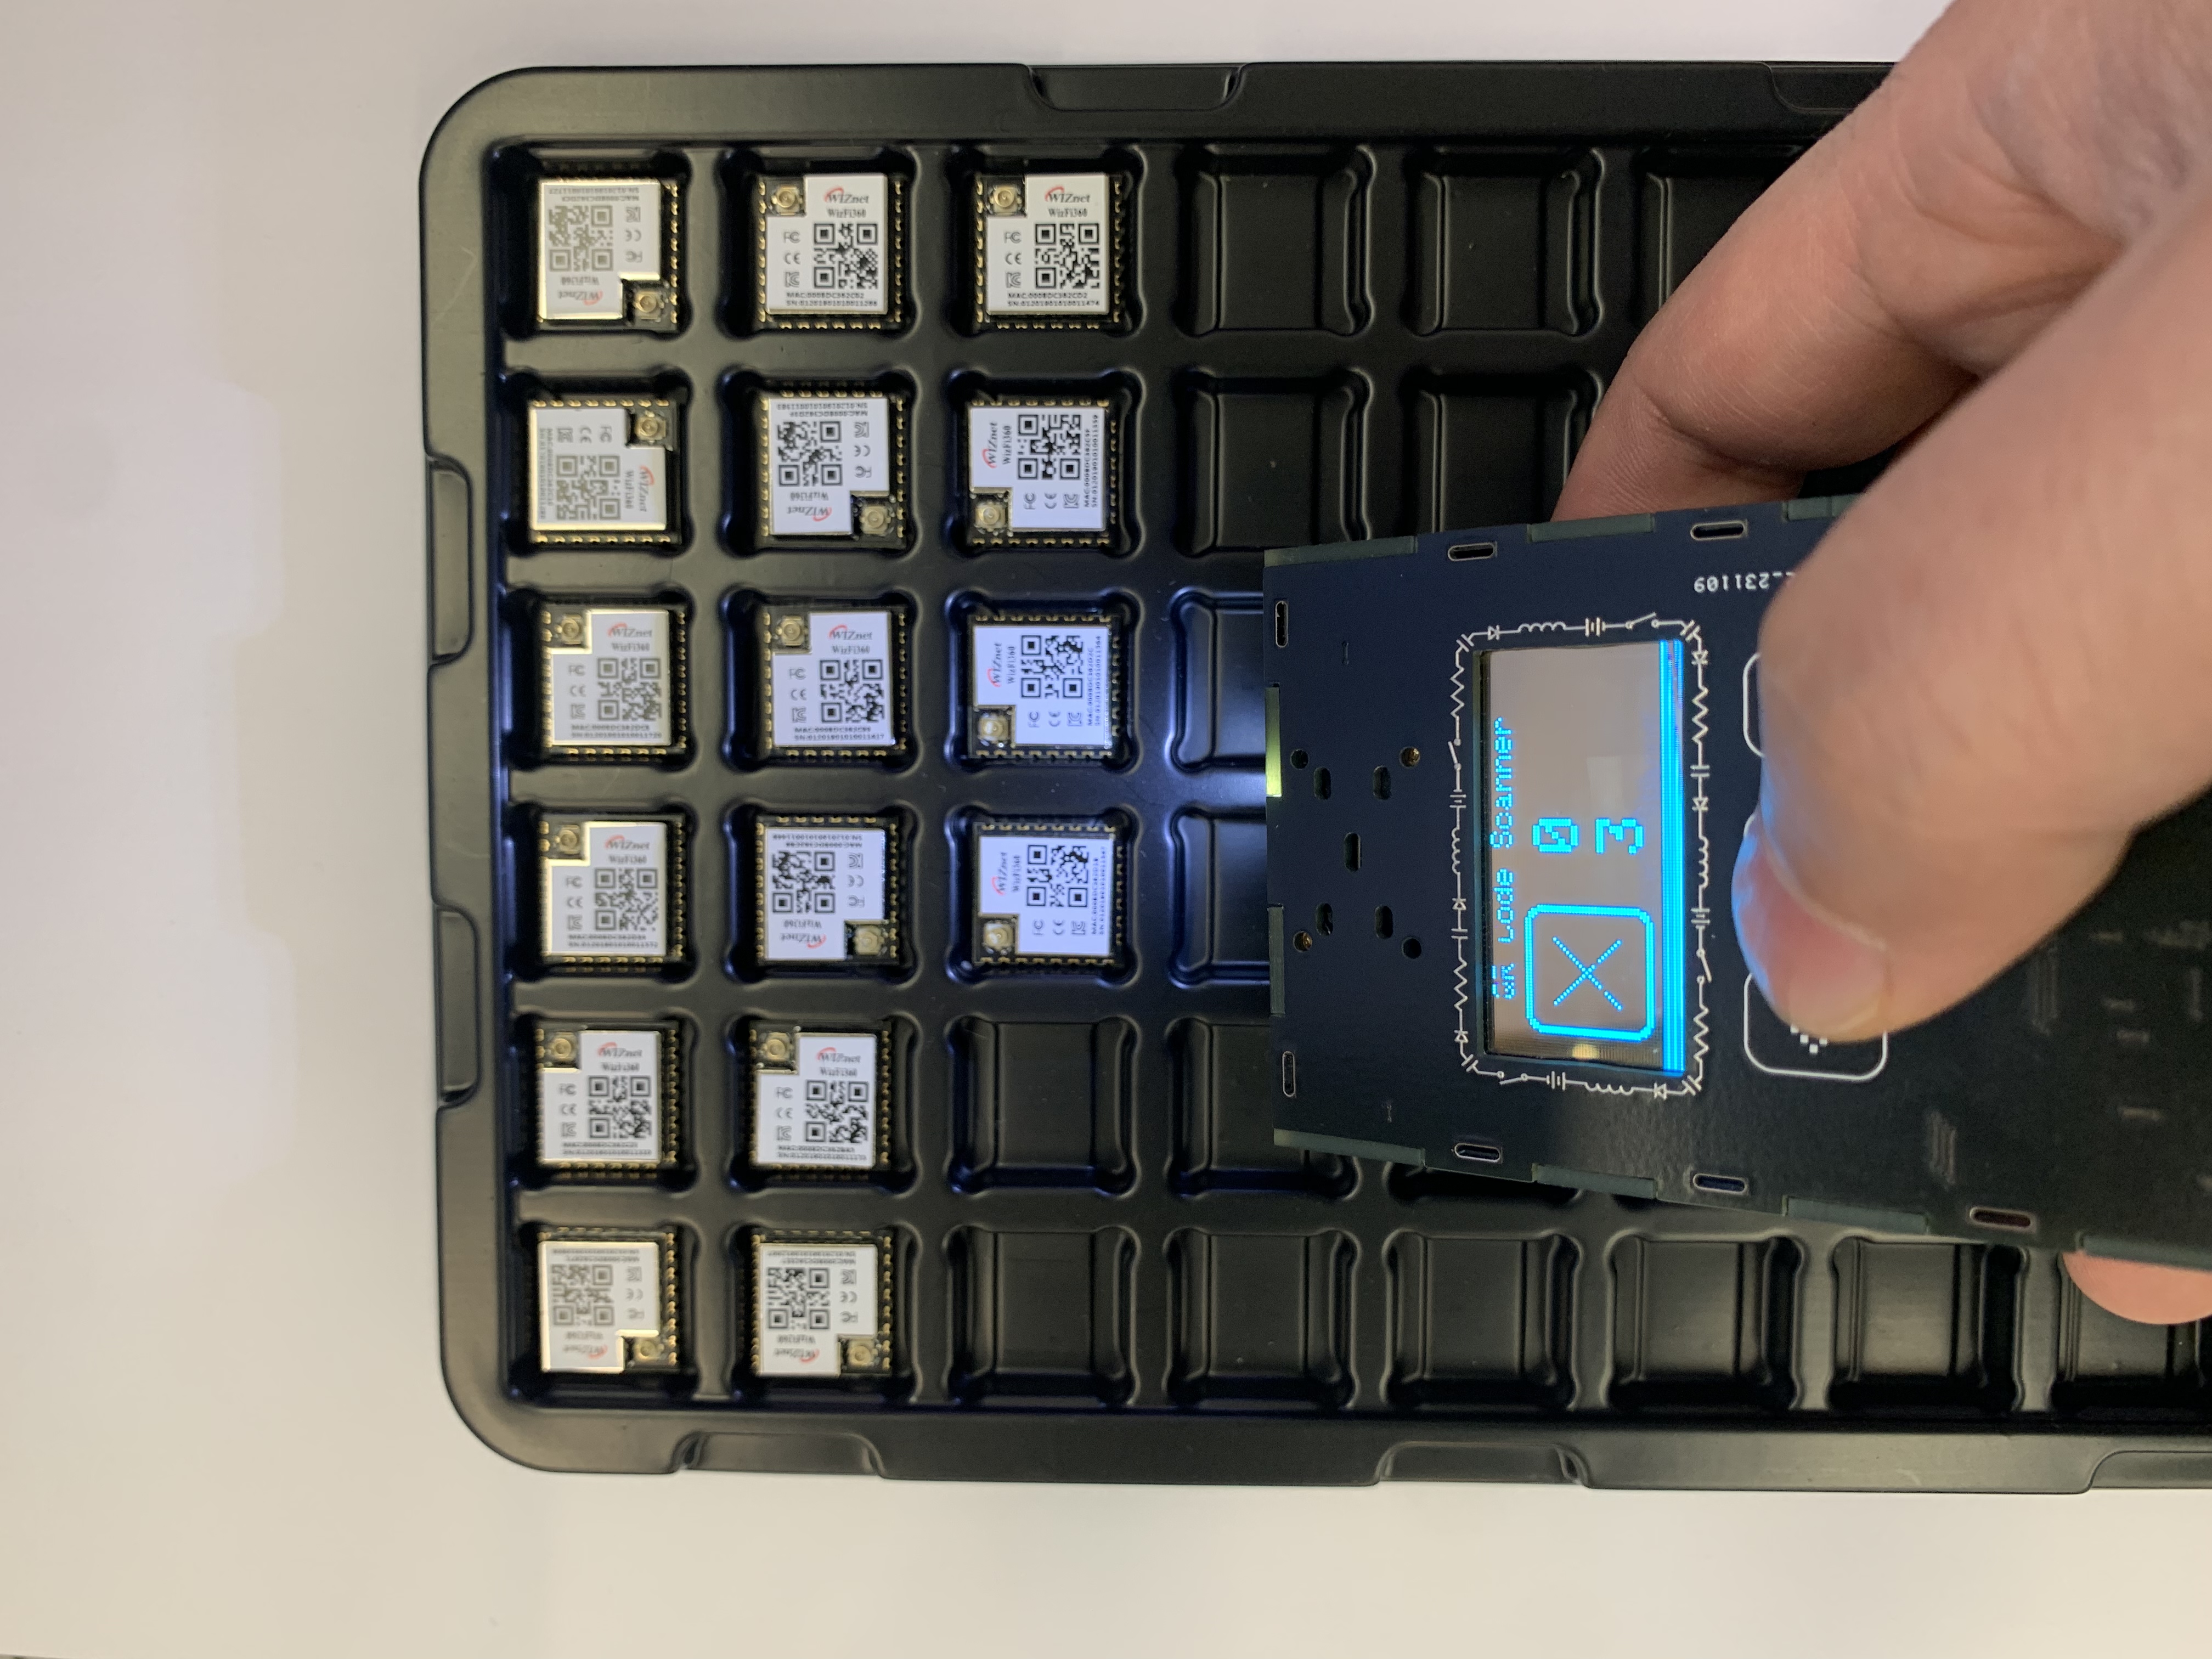
If the scan fails, an error message will appear in the box on the left side of the screen and you will need to rescan. As follows:
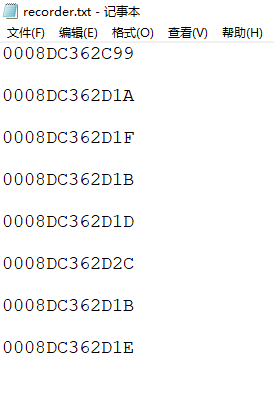
After successfully identifying the QR code, it will be stored in the file "recorder.txt" which stored in TF card, as shown in the figure below;

The QR code storage format is as follows:
The code for QR Code Scanner mode is as follows:
  case DO_QR_Scan:
    {
      if(Touch_Key_Enter == true)
      {
        display.drawBitmap(4, 8, frames_tick[1], FRAME_WIDTH, FRAME_HEIGHT, 0);
        display.drawBitmap(4, 8, frames_tick[0], FRAME_WIDTH, FRAME_HEIGHT, 1);
        display.fillRect(0, 55, 128, 8, SSD1306_WHITE);
        digitalWrite(PIN_QR_TRIG, LOW);
        Scan_En = true;
        Touch_Key_Enter = false;
      }
      if(Scan_En)
      {
        if( millis()- Time_Touch_Key > 6000)
        {
          digitalWrite(PIN_QR_TRIG, HIGH);
          display.writeLine(17, 21, 37, 41,SSD1306_WHITE);
          display.writeLine(17, 41, 37, 21,SSD1306_WHITE);
        }
        if( millis()- Time_Touch_Key > 10000)
        {
          display.writeLine(17, 21, 37, 41,SSD1306_BLACK);
          display.writeLine(17, 41, 37, 21,SSD1306_BLACK);
          Scan_En = false;
        }
      }
      while (QR.available())
      {
        char a = QR.read();
        Serial.print(a);
        data_String += a;
        digitalWrite(PIN_QR_TRIG, HIGH);
        delay(10);
      }
      if(data_String != "")
      {
        display.drawBitmap(4, 8, frames_tick[0], FRAME_WIDTH, FRAME_HEIGHT, 0);
        display.drawBitmap(4, 8, frames_tick[1], FRAME_WIDTH, FRAME_HEIGHT, 1);
        display.setTextColor(SSD1306_BLACK);
        display.setTextSize(2);
        display.setCursor(65, 15);
        display.println(QR_num_Now);
        display.setCursor(65, 35);
        display.println(QR_num);
        QR_num ++;
        QR_num_Now ++;

        display.setTextColor(SSD1306_BLACK);
        display.setTextSize(1);
        display.setCursor(1, 56);
        display.print(data_String);

        myFile = SD.open(file_name, FILE_WRITE);
        if (myFile) {
          myFile.println(data_String);
          myFile.close();
          data_String = "";
        }
        Scan_En = false;
      }
      display.setTextColor(SSD1306_WHITE);
      display.setTextSize(2);
      display.setCursor(65, 15);
      display.println(QR_num_Now);
      display.setCursor(65, 35);
      display.println(QR_num);
      display.display();
    }
    break;
2. QR code classification and printing;
In "QR code classify mode", scan each QR code one by one, and scan the QR code in the order of "Model--LOT--DateCode-Quantity". When all QR codes are scanned, all goods can be summarized according to category. And output storage or printing.

As shown in the picture above, there is a scanning order indicator on the right side of the screen. When the currently required QR code is correctly scanned, the box corresponding to this category will be filled.
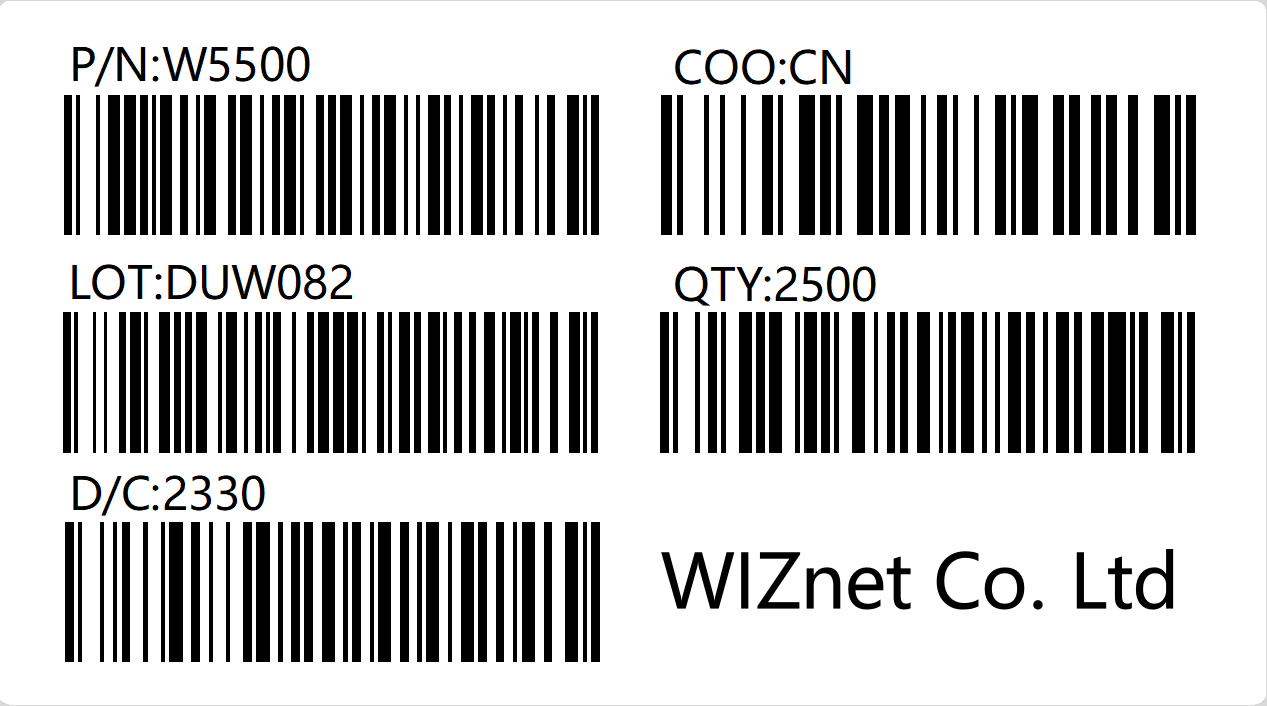
This is the QR code label on the surface of the box when we leave the warehouse. I judge whether it is the QR code required for this scan by judging the characters such as "P/N", "LOT", "D/C", and "QTY". code,
code show as below:
        if(DO_QR_Classify_Step == 0)
        {
          if(data_String.substring(0, data_String.indexOf(":", 0)) == "P/N")
          {
            Product_Box[Product_Box_cnt].MODEL = data_String.substring(data_String.indexOf(":", 0)+1, data_String.length()-1);
            display.fillRoundRect(95, 16, 16,3,3,SSD1306_WHITE);
            DO_QR_Classify_Step ++;
          }
        }else if(DO_QR_Classify_Step == 1)
        {
          if(data_String.substring(0, data_String.indexOf(":", 0)) == "LOT")
          {
            Product_Box[Product_Box_cnt].LOT = data_String.substring(data_String.indexOf(":", 0)+1, data_String.length()-1);
            display.fillRoundRect(95, 26, 16,3,3,SSD1306_WHITE);
            DO_QR_Classify_Step ++;
          }
        }else if(DO_QR_Classify_Step == 2)
        {
          Product_Box[Product_Box_cnt].DC = data_String.substring(data_String.indexOf(":", 0)+1, data_String.length()-1);

          if(data_String.substring(0, data_String.indexOf(":", 0)) == "D/C")
          {
            display.fillRoundRect(95, 36, 16,3,3,SSD1306_WHITE);
            DO_QR_Classify_Step ++;
          }
        }else if(DO_QR_Classify_Step == 3)
        {
          if(data_String.substring(0, data_String.indexOf(":", 0)) == "QTY")
          {
              Product_Box[Product_Box_cnt].Qty = data_String.substring(data_String.indexOf(":", 0)+1, data_String.length()-1).toInt();
              display.fillRoundRect(95, 46, 16,3,3,SSD1306_WHITE);
              myFile = SD.open(file_name, FILE_WRITE);
              if (myFile) {
                myFile.print("BOX No:");
                myFile.println(Product_Box_cnt);
                myFile.print("MODEL:");
                myFile.println(Product_Box[Product_Box_cnt].MODEL);
                myFile.print("LOT:");
                myFile.println(Product_Box[Product_Box_cnt].LOT);
                myFile.print("D/C:");
                myFile.println(Product_Box[Product_Box_cnt].DC);
                myFile.print("QTY:");
                myFile.println(Product_Box[Product_Box_cnt].Qty);
                myFile.println("");
                myFile.close();
              }
              DO_QR_Classify_Step = 0;
              Product_Box_cnt ++;
              display.fillRoundRect(92, 14, 22,7,7,SSD1306_BLACK);
              display.fillRoundRect(92, 24, 22,7,7,SSD1306_BLACK);
              display.fillRoundRect(92, 34, 22,7,7,SSD1306_BLACK);
              display.fillRoundRect(92, 44, 22,7,7,SSD1306_BLACK);
              display.drawRoundRect(92, 14, 22,7,7,SSD1306_WHITE);
              display.drawRoundRect(92, 24, 22,7,7,SSD1306_WHITE);
              display.drawRoundRect(92, 34, 22,7,7,SSD1306_WHITE);
              display.drawRoundRect(92, 44, 22,7,7,SSD1306_WHITE);
          }
        }
Each QR code scanned successfully will be displayed at the bottom of the screen; and it will be judged whether it is the required content. If there is an error, it will be stuck in this scan. If you want to exit this scan, click the left button to exit this scan and try again. Scan, when the QR codes of the four categories "Model--LOT--DateCode-Quantity" are successfully scanned, they will be stored in the TF card.
#define Product_Box_max 64
struct _Product_Box{
String MODEL;
String LOT;
String DC;
uint32_t Qty;
} ;
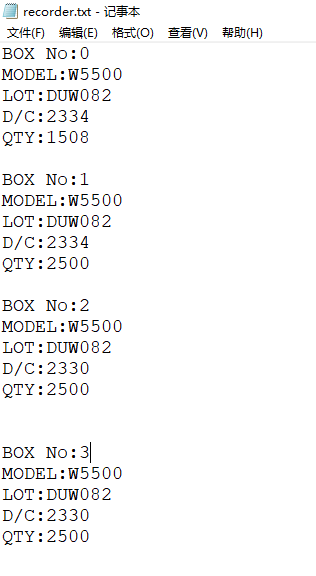
_Product_Box Product_Box[Product_Box_max];For example, the four labels in the picture below,

The format stored in the TF Card after scanning is:
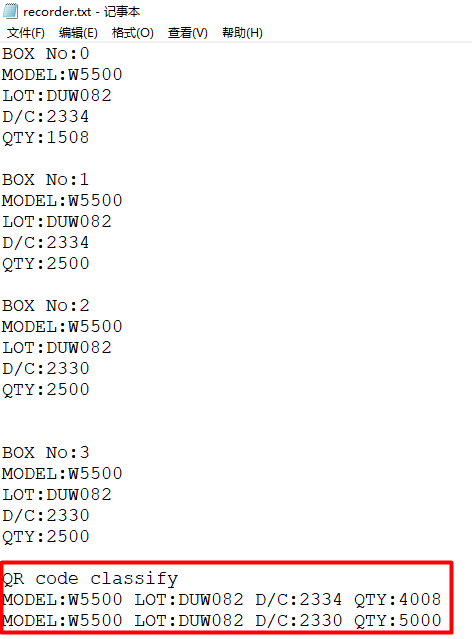
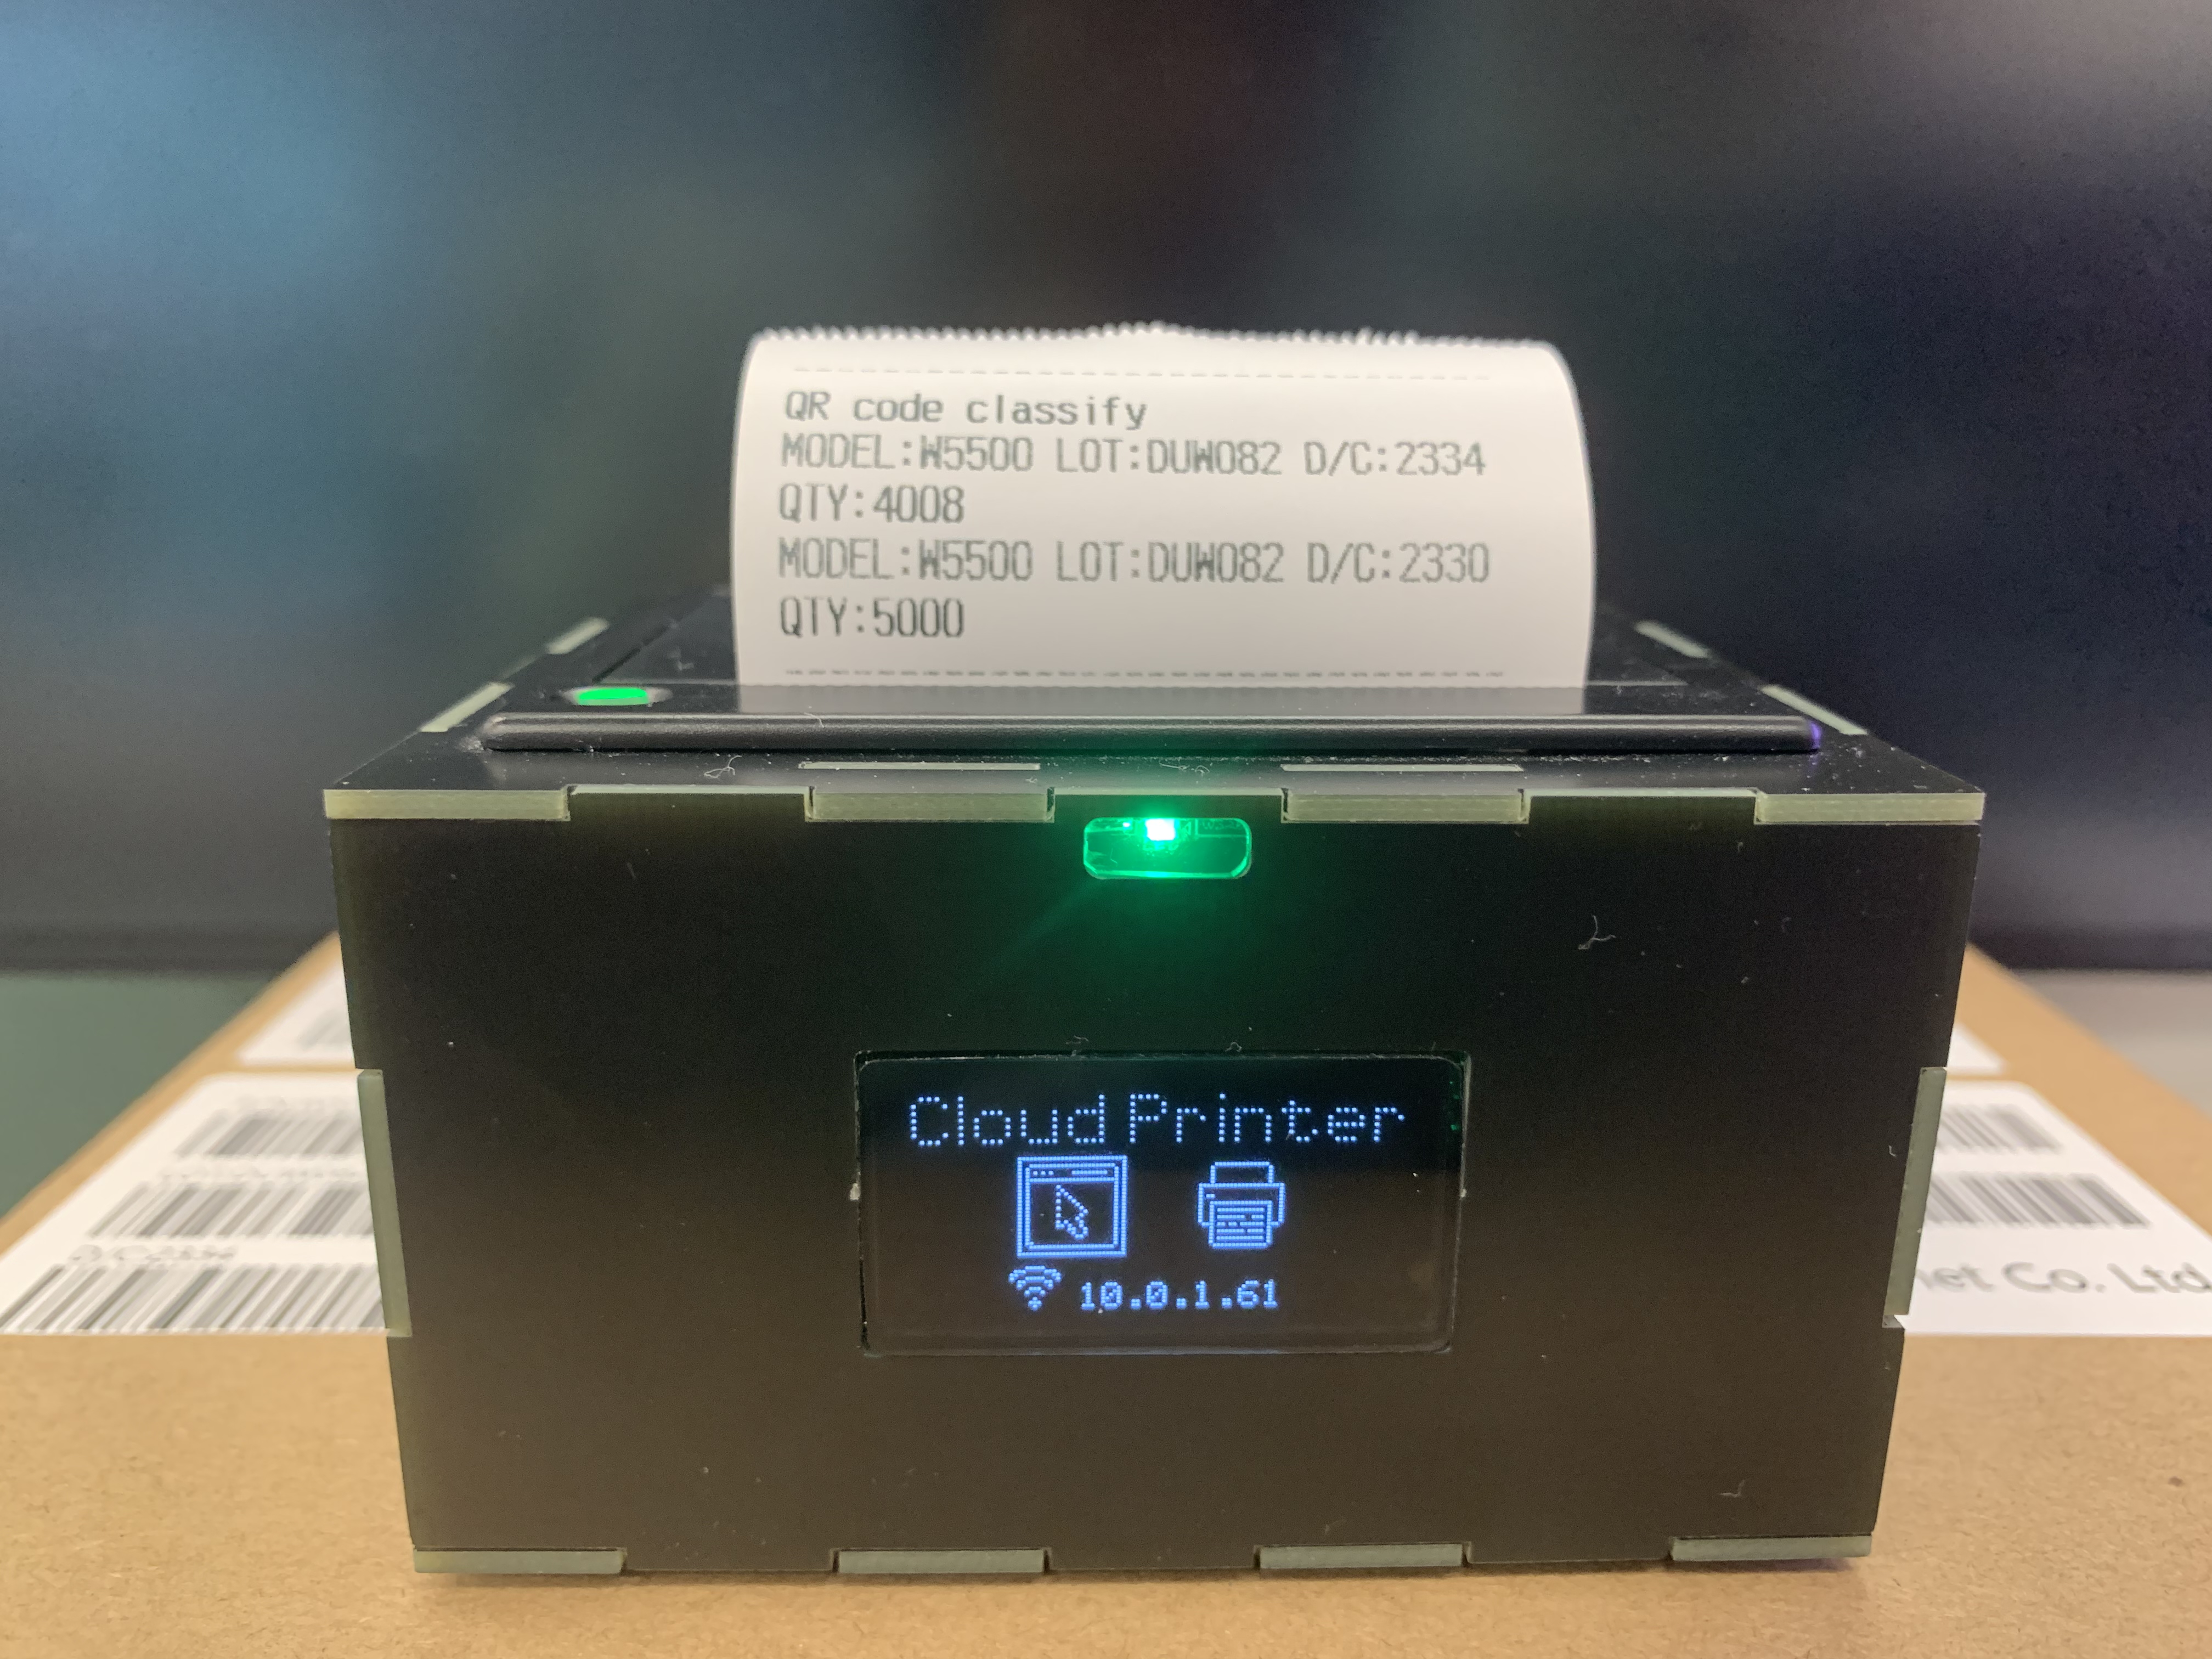
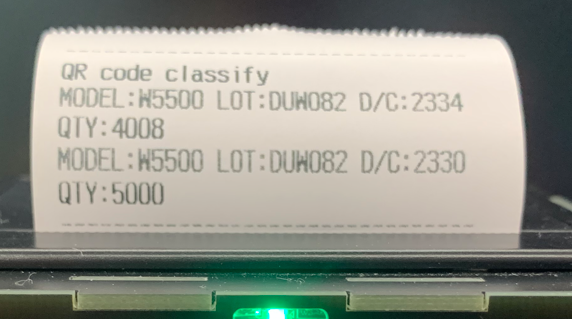
If you long press the left button, you will enter the QR code classification mode, still according to the "Model--LOT--DateCode" classification, and the number of goods in the same category will be accumulated together. Still using the example in the picture, after long pressing the left button, the TF card will summarize the output as follows:
In order to save battery power, the WiFi module is turned off under normal conditions. If the printing option is set in the settings, Digital QR Scanner will turn on the WiFi module and connect to the Cloud Printer through the network. The summary results of this scan will also be printed.
The code for printing part is as follows:
  case DO_QR_Classify_Print:
    {
       switch(Wifi_State){
        case Power_On_wifi:
          {
            Serial.println("POWER_ON1");
            digitalWrite(PIN_Wifi_RST, HIGH);
            delay(1000);
            WiFi.init(&Serial2);
            Serial2.flush();
            Serial2.begin(2000000);
            // attempt to connect to WiFi network
            while ( status != WL_CONNECTED) {
              // Connect to WPA/WPA2 network
              status = WiFi.begin(ssid, pass);
            }
            // print your WiFi shield's IP address
            ip = WiFi.localIP();
            Wifi_State = Link_To_Network;
          }
          break;
        case Link_To_Network:
          {
             if (client1.connect(Cloud_Printer,80)){
                delay(3000);
                client1.print(String("TEXT")+String("QR CODE Classify"));
                Wifi_State = QR_Code_print;
             }
          }
          break;
        case QR_Code_print:
          {
          }
          break;
       }
    }
    break;
3. Chip counting;
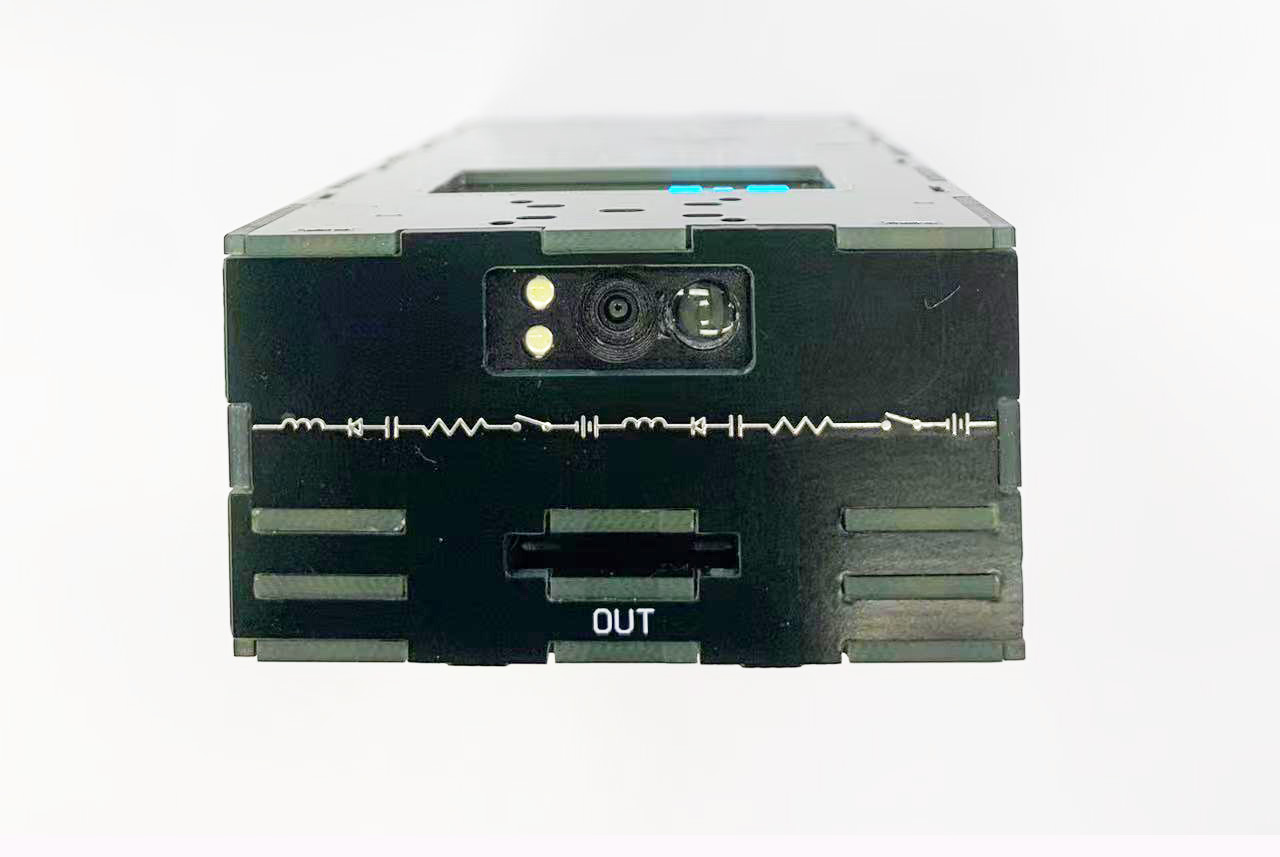
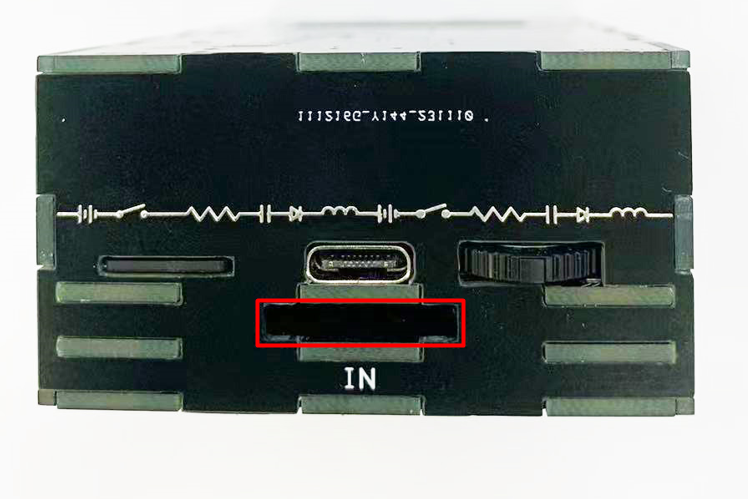
The chip counting function is mainly handled by 3 sets of infrared transmitting tubes and receiving tubes, 2 of which are used for counting, and an additional set of infrared transmitting tubes and receiving tubes are used to determine whether there is a chip at the current position of the tape.
There are some small holes on the side of the chip's braid, three holes corresponding to each chip. So count the number of chips by counting the number of holes.
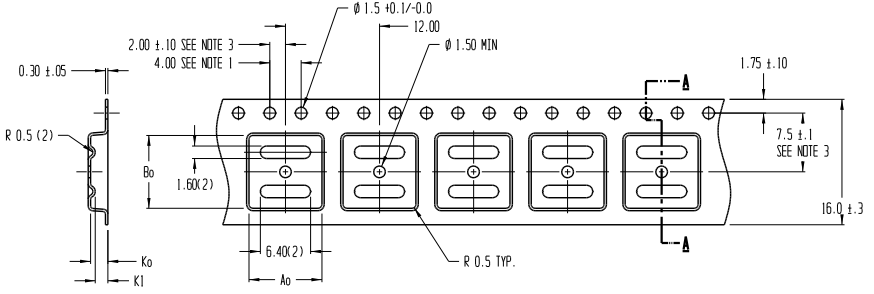
In order to accurately identify the quantity, I designed a tunnel using a two-layer PCB.
I used two interrupt functions, corresponding to the IO of the two infrared receiving tubes.
  pinMode(PIN_IR_1, INPUT);
  attachInterrupt(digitalPinToInterrupt(PIN_IR_1), IR_COUNTER, CHANGE);
  pinMode(PIN_IR_2, INPUT);
  attachInterrupt(digitalPinToInterrupt(PIN_IR_2), IR_COUNTER, CHANGE);
If normal, the encoding of the two IOs should be in the state of 00 - 11 - 01 - 10. This means that a small hole passes through the two infrared tubes, and the count is +1.
void IR_COUNTER()
{
  IR_current = ((IR_current << 2) | (digitalRead(PIN_IR_1) << 1) | (digitalRead(PIN_IR_2)));
  Serial.println((digitalRead(PIN_IR_1) << 1) | (digitalRead(PIN_IR_2)), HEX);
  if ((IR_current == 0b00101101) || (IR_current == 0b11101101)|| (IR_current == 0b00100001) || (IR_current == 0b00101001)|| (IR_current == 0b10001000))
  {
    Hole_num ++ ;
//    Serial.print("NUM:");
//    Serial.println(Hole_num);
  }
}
The code for the entire chip counting part is as follows:
  case DO_Chip_Counter:
    {
      display.clearDisplay();
      display.setTextColor(SSD1306_WHITE);
      display.setTextSize(1);
      display.setCursor(32, 1);
      display.print("Chip Counter");
      if(Hole_num > Hole_num_Now)
      {
        display.drawBitmap(8, 8, frames_CountX[frame], FRAME_WIDTH, FRAME_HEIGHT, 1);
        frame = (frame + 1) % FRAME_COUNT_CountX;
        if(frame == FRAME_COUNT_CountX-1)
        {
          Hole_num_Now = Hole_num;
        }
      }
      else
      {
        display.drawBitmap(8, 8, frames_CountX[0], FRAME_WIDTH, FRAME_HEIGHT, 1);
      }
      display.setTextColor(SSD1306_WHITE);
      display.setTextSize(2);
      display.setCursor(65, 25);
      display.println(Hole_num/3);
      display.display();
      delay(FRAME_DELAY);
    }
    break;
For the Cloud printer part, I used the code from the last time I developed the Any printer project. Which code only needs to create the Socket and send data with TEXT as the prefix, and the sent data will be printed directly.
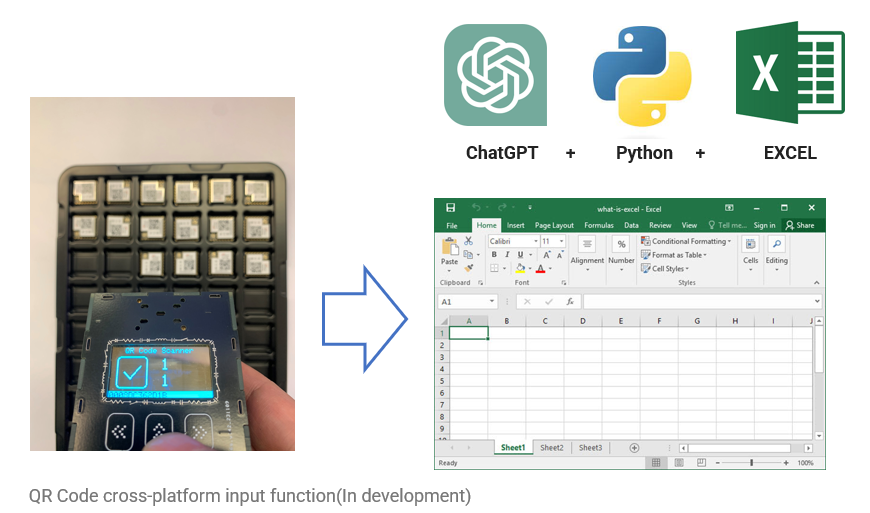
Embedded web pages and cross-platform input programs are under development.
Among them, the cross-platform input function is progressing smoothly. Through the computer-side Python program, the scan results of the Digital QR Code Scanner are received and the corresponding positions on EXCEL are automatically filled in. I think it is a relatively practical function.
To be continued.
-
Digital_QR_code_Scannner_arduino_code
