
Dancing with Wolves – Installing an M416 Fully Automatic Water Gun on a Go2 (Part 2)
Dancing with Wolves – Installing an M416 Fully Automatic Water Gun on a Go2 (Part 2)

Introduction
As this is the opening chapter of the series, it's necessary to make some agreements first:
- The following content will only provide the code for the core functions, keeping it as concise as possible. After all, every dog owner will have their own ideas and will add their own functions. Writing too much code will make it difficult to integrate, not to mention that I haven't made any complex functions.
- The provided code snippets will not be explained in detail; programming languages are languages, so just "grasp the spirit" is enough.
- Whether it's hardware design or software programming, we follow the design philosophy of the Indian military industry: we will never code our own code if we can rely on existing software functions, and we will never make our own electronic modules if we can buy them.
- The robot operating system employs
Ros2 Foxysoftware programmingpythonlanguages and hardware programmingclanguagesUbuntu 20.04.
Function
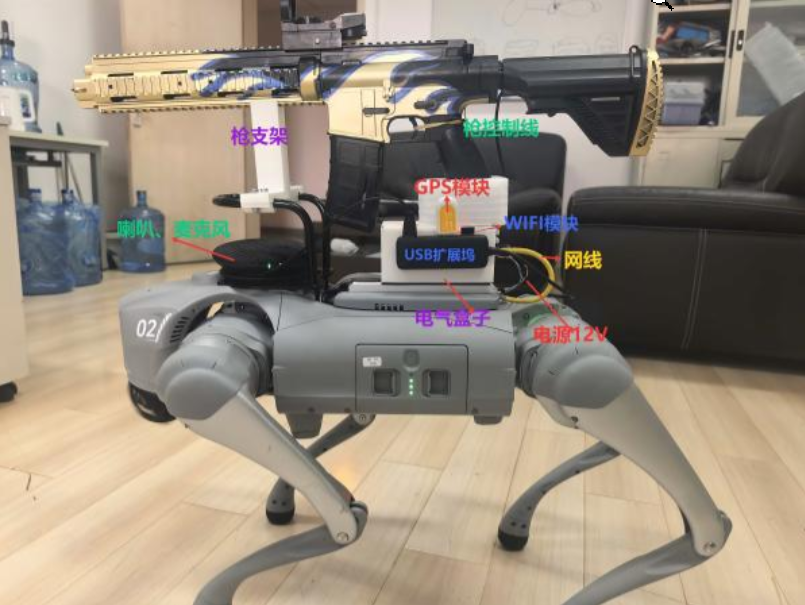
The functions described here refer only to those related to mounting the gun. (The water gun was a gift from my son; please do not shoot it at people.)
- The bracket and electrical box are printed using a 3D printer to hold the gun and circuit board.
- The go2 dock sends a UDP broadcast message to the control circuit, which then fires.
- Programmatically implement the original remote control
向上按钮as the fire button. - Implement
cv2a simple face recognition system. - Implement a
deepseek agentfeature that allows Go2 to understand your commands and execute tasks accordingly (e.g., find Zhang San and fire immediately, or say hello...).
hardware
First, here's a picture, the actual wiring diagram:
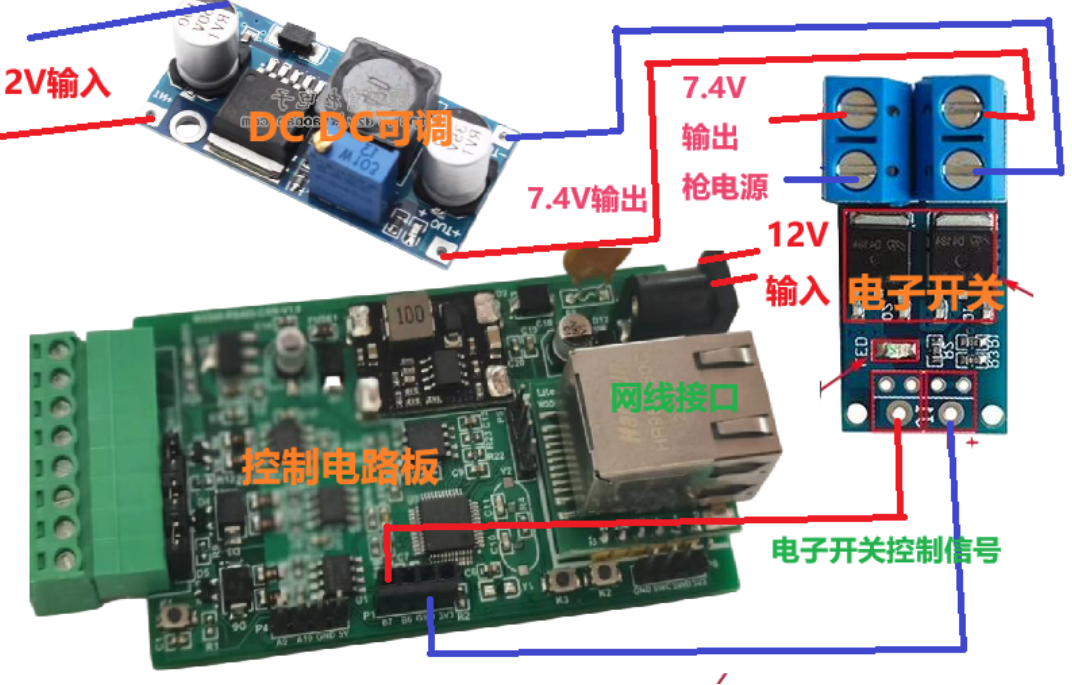
The boards in the picture were all purchased from Taobao. The control board cost around 150 yuan, the DC-DC module cost around 2 yuan, and the electronic switch cost less than 1 yuan.
1. Water bullet gun
The M416 automatic rifle I use in PUBG was bought many years ago; I don't remember how much it cost. It also had many accessories, but I've lost them all. It's a bit worn out, but it still works, and it's very relaxing to play with. It's powered by two 18650 batteries (3.7V + 3.7V = 7.4V), but the batteries have deteriorated over time. Therefore, I draw power from the 12V output of my Go2 and supply it to the rifle through an adjustable DC-DC step-down module.
2. Control board
I bought a development board before, which had an STM32F103C8T6 chip, a W5500 Ethernet module, two CAN channels, and two 485 channels, for about 150 yuan. Actually, you don't need so many functions to control the gun. All you need is a board with a W5500 Ethernet module and GPIO output. The GPIO ports control the electronic switches to power the gun.
3. DC-DC module
Reduce the DC voltage of go2 from 12V to 7.4V.
4. Electronic switch
It receives GPIO control signals to turn the gun's power on or off; the gun fires when it has power. (The trigger of the gun is strapped to the firing position.)
Control Program
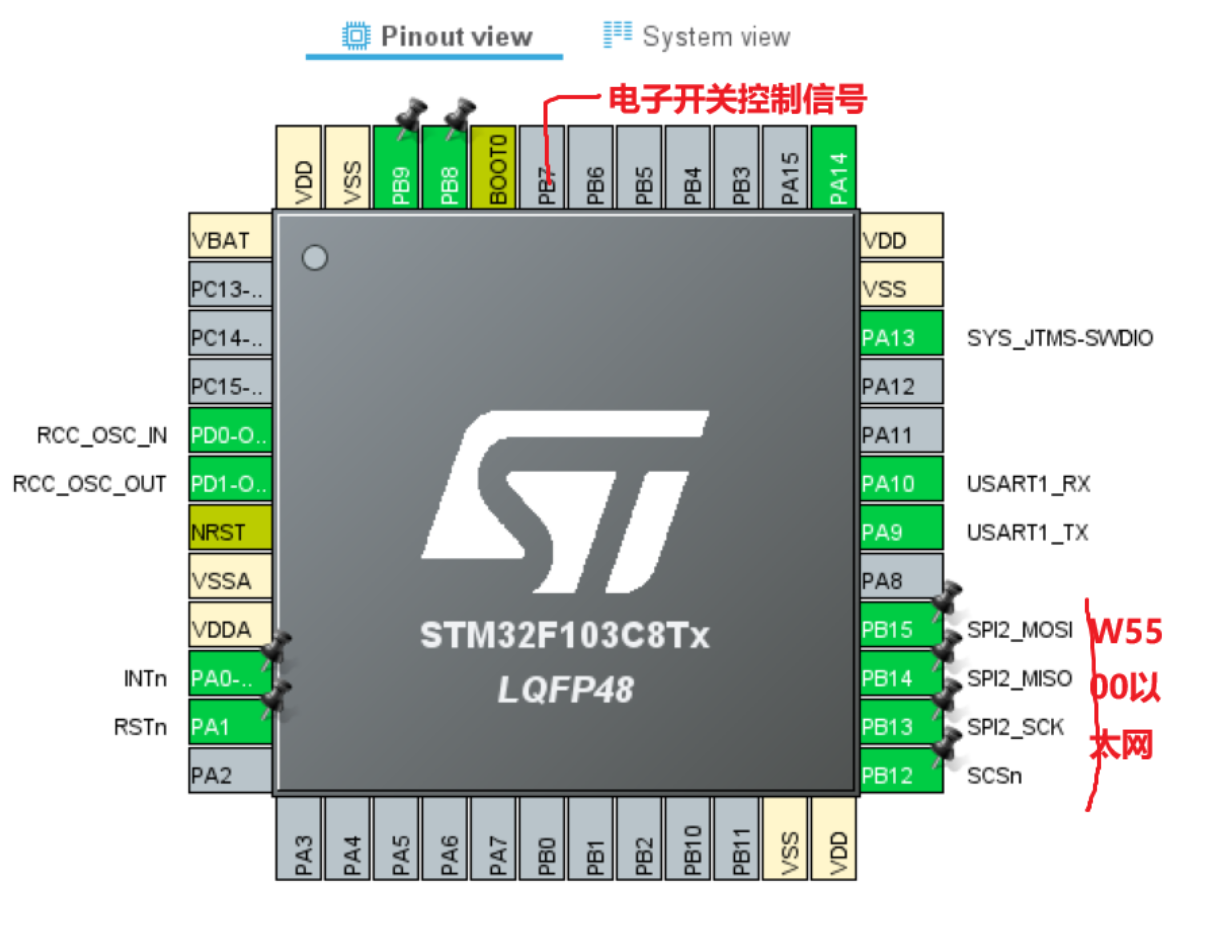
- STM32CubeMX
Porting the W5500 driver library
-- 1. Download the W5500 driver library from Gitee or GitHub . ioLibrary_DriverCopy the directory to your project.
-- 2. Add ioLibrary_Driver\Ethernetthe three files in the directory and their header files -- w5500.c, wizchip_conf.c, socket.cto your project.
Control Program
This part of the code uses FreeRTOSthe operating system and listens UDP 5001on a port. When a message containing a string is received fire, port PB7 remains high for one second. In other words, when a UDP message is received fire, the M416 fires for one second.
/* USER CODE END Header_StartTaskSendMsg */
void StartTaskGetMsg(void *argument)
{
  /* USER CODE BEGIN StartTaskSendMsg */
  /* Infinite loop */
  for(;;)
  {
		do_udp();

		if (fired == 1)
		{
			HAL_GPIO_WritePin(GPIOB,GPIO_PIN_7,GPIO_PIN_SET);
			osDelay(1000);
			HAL_GPIO_TogglePin(GPIOB,GPIO_PIN_7);
			fired = 0;
		}

    osDelay(1000);

  }
  /* USER CODE END StartTaskSendMsg */
}
myudp.cThe program defines the W5500's network information, including the listening port and IP address, and processes received messages.
(myudp.h )
#ifndef MYUDP_H
#define MYUDP_H

#include "myudp.h"
#include "main.h"
#include "w5500.h"
#include "socket.h"
#include "wizchip_conf.h"
#include "spi.h"
#include <string.h>

#define SOCK_UDPS 2

extern uint8_t buff[128];
extern uint8_t UDP_send_buff[128];
extern uint8_t remote_ip[4];
extern uint16_t remote_port;

void UDPinit(void);
void do_udp(void);
void udp_send(uint8_t* data, uint8_t len);
void Analysis(uint8_t *buf);
#endif // MYUDP_H
Here you can modify your IP address, listen on the port, and process received messages.
(myudp.c)
#include "myudp.h"
#include "main.h"
#include "w5500.h"
#include "socket.h"
#include "wizchip_conf.h"
#include "spi.h"
#include <string.h>

uint8_t buff[128];
uint8_t UDP_send_buff[128];

uint8_t remote_ip[4] = {255,255,255,255};
uint16_t remote_port = 8080;
//片选
void W5500_Select(void) {
    HAL_GPIO_WritePin(SCSn_GPIO_Port, SCSn_Pin, GPIO_PIN_RESET);
}
void W5500_Unselect(void) {
    HAL_GPIO_WritePin(SCSn_GPIO_Port, SCSn_Pin, GPIO_PIN_SET);
}
void W5500_Restart(void) {
    HAL_GPIO_WritePin(RSTn_GPIO_Port, RSTn_Pin, GPIO_PIN_RESET);
    HAL_Delay(1);  // delay 1ms
    HAL_GPIO_WritePin(RSTn_GPIO_Port, RSTn_Pin, GPIO_PIN_SET);
    HAL_Delay(1600);  // delay 1600ms
}

void W5500_ReadBuff(uint8_t* buff, uint16_t len) {
    HAL_SPI_Receive(&hspi2, buff, len, HAL_MAX_DELAY);
}

void W5500_WriteBuff(uint8_t* buff, uint16_t len) {
    HAL_SPI_Transmit(&hspi2, buff, len, HAL_MAX_DELAY);
}

uint8_t W5500_ReadByte(void) {
    uint8_t byte;
    W5500_ReadBuff(&byte, sizeof(byte));
    return byte;
}

void W5500_WriteByte(uint8_t byte) {
    W5500_WriteBuff(&byte, sizeof(byte));
}

//配置W5500网络信息
wiz_NetInfo gSetNetInfo = {
  .mac  = {0x00, 0x08, 0xdc, 0x11, 0x11, 0x11},
  .ip   = {192, 168, 123, 55},
  .sn   = {255, 255, 255, 0},
  .gw   = {192, 168, 123, 1},
  .dns  = {144, 144, 144, 144},
  .dhcp = NETINFO_STATIC};

wiz_NetInfo gGetNetInfo;

enum Status
{
  Failed = 0,
  Success = 1
};

/**
 * @brief valid the result of set net info
 * @return 1: Success
 *         0: Failed
*/
uint8_t validSetNetInfoResult(wiz_NetInfo* _set, wiz_NetInfo* _get)
{
  return (!memcmp(_set, _get, sizeof(wiz_NetInfo)));  // if same, memcmp return 0
}


void UDPinit(void)
{
  reg_wizchip_cs_cbfunc(W5500_Select, W5500_Unselect);
  reg_wizchip_spi_cbfunc(W5500_ReadByte, W5500_WriteByte);

  W5500_Restart();  // hardware restart through RESET pin

  ctlnetwork(CN_SET_NETINFO, (void*)&gSetNetInfo);  // set net info
  // maybe need delay
  ctlnetwork(CN_GET_NETINFO, (void*)&gGetNetInfo);  // get net info

  // W5500 has 8 channel, 32k buffer, 2 means 2KBytes
  uint8_t buffer_size_8channel_tx_rx[16] = {2, 2, 2, 2, 2, 2, 2, 2,  // 8 channel tx
                                            2, 2, 2, 2, 2, 2, 2, 2}; // 8 channel rx
  if(ctlwizchip(CW_INIT_WIZCHIP,(void*)buffer_size_8channel_tx_rx))
  {
    // failed

  }

  uint8_t sta = getSn_SR(SOCK_UDPS);
  if(sta == SOCK_CLOSED)
  {
    socket(SOCK_UDPS, Sn_MR_UDP, 5001, 0);
  }
  HAL_Delay(100);

}


void do_udp(void)
{
	uint16_t len=0;
	switch(getSn_SR(SOCK_UDPS))       /*获取socket的状态*/
	{
		case SOCK_CLOSED:                 /*socket处于关闭状态*/
			socket(SOCK_UDPS,Sn_MR_UDP,5001,0);    /*初始化socket*/
		  break;

		case SOCK_UDP:      /*socket初始化完成*/
			HAL_Delay(10);
			if(getSn_IR(SOCK_UDPS) & Sn_IR_RECV) //检查是否有接收中断
			{
				setSn_IR(SOCK_UDPS, Sn_IR_RECV);  /*清接收中断*/
			}
			if((len=getSn_RX_RSR(SOCK_UDPS))>0)  /*接收到数据*/
			{
				recvfrom(SOCK_UDPS,buff, len, remote_ip,&remote_port);               /*W5500接收计算机发送来的数据W5500接收计算机发送来的数据,并获取发送方的IP地址和端口号*/
				sendto(SOCK_UDPS,buff,len-8, remote_ip, remote_port);                /*W5500把接收到的数据发送*/
        Analysis(buff);//分析数据
        memset(buff, 0, sizeof(buff));
			}
			break;
	}
}


void udp_send(uint8_t* data,uint8_t len)
{
  sendto(SOCK_UDPS, data, len, remote_ip, remote_port);
  memset(data, 0, len);
}

void SystemReset() {
    __HAL_RCC_BACKUPRESET_FORCE(); // 强制备份域复位
    __HAL_RCC_BACKUPRESET_RELEASE(); // 释放备份域复位
    NVIC_SystemReset(); // 发起系统复位
}

void Analysis(uint8_t *buf)
{
	char * gun = "fire";
	char * result = strstr((char*)buf, gun);
	if (result != NULL)
	{
		fired =1;
		return;
	}

	char * devreset ="reset";
	result = strstr((char*)buf, devreset);
	if (result != NULL)
	{
			SystemReset();
			return;
	}
}