
ChatGPT Recorder & Monitor(Raspberry Pi Pico & WizFi360)
Record all chatgpt conversations, store them in the SD card, and display them on the screen.
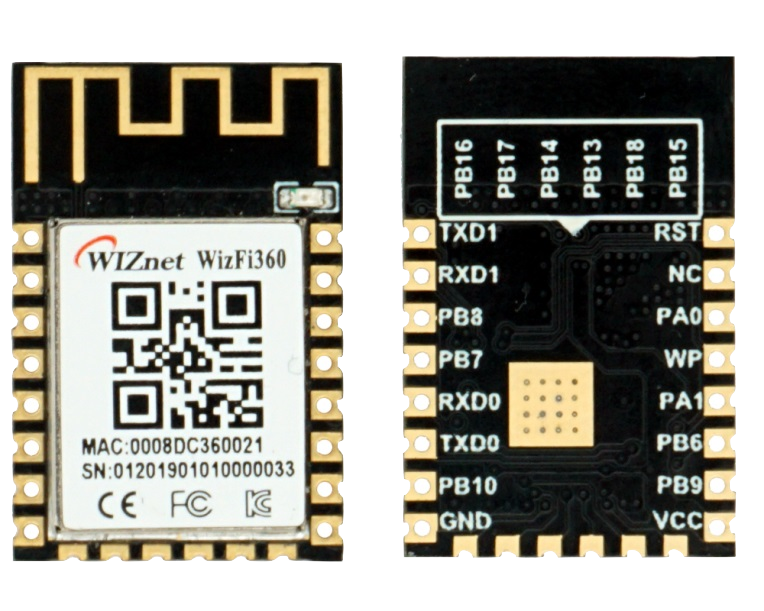
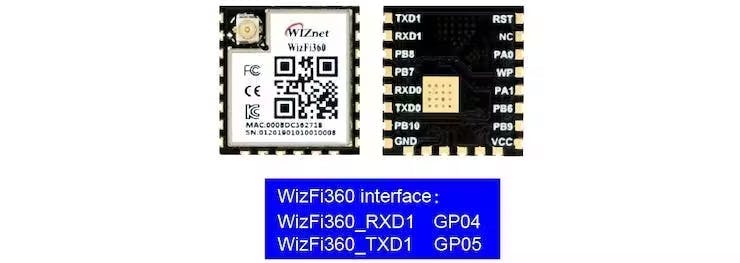
WIZnet - WizFi360
x 1

Raspberry Pi - RP2040
x 1

Arduino - Arduino IDE
x 1
I want to store ChatGPT conversations to SD card and display the conversation content on one screen.
ChatGPT, as the earliest OPEN AI program open to ordinary users, has been warmly welcomed by everyone since its launch, and currently has more than 100 million users.
At present, ChatGPT also launched an API for users to use, and the information URL is as follows:
I use wizfi360 as http client to send ChatGPT API request and get ChatGPT Answer. WizFi360 is a WiFi module, which can connect to WiFi through commands and perform TCP or TCP (SSL) connections. I have used it many times and it is very convenient.
RP2040 acts as an MCU, after get todolist info from wizfi360, it performs data processing and displays the content on the screen.
This project is divided into five steps:
Step 1: Create New Account on the ChatGPT website and get API TOKEN;
Step2: Install library files and board support in the Arduino IDE;
Step 3: Submit questions via the built-in web page;
Step 4: Get answersfrom ChatGPT API through WizFi360 and and store in SD;
Step 5: Displays the ChatGPT question and answer on the screen(ILI9488);
The following are step by step instructions.
Step 1: Create New Account on the ChatGPT website and get API TOKEN;
After creat account in this website, you can see your API TOKEN on the "My accounts" page. Please record it, because this TOKEN will be required for future page visits.

Your API token provides full access to view and modify your account. Please treat this like a password and take care when sharing it.
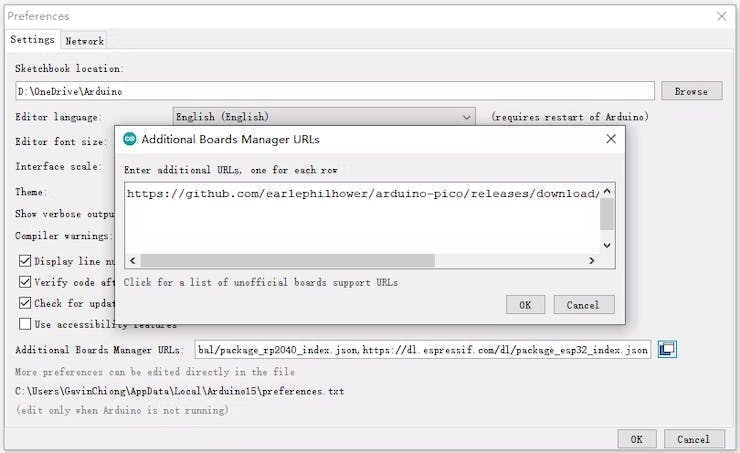
Step2: Install library files and board support in the Arduino IDE;
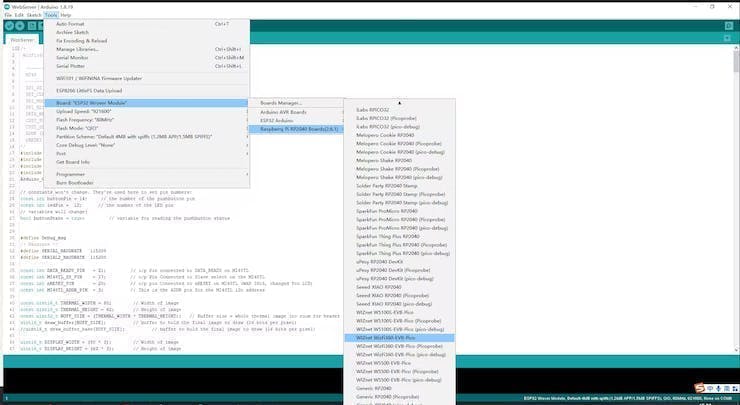
Add "WIZnet WizFi360-EVB-PICO" support to Arduino IDE
Open up the Arduino IDE and go to File->Preferences.
In the dialog that pops up, enter the following URL in the "Additional Boards Manager URLs" field:
https://github.com/earlephilhower/arduino-pico/releases/download/global/package_rp2040_index.json
Search "WizFi360" and Install Board support by "Board Manager"
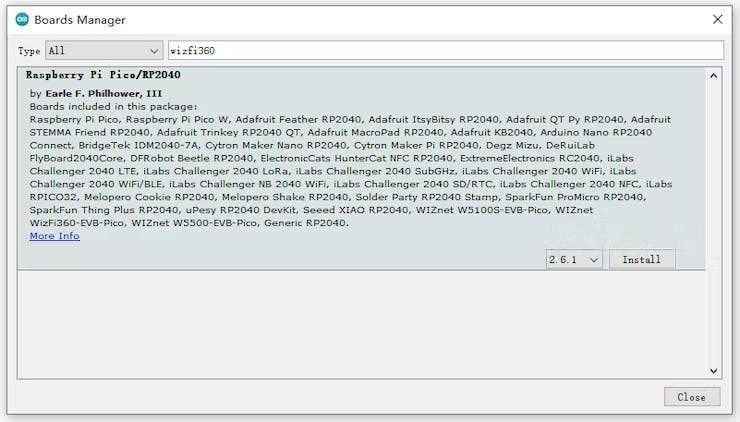
"Tools->Board:"***"-> Raspberry Pi RP2040 Boards(2.6.1) " Select “WIZnet WizFi360-EVB-PICO”.
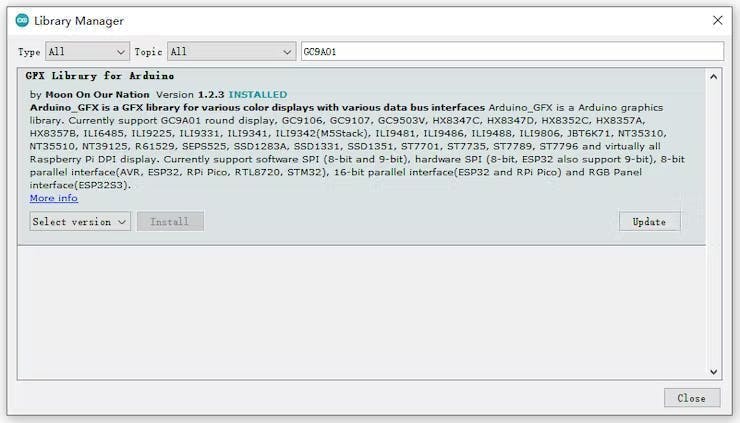
Add “GFX Library for rduino”, this library support the screen ili9488.
Because we need to display the Todolist's icon, we need to load a PNG library“PNGdec” to decode the image.
Step 3: Submit questions via the built-in web page;
Initialize serial port for WizFi360 module and change the baudrate to 2000000bps(MAX baudrate for wizfi360).
The first initialization is 115200, and then setting the baud rate (2000000) is added to the initialization part of the WiZfi360 library, and the second time is changed to 2000000bps.
// initialize serial for WizFi360 module
  Serial2.setFIFOSize(4096);
  Serial2.begin(2000000);
  WiFi.init(&Serial2);
Check the wizfi360 Link status of wifi in the “void setup()”
// check for the presence of the shield
  if (WiFi.status() == WL_NO_SHIELD) {
    while (true);// don't continue
  }
  // attempt to connect to WiFi network
  while ( status != WL_CONNECTED) {
    status = WiFi.begin(ssid, pass);// Connect to WPA/WPA2 network
  }
Because my device doesn't have an input interface, we made an embedded page to input ChatGPT questions that need to be displayed and stored.This process is very simple to use wizfi360.
“void loop()” There are 9 cases in The switch statement.
typedef enum
{
  do_chatgpt_display = 0,
  do_webserver_index,
  do_webserver_js,
  send_chatgpt_request,
  get_chatgpt_list,
}STATE_;
STATE_ currentState;
We use two Sockets. Among them, Client1 refers to the Socket client after the web server is established, and Client2 refers to the Socket Client that sends data to ChatGPT.
#include "WizFi360.h"

// Wi-Fi info //
char ssid[] = "WIZNET_test";       // your network SSID (name)//
char pass[] = "********";          // your network password//
int status = WL_IDLE_STATUS;       // the Wifi radio's status//
// Initialize the Ethernet client object
WiFiClient client1;
WiFiClient client2;
WiFiServer server(80);
The following code is the flow of web server processing:
case do_webserver_index:
{
client1 = server.available();
if (client1)
{
// an http request ends with a blank line
boolean currentLineIsBlank = true;
while (client1.connected())
{
if (client1.available()) {
char c = client1.read();
json_String += c;
if (c == '\n' && currentLineIsBlank) {
dataStr = json_String.substring(0, 4);
Serial.println(dataStr);
if(dataStr == "GET ")
{
client1.print(html_page);
}
else if(dataStr == "POST")
{
json_String = "";
while(client1.available())
{
json_String += (char)client1.read();
}
Serial.println(json_String);
dataStart = json_String.indexOf("chatgpttext=") + strlen("chatgpttext=");
chatgpt_Q = json_String.substring(dataStart, json_String.length());
client1.print(html_page);
// close the connection:
delay(10);
client1.stop();
currentState = send_chatgpt_request;
}
json_String = "";
break;
}
if (c == '\n') {
// you're starting a new line
currentLineIsBlank = true;
}
else if (c != '\r') {
// you've gotten a character on the current line
currentLineIsBlank = false;
}
}
}
}
}
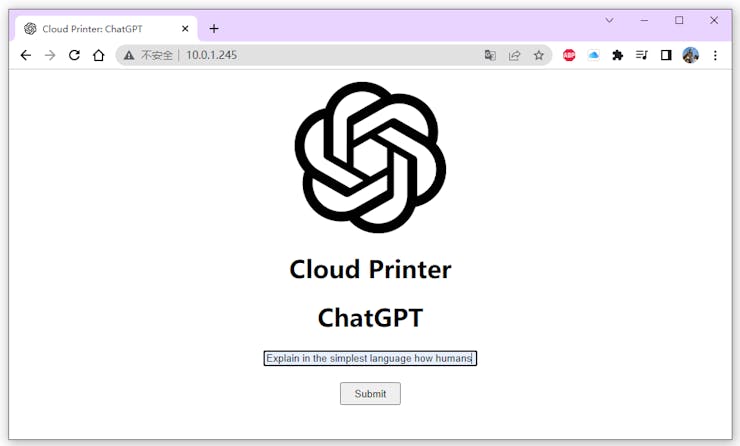
break;Enter the IP address of the WiFi module on the browser to access the embedded WEB page.
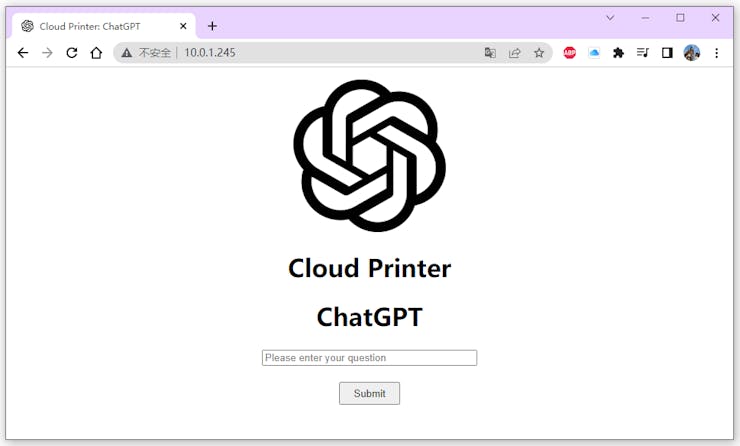
The HTML code of the embedded WEB is as follows:
const char html_page[] PROGMEM = {
    "HTTP/1.1 200 OK\r\n"
    "Content-Type: text/html\r\n"
    "Connection: close\r\n"  // the connection will be closed after completion of the response
    //"Refresh: 1\r\n"         // refresh the page automatically every n sec
    "\r\n"
    "<!DOCTYPE HTML>\r\n"
    "<html>\r\n"
    "<head>\r\n"
      "<meta charset=\"UTF-8\">\r\n"
      "<title>Cloud Printer: ChatGPT</title>\r\n"
      "<link rel=\"icon\" href=\"https://seeklogo.com/images/C/chatgpt-logo-02AFA704B5-seeklogo.com.png\" type=\"image/x-icon\">\r\n"
    "</head>\r\n"
    "<body>\r\n"
    "<p style=\"text-align:center;\">\r\n"
    "<img alt=\"ChatGPT\" src=\"https://seeklogo.com/images/C/chatgpt-logo-02AFA704B5-seeklogo.com.png\" height=\"200\" width=\"200\">\r\n"
    "<h1 align=\"center\">Cloud Printer</h1>\r\n"
    "<h1 align=\"center\">ChatGPT</h1>\r\n"
    "<div style=\"text-align:center;vertical-align:middle;\">"
    "<form action=\"/\" method=\"post\">"
    "<input type=\"text\" placeholder=\"Please enter your question\" size=\"35\" name=\"chatgpttext\" required=\"required\"/><br><br>\r\n"
    "<input type=\"submit\" value=\"Submit\" style=\"height:30px; width:80px;\"/>"
    "</form>"
    "</div>"
    "</p>\r\n"
    "</body>\r\n"
    "<html>\r\n"
};
After entering the question in the text box, click the “Submit” button. Our program gets the question it needs to query.
For example: “Explain in the simplest language how humans find aliens”
Step 4: Get answers from ChatGPT API through WizFi360 and and store in SD;
According to the documentation of ChatGPT, the format we need to send the request is as follows:
curl https://api.openai.com/v1/completions \
-H 'Content-Type: application/json' \
-H 'Authorization: Bearer YOUR_API_KEY' \
-d '{
"model": "text-davinci-003",
"prompt": "Say this is a test",
"max_tokens": 7,
"temperature": 0
}'
Our code to send this ChatGPT request is as follows:
case send_chatgpt_request:
       {
        // if you get a connection, report back via serial
        if (client2.connectSSL(chatgpt_server,443)){
          delay(3000);
          // Make a HTTP request
          client2.println(String("POST /v1/completions HTTP/1.1"));
          client2.println(String("Host: ")+ chatgpt_server);
          client2.println(String("Content-Type: application/json"));
          client2.println(String("Content-Length: ")+(73+chatgpt_Q.length()));
          client2.println(String("Authorization: Bearer ")+ chatgpt_token);
          client2.println("Connection: close");
          client2.println();
          client2.println(String("{\"model\":\"text-davinci-003\",\"prompt\":\"")+ chatgpt_Q + String("\",\"temperature\":0,\"max_tokens\":100}"));
          json_String= "";
          currentState = get_chatgpt_list;
        }
        else
        {
          client2.stop();
          delay(1000);
        }
       }
      break;
After a short wait, we will get the answer to the question from Chart GPT's server.
The following is the code that handles the response part of ChatGPT and the storage part.
case get_chatgpt_list:
       {
          while (client2.available()) {
            json_String += (char)client2.read();
            data_now =1;
          }
          if(data_now)
          {
            //Serial.println(json_String);
            dataStart = json_String.indexOf("\"text\":\"") + strlen("\"text\":\"");
            dataEnd = json_String.indexOf("\",\"", dataStart);
            chatgpt_A = json_String.substring(dataStart+4, dataEnd);
            Serial.println(chatgpt_A);
            chatgpt_Q.replace("+", " ");
            Serial.println(chatgpt_Q);
            myFile = SD.open("chatgpt_record.txt", FILE_WRITE);
            if (myFile) {
              myFile.print("[N]{");
              myFile.print(chatgpt_num);
              myFile.print("}\r\n[Q]{");
              myFile.print(chatgpt_Q);
              myFile.print("}\r\n[A]{");
              myFile.print(chatgpt_A);
              myFile.print("}\r\n");
              myFile.close();
            }
            chatgpt_num++;
            SD_str = read_from_sd("chatgpt_record.txt");
            json_String = "";
            data_now =0;
            client2.stop();
            delay(1000);
            currentState = do_chatgpt_display;
          }
       }
      break;
Step 5: Displays the ChatGPT question and answer on the screen(ILI9488);
#include <Arduino_GFX_Library.h>
Arduino_GFX *tft = create_default_Arduino_GFX();
define of pin which is used by ILI9488 in the "libraries\GFX_Library_for_Arduino\src\Arduino_GFX_Library.h"
#elif defined(ARDUINO_RASPBERRY_PI_PICO)||defined(ARDUINO_WIZNET_WIZFI360_EVB_PICO)||defined(ARDUINO_WIZNET_5100S_EVB_PICO)
#define DF_GFX_SCK 26
#define DF_GFX_MOSI 27
#define DF_GFX_MISO GFX_NOT_DEFINED
#define DF_GFX_CS 25
#define DF_GFX_DC 23
#define DF_GFX_RST 28
#define DF_GFX_BL 22
define library used by ILI9488 in the "libraries\GFX_Library_for_Arduino\src\Arduino_GFX_Library.cpp"
#include "Arduino_GFX_Library.h"

#define lCD_ILI9488

Arduino_DataBus *create_default_Arduino_DataBus()
{
#if defined(ARDUINO_ARCH_NRF52840)
    return new Arduino_NRFXSPI(DF_GFX_DC, DF_GFX_CS, DF_GFX_SCK, DF_GFX_MOSI, DF_GFX_MISO);
//#elif defined(ARDUINO_RASPBERRY_PI_PICO) || defined(ARDUINO_RASPBERRY_PI_PICO_W)
//    return new Arduino_RPiPicoSPI(DF_GFX_DC, DF_GFX_CS, DF_GFX_SCK, DF_GFX_MOSI, DF_GFX_MISO, spi0);
#elif defined(ARDUINO_RASPBERRY_PI_PICO)|| defined(ARDUINO_RASPBERRY_PI_PICO_W) ||defined(ARDUINO_WIZNET_WIZFI360_EVB_PICO)||defined(ARDUINO_WIZNET_5100S_EVB_PICO)
    return new Arduino_RPiPicoSPI(DF_GFX_DC, DF_GFX_CS, DF_GFX_SCK, DF_GFX_MOSI, DF_GFX_MISO, spi1);
#elif defined(ESP32)
    return new Arduino_ESP32SPI(DF_GFX_DC, DF_GFX_CS, DF_GFX_SCK, DF_GFX_MOSI, DF_GFX_MISO);
#elif defined(ESP8266)
    return new Arduino_ESP8266SPI(DF_GFX_DC, DF_GFX_CS);
#else
    return new Arduino_HWSPI(DF_GFX_DC, DF_GFX_CS);
#endif
}

Arduino_GFX *create_default_Arduino_GFX()
{
    Arduino_DataBus *bus = create_default_Arduino_DataBus();
#if defined(WIO_TERMINAL)
    return new Arduino_ILI9341(bus, DF_GFX_RST, 1 /* rotation */);
#elif defined(ARDUINO_RASPBERRY_PI_PICO)|| defined(ARDUINO_RASPBERRY_PI_PICO_W) ||defined(ARDUINO_WIZNET_WIZFI360_EVB_PICO)||defined(ARDUINO_WIZNET_5100S_EVB_PICO)
    {
        #if defined (lCD_ILI9488)
        {
            return new Arduino_ILI9488_18bit(bus, DF_GFX_RST, 1 /* rotation */, false /* IPS */);
        }
        #else
        {
            return new Arduino_GC9A01(bus, DF_GFX_RST, 0 /* rotation */, true /* IPS */);
        }
        #endif
    }
#elif defined(ESP32_S3_BOX)
    return new Arduino_ILI9342(bus, DF_GFX_RST, 0 /* rotation */);
#elif defined(M5STACK_CORE)
    return new Arduino_ILI9342(bus, DF_GFX_RST, 2 /* rotation */);
#elif defined(ODROID_GO)
    return new Arduino_ILI9341(bus, DF_GFX_RST, 3 /* rotation */);
#elif defined(TTGO_T_WATCH)
    return new Arduino_ST7789(bus, DF_GFX_RST, 0 /* rotation */, true /* IPS */, 240, 240, 0, 80);
#else
    return new Arduino_ILI9341(bus, DF_GFX_RST, 0 /* rotation */);
#endif
}
Initialize the screen and open the backlight of the screen in the “void setup()”
tft->begin();
tft->fillScreen(WHITE);
pinMode(backLightPin, OUTPUT);
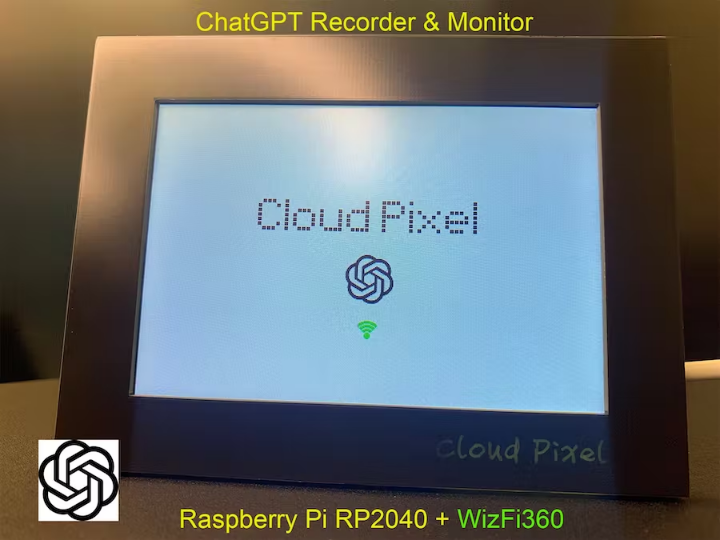
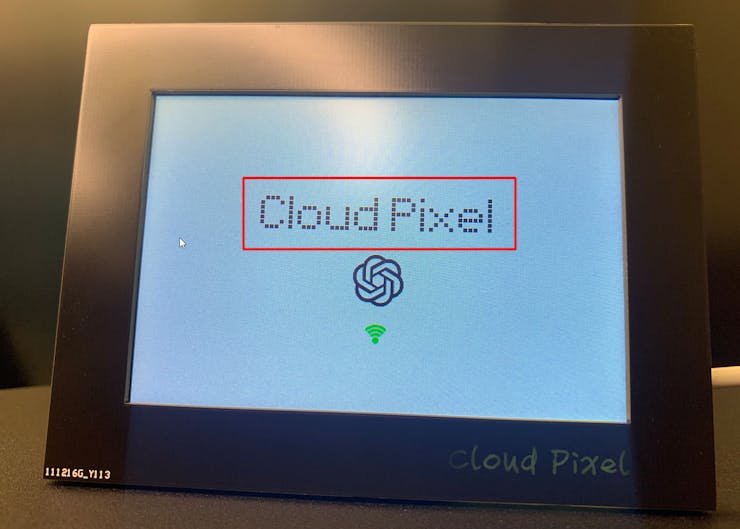
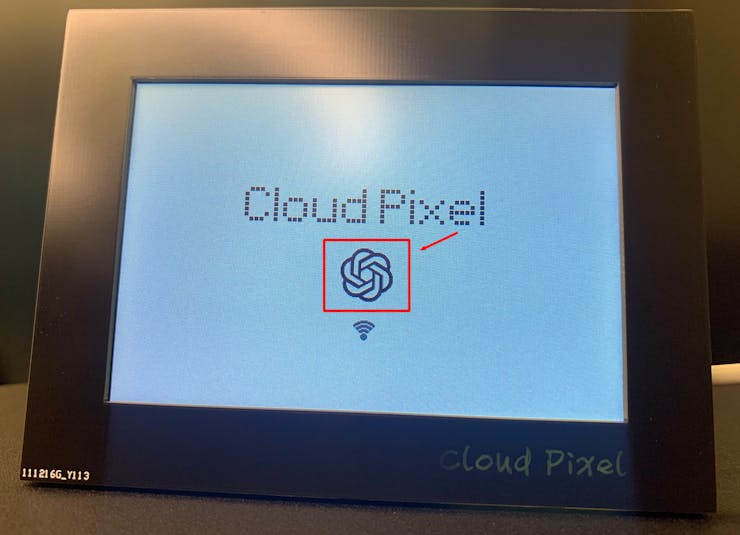
digitalWrite(backLightPin, HIGH);- 5.1 Display the "Cloud Pixel" logo in the first interface on the screen.
void display_logo(uint16_t x,uint16_t y,uint16_t color)
{
  uint8_t cloud_pixel[5*11]=
  {
    0b00111110,0b01000001,0b01000001,0b01000001,0b00100010, // C
    0b00000000,0b00000000,0b01111111,0b00000000,0b00000000, // l
    0b00001110,0b00010001,0b00010001,0b00010001,0b00001110, // o
    0b00011110,0b00000001,0b00000001,0b00000001,0b00011111, // u
    0b00001110,0b00010001,0b00010001,0b00010001,0b01111111, // d
    0b00000000,0b00000000,0b00000000,0b00000000,0b00000000, // space
    0b01111111,0b01001000,0b01001000,0b01001000,0b00110000, // P
    0b00000000,0b00000000,0b01011111,0b00000000,0b00000000, // i
    0b00010001,0b00001010,0b00000100,0b00001010,0b00010001, // x
    0b00001110,0b00010101,0b00010101,0b00010101,0b00001100, // e
    0b00000000,0b00000000,0b01111111,0b00000000,0b00000000  // l
  };
  uint16_t _x = x - (5*5*5) - 6;
  uint16_t _y = y - 20;
  for(uint8_t i=0;i<11;i++)
  {
    if(i == 1 || i == 2 || i ==5 || i==6 ||i==7 ||i==8 || i == 10)
    {
       _x = _x -6;
    }
    else
    {
       _x = _x+4;
    }
    for(uint8_t m=0;m<5;m++)
    {
      _x = _x +5;
      _y = y - 20;
      for(uint8_t n=0;n<8;n++)
      {
        if((cloud_pixel[i*5+m]>>(7-n))&0x01)
        {
          tft->fillRect(_x+1,_y+1,4,4,color);
        }
        _y += 5;
      }
    }
  }
}- 5.2 Display the "ChatGPT" logo in the first interface on the screen.
void display_chatgpt_icon(uint8_t PNGnum)
{
  char szTemp[256];
  int rc;
  if(PNGnum == 1)
  {
    rc = png.openFLASH((uint8_t *)chatgpt_icon_big, sizeof(chatgpt_icon_big), PNGDraw);
  }
  else if(PNGnum == 2)
  {
    rc = png.openFLASH((uint8_t *)chatgpt_icon_mini, sizeof(chatgpt_icon_mini), PNGDraw);
  }
  if (rc == PNG_SUCCESS) {
    rc = png.decode(NULL, 0); // no private structure and skip CRC checking
    png.close();
  }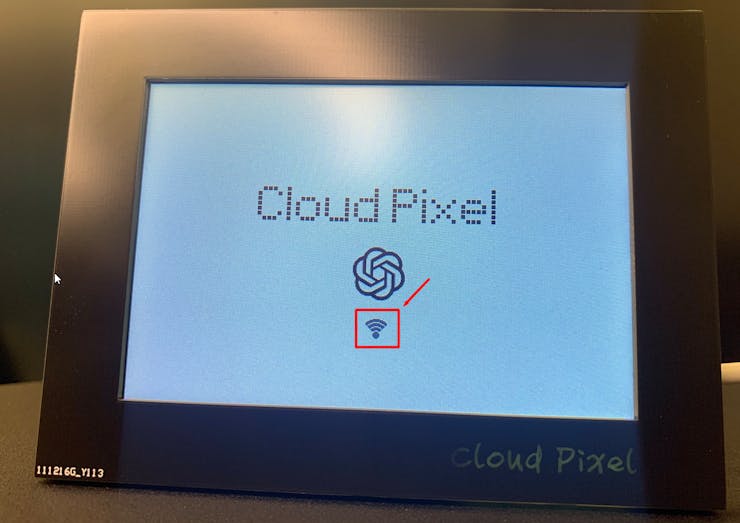
}- 5.3 Display the "WiFi Signal" in the first interface on the screen.when not connect to the WiFi network.
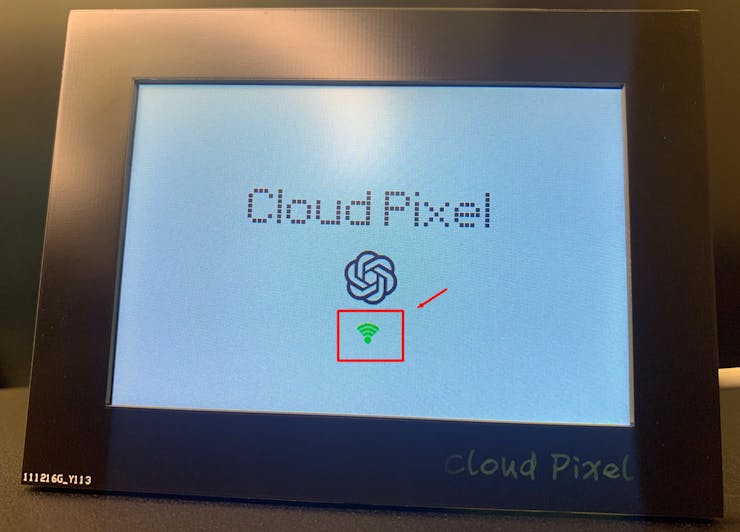
when connected to the WiFi network.
void display_wifi_status(uint8_t x,uint8_t y)
{
  if( status != WL_CONNECTED)
  {
    tft->fillCircle(x,y,3,DARKGREY);
    tft->fillArc(x,y, 5, 7, 225, 315, DARKGREY);
    tft->fillArc(x,y, 9, 11, 225, 315, DARKGREY);
    tft->fillArc(x,y, 13, 15, 225, 315, DARKGREY);
  }
  else
  {
    tft->fillCircle(x,y,3,GREEN);
    tft->fillArc(x,y, 5, 7, 225, 315, GREEN);
    tft->fillArc(x,y, 9, 11, 225, 315, GREEN);
    tft->fillArc(x,y, 13, 15, 225, 315, GREEN);
  }
}- 5.4 Display the dashboard in the “void setup()”

void display_dashboard()
{
    tft->fillScreen(WHITE);
    image_x = 6;
    image_y = 0;
    display_chatgpt_icon(2);

    tft->setTextColor(DARKGREEN);
    tft->setTextSize(2);
    tft->setCursor(110, 1);
    tft->print(String("ChatGpt Recorder & Monitor"));

    tft->drawLine(20,18,480,18,RED);
}- 5.5 Read out display content from SD card
String read_from_sd(String filename)
{
  String str;
  // re-open the file for reading:
  myFile = SD.open(filename);
  if (myFile) {
    //Serial.print(filename);
    //Serial.println(":");
    while (myFile.available()) {
      str += (char)myFile.read();
    }
    //Serial.println(str);
    myFile.close();
  }
  else
  {
//    Serial.print(filename);
//    Serial.println(" is NOT");
  }
  return str;
}- 5.6 Display in the screen
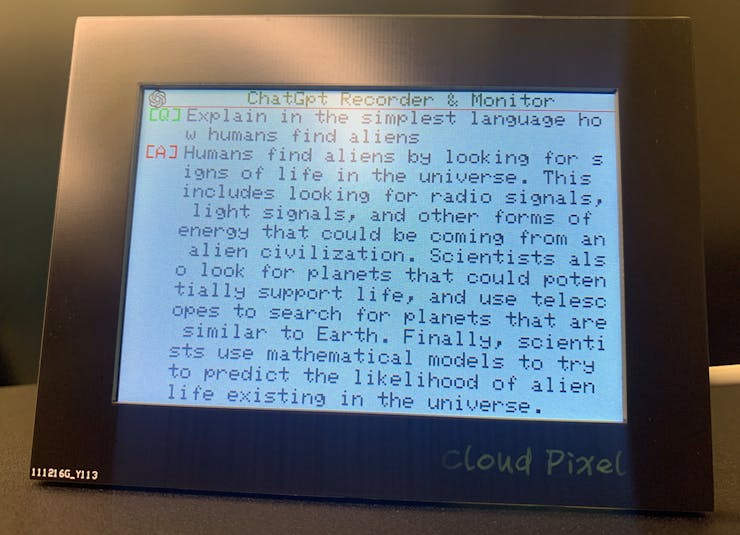
The screen display processing code is as follows:
case do_chatgpt_display:
{
display_dashboard();
uint16_t display_row_num = 0;
uint16_t display_num = 0;
dataStart = SD_str.lastIndexOf("[Q]{") + strlen("[Q]{");
dataEnd = SD_str.indexOf("}\r\n", dataStart);
dataStr = SD_str.substring(dataStart, dataEnd);
dataLen = dataStr.length();
tft->setTextColor(GREEN);
tft->setTextSize(2);
tft->setCursor(6, (display_row_num+1)*20);
tft->print("[Q]");
tft->setTextColor(DARKGREY);
if(dataStr.length()>= 35)
{
while(((dataStr.length()-(display_num)*35))>35)
{
tft->setCursor(48, (display_row_num+1)*20);
tft->print(dataStr.substring(display_num*35, (display_num+1)*35));
display_row_num ++;
display_num ++;
}
}
tft->setCursor(48, (display_row_num+1)*20);
tft->print(dataStr.substring(display_num*35, dataStr.length()));
display_row_num ++;
display_num = 0;
dataStart = SD_str.lastIndexOf("[A]{") + strlen("[A]{");
dataEnd = SD_str.indexOf("}\r\n", dataStart);
dataStr = SD_str.substring(dataStart, dataEnd);
dataLen = dataStr.length();
tft->setTextColor(RED);
tft->setTextSize(2);
tft->setCursor(6, (display_row_num+1)*20);
tft->print("[A]");
tft->setTextColor(DARKGREY);
if(dataStr.length()>= 35)
{
Serial.println(dataStr.length());
while((dataStr.length()-((display_num)*35))>35)
{
tft->setCursor(48, (display_row_num+1)*20);
tft->print(dataStr.substring(display_num*35, (display_num+1)*35));
Serial.println((dataStr.length()-((display_num+1)*35)));
display_row_num ++;
display_num++;
}
}
tft->setCursor(48, (display_row_num+1)*20);
tft->print(dataStr.substring(display_num*35, dataStr.length()));
Serial.println("do_chatgpt_display");
currentState = do_webserver_index;
}
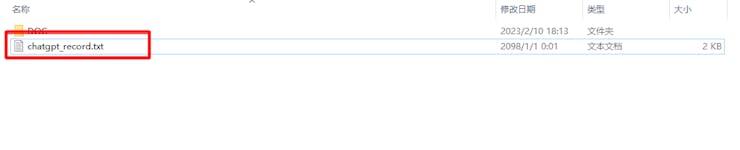
break;The files stored in SD are as follows:
Finish!
-
ChatGPT Recorder & Monitor_Arduino_Code

-
ChatGPT_Recorder_&_Monitor_schmatic.pdf