
Blog – DIY NTRIP CASTER CORS Server with ESP32 and free DDNS host name – F9P PX1122R ESP32 RTK.
In this post, we will try to guide you in as much detail as possible to be able to build an NTRIP CASTER RTK server with ESP32.
DIY NTRIP CASTER CORS Server with ESP32 and free DDNS host name – ESP32 RTK – F9P PX1122R.
In this post, we will try to guide you in as much detail as possible to be able to build an NTRIP CASTER RTK server with ESP32.
Yes, you didn’t get it wrong!
You will have your own fully functional CORS NTRIP CASTER server that can be used for any RTK application without RTK2GO any more (ESPrtk version 3.9.95 ):

(It’s NTRIP CORS Server by itself and no require RTK2GO server anymore )
See one of our user James Duggan building his CORS server for his AGOPENGPS jonhdree tractor :
https://esprtk.com/james_duggan_agopengps_ntrip_caster_server_rtk/
He made an video and shared to us, watch it here :
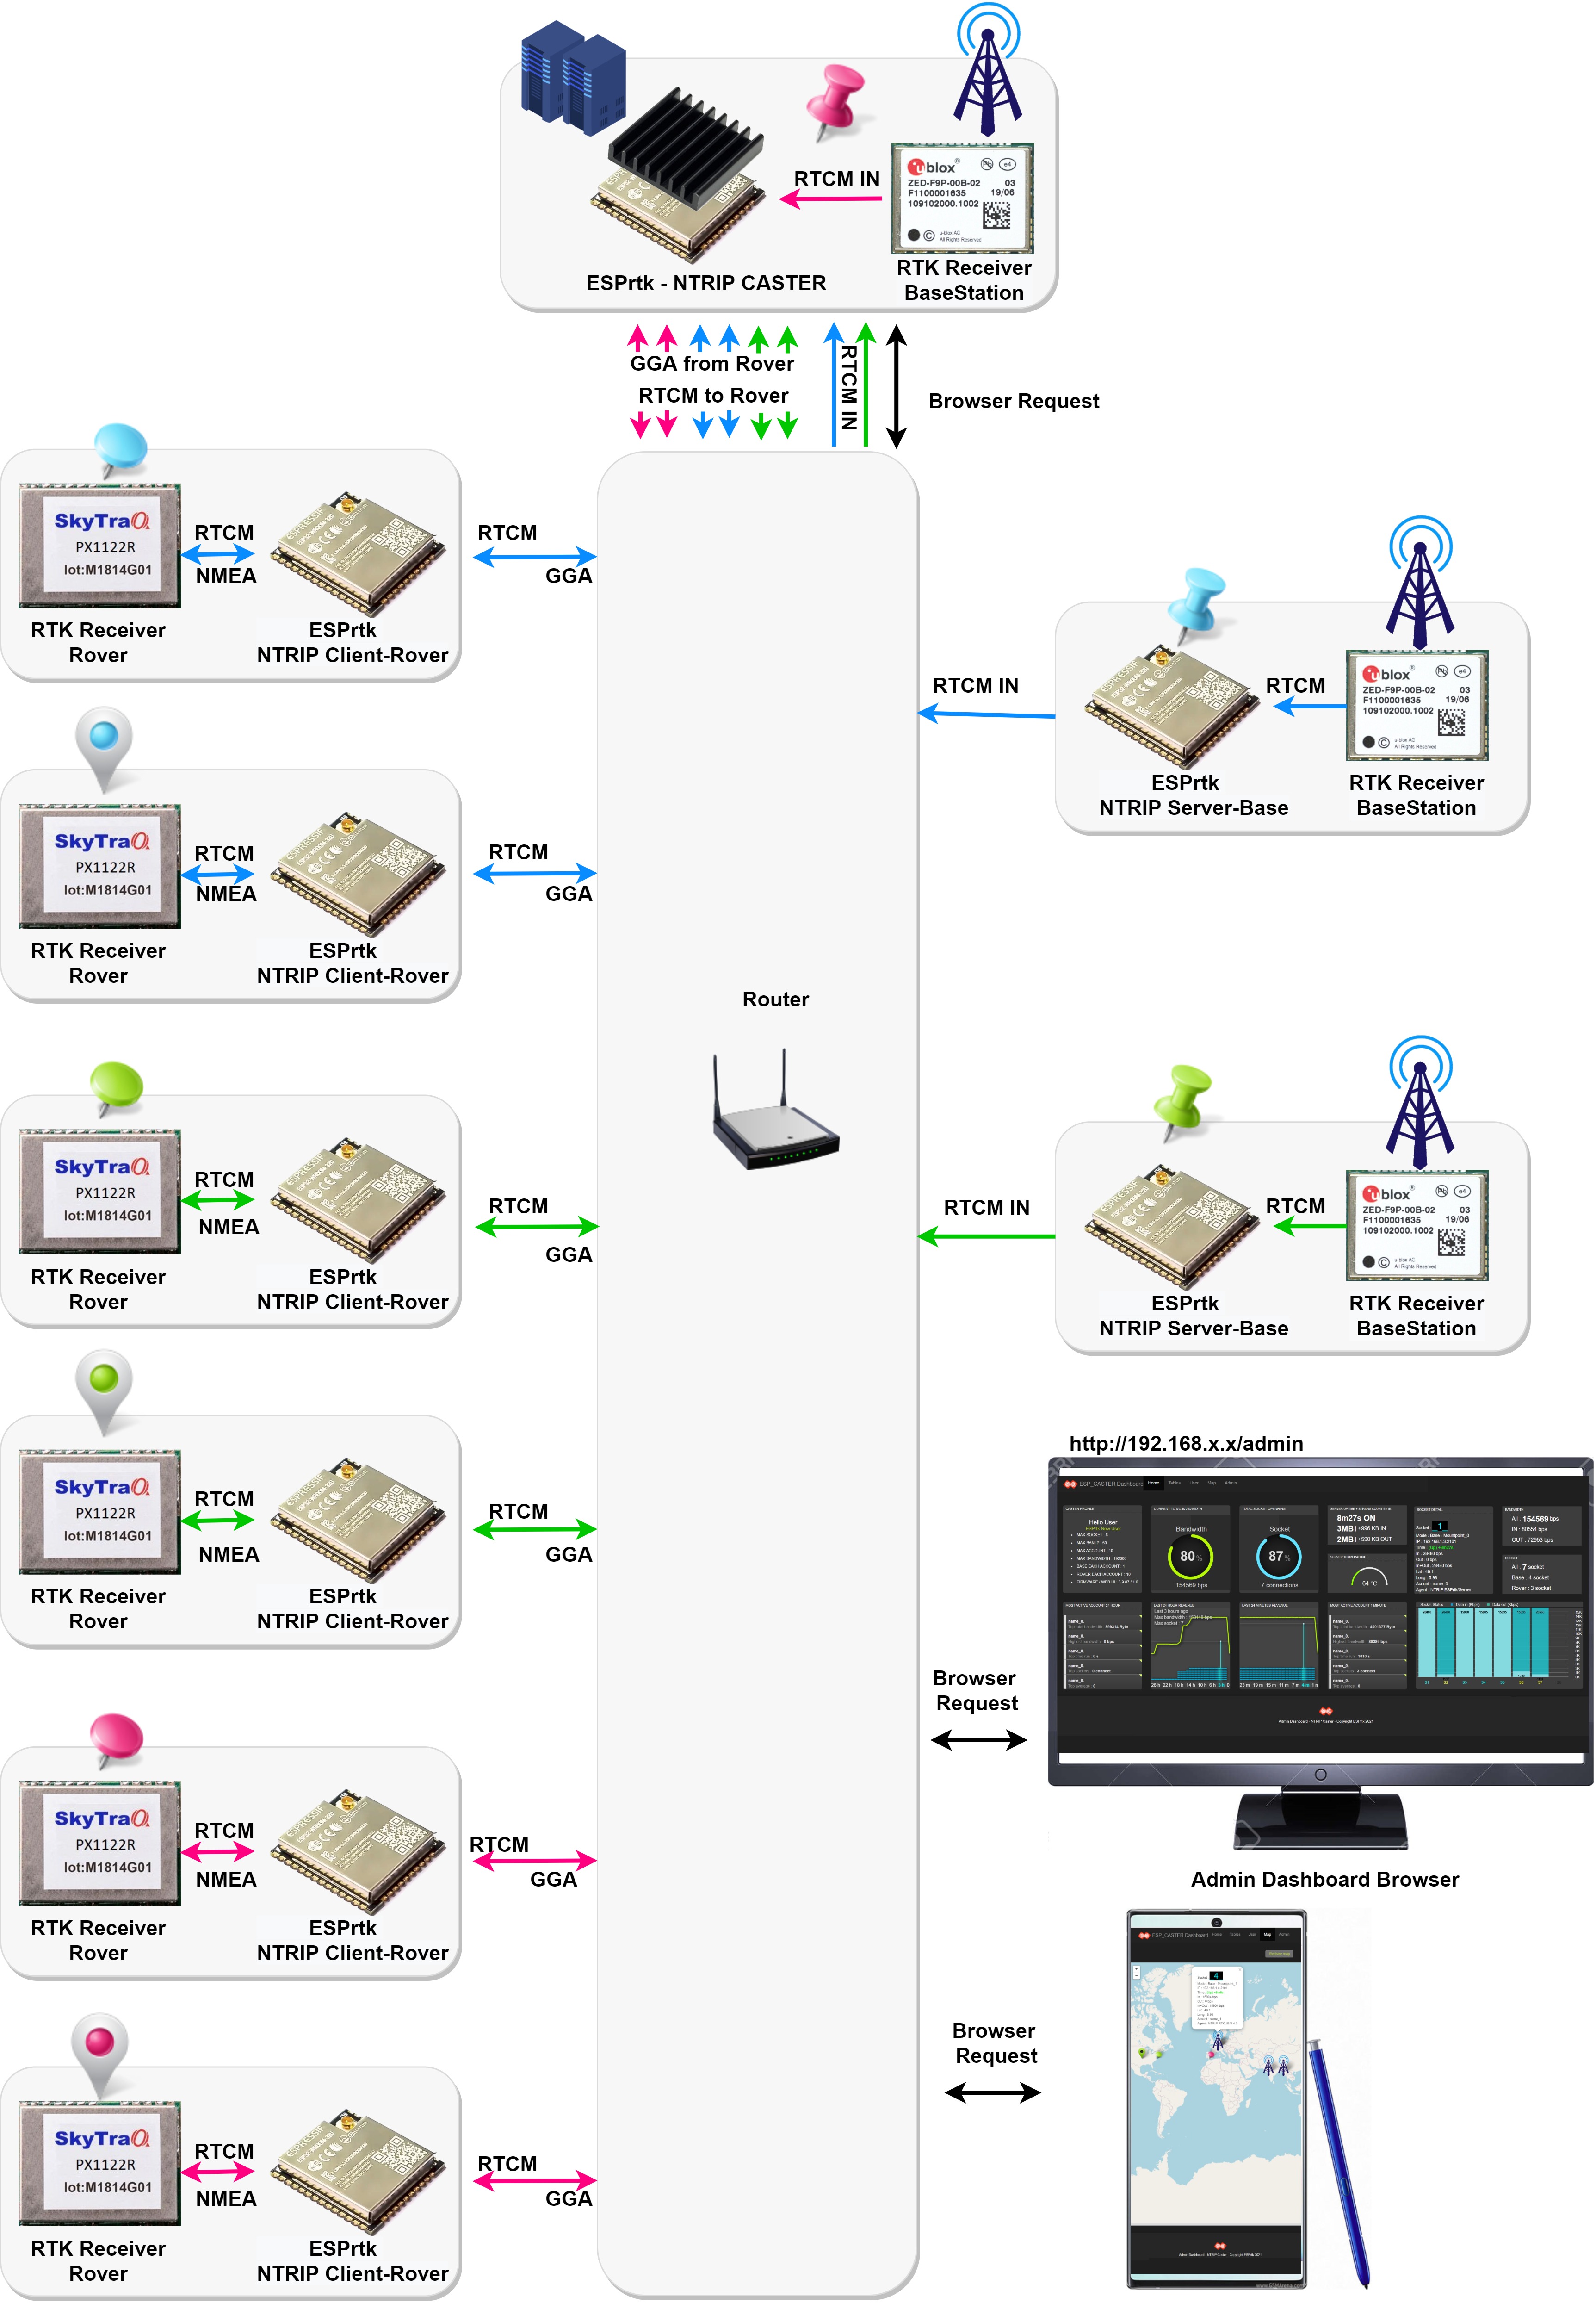
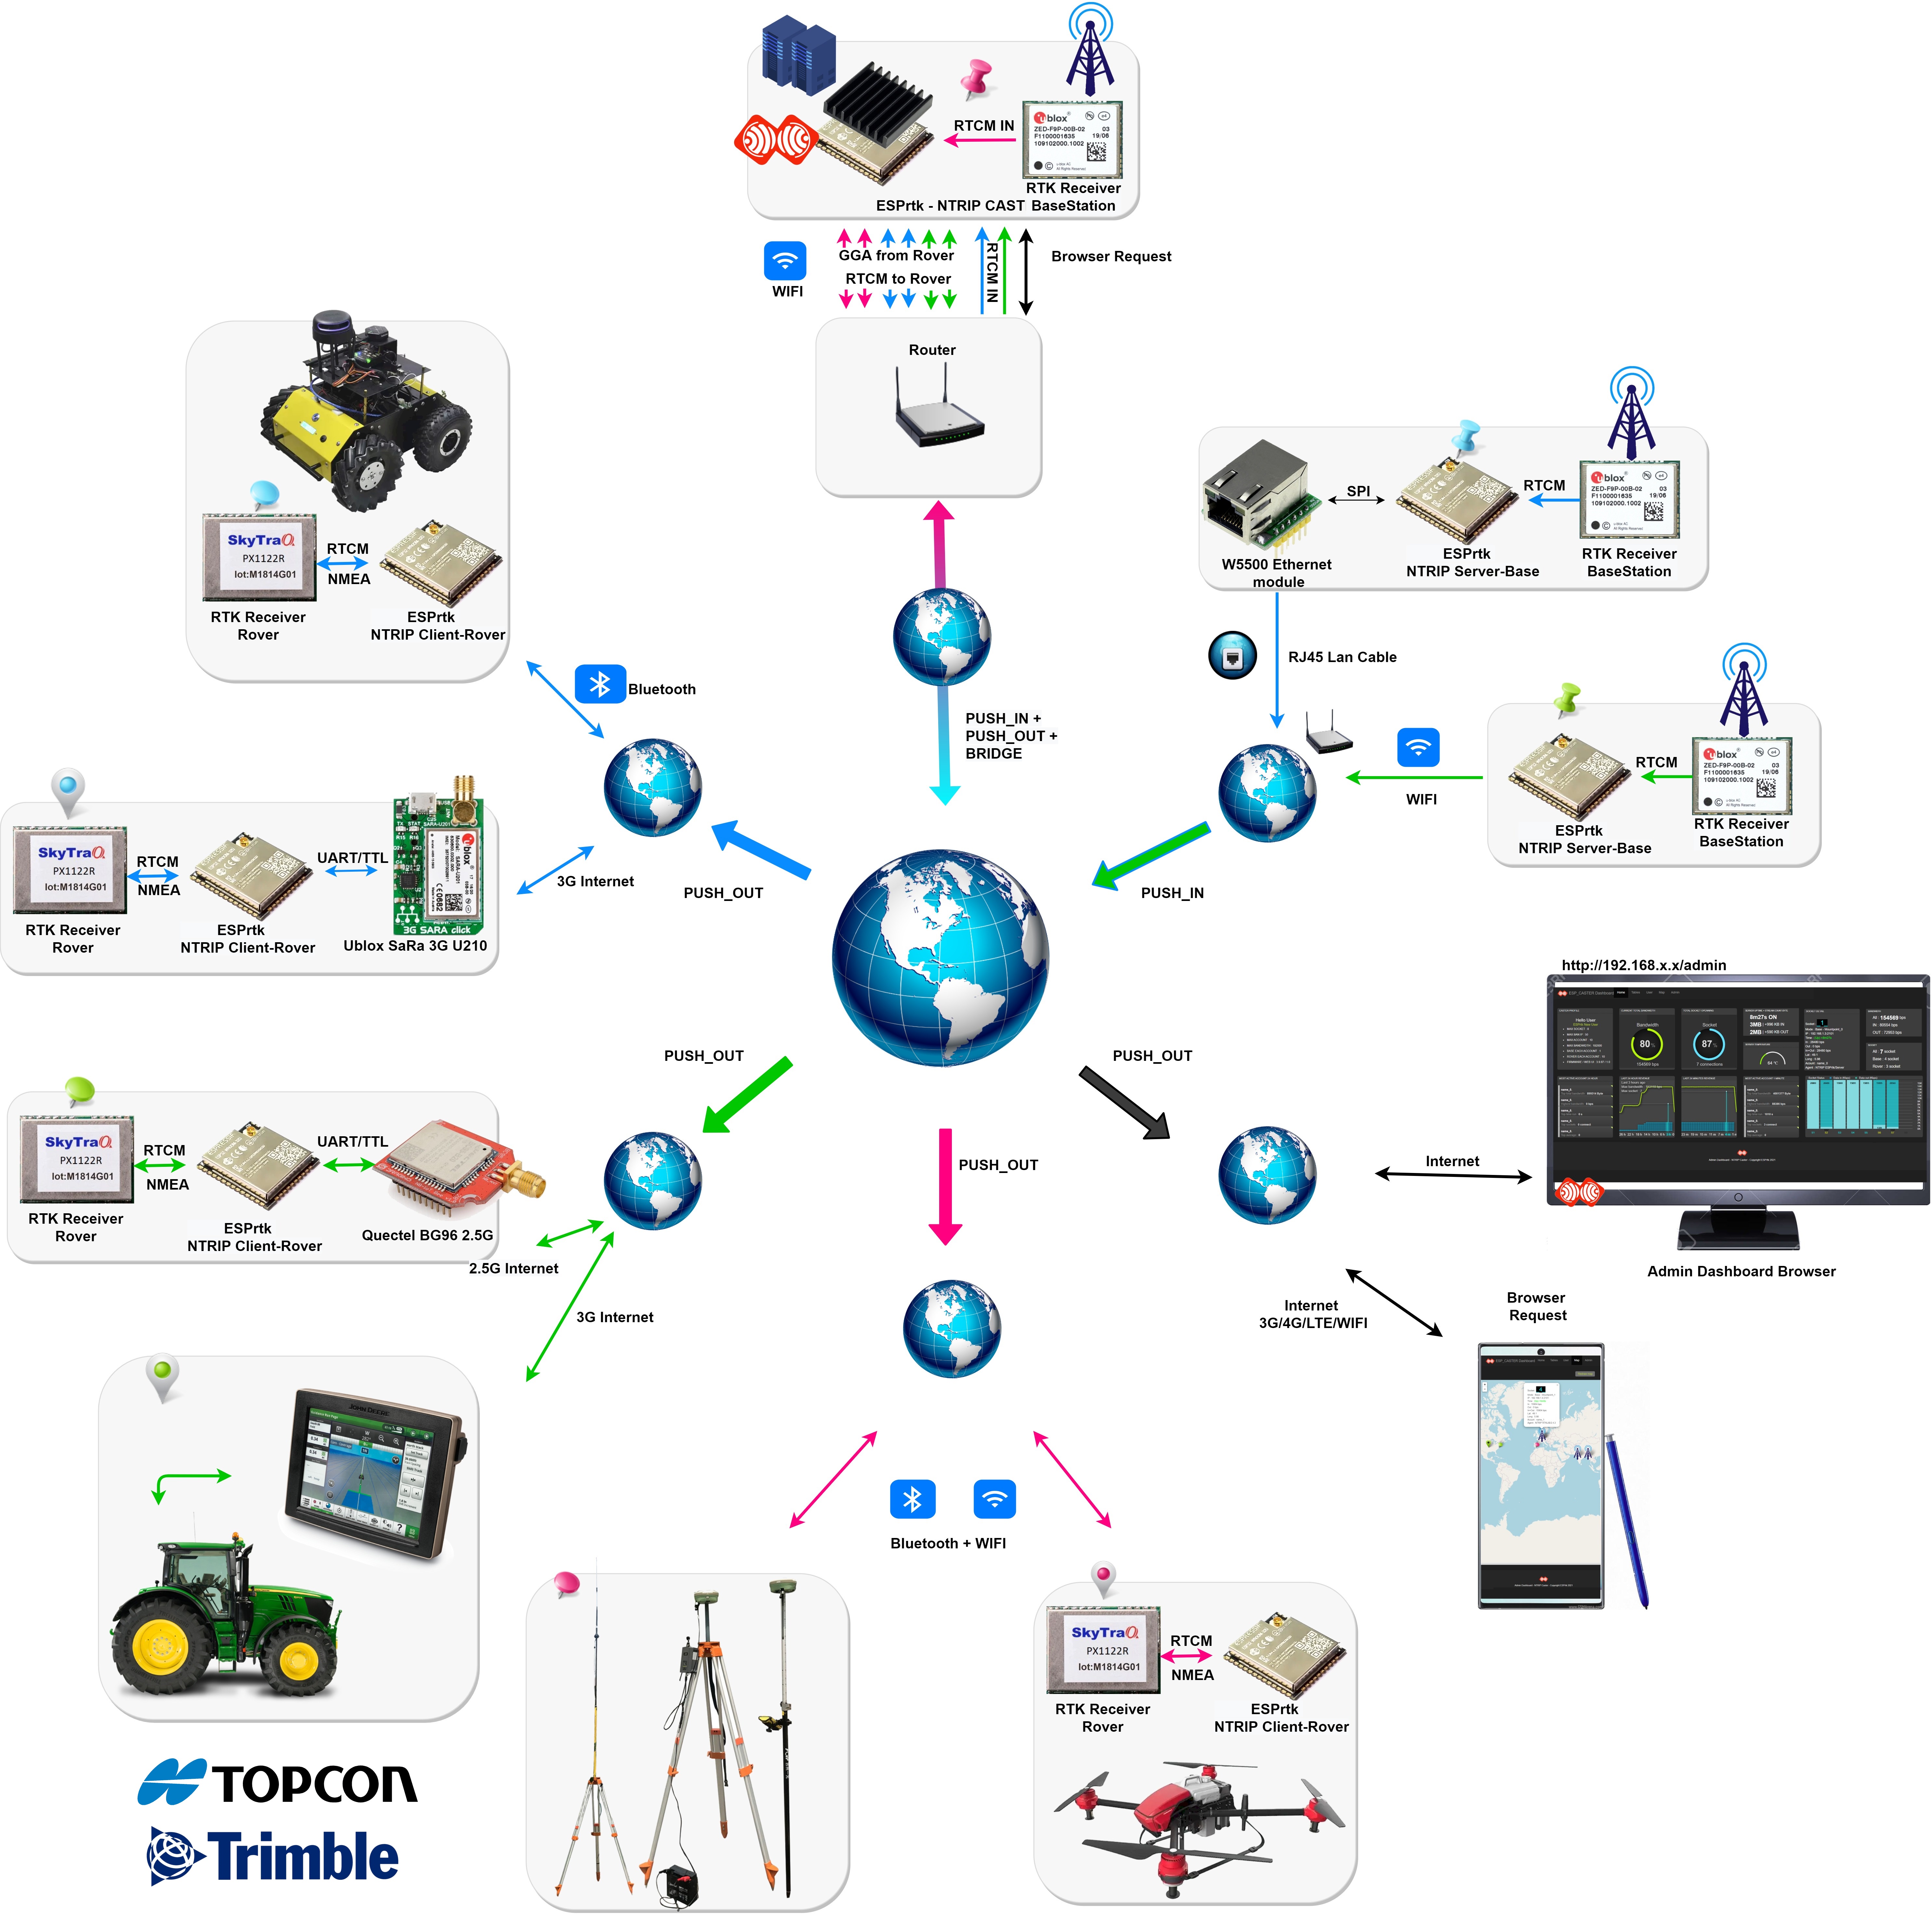
- Realtime CORS NTRIP CASTER server.
- Support NTRIP Client (Rover PUSH-DOWN).
- Support NTRIP Server (Basestation PUSH-UP).
- Support analysis of NMEA GGA/RMC from Rover and display on map.
- MAX SOCKET : 9 + 1 (including Admin dashboard).
- MAX BAN IP : 50
- MAX ACCOUNT : 100
- MAX BANDWIDTH : 3600000 bps
- BASE EACH ACCOUNT : 1
- ROVER EACH ACCOUNT : 10
- NMEA/RTCM injection : GGA , RTCM 1005,1006,1007,1008,1032,1033,1004,1012 (for TOPCON, Trimble and Hemisphere, John Deree)
- Admin management page (Account, kick or ban connection, map, graph, restart …)
- Runs in local network ( address 192.168.x.x:port )
- Run in the global network and connect anywhere in the world with the free DDNS service!
- Access and Server type select (img)
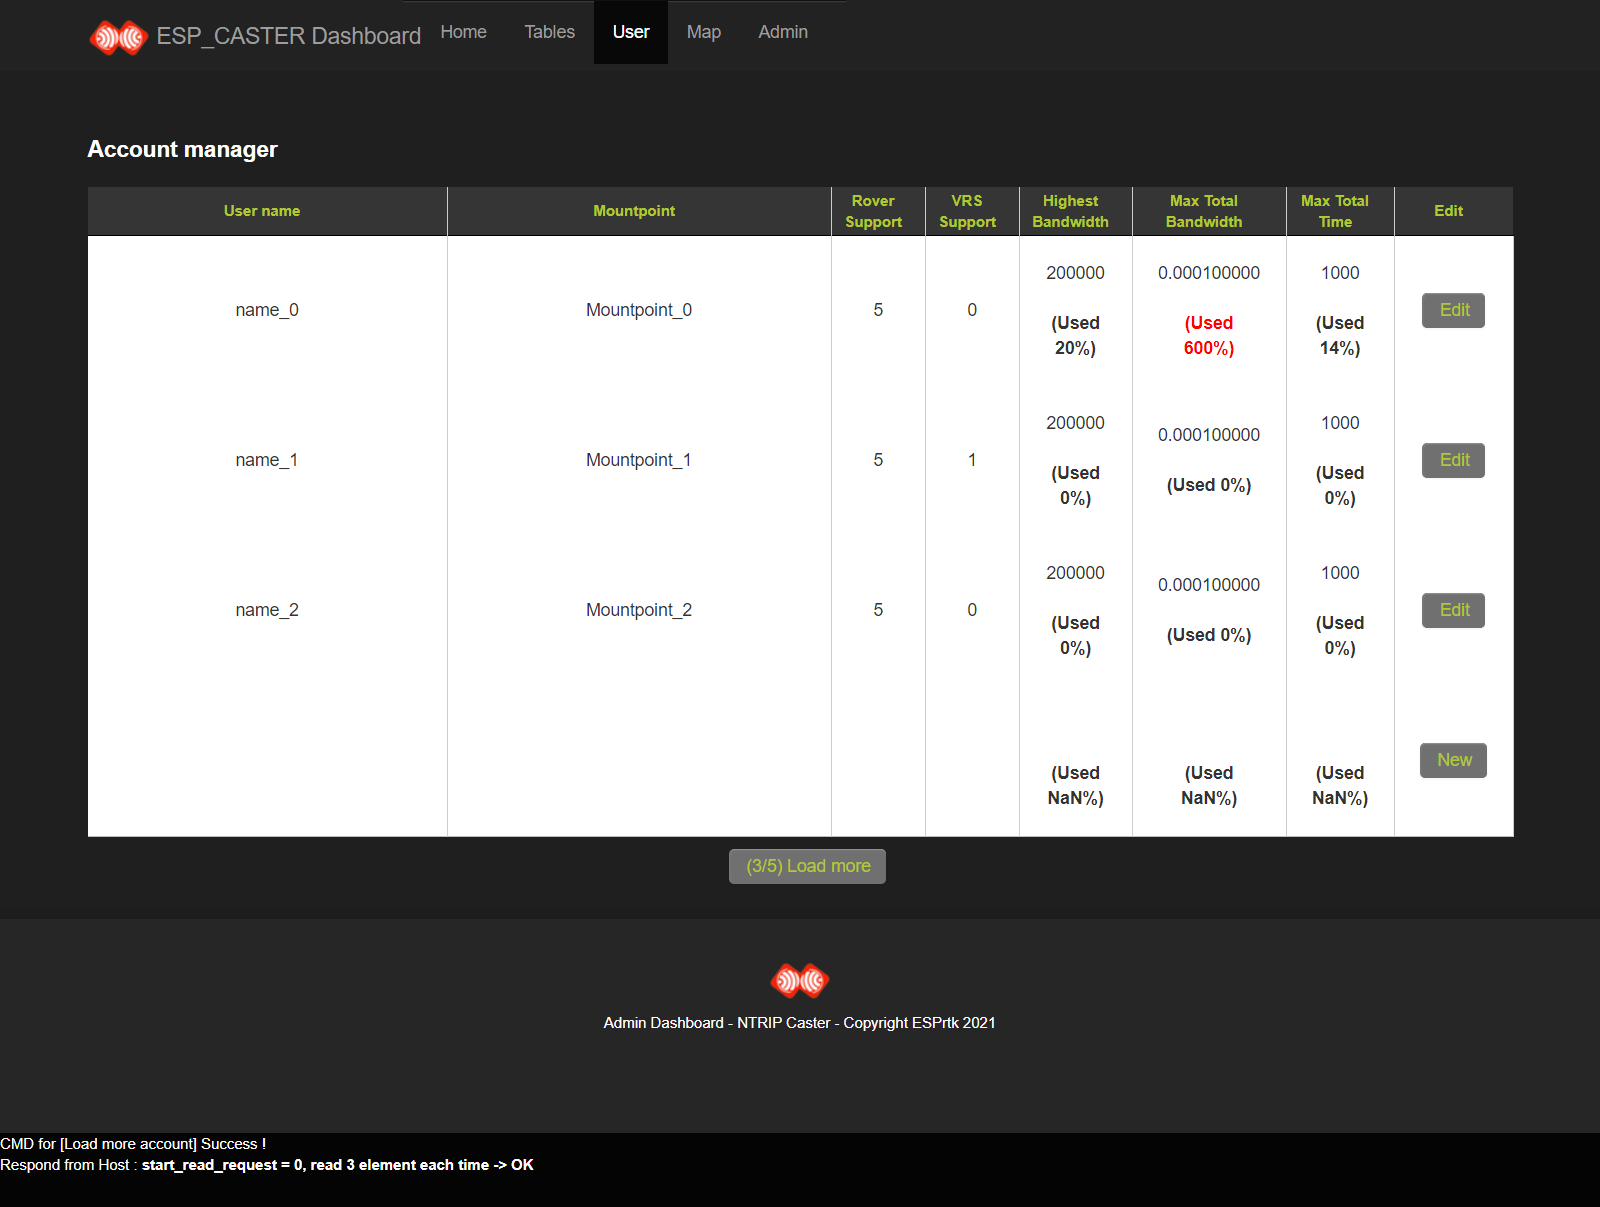
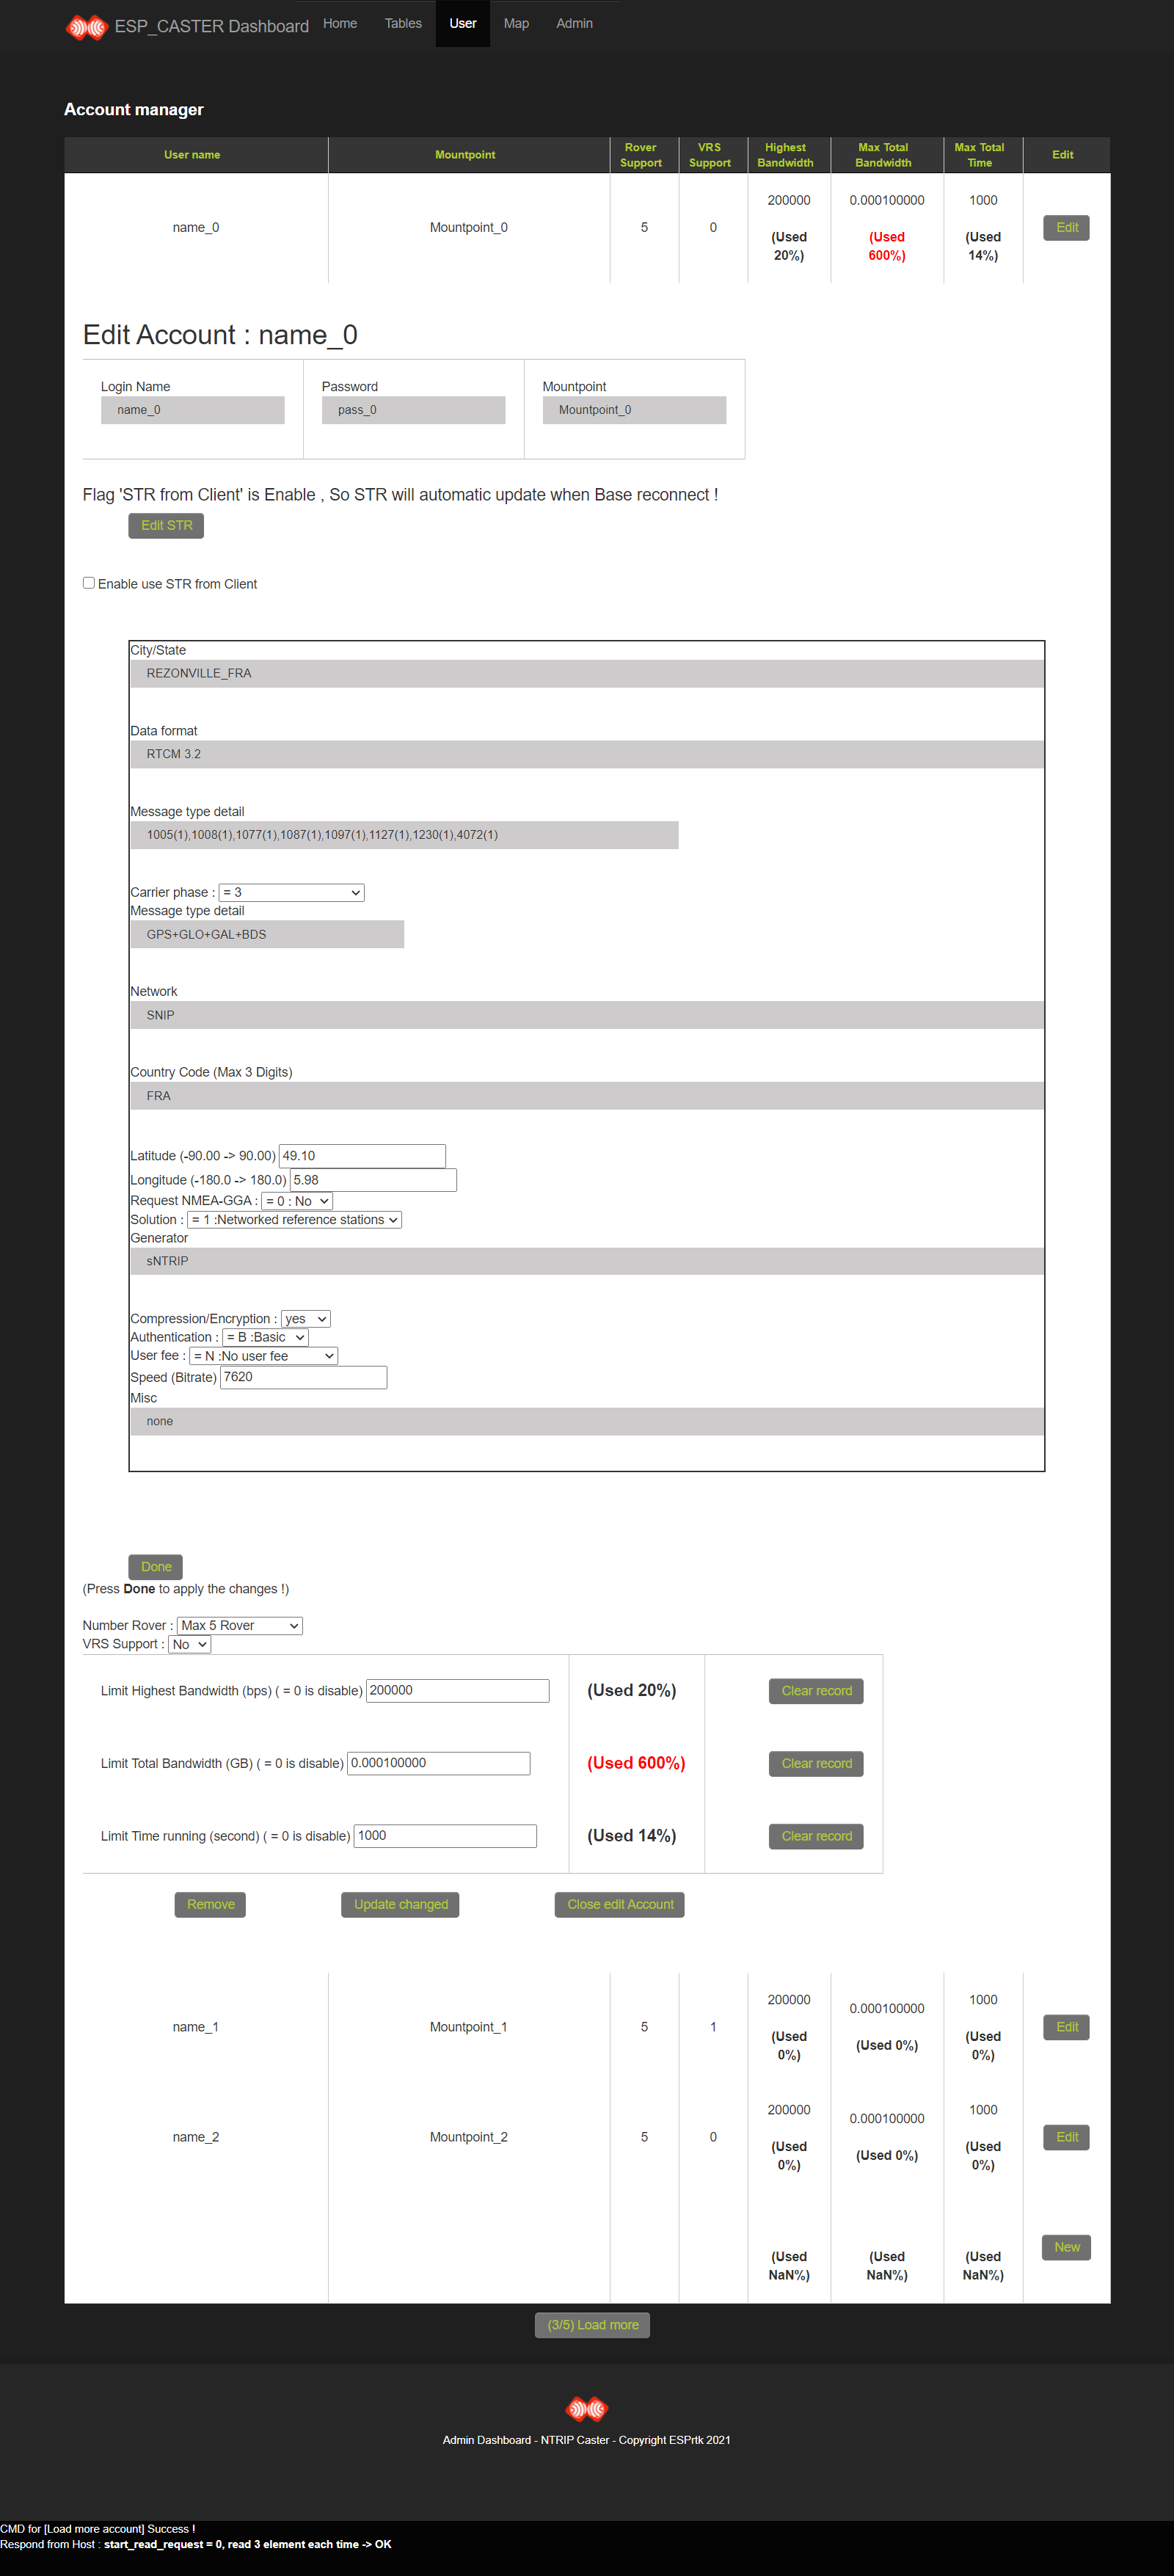
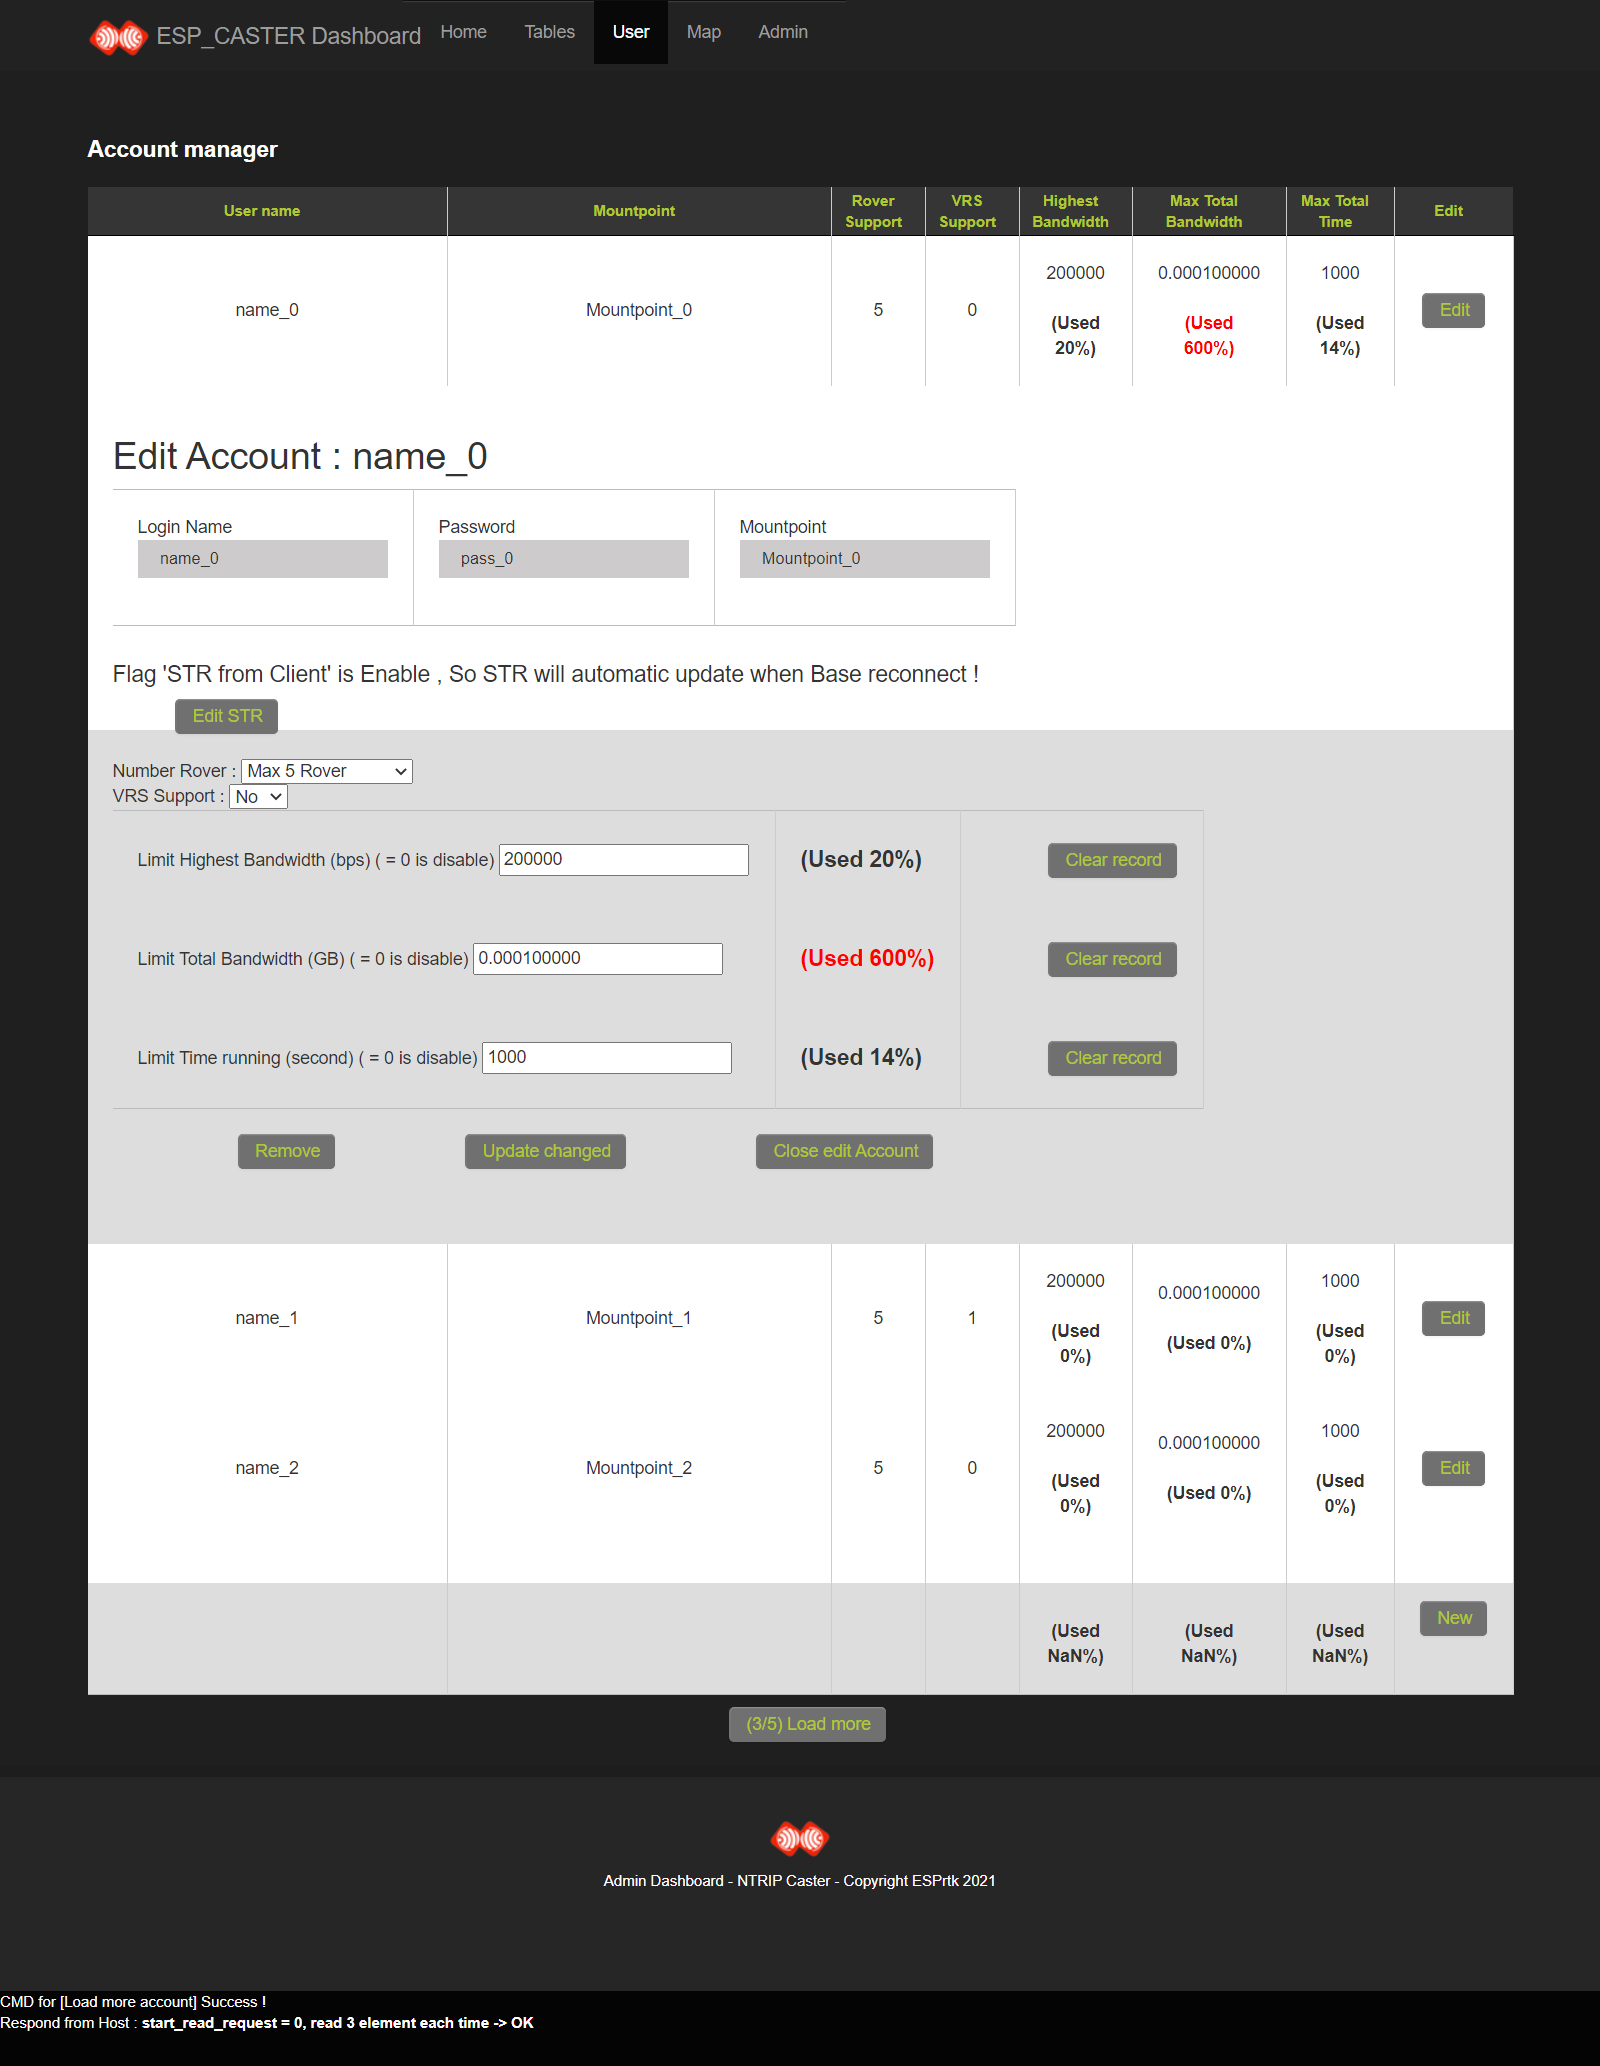
- Account manager for each Base/Rover (img)
- Custom STR editor for each Base/Rover (img)
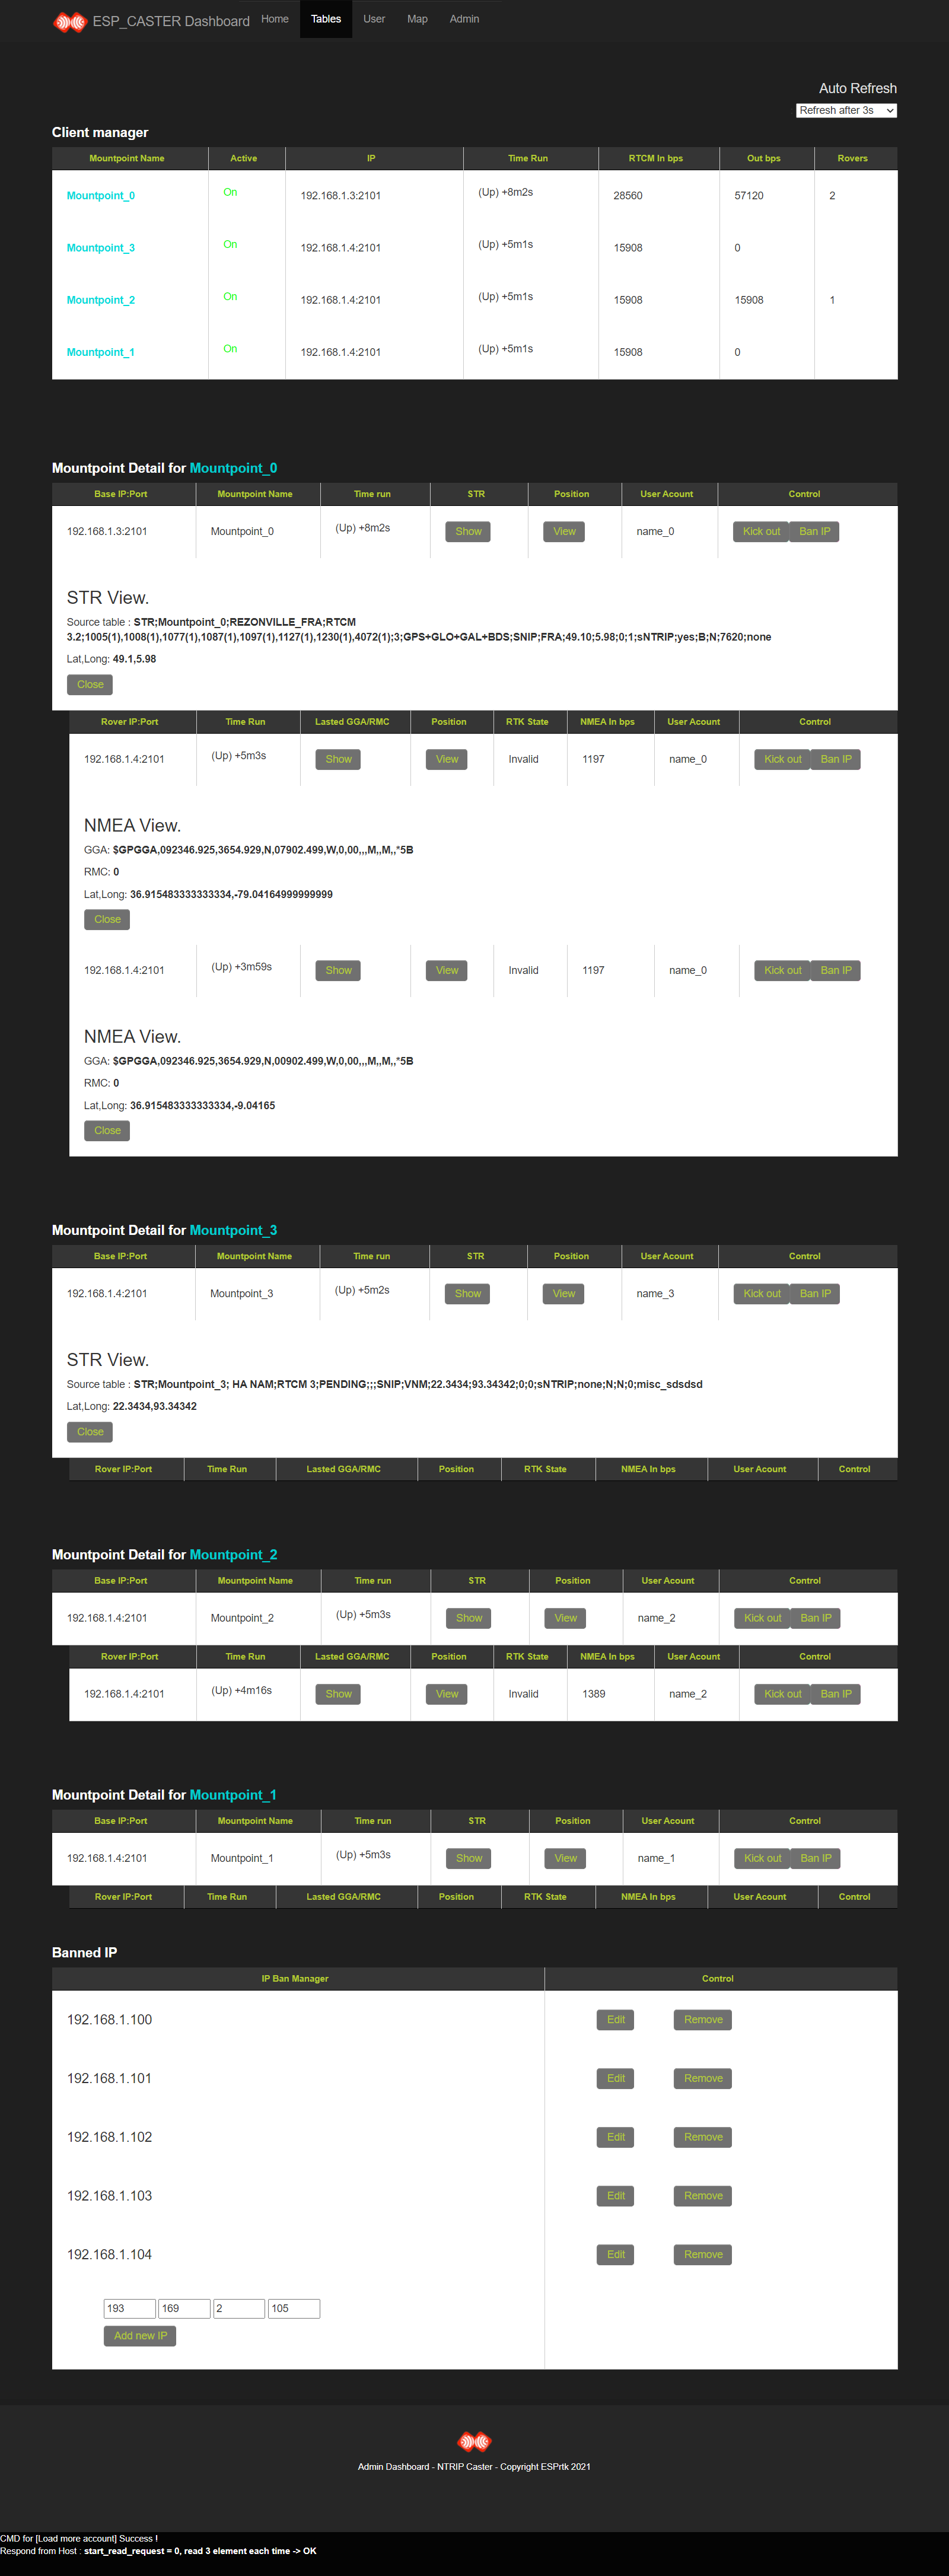
- Socket manager , force kick out, ban IP user , IP/Port/Acount/Speed ….. for each Base/Rover (img)
- Set limit bandwidth , limit time , limit rover numbers , VRS , password login ,…. for each Base/Rover (img)
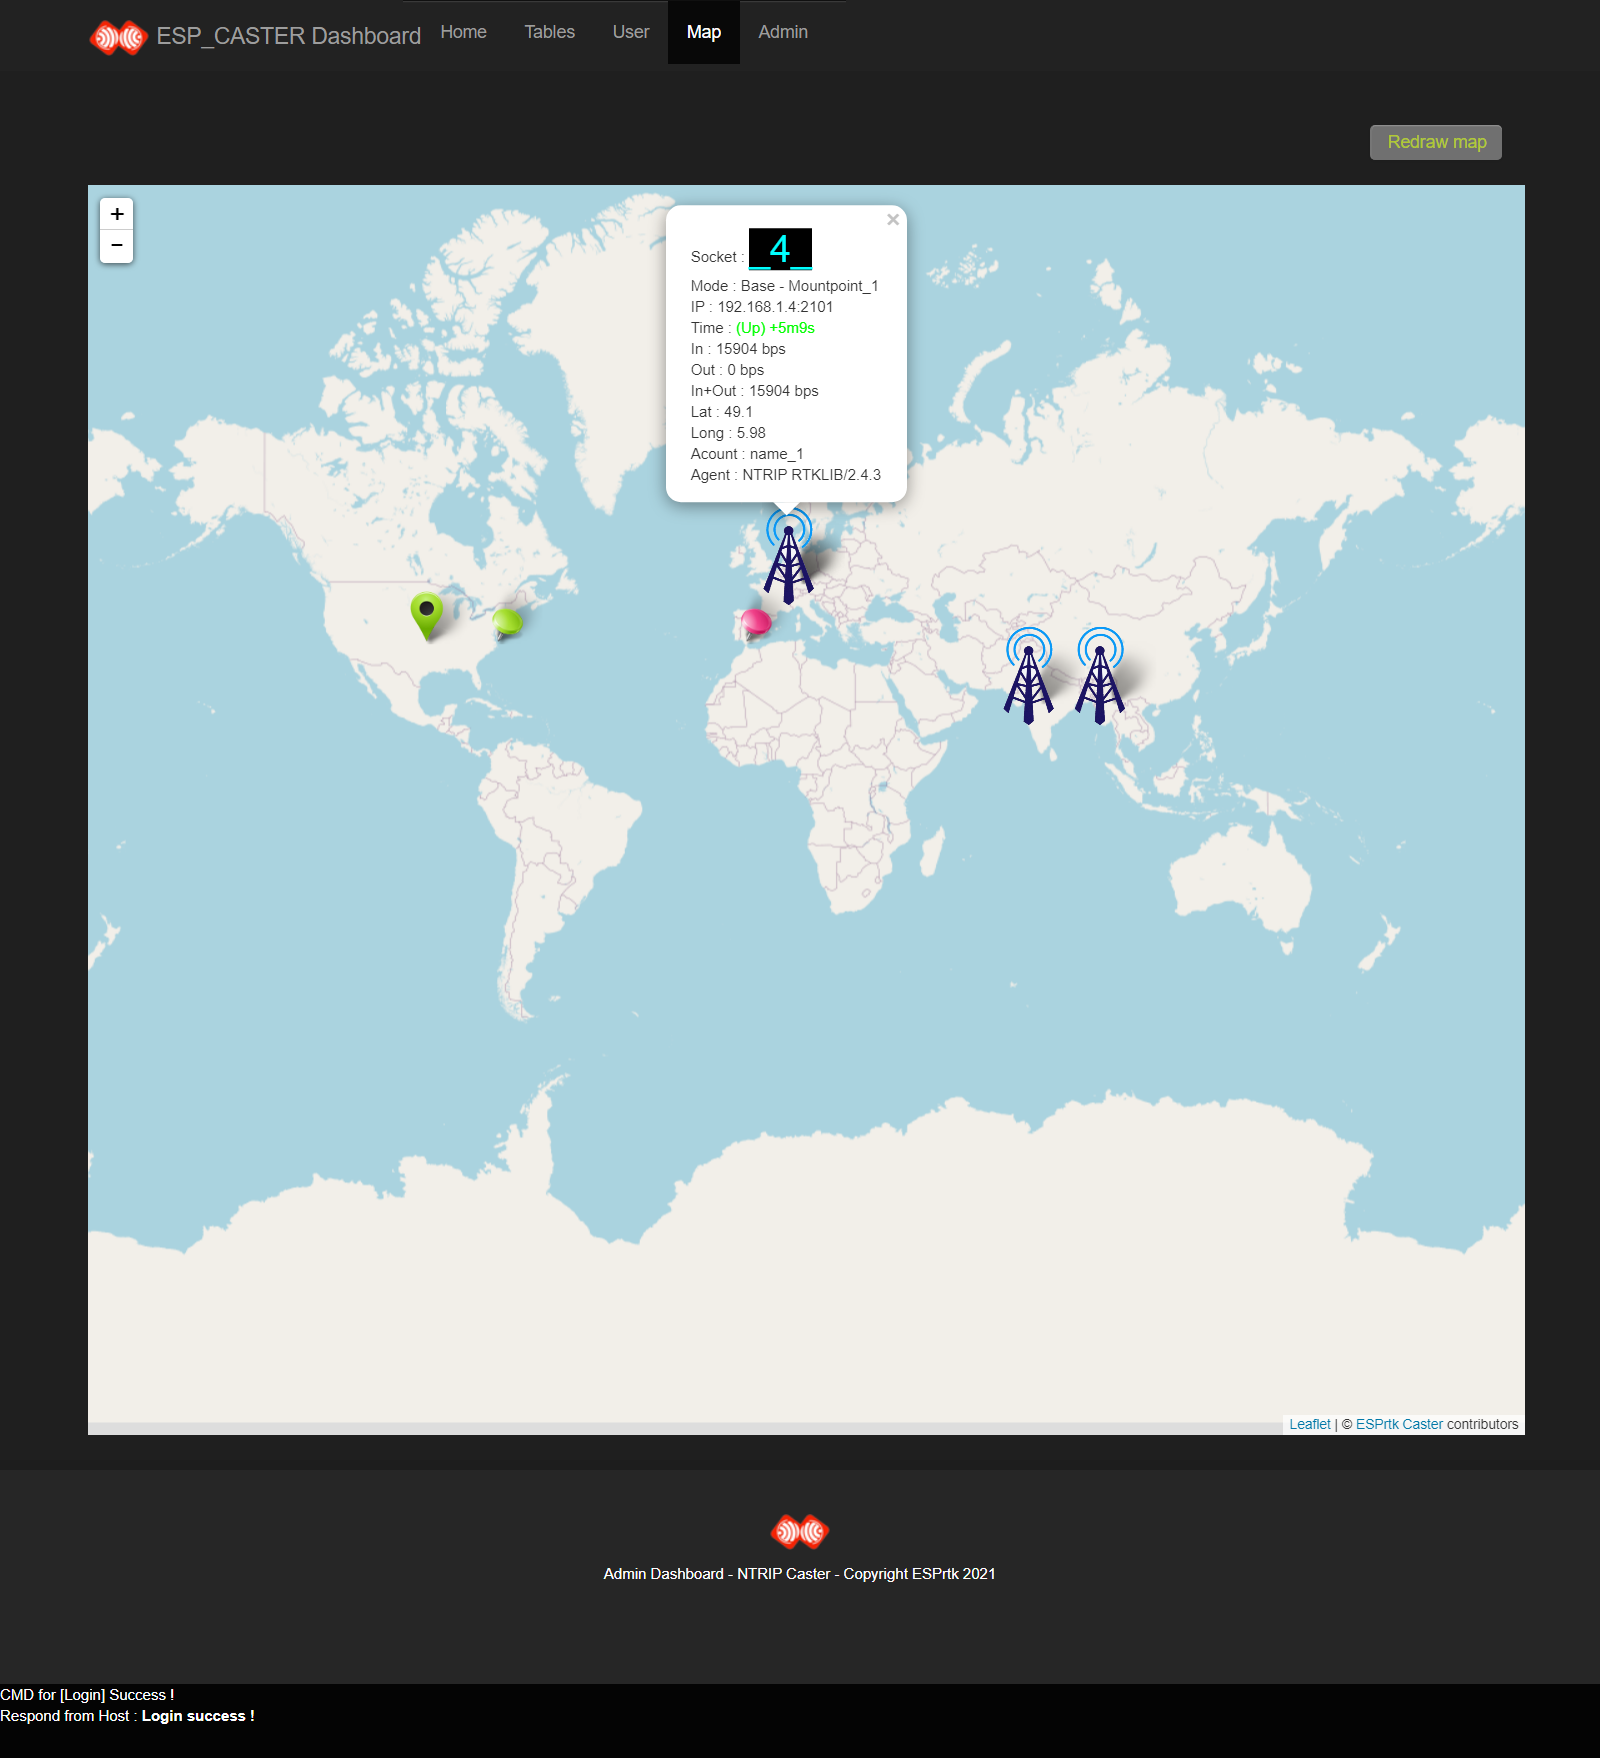
- STR/NMEA/GGA/RMC collector , real time tracking and position viewer by map view , auto marker , tooltip – popup ,… for each Base/Rover (img)
- View all position of Base and Rover on a single page (img)
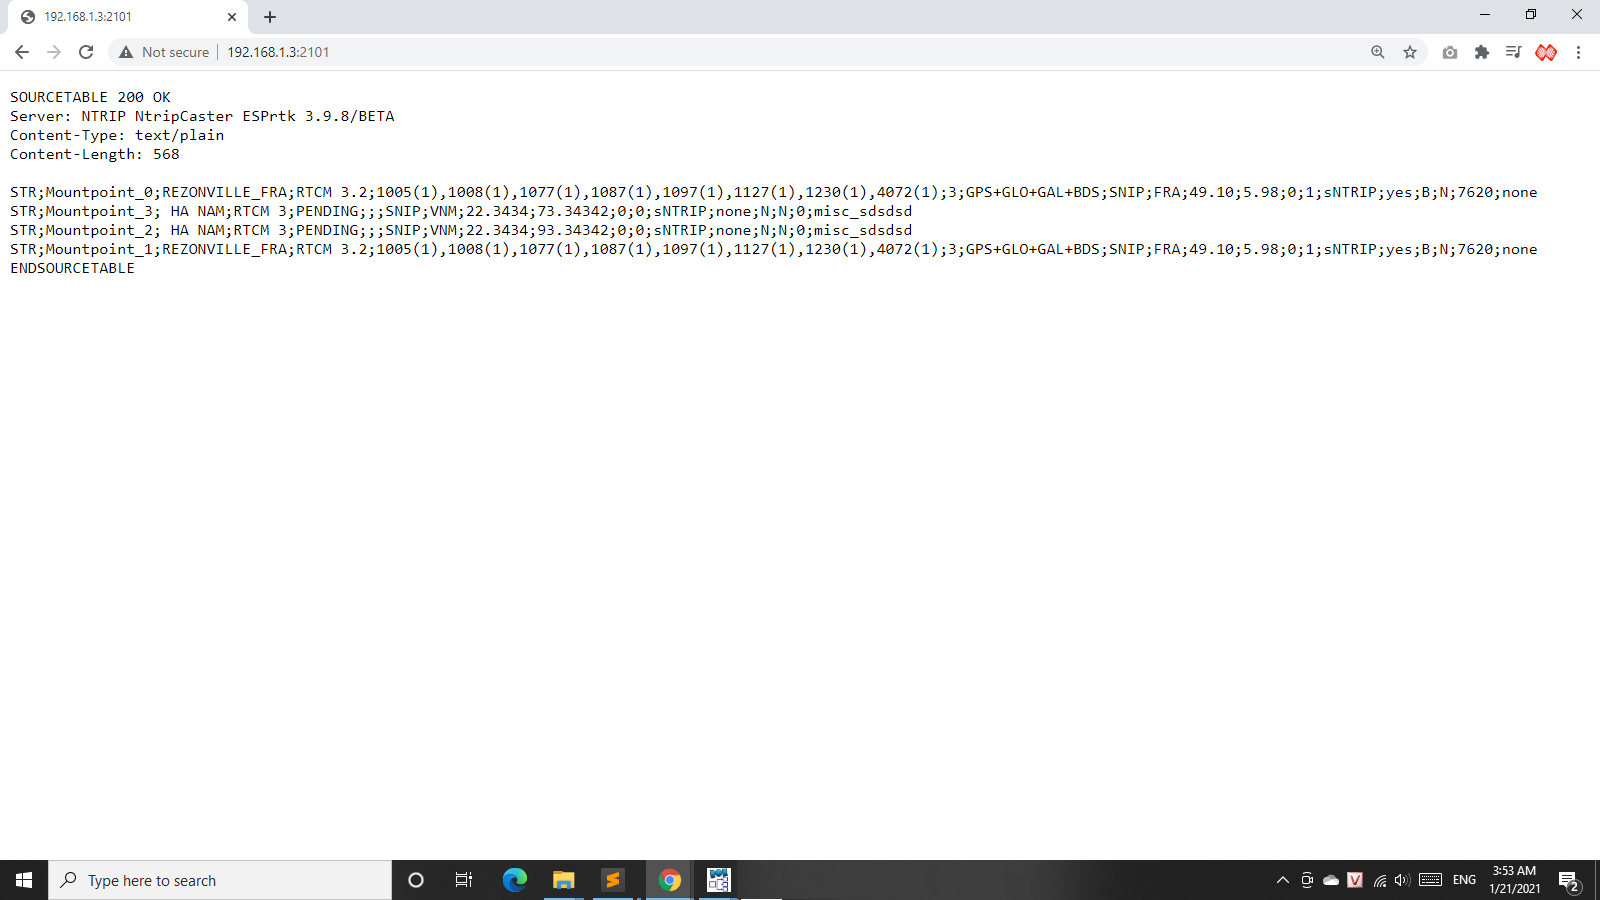
- Mountpoint Sourcetable view on browser (img)
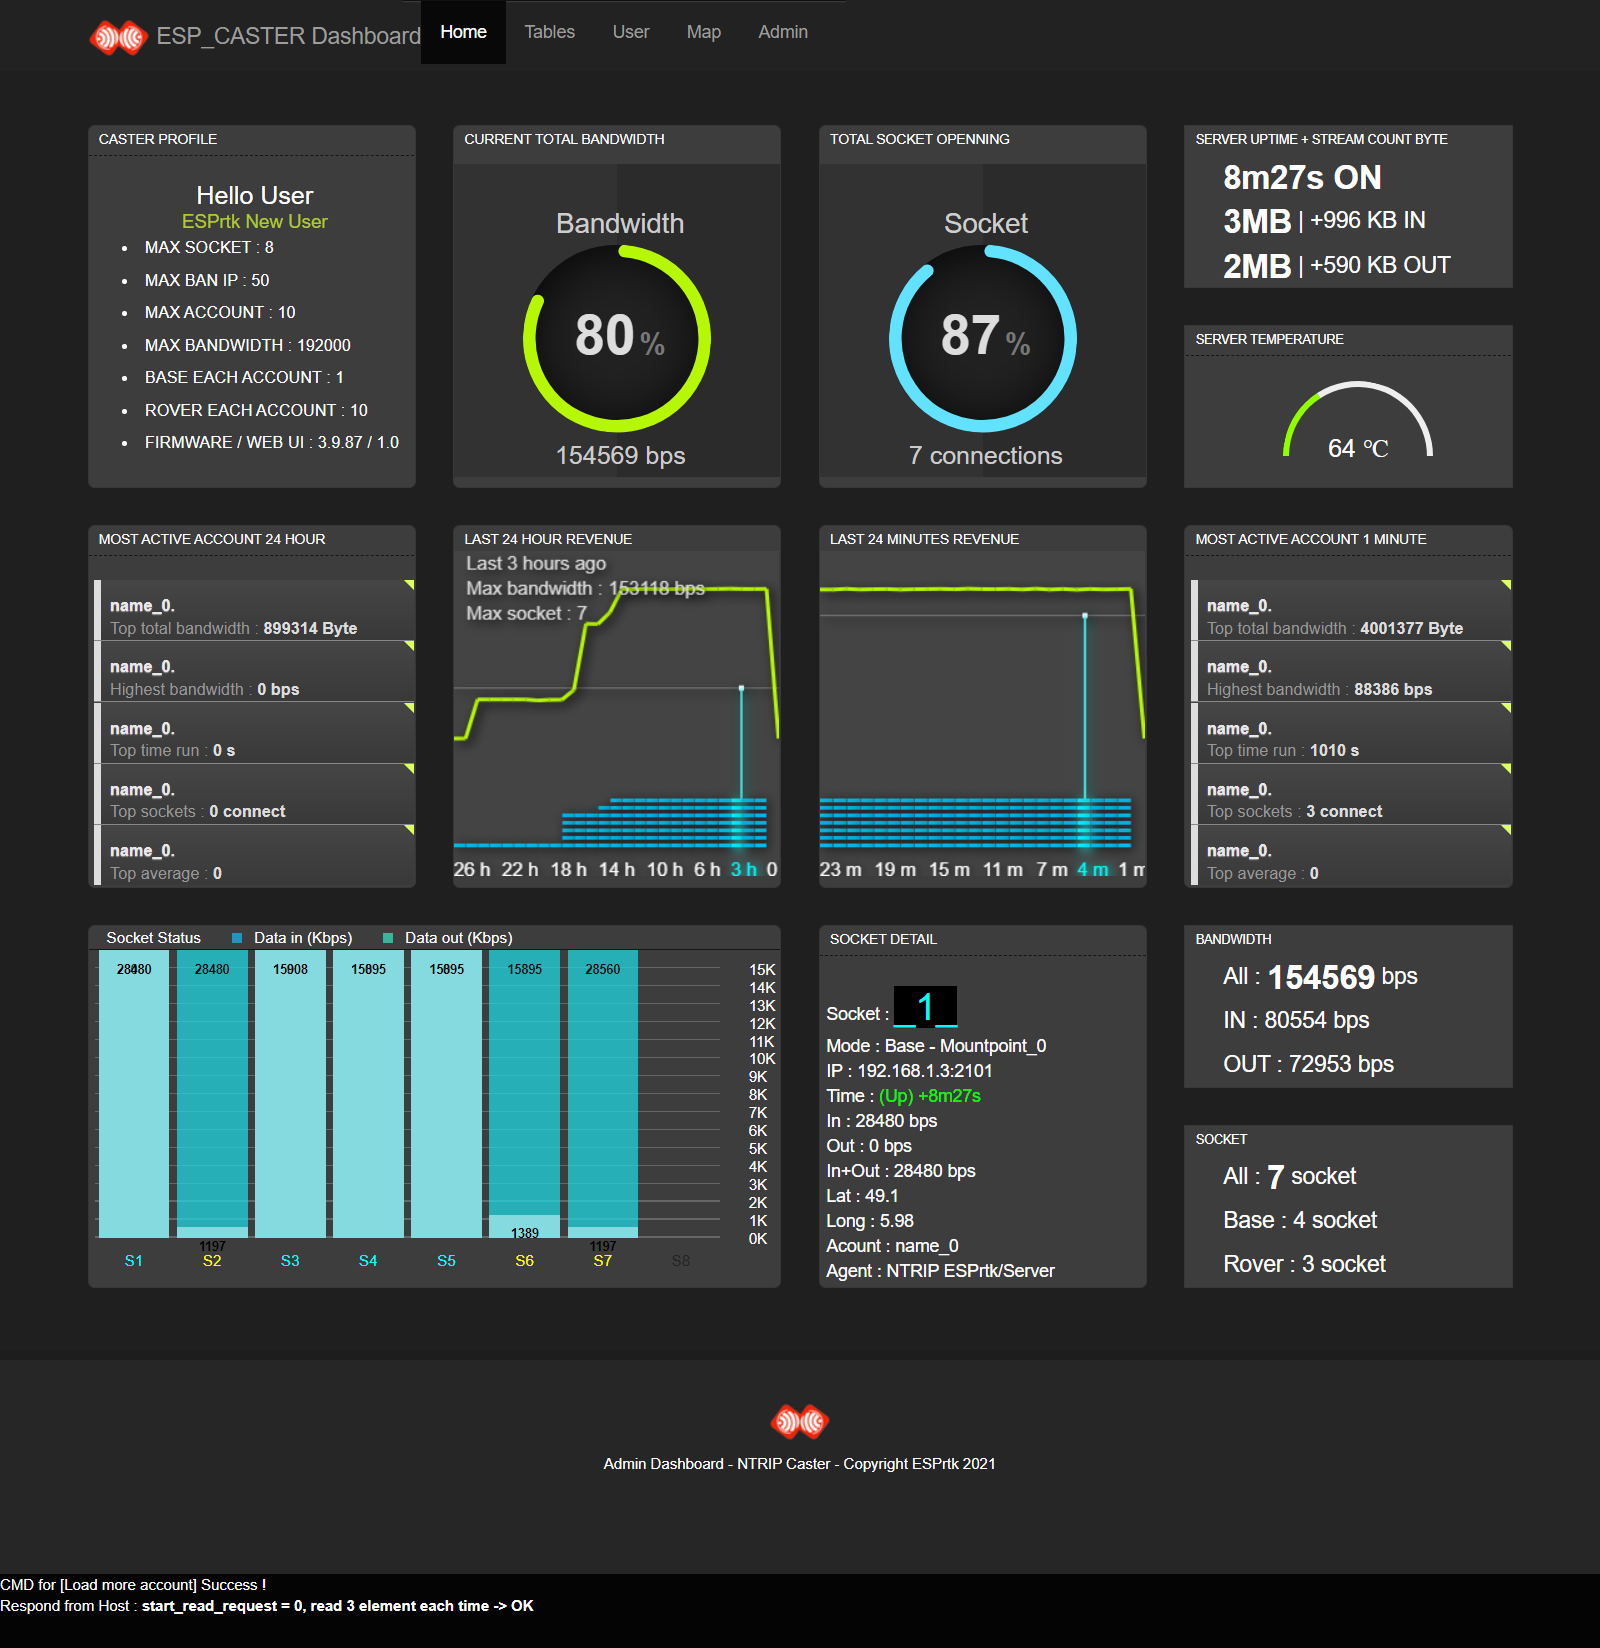
- Dash board viewer : CASTER PROFILE , CURRENT TOTAL BANDWIDTH , TOTAL SOCKET OPENNING, SERVER UPTIME + STREAM COUNT BYTE, MOST ACTIVE ACCOUNT 24 HOUR , LAST 24 HOUR REVENUE , LAST 24 MINUTES REVENUE ,MOST ACTIVE ACCOUNT 1 MINUTE , Socket StatusData in (Kbps)Data out (Kbps), SOCKET DETAIL (Socket , Mode,IP +Time +In bps+Out bps+In&Out bps+Lat +Long+ Acount Name +HTTP User Agent ) ,BANDWIDTH (ALL+IN+OUT) , SOCKET COUNT (All+BASE+ROVER) (img)
Learn all the powerful features here:
We also created a video tutorial here: https://youtu.be/jYI4_MdHs5E
Hardware preparation
ESPrtk NTRIP CASTER is supported since version 3.9.89 .
But we recommend using the latest version of ESPrtk. ( currently 3.9.95 ).
Learn about ESPrtk 3.x.x version here: 3.x.x Firmware Support
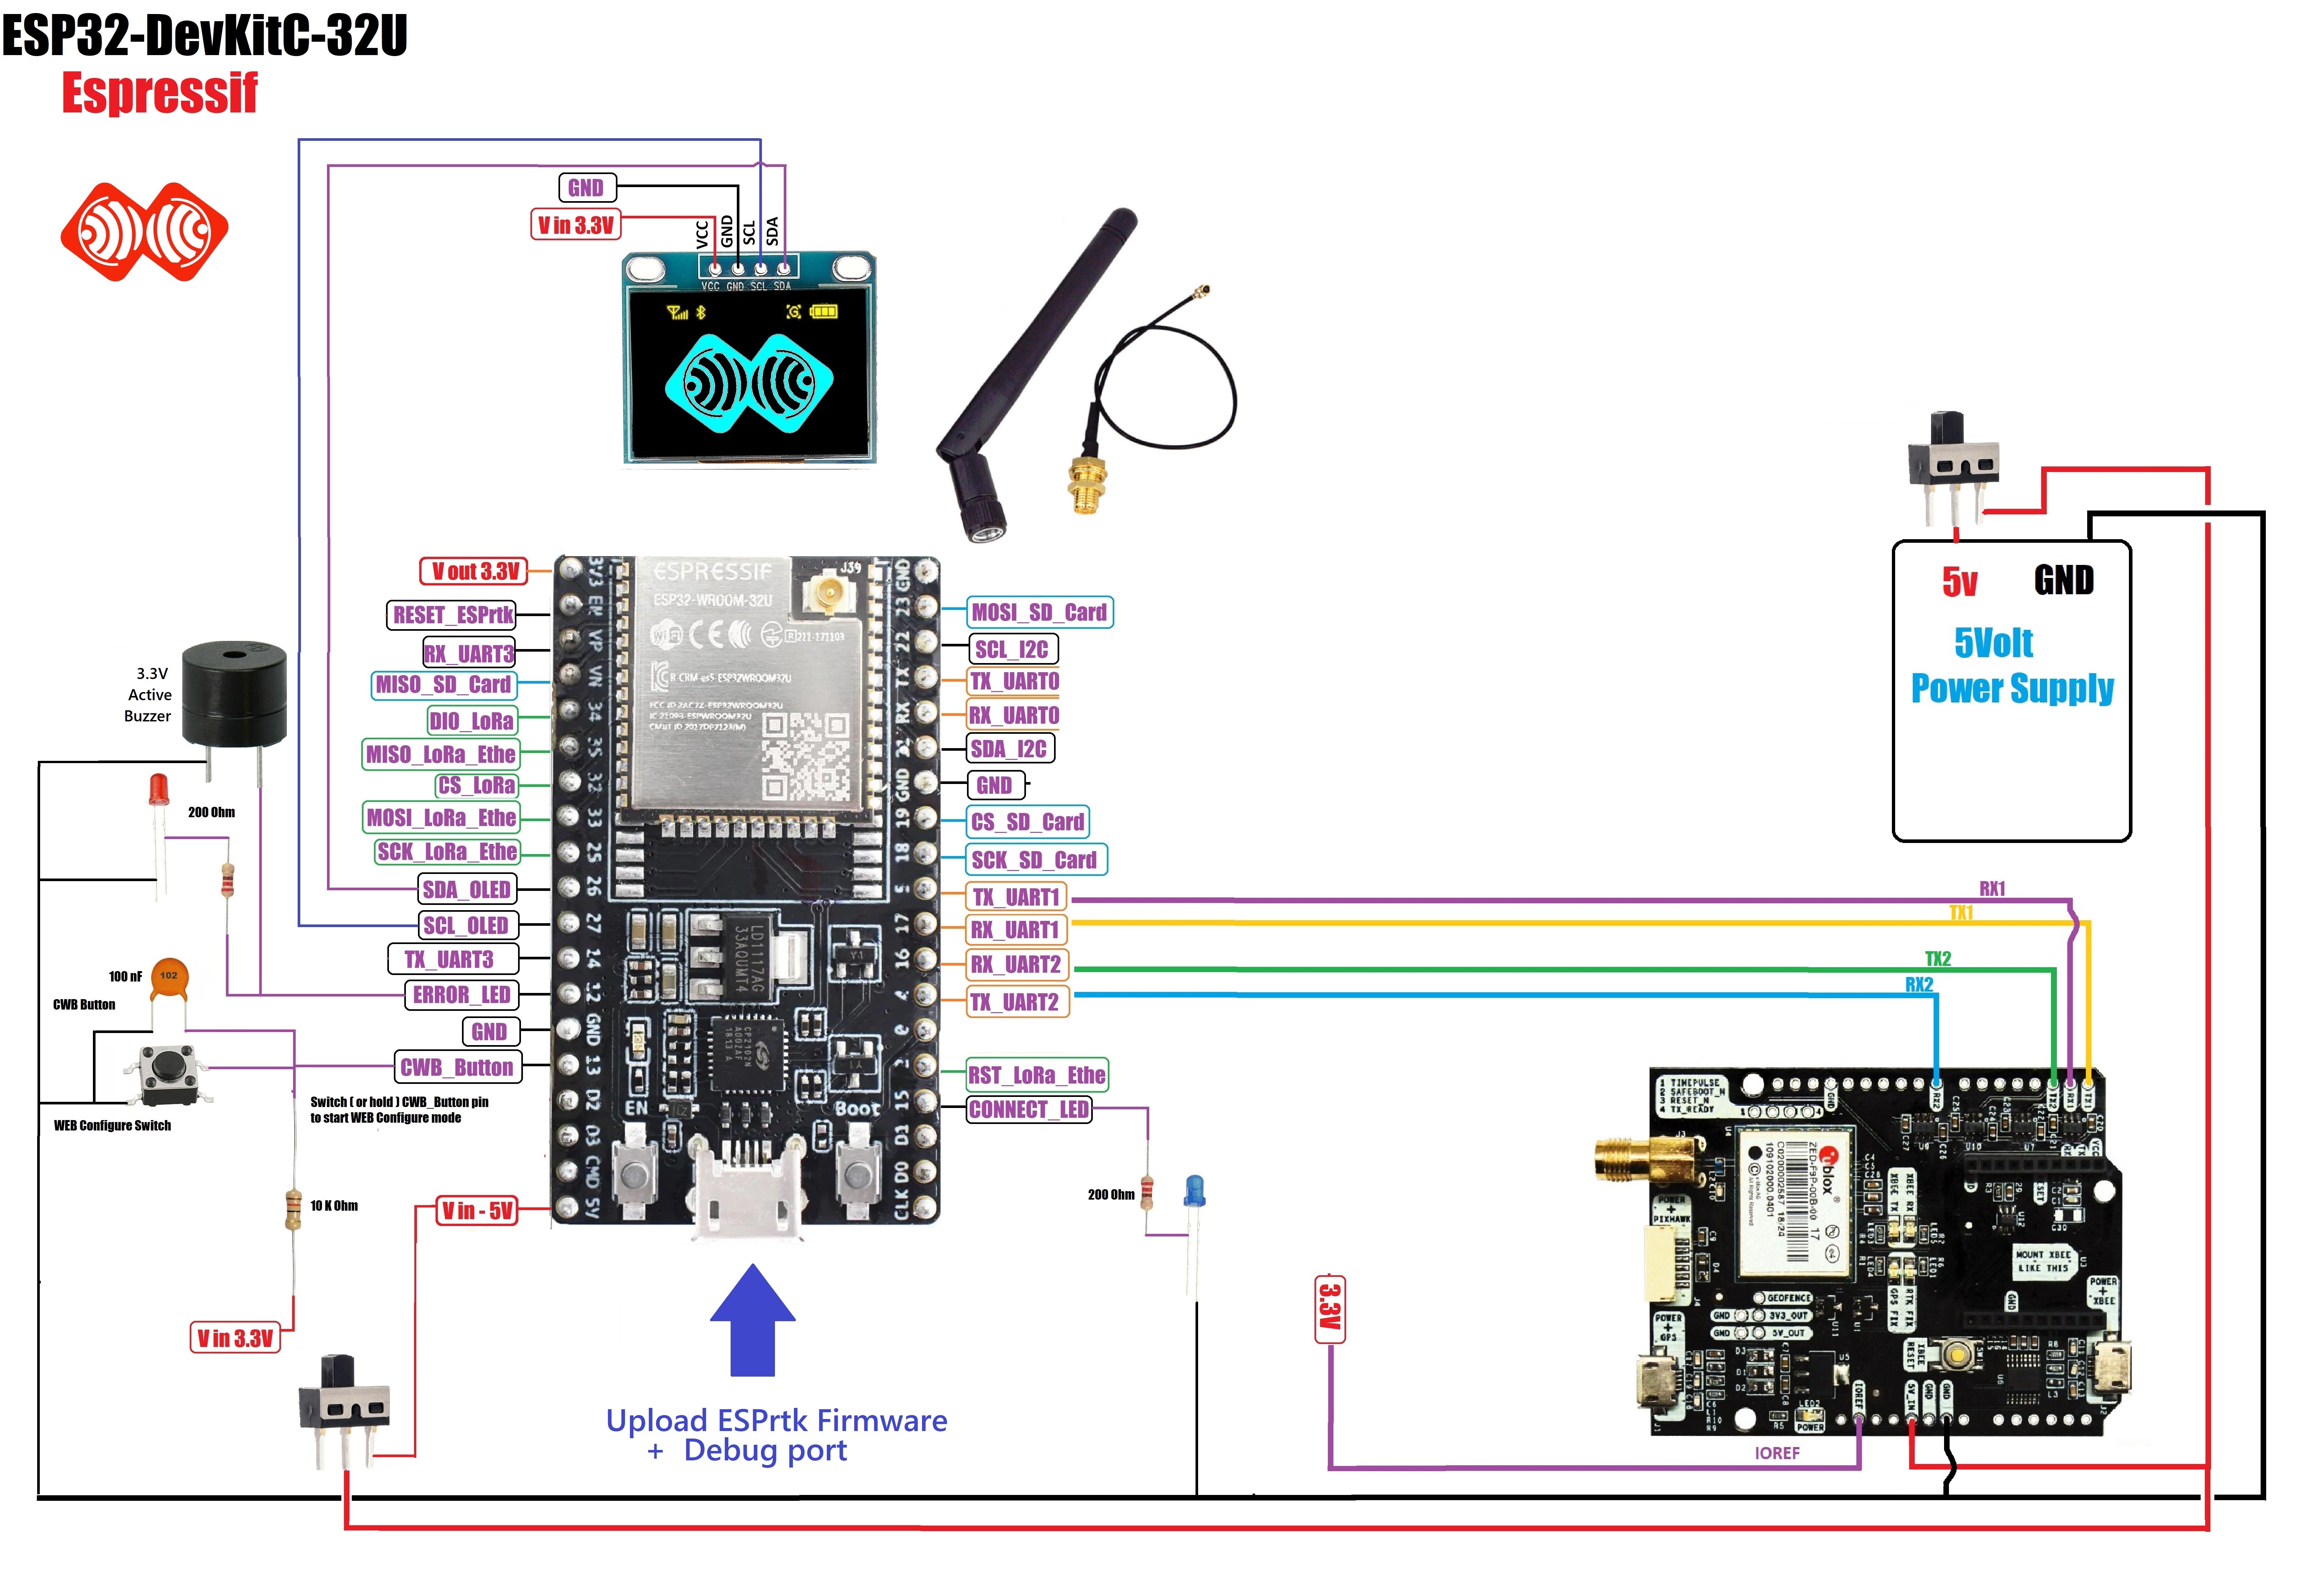
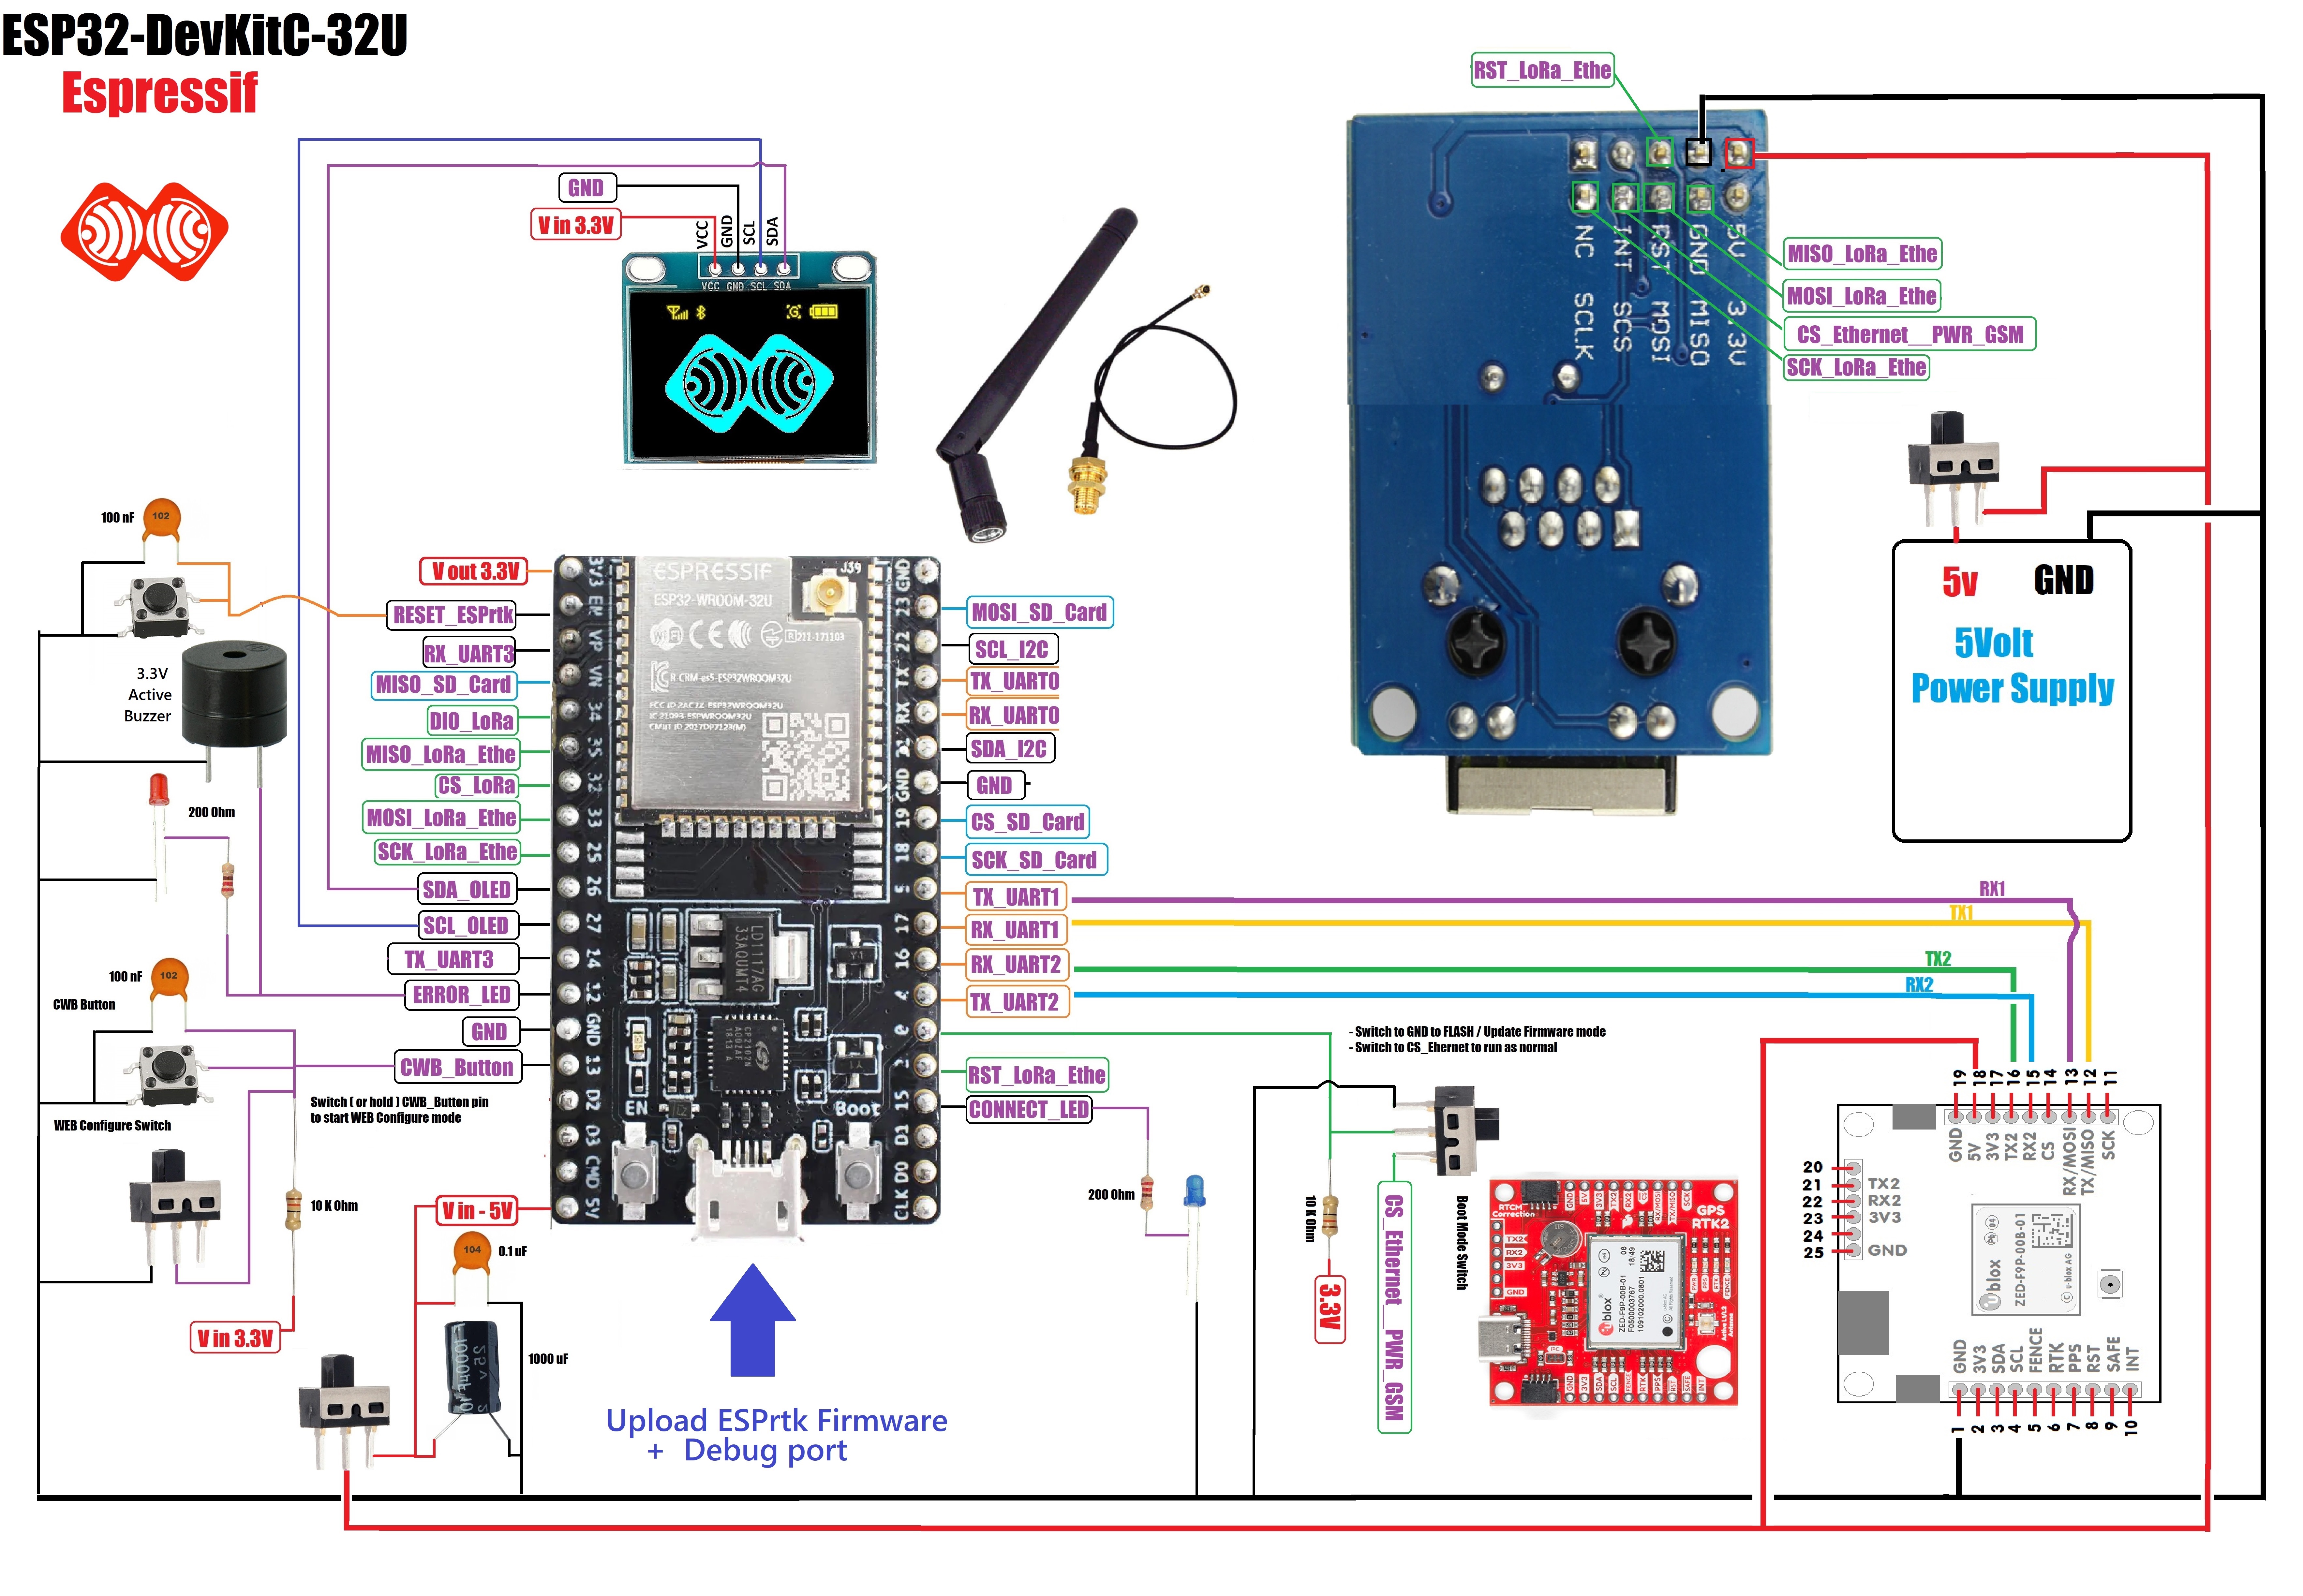
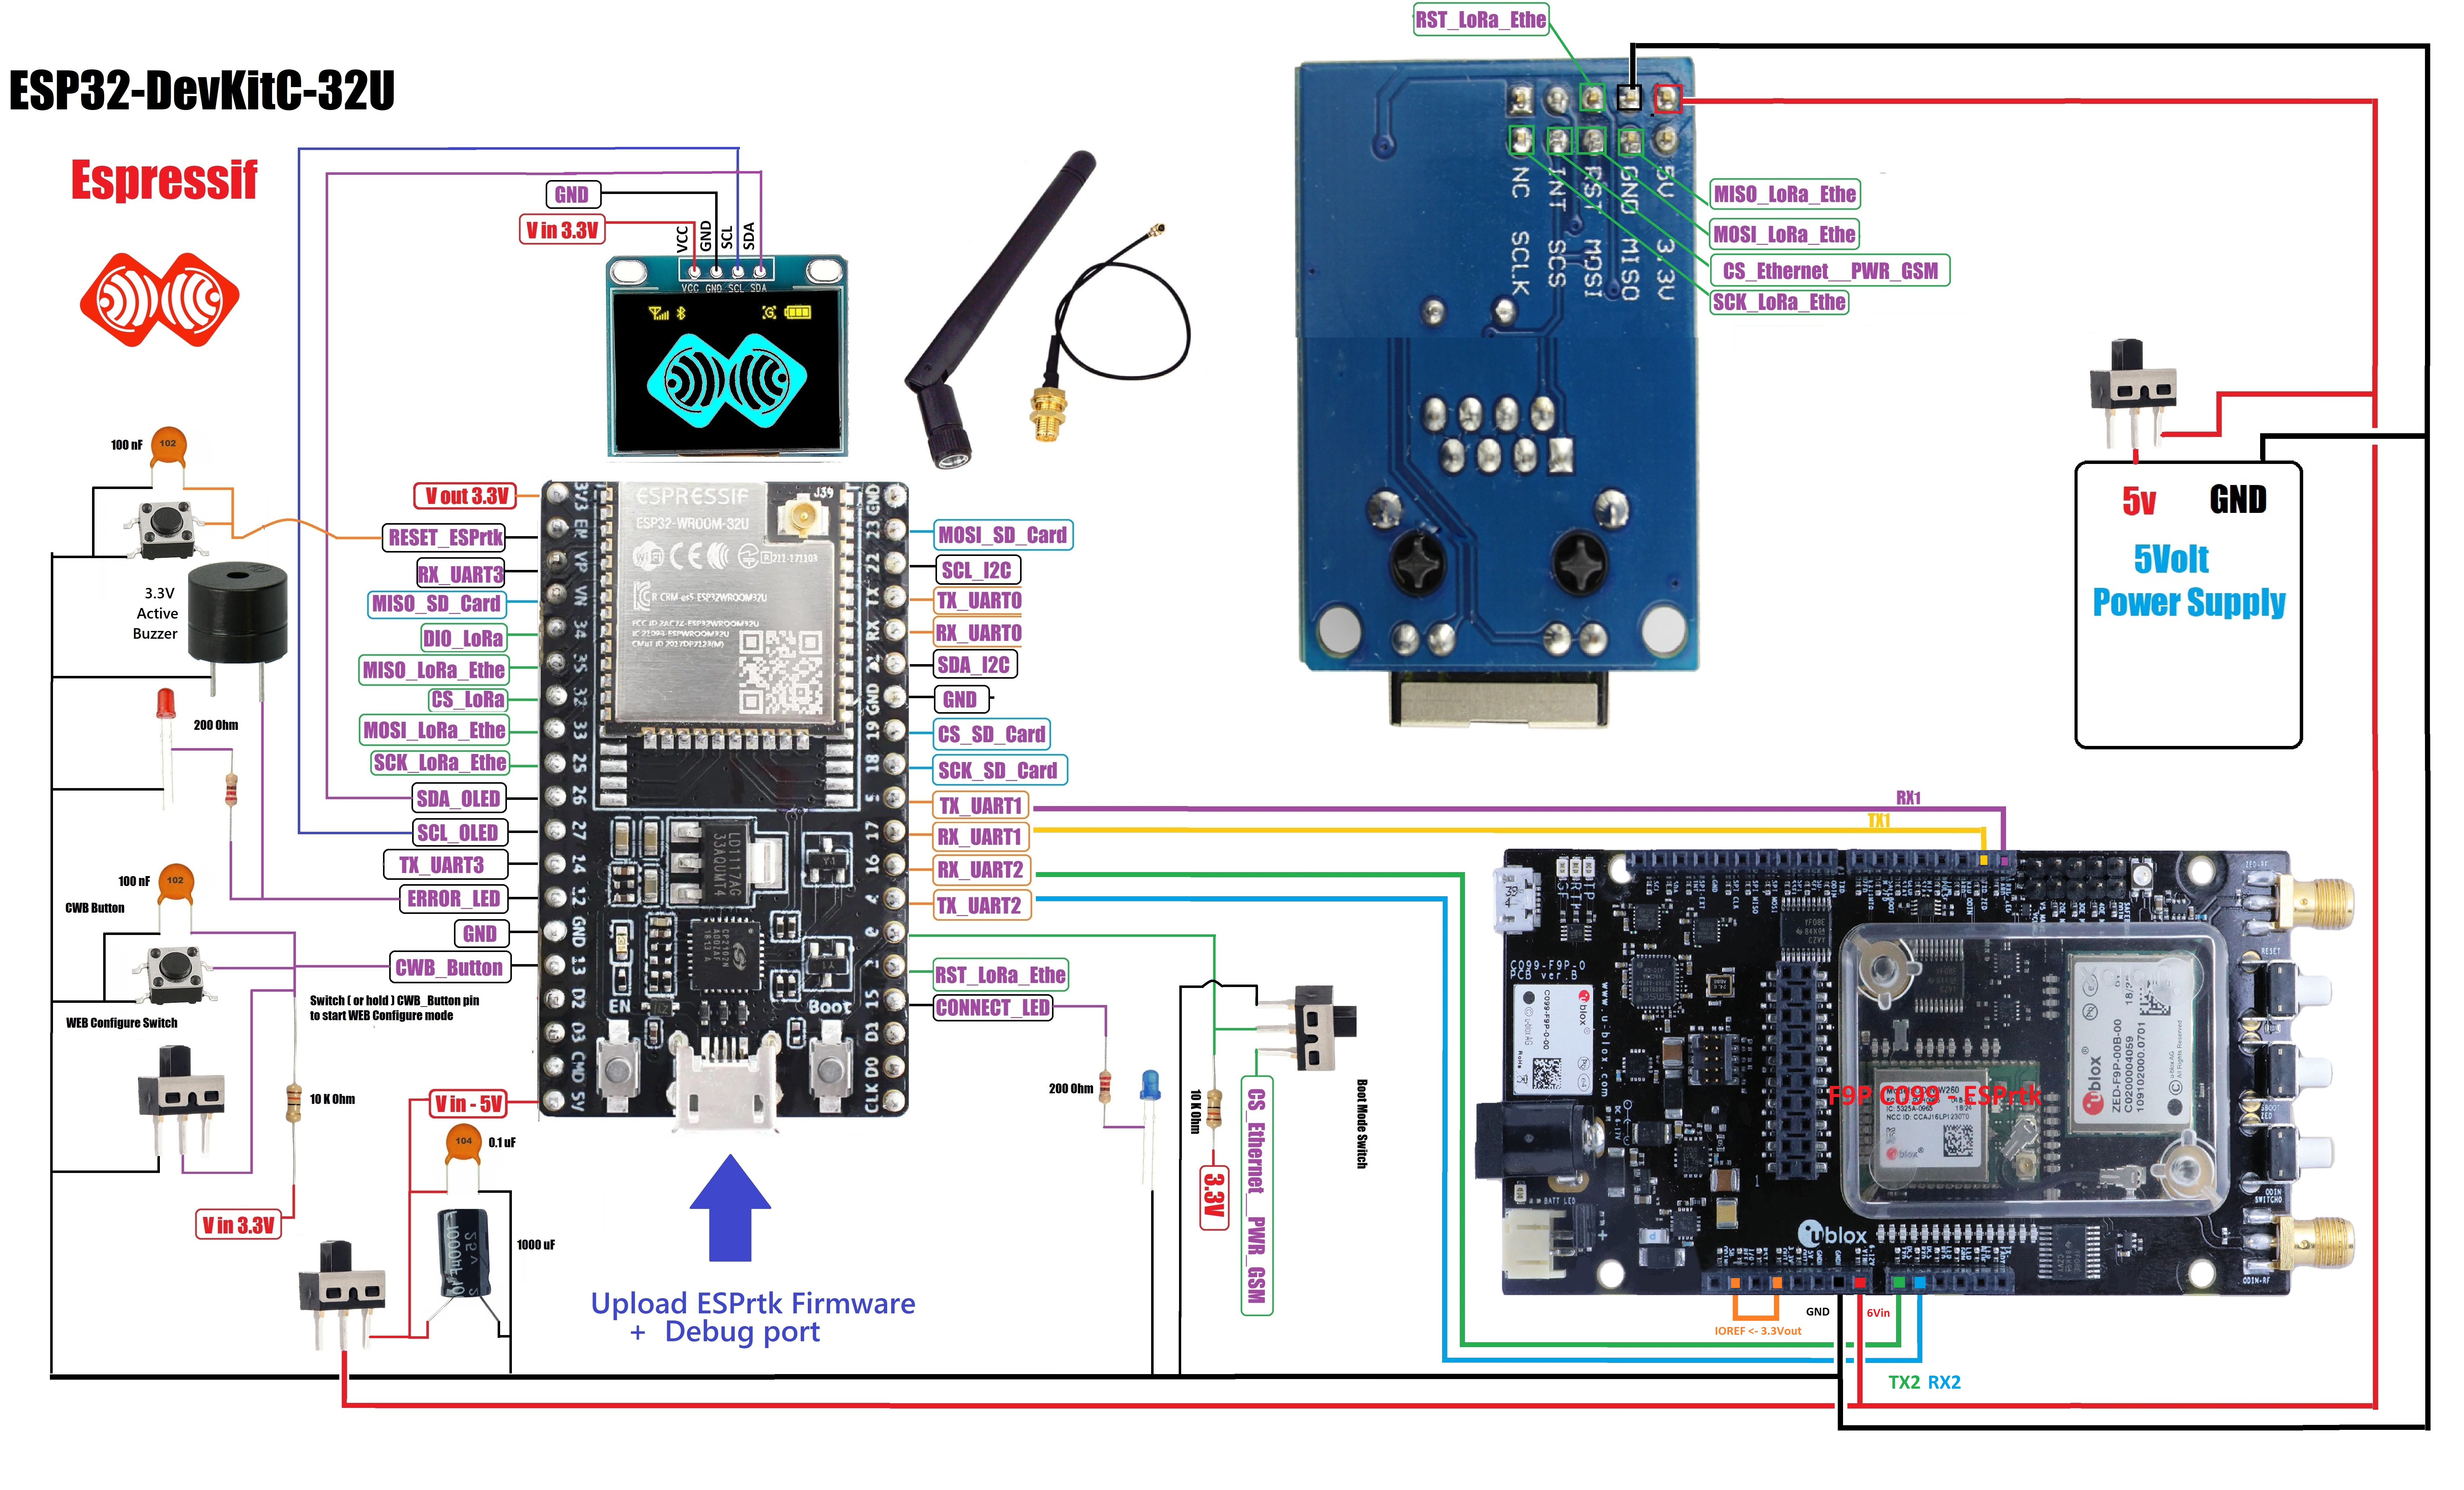
Hardware.
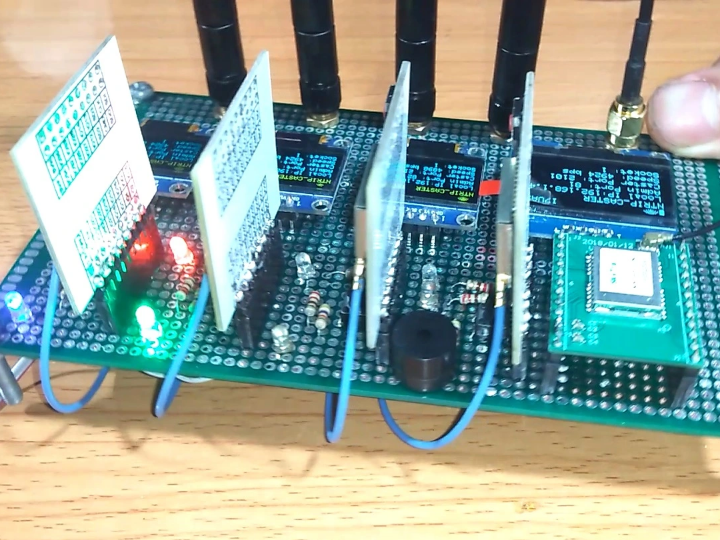
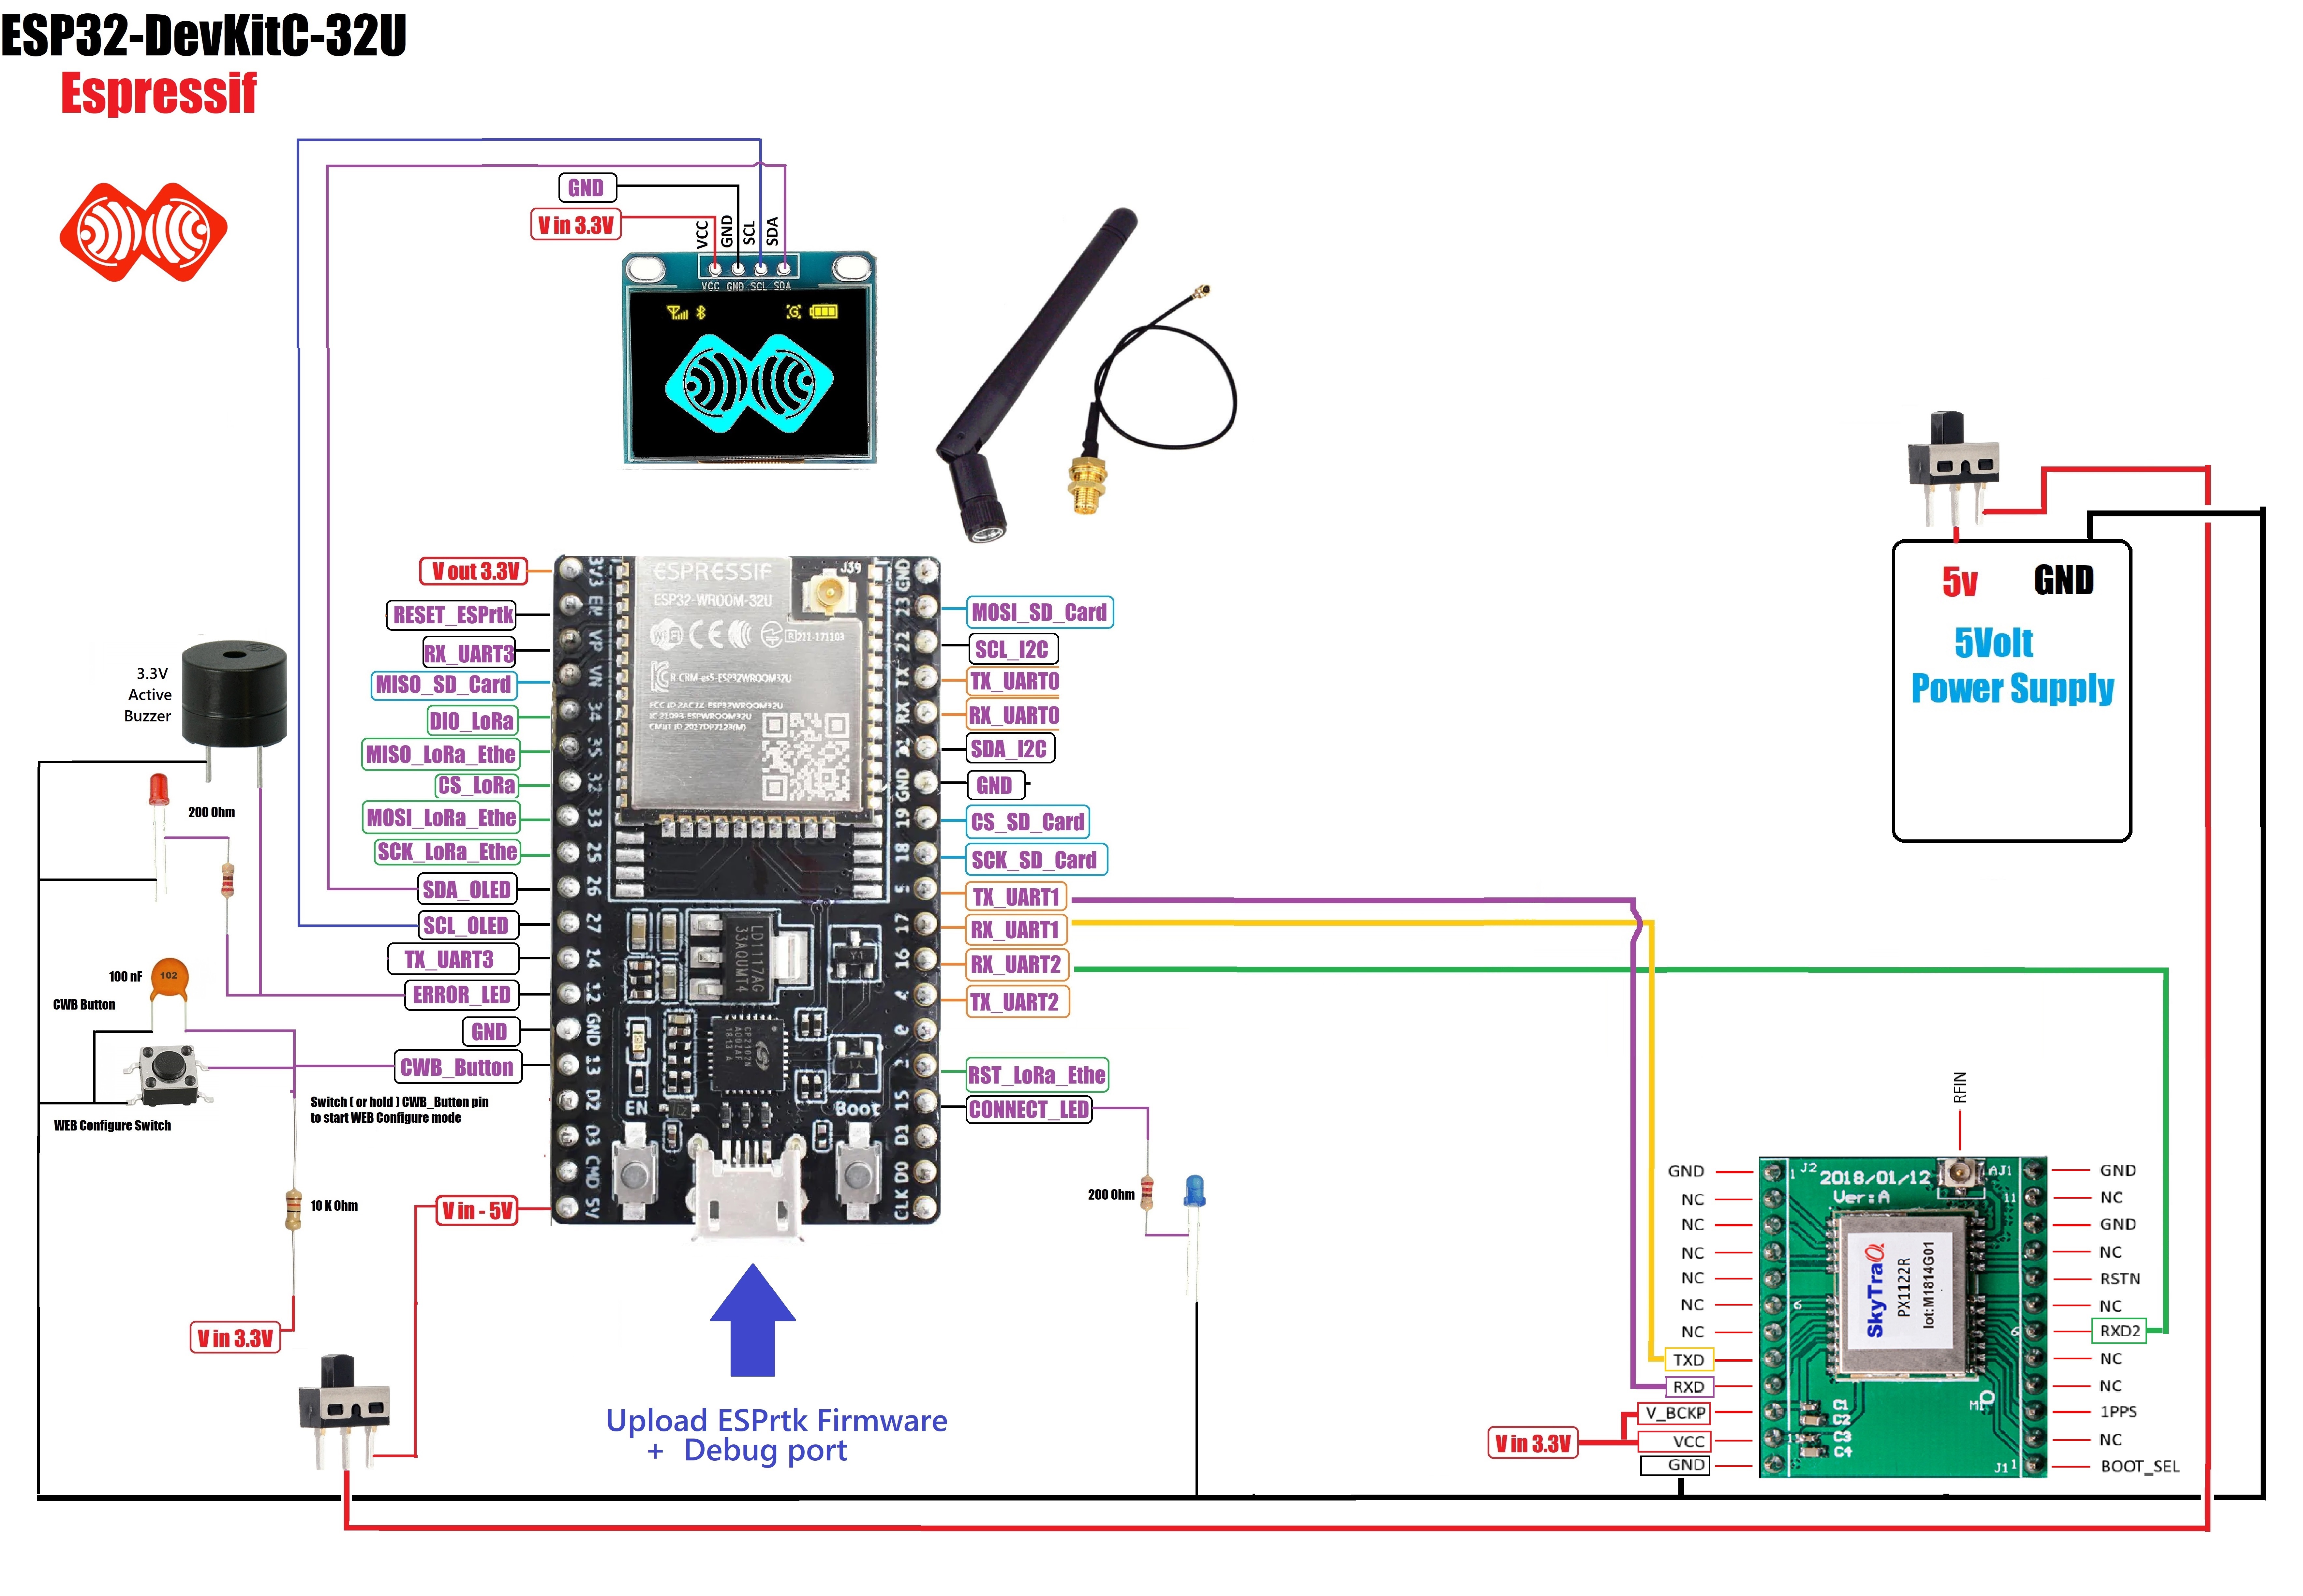
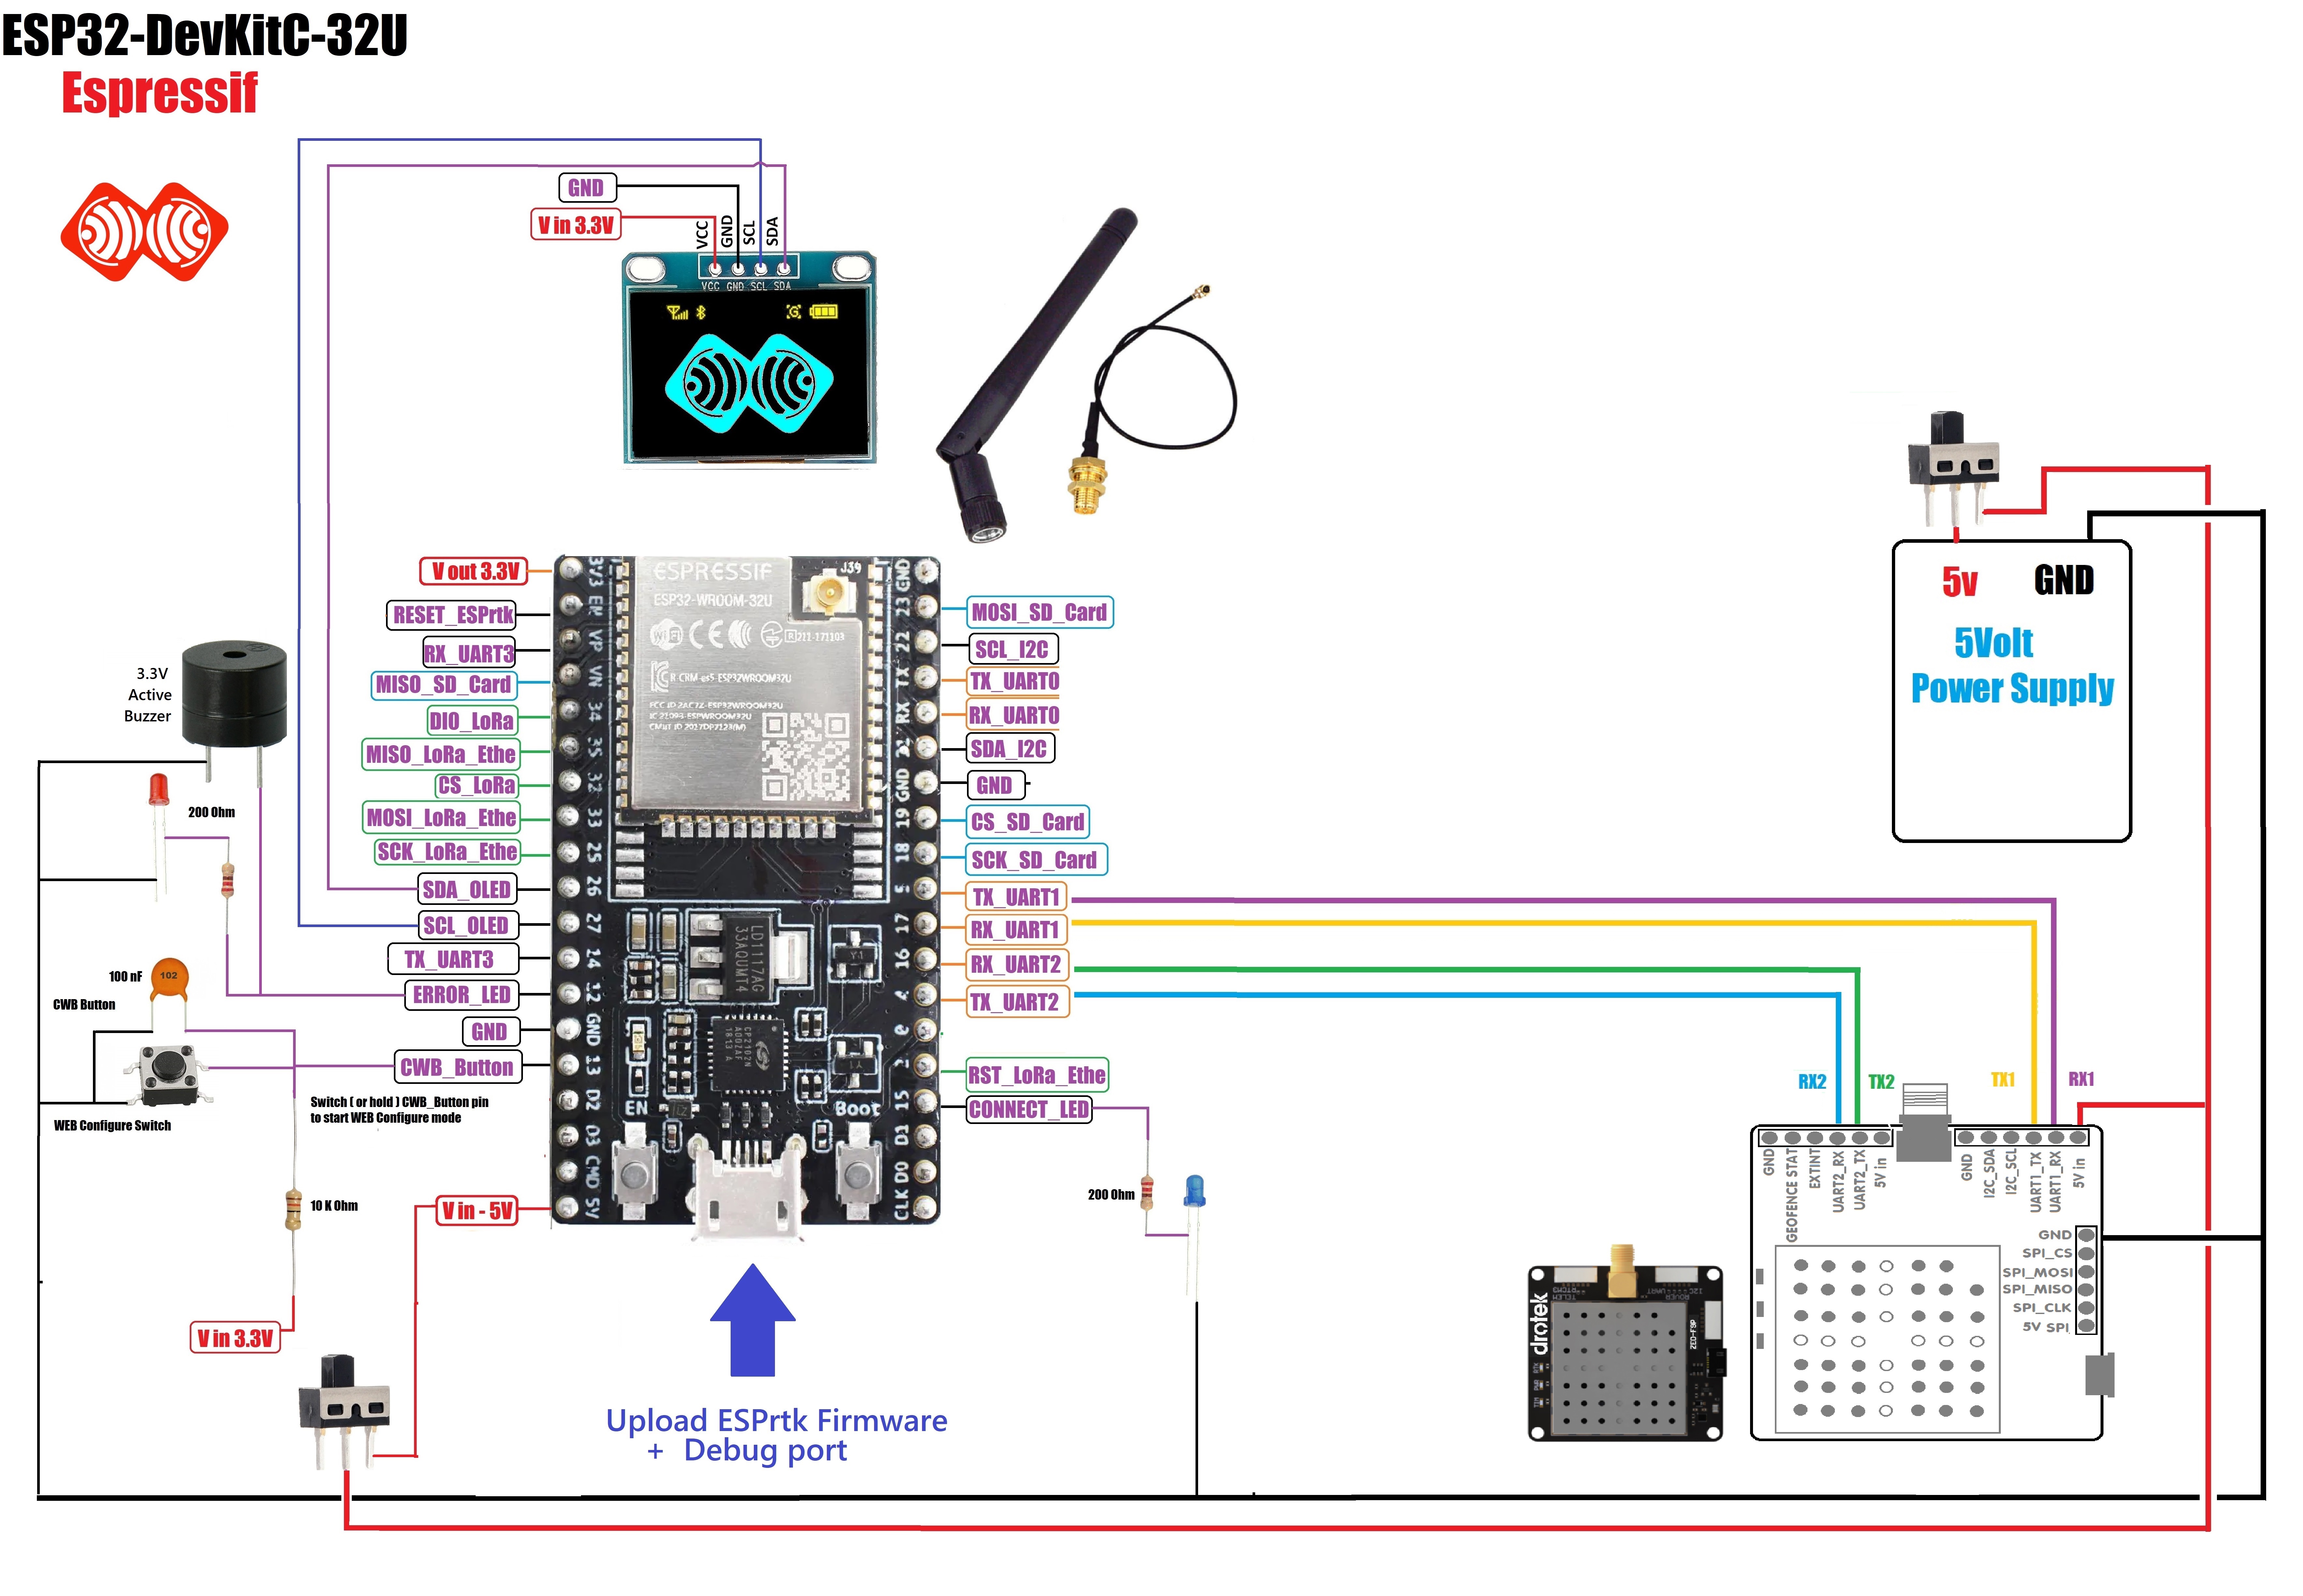
Warning !
For those who are intending to use buzzer on ESPrtk.
To protect ESP32 chip. Do not connect the buzzer directly to the ESP32’s GPIO12 pin.
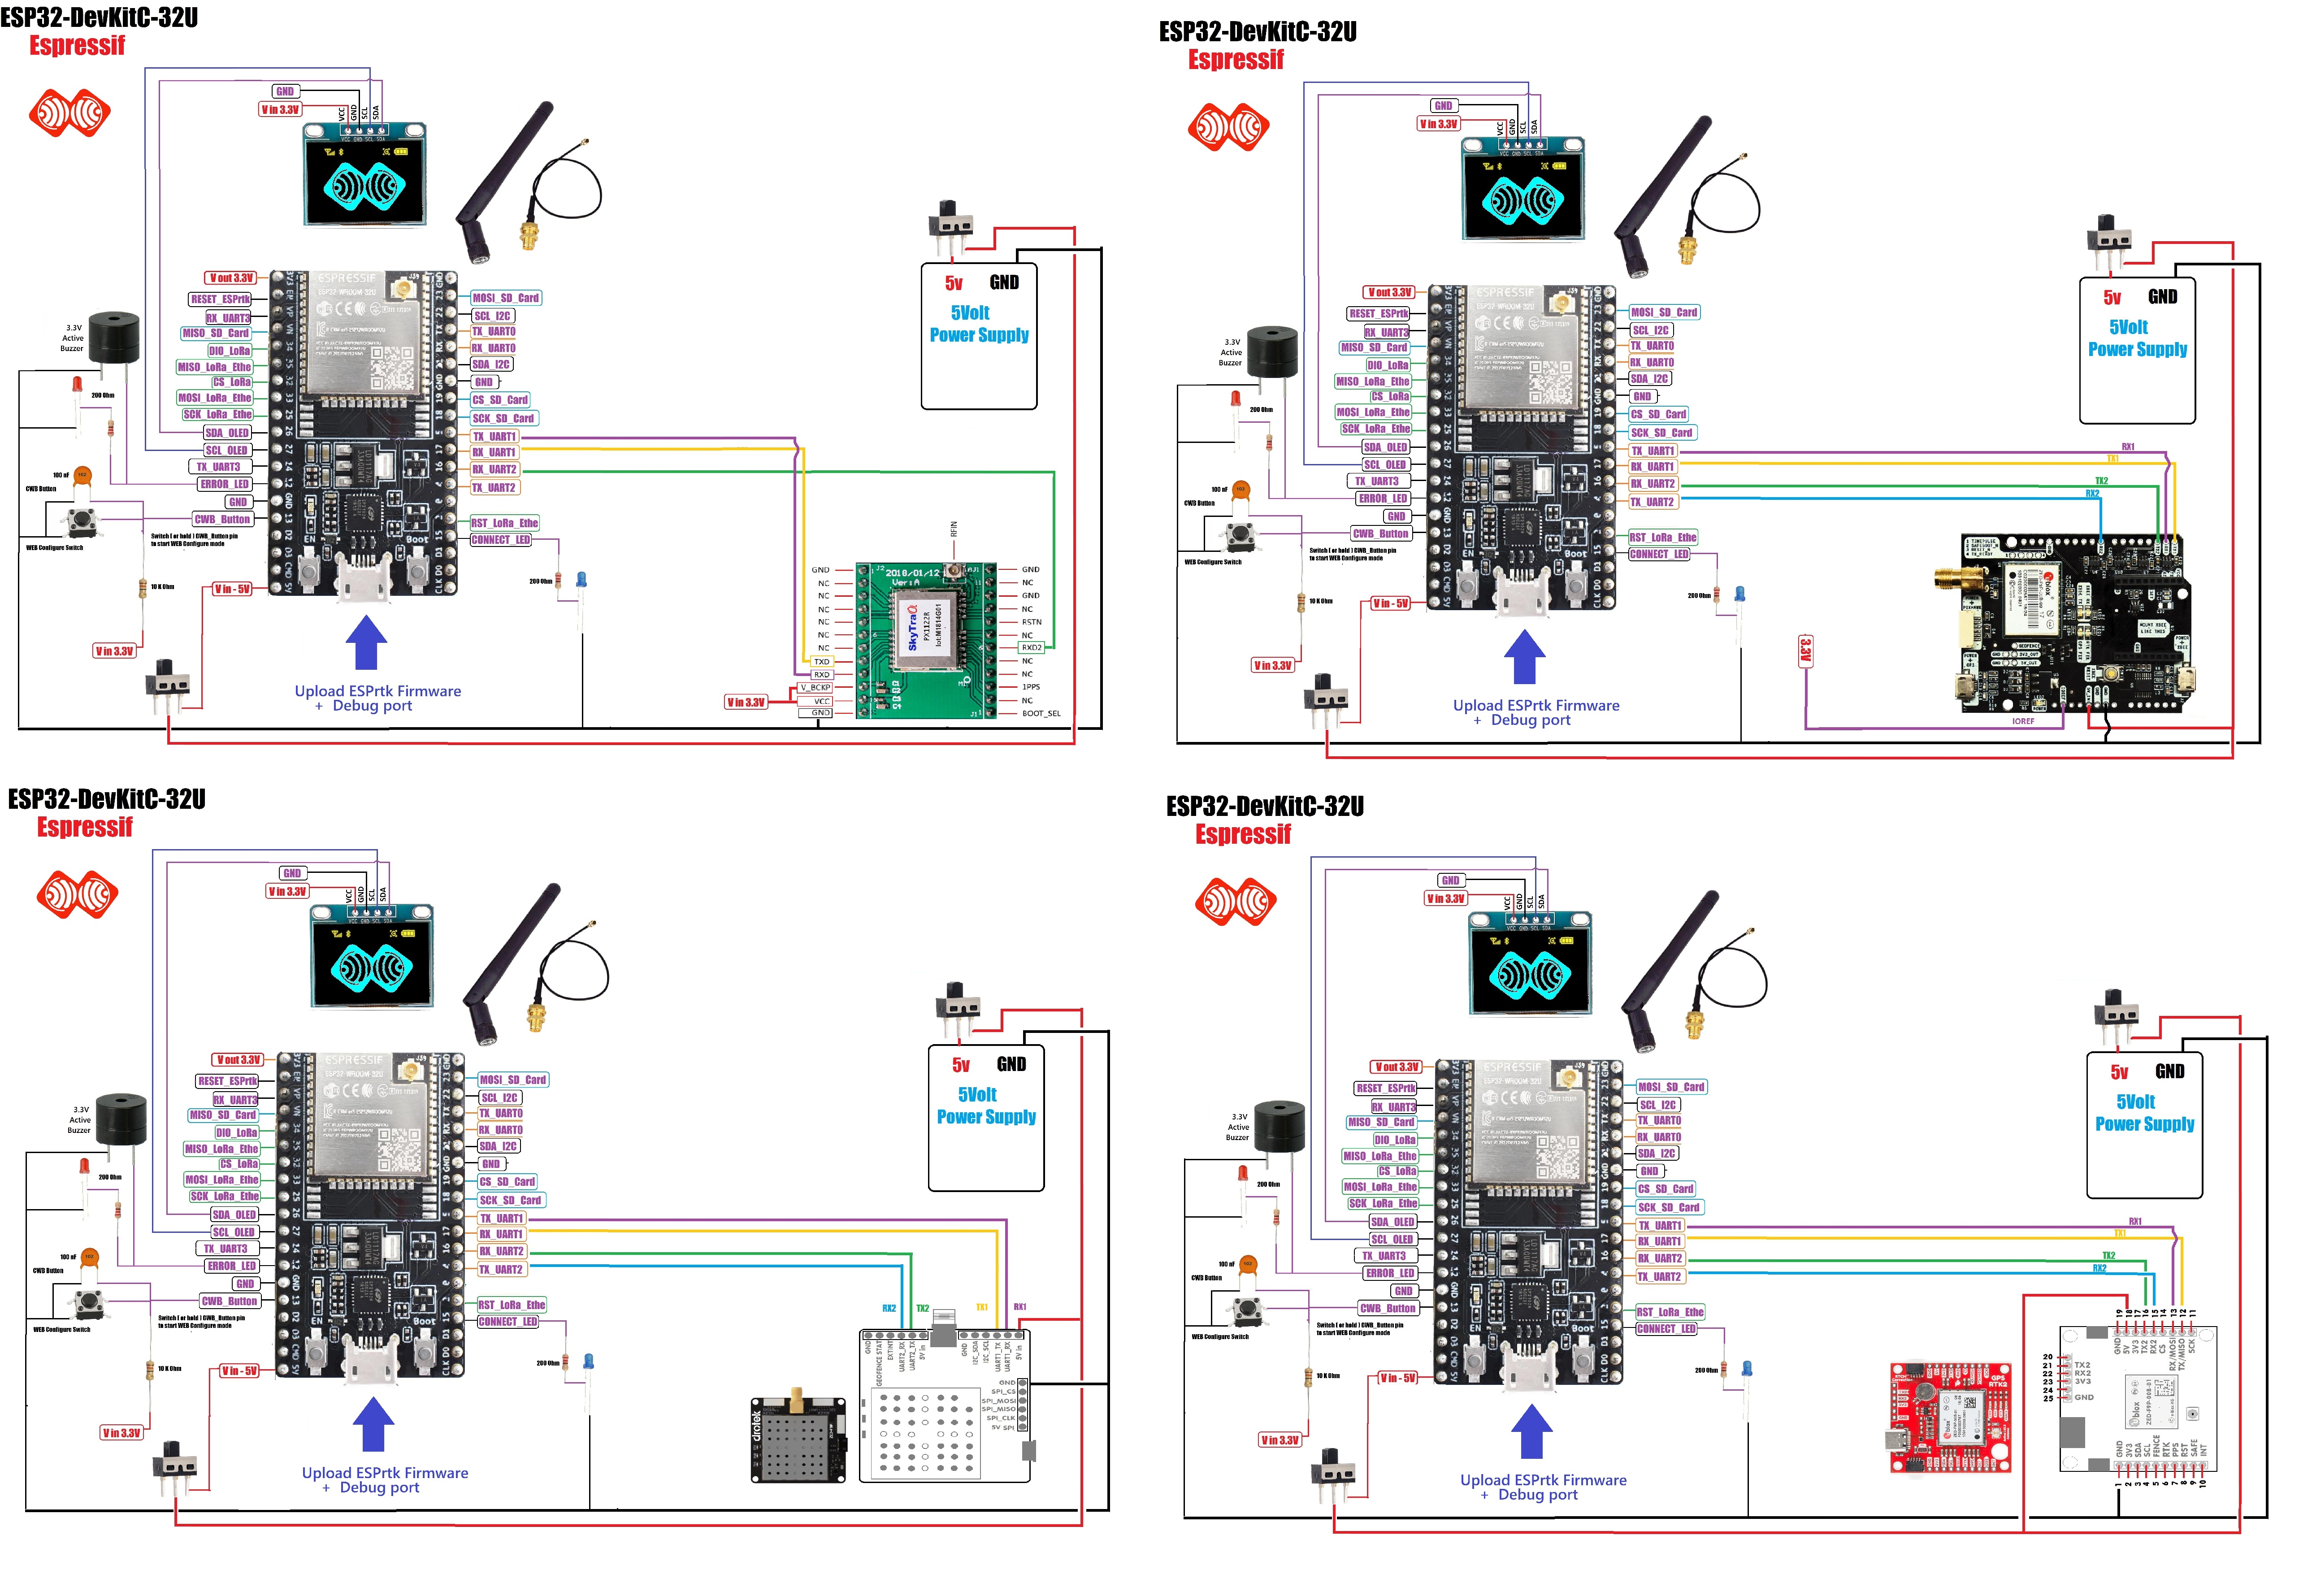
Please use protection diode (or combine with NPN transistor as shown image below).

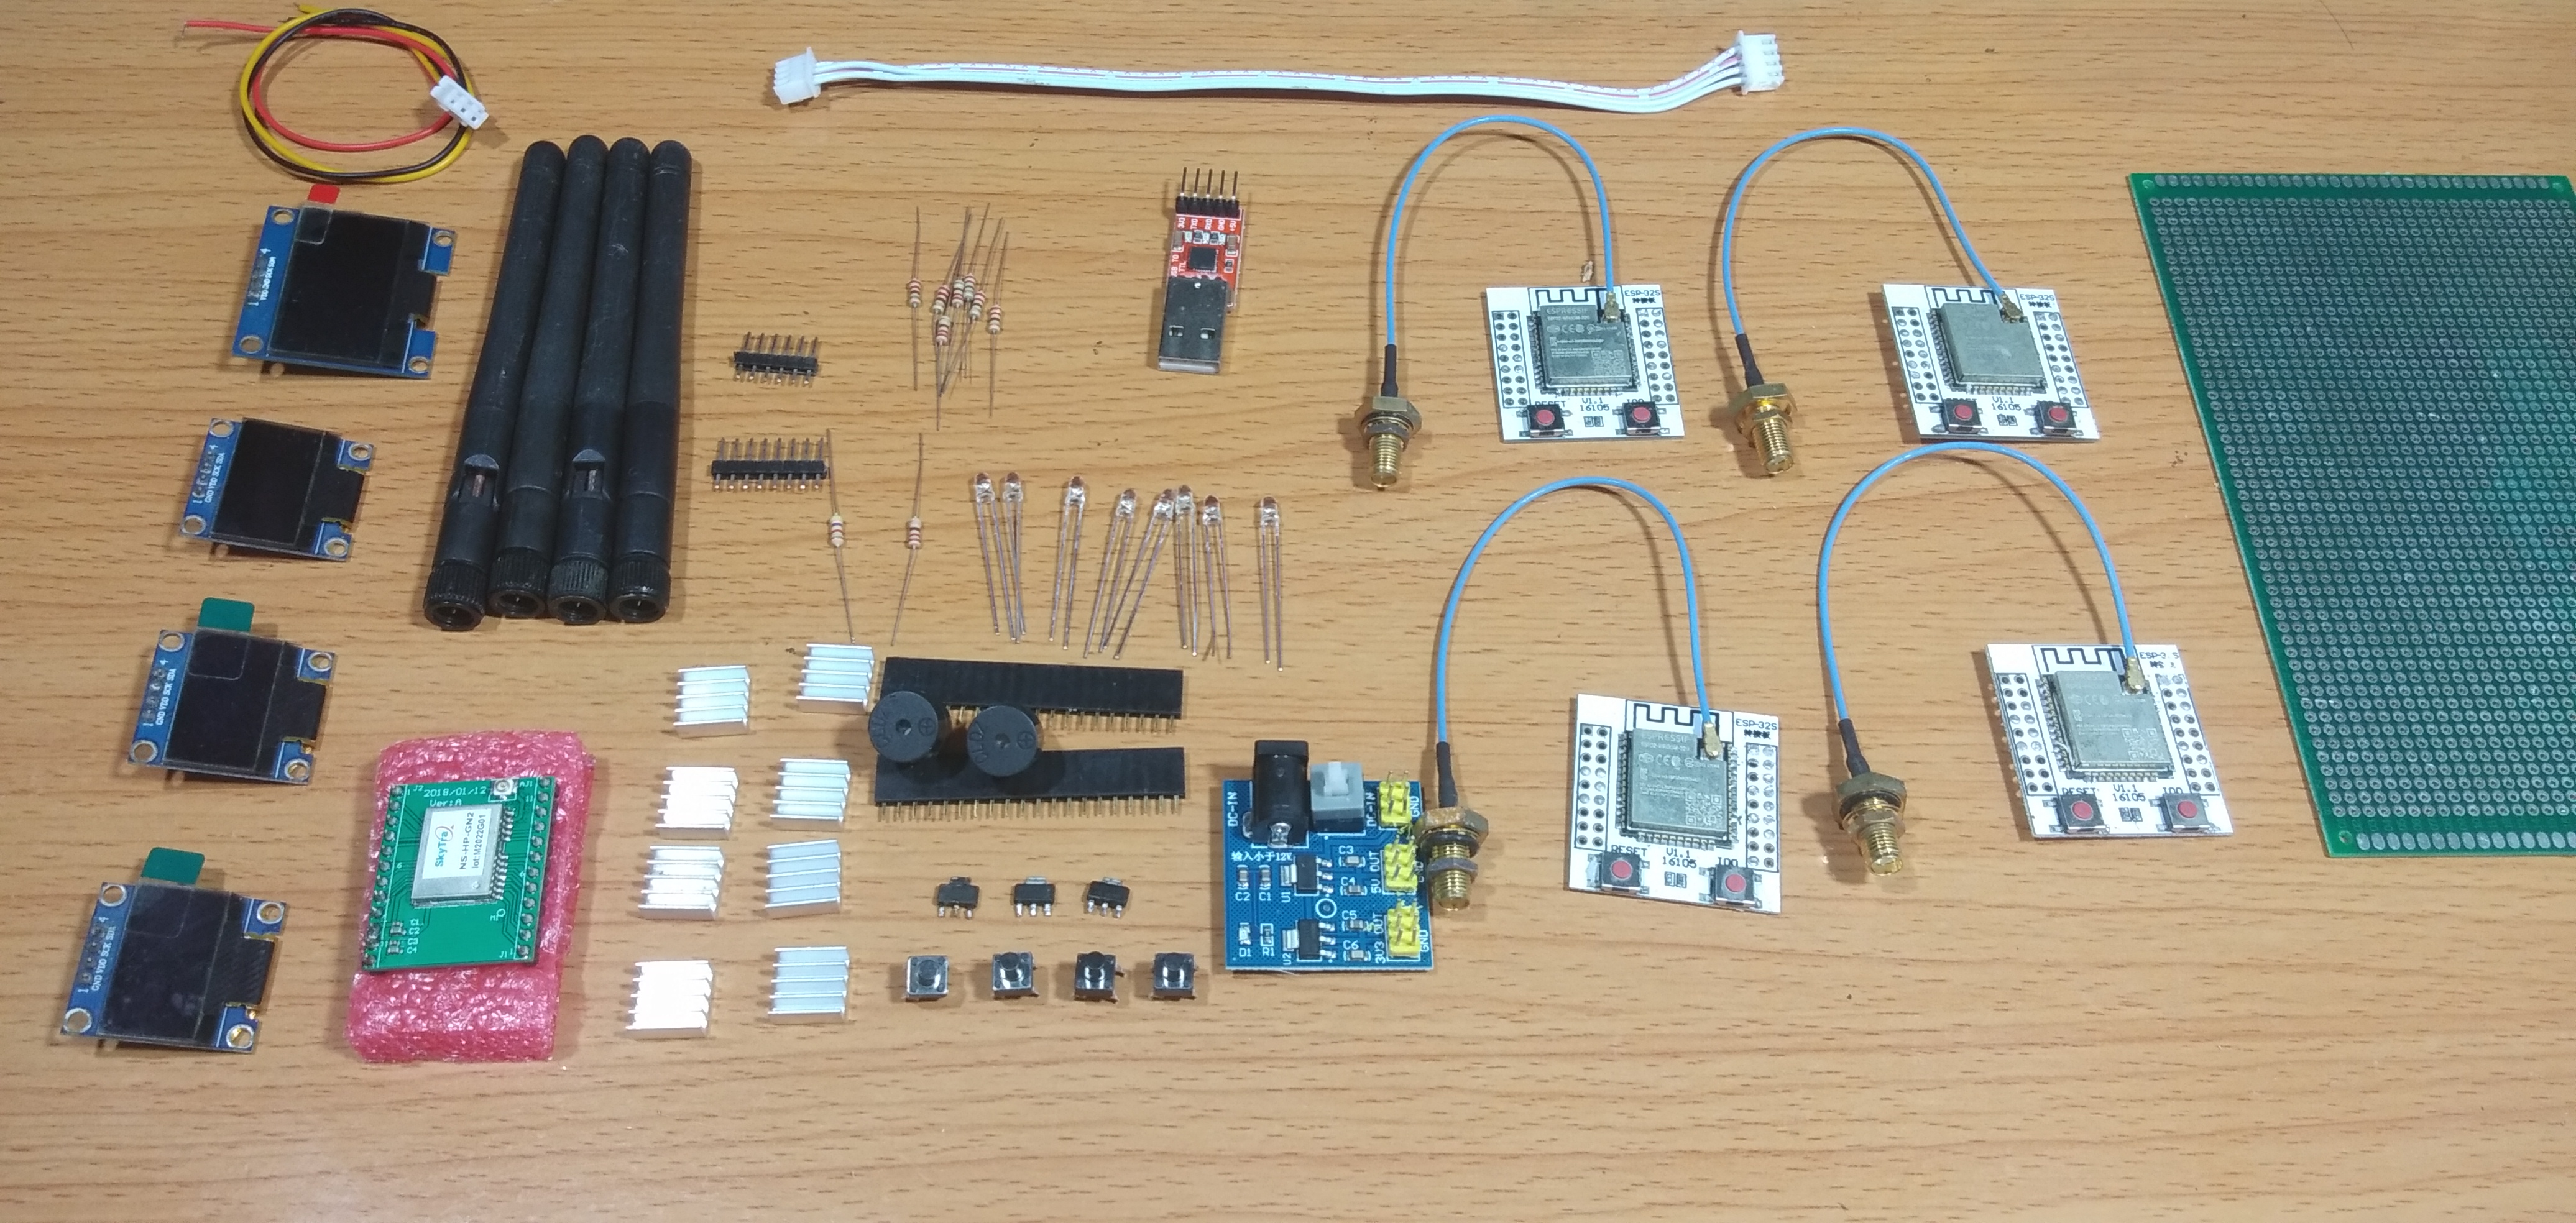
- App Build : NTRIP/MQTT RTK BaseStation+Rover+CASTER
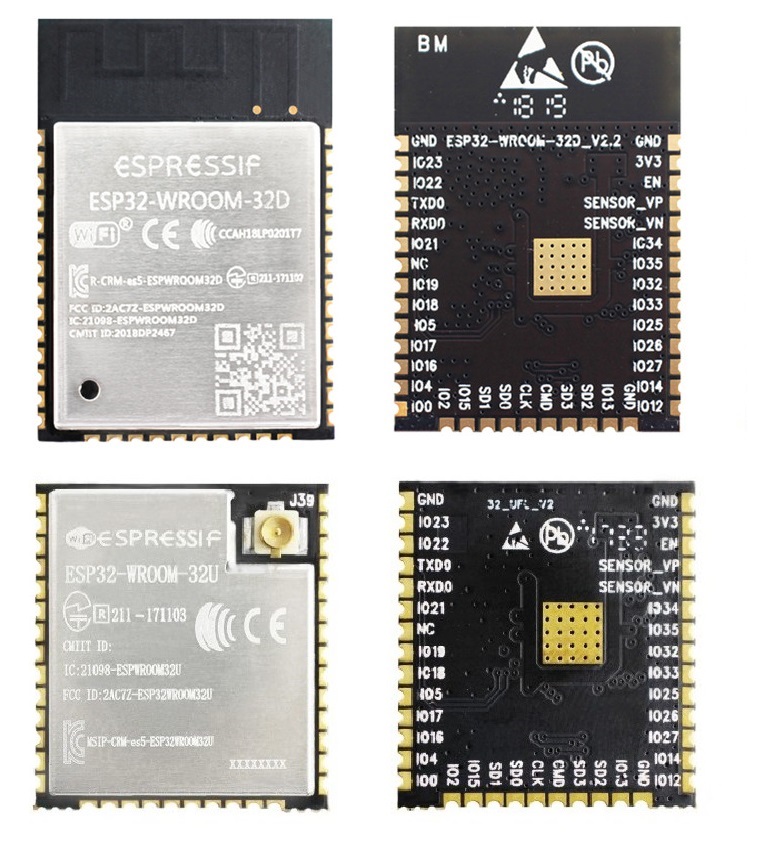
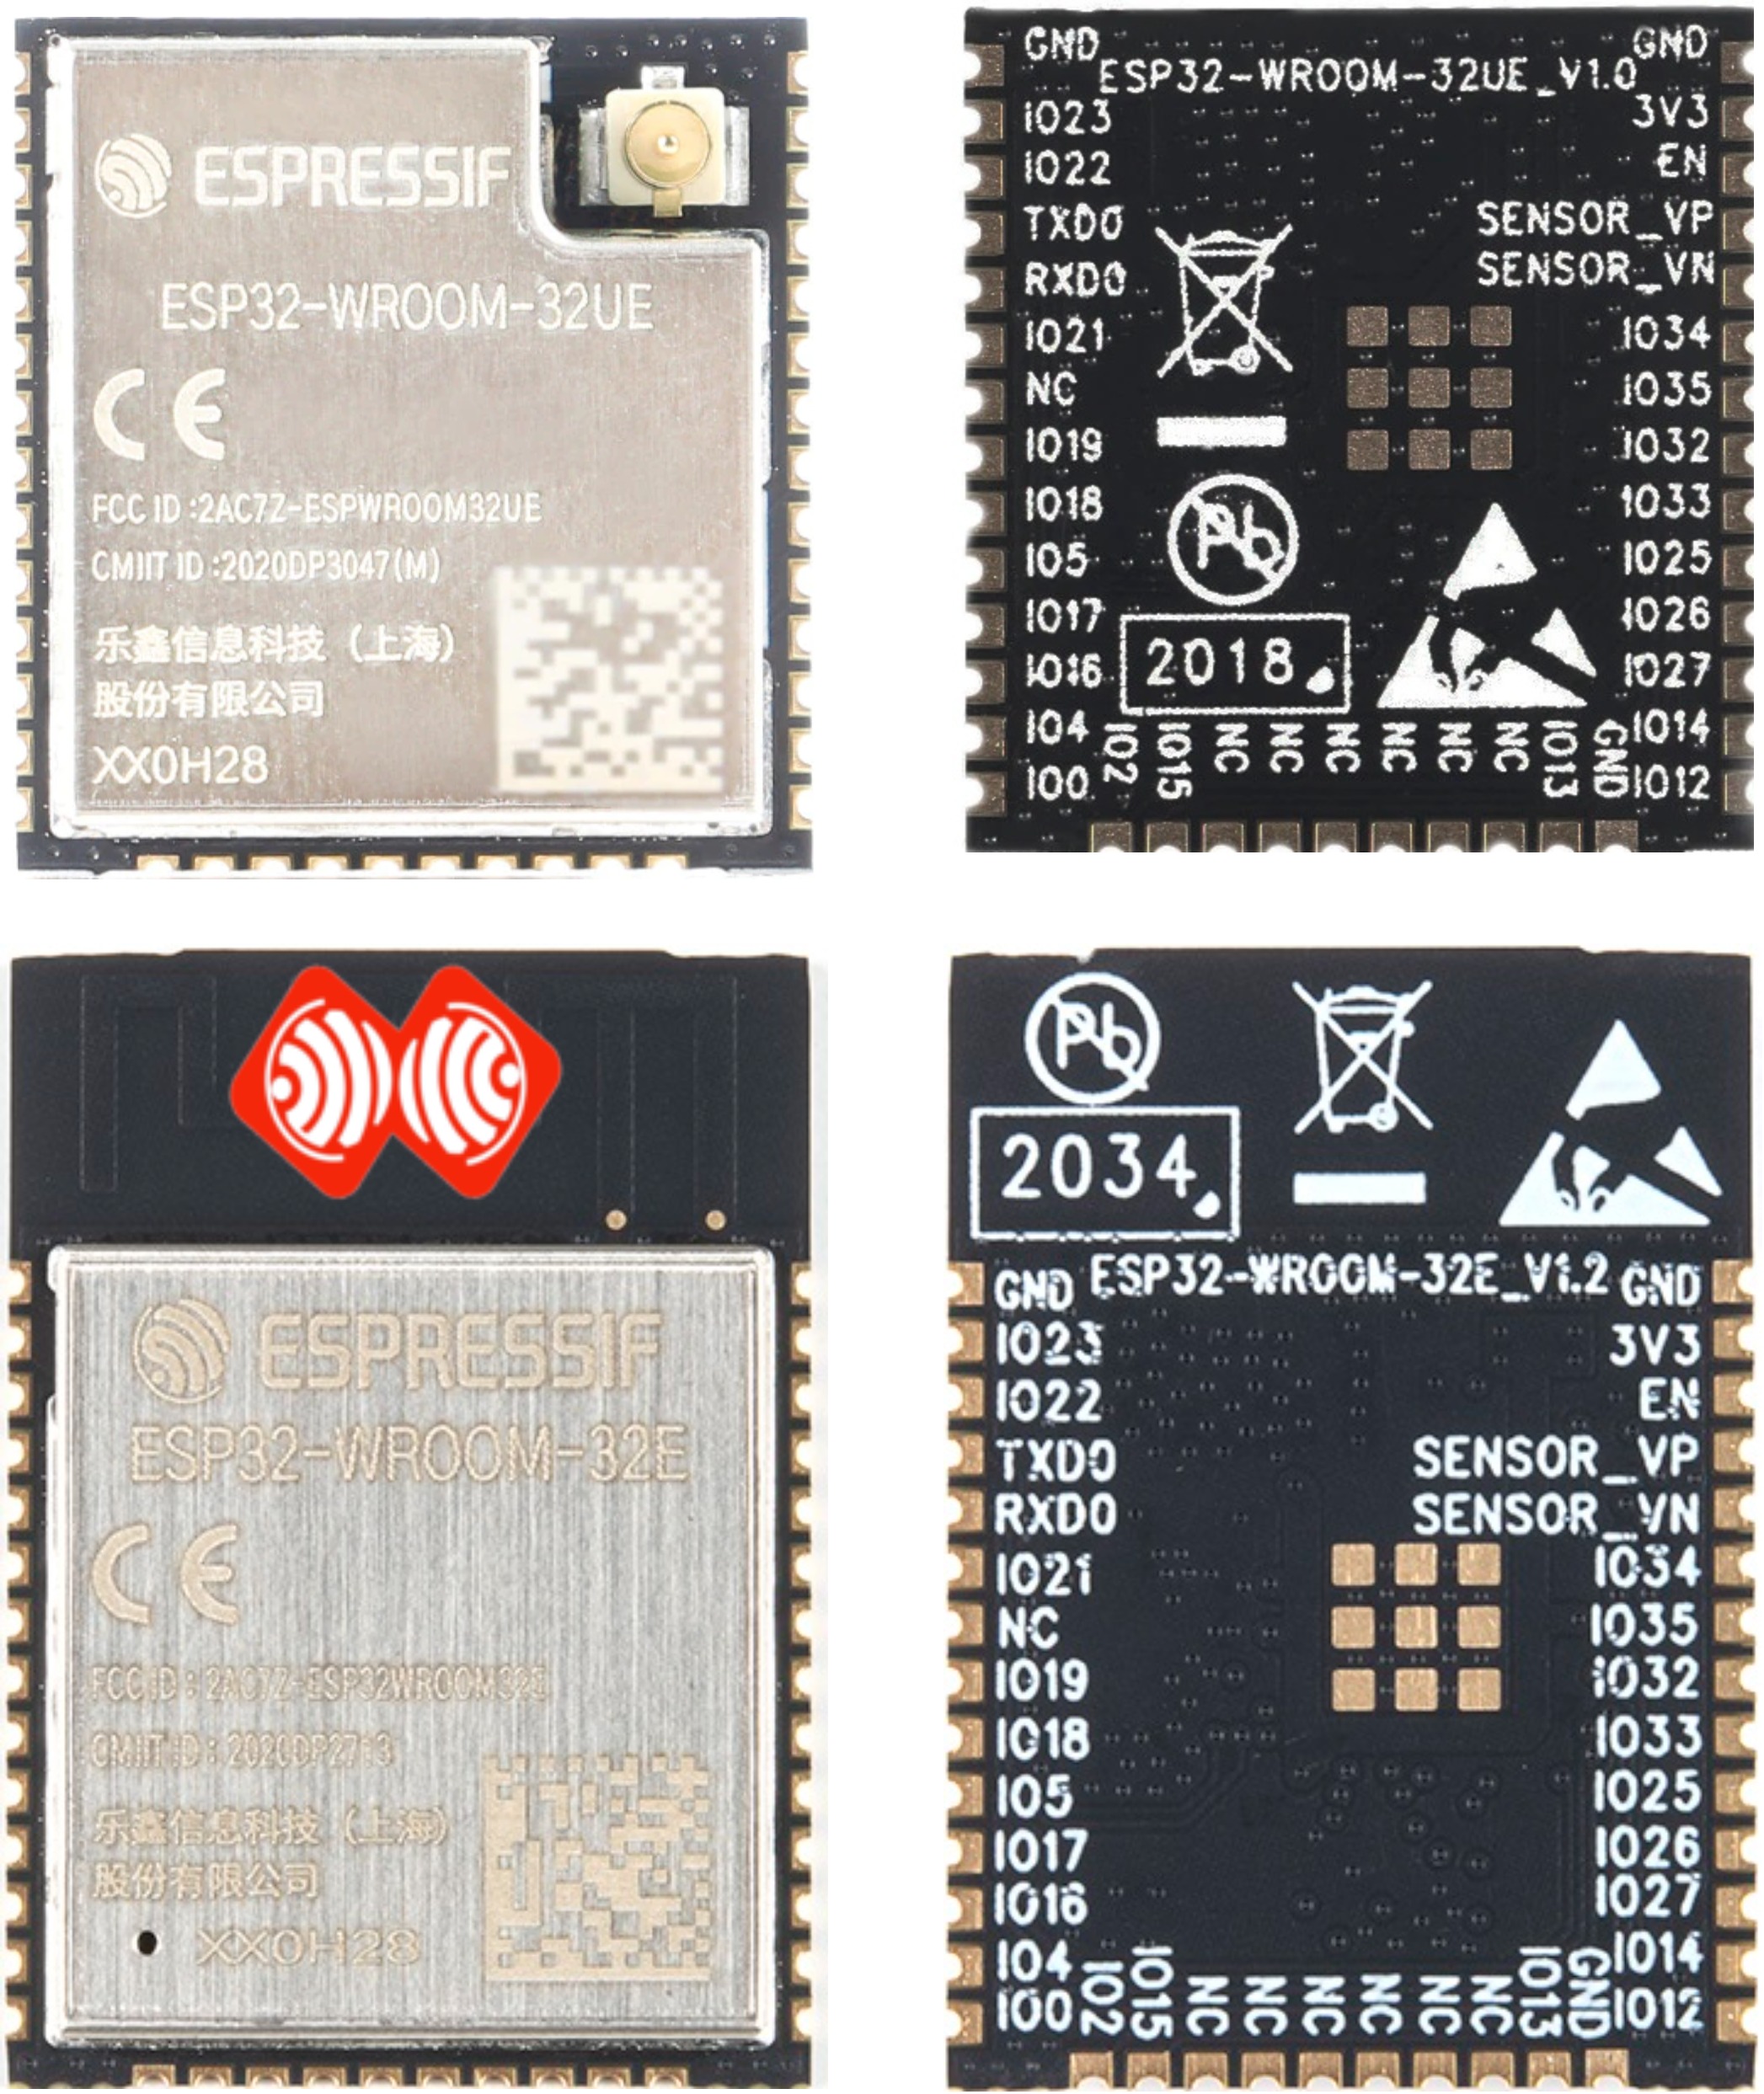
- ESP32 : ESP32 DEV KIT C Espressif ( ESP32_WROOM_32U or ESP32_WROOM_32UE CHIP)
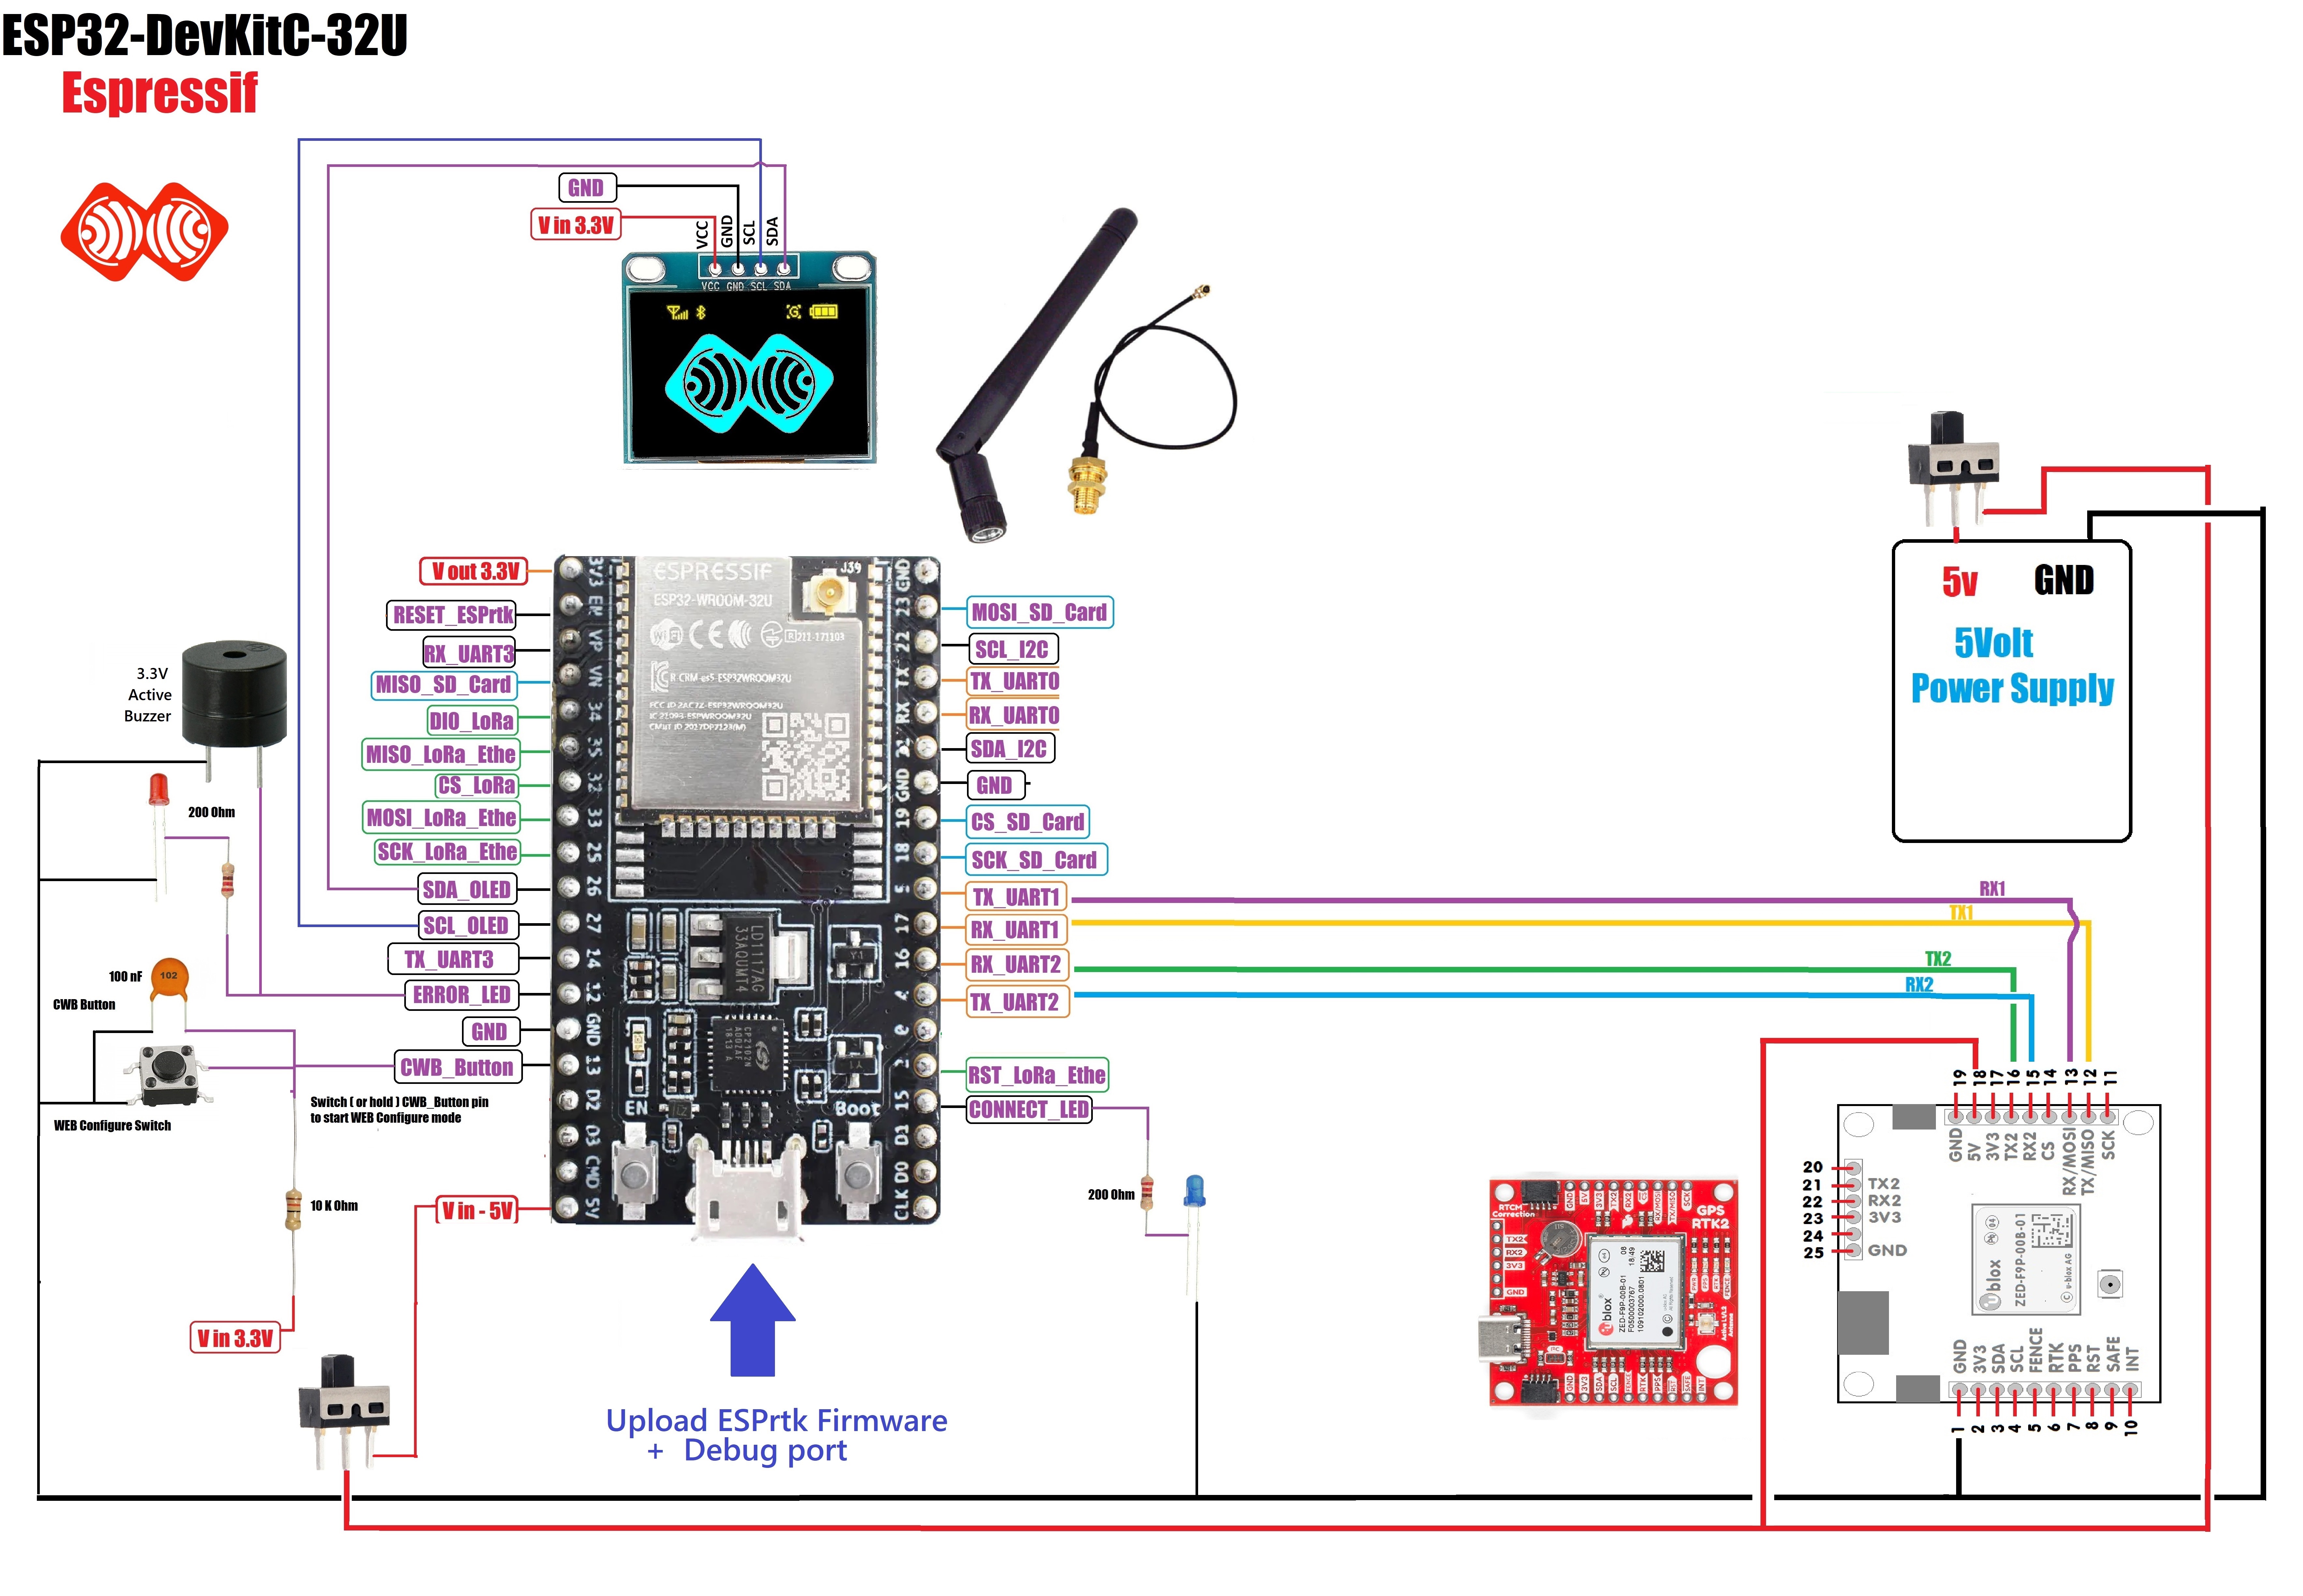
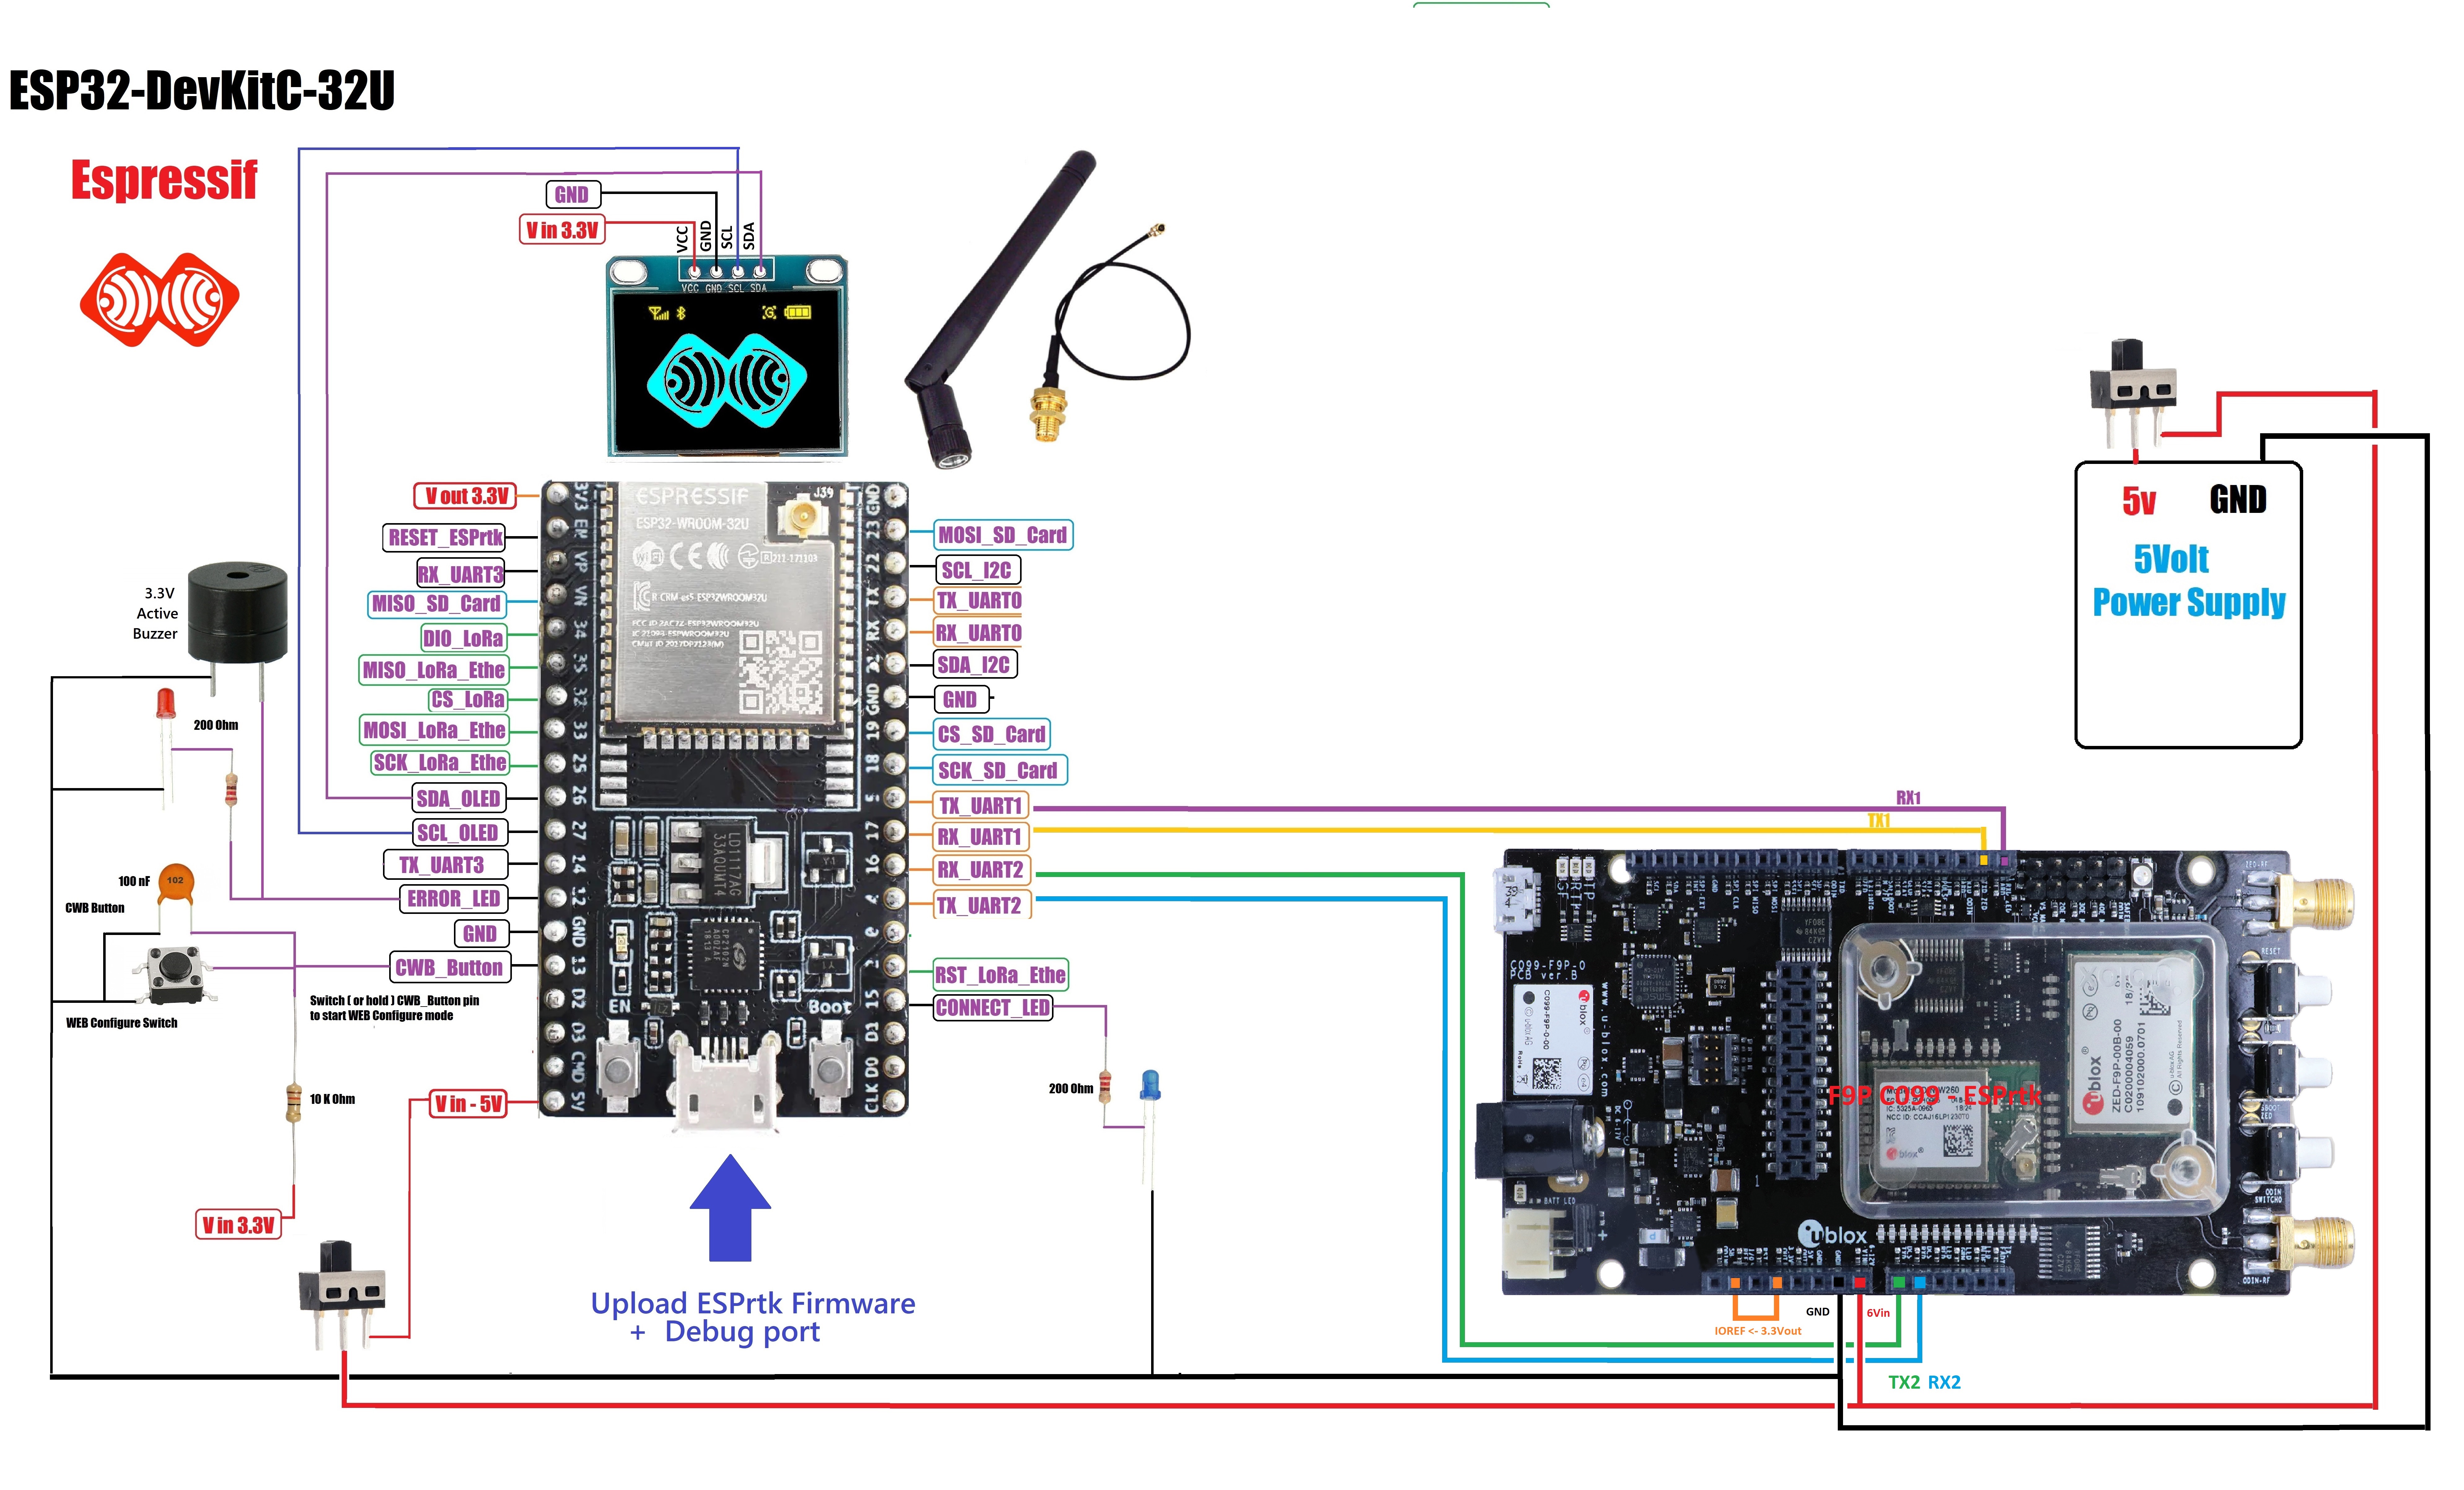
- RTK GNSS: F9P or PX1122R
- Display: OLED SSD1306 0.96 inch or SH1106 1.3 inch( option !)
- Power supply: 5V 2.5A Adapter
- Other: LED , Button, Switch , 2.4Ghz WiFi Antenna , GNSS RTK Antenna, RJ45 Etheret cable, Micro USB Cable , 3.3V Active Buzzer , …

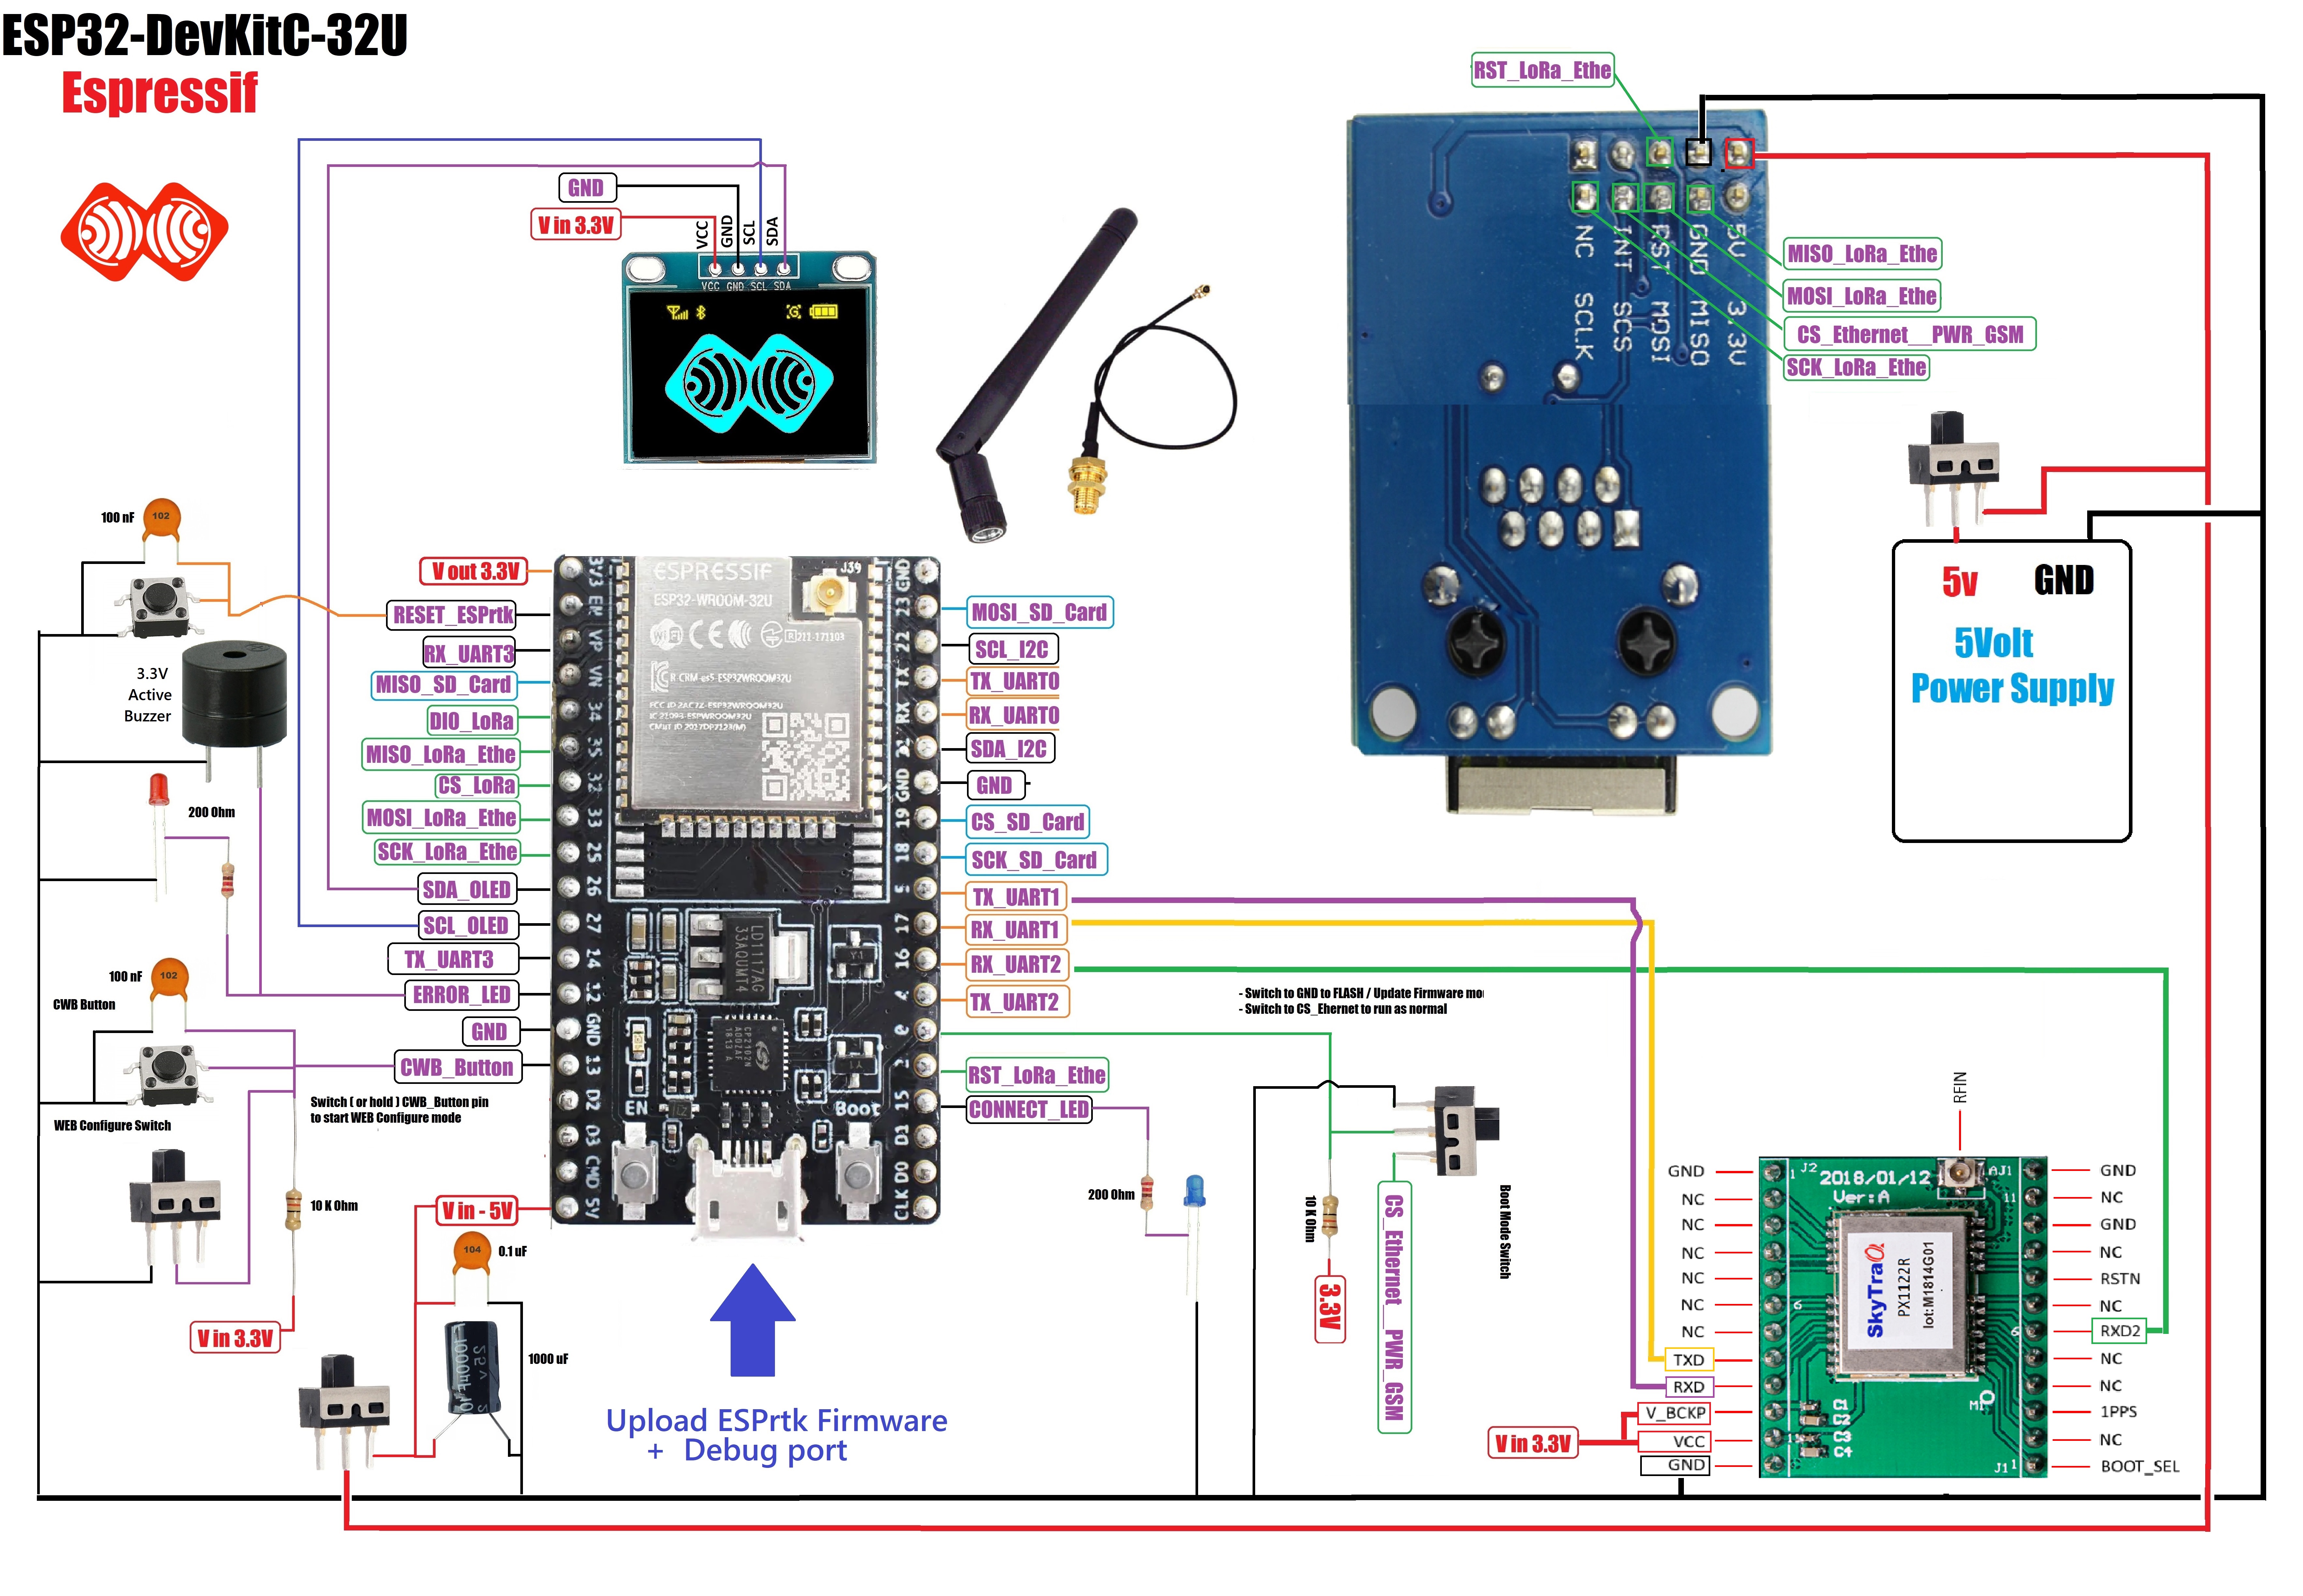
- PX1122R/PX1172R – Navspark (Fullsize)
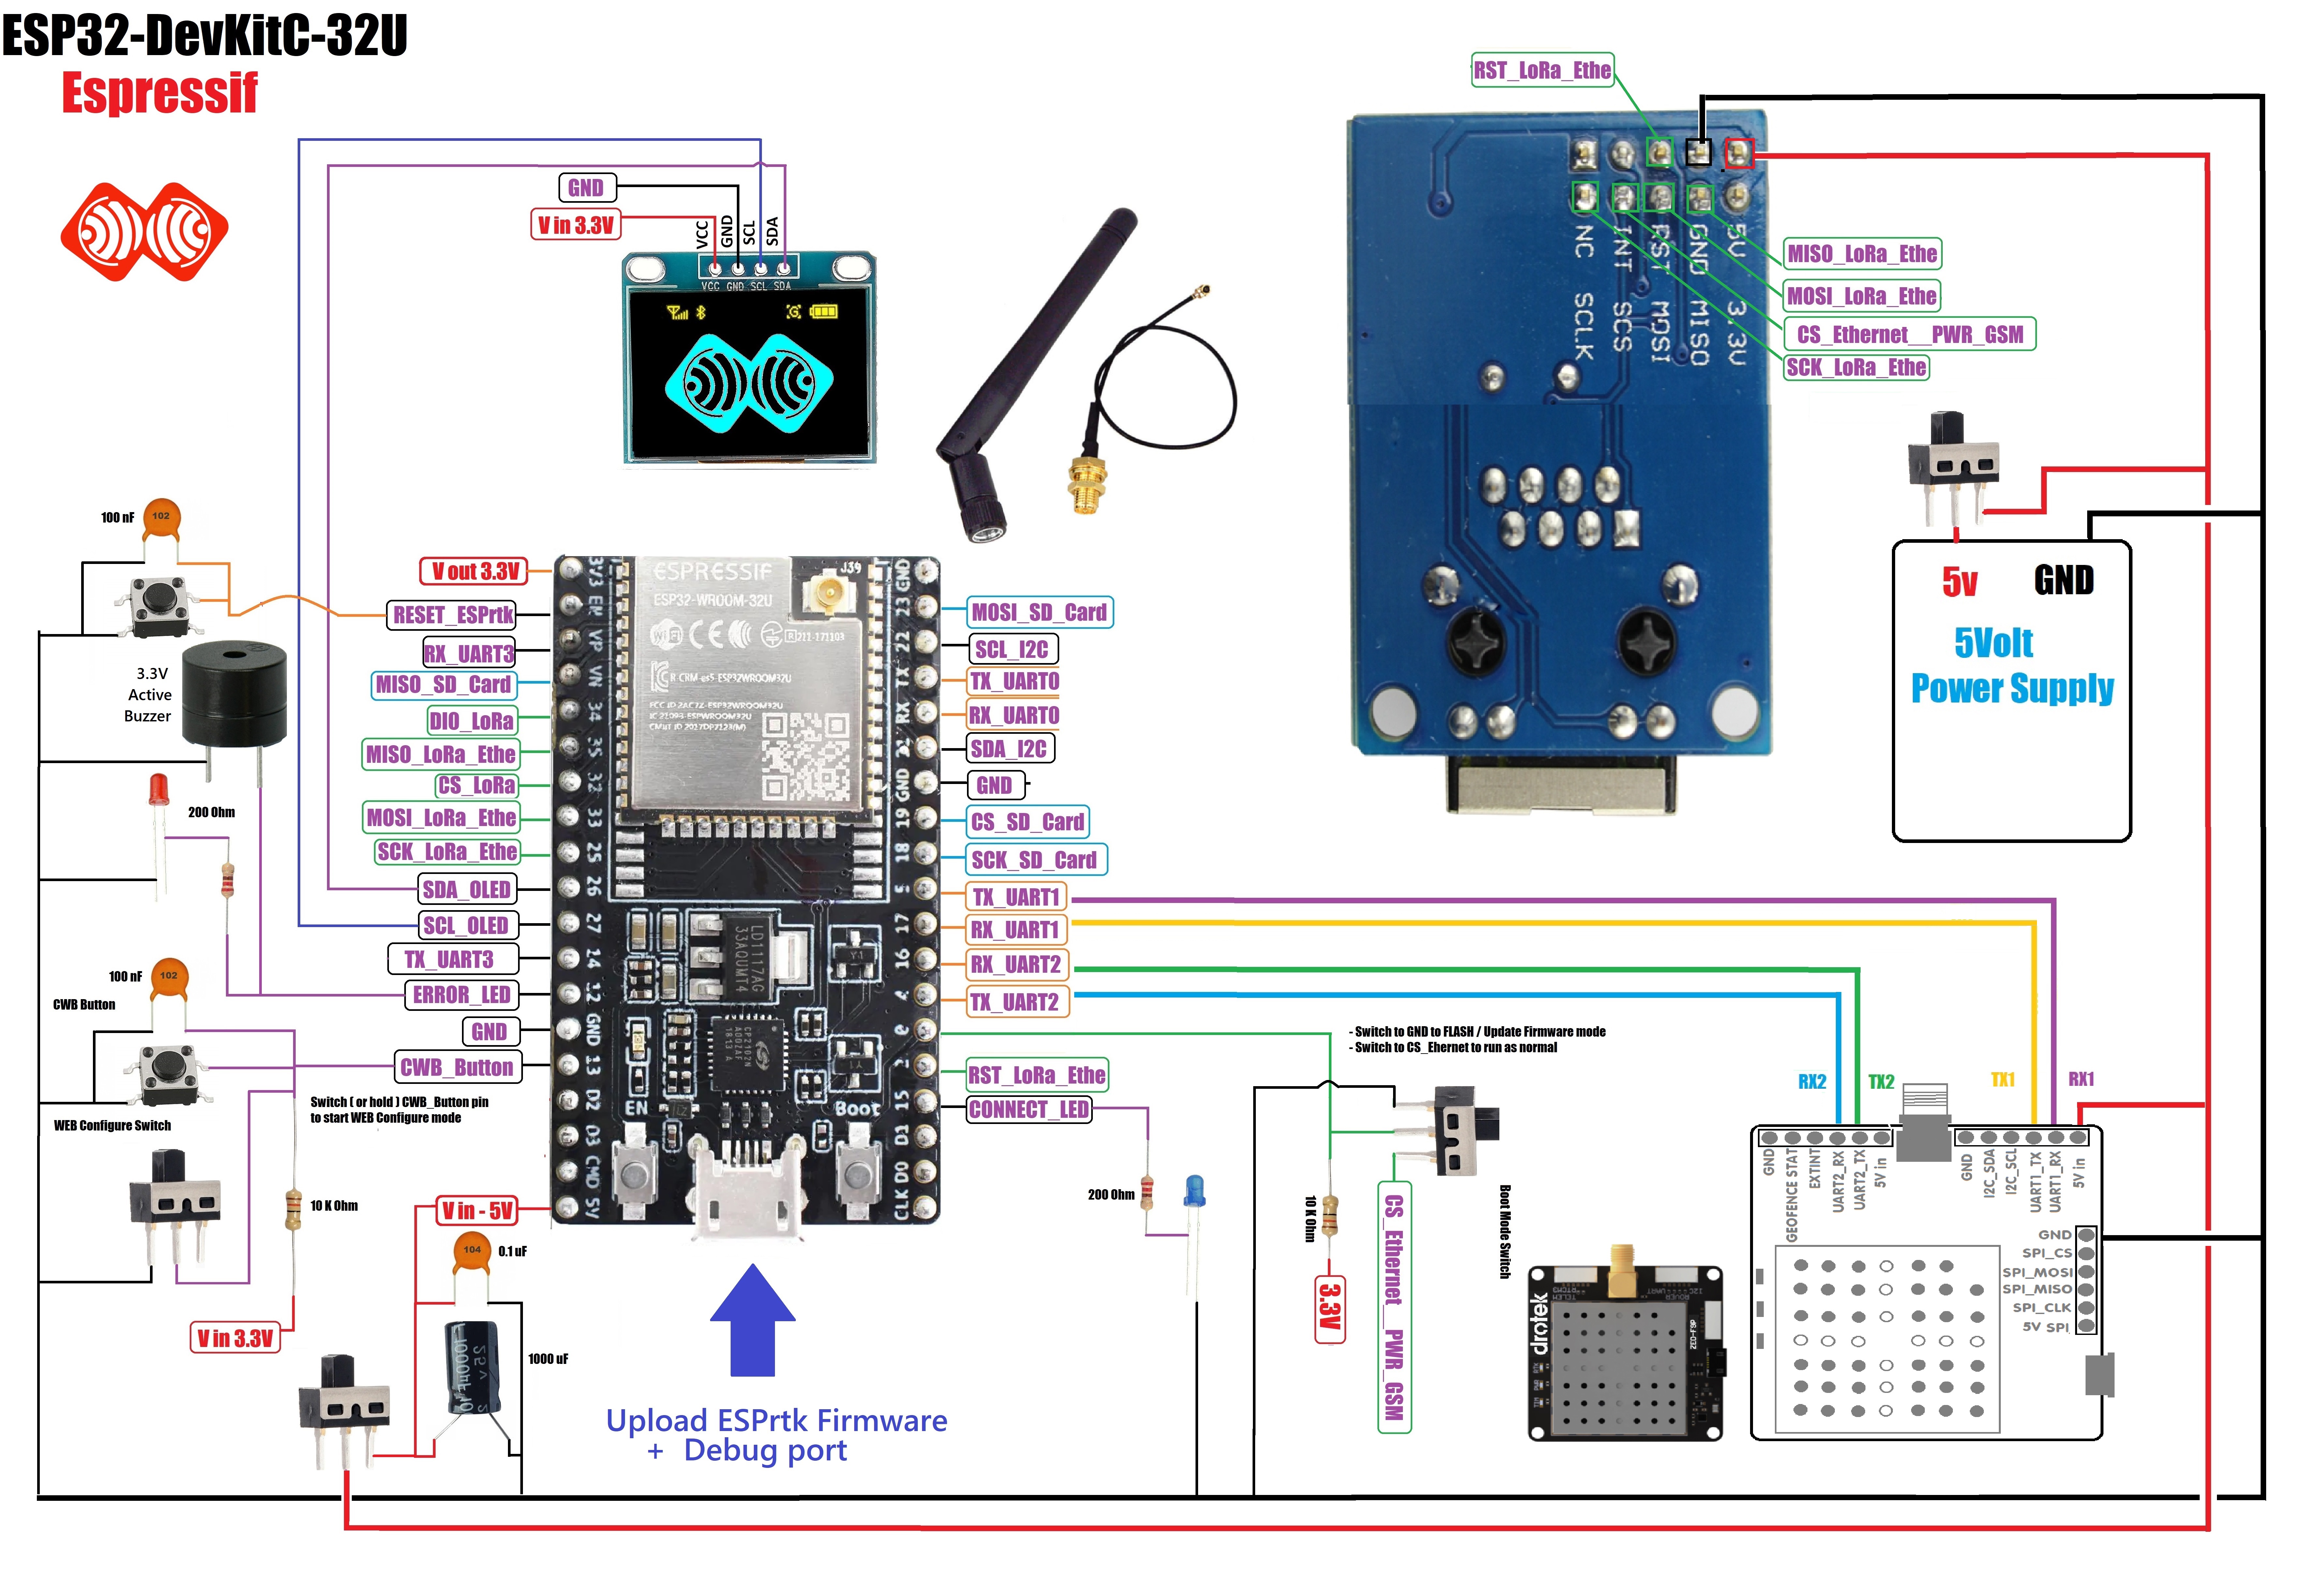
- F9P – Drotek (Fullsize)
- F9P – Ardusimple (Fullsize)
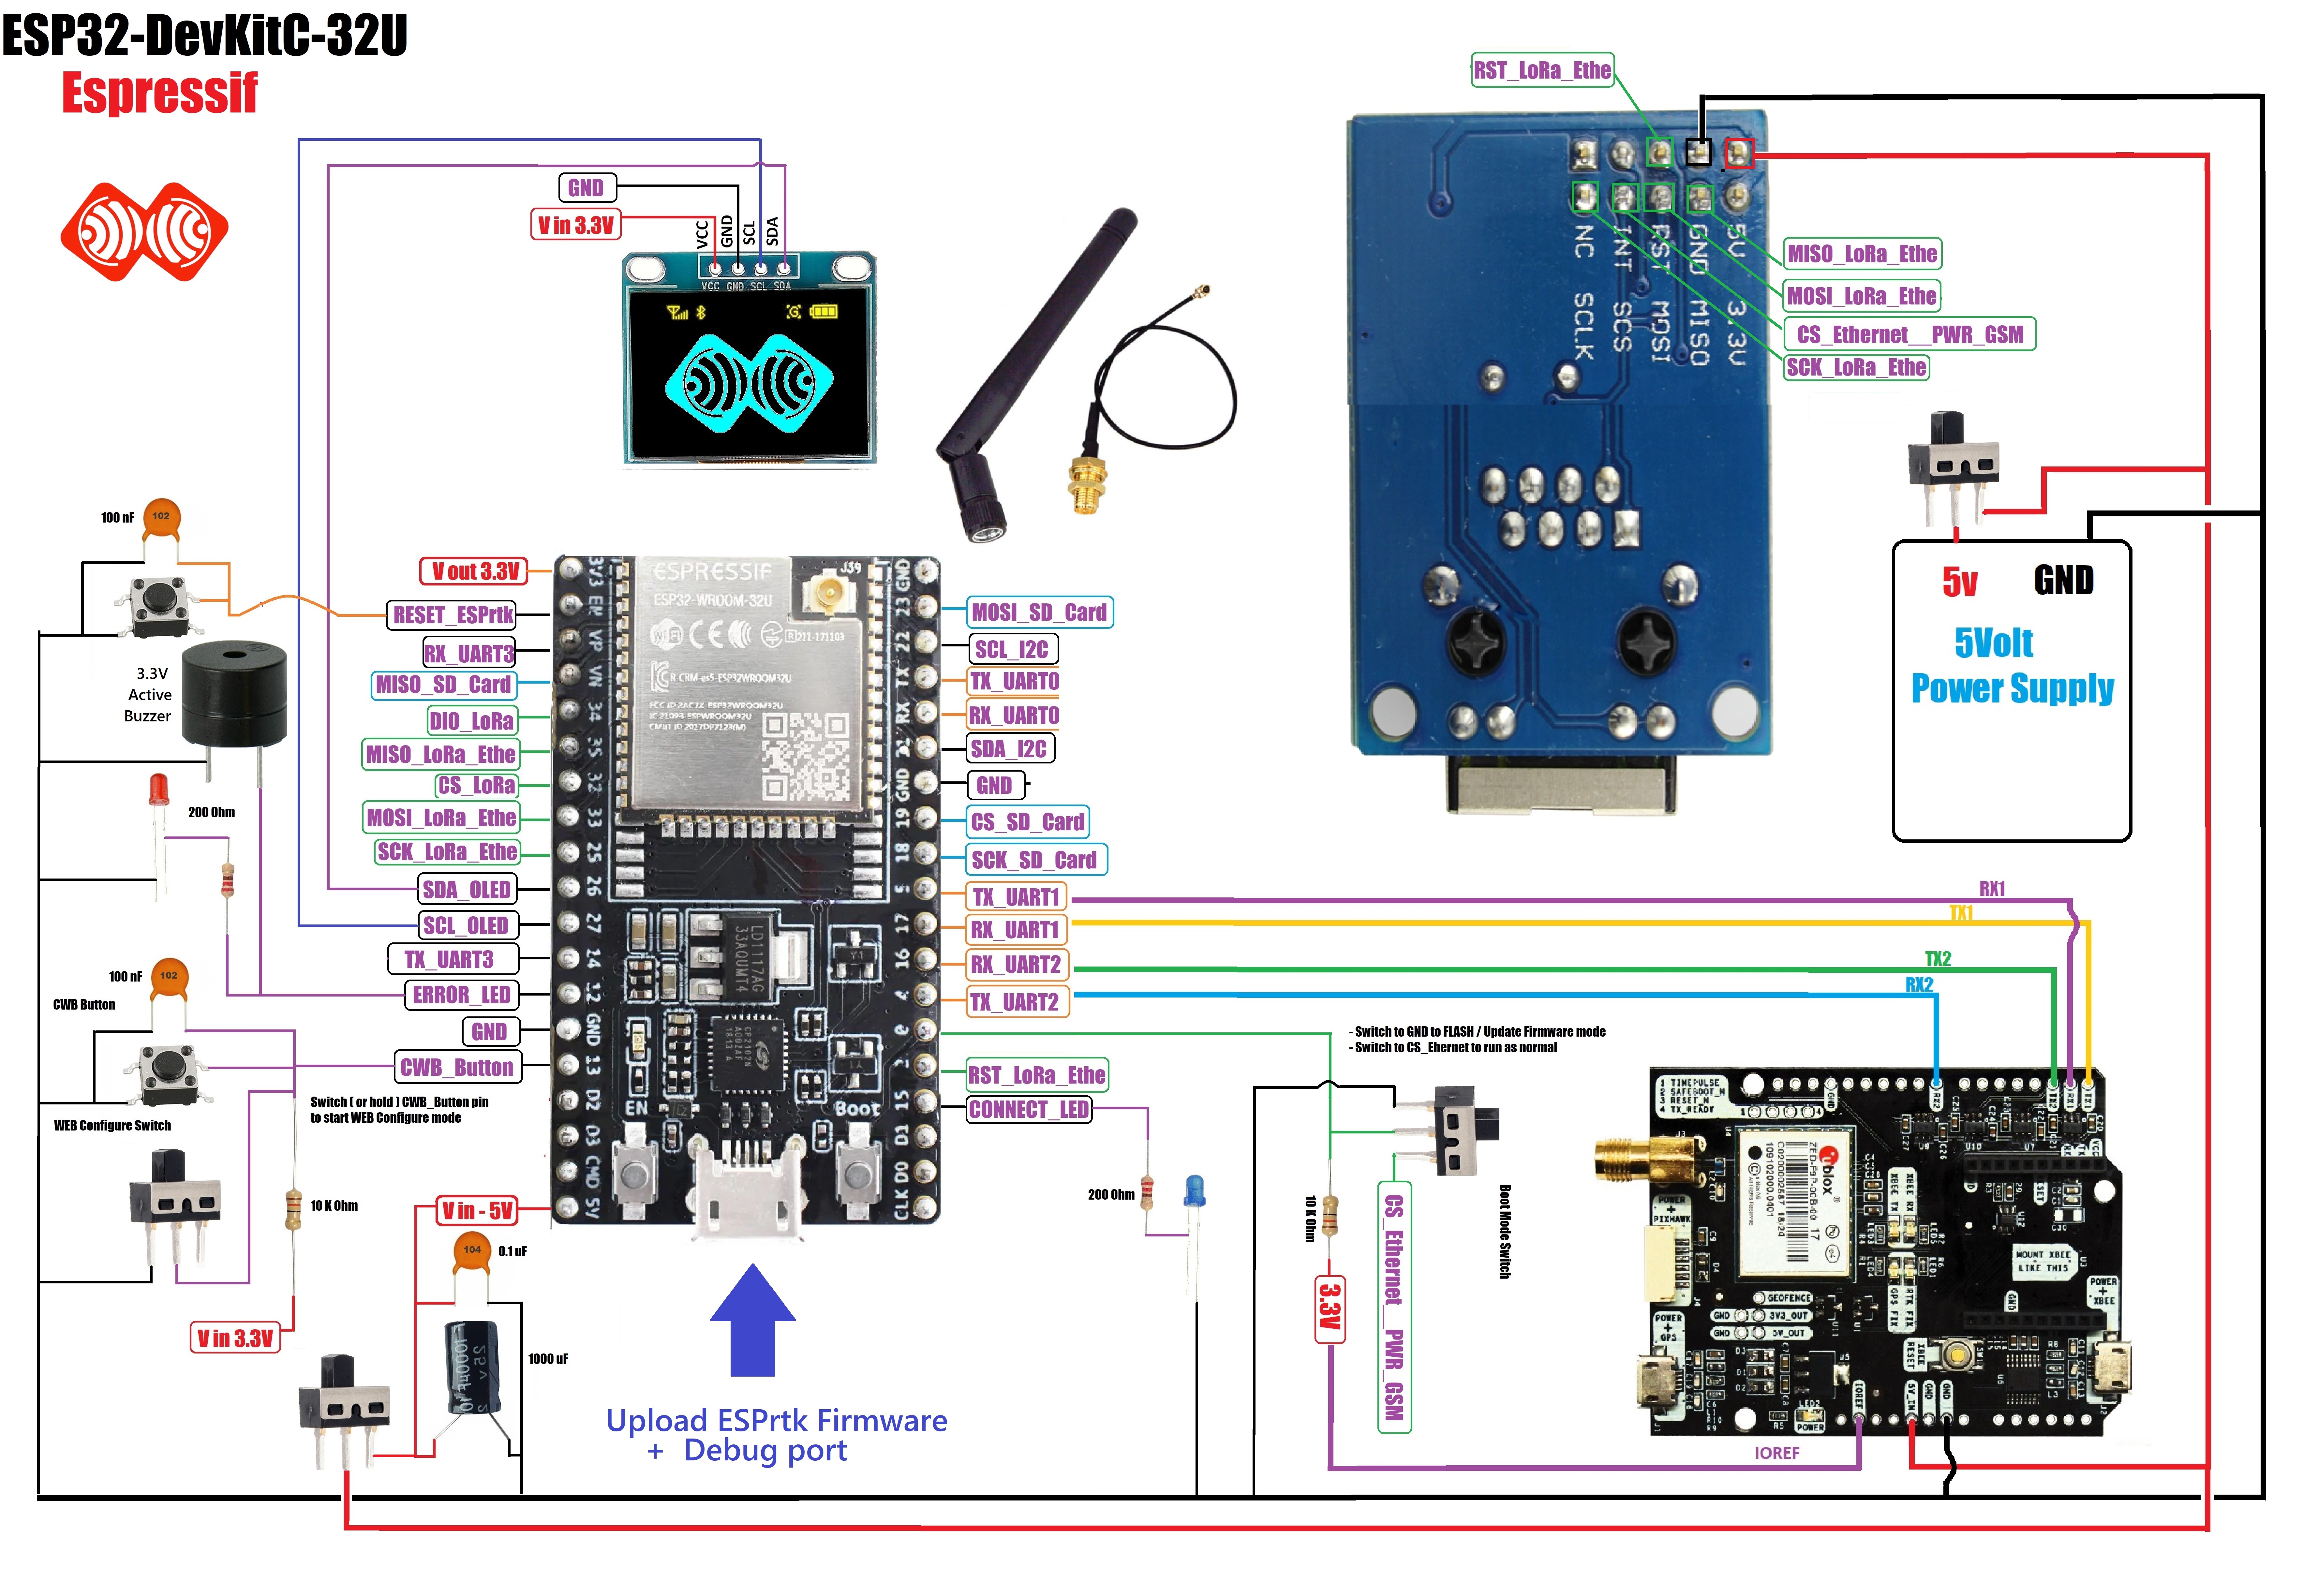
- F9P – Sparkfun (Fullsize)
- F9P – C099-F9P UBLOX (Fullsize)
Warning !
For those who are intending to use buzzer on ESPrtk.
To protect ESP32 chip. Do not connect the buzzer directly to the ESP32’s GPIO12 pin.
Please use protection diode (or combine with NPN transistor as shown image below).
Register and download the firmware for the ESP32
The process of downloading firmware for ESP32 consists of 2 steps.
- Upload the register file Register.bin (If it is a new ESP32 chip).
- Upload the App.bin file.
Please read this article carefully: http://esprtk.wap.sh/tt/t3/register_update_firmware.html
Configure ESP32 and GNSS module RTK
ESPrtk Configure – Action Planning

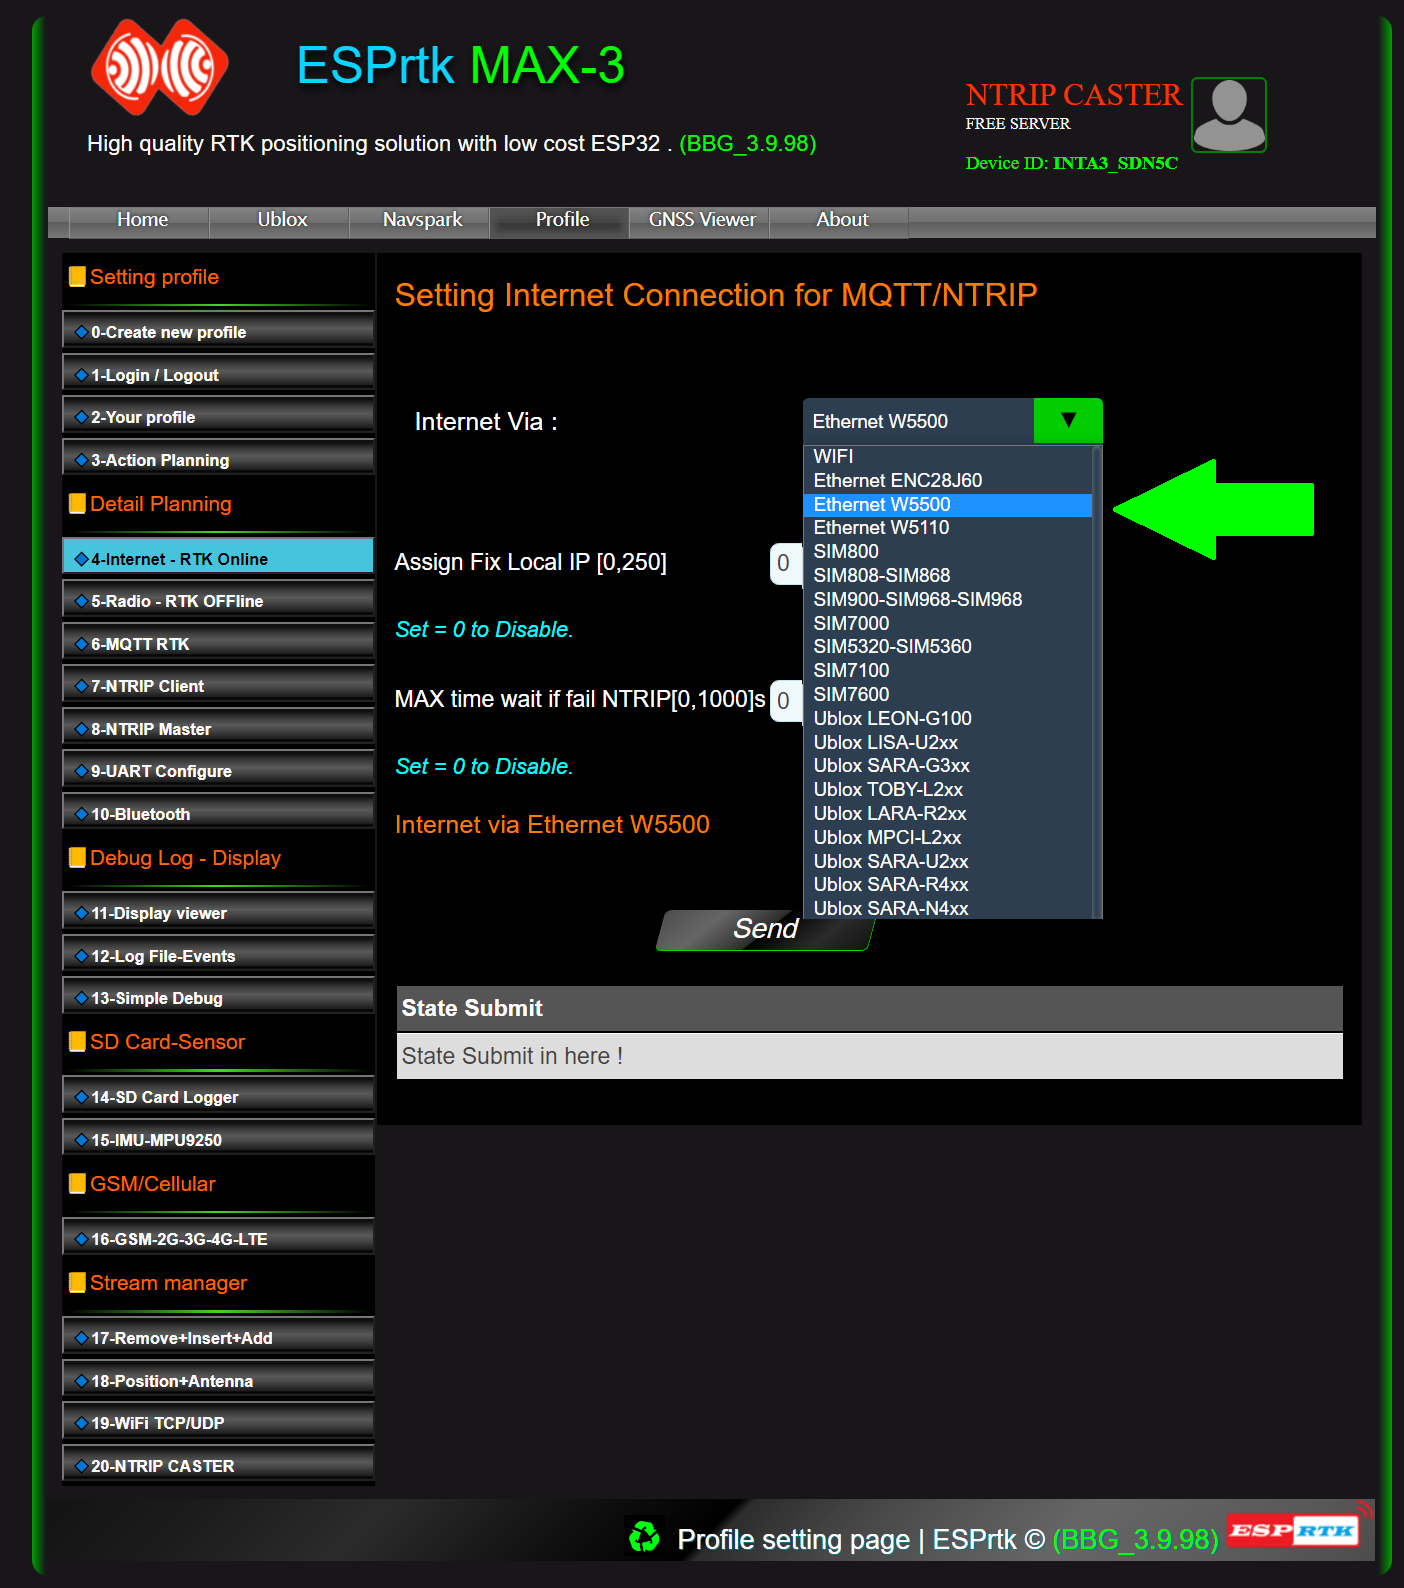
ESPrtk Configure – Internet WIFI

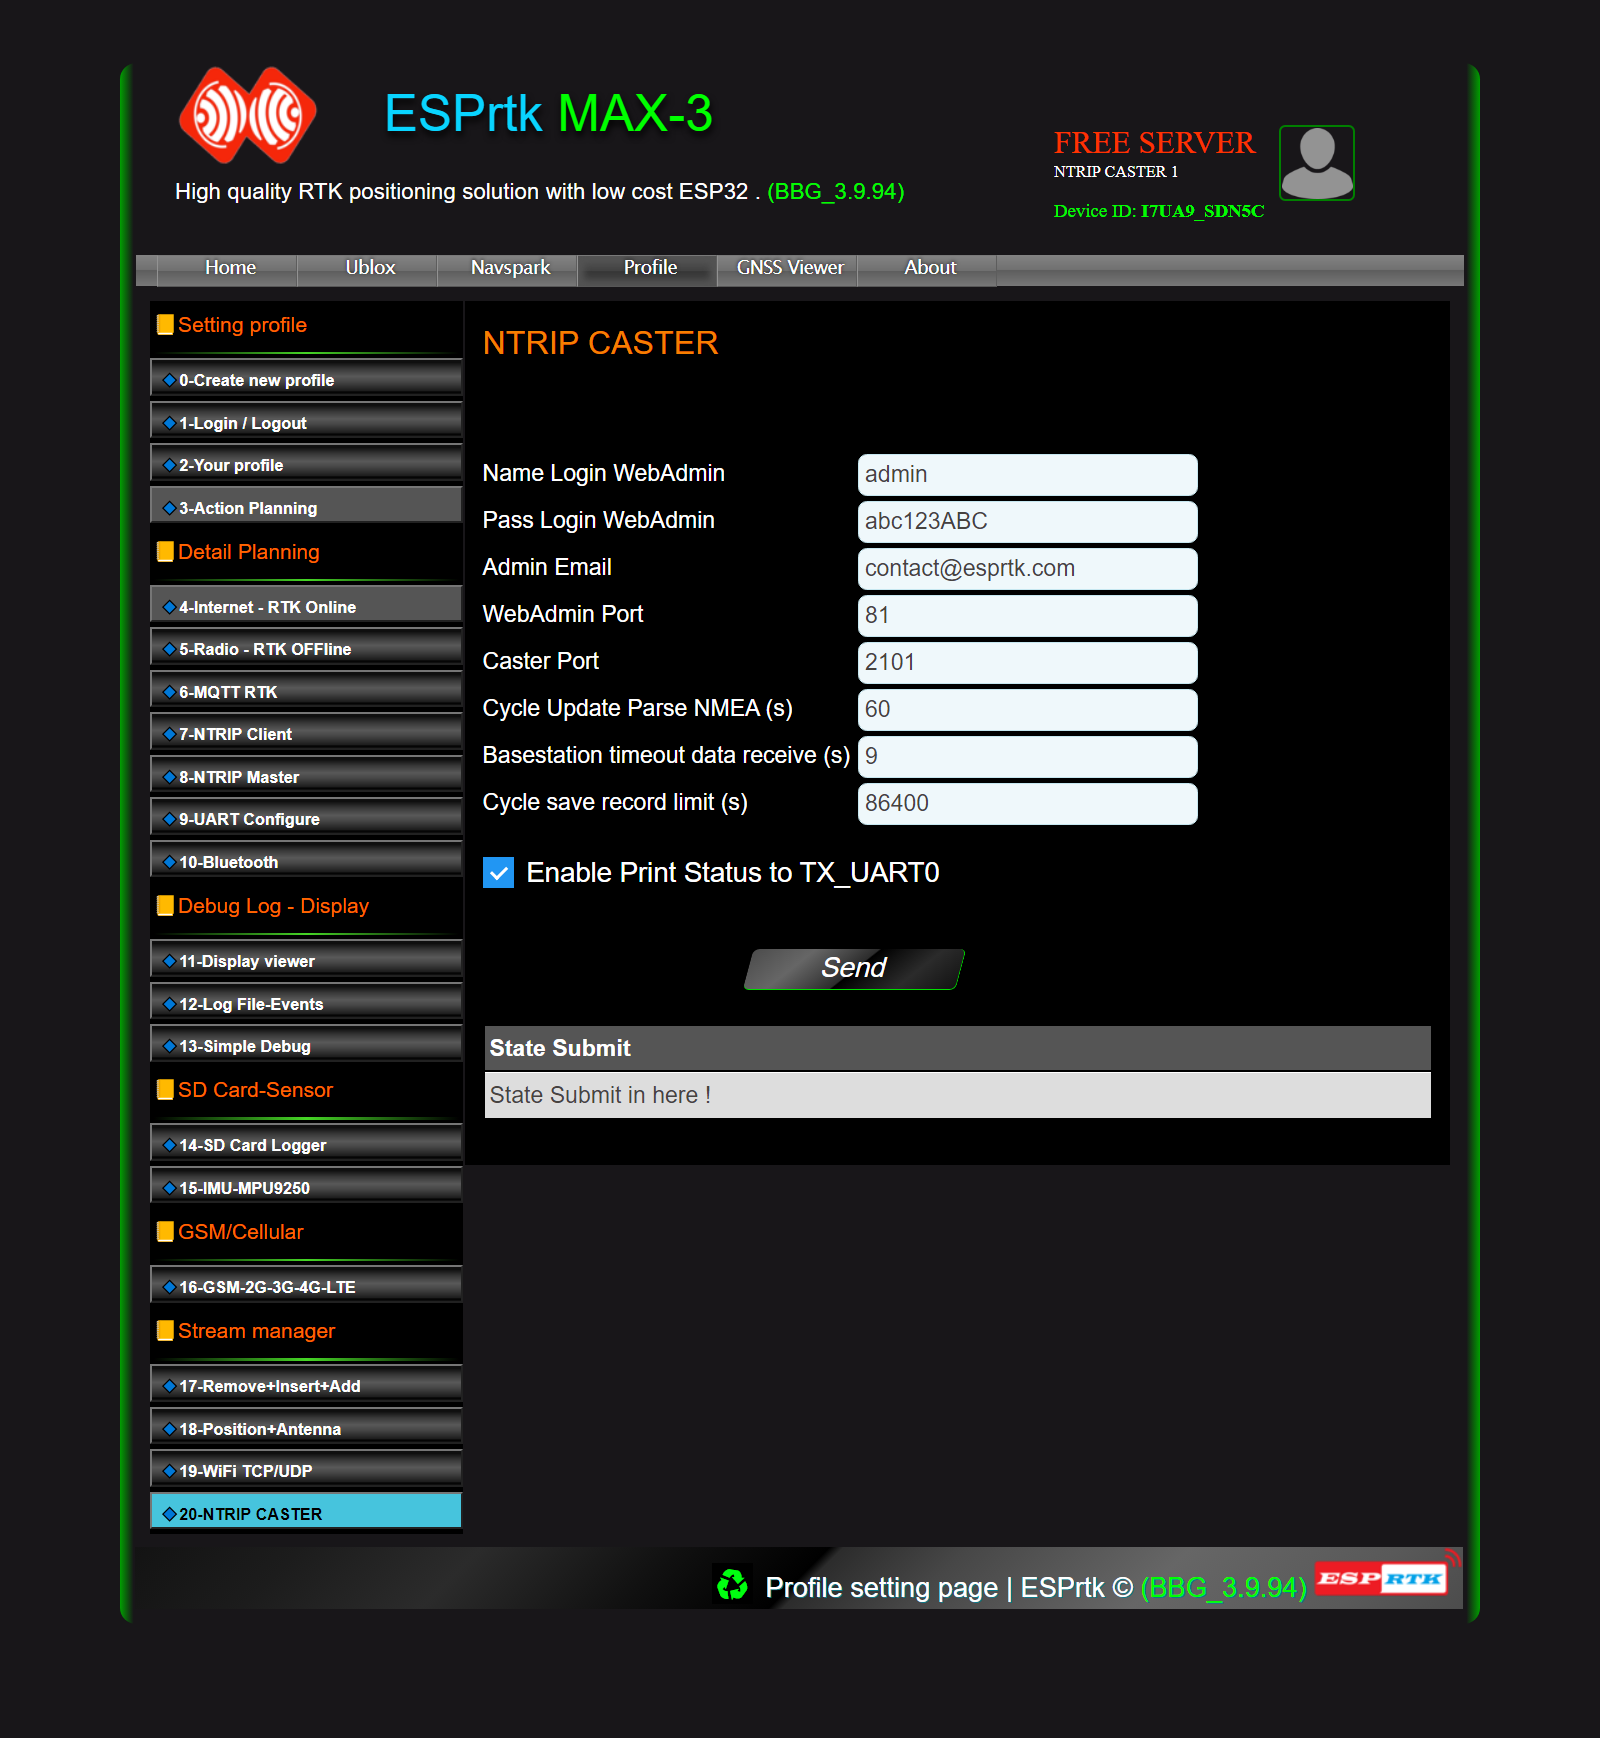
ESPrtk Configure – CASTER port
ESPrtk Configure – Auto inject RTCM 1008,1007,1033,1004,1012…

GNSS Configure – PX1122R Base mode
Read detail here : Configure NS-HP GL/BD/GN Navspark as BASE Station

GNSS Configure – PX1122R RTCM out
Read detail here : Configure NS-HP GL/BD/GN Navspark as BASE Station

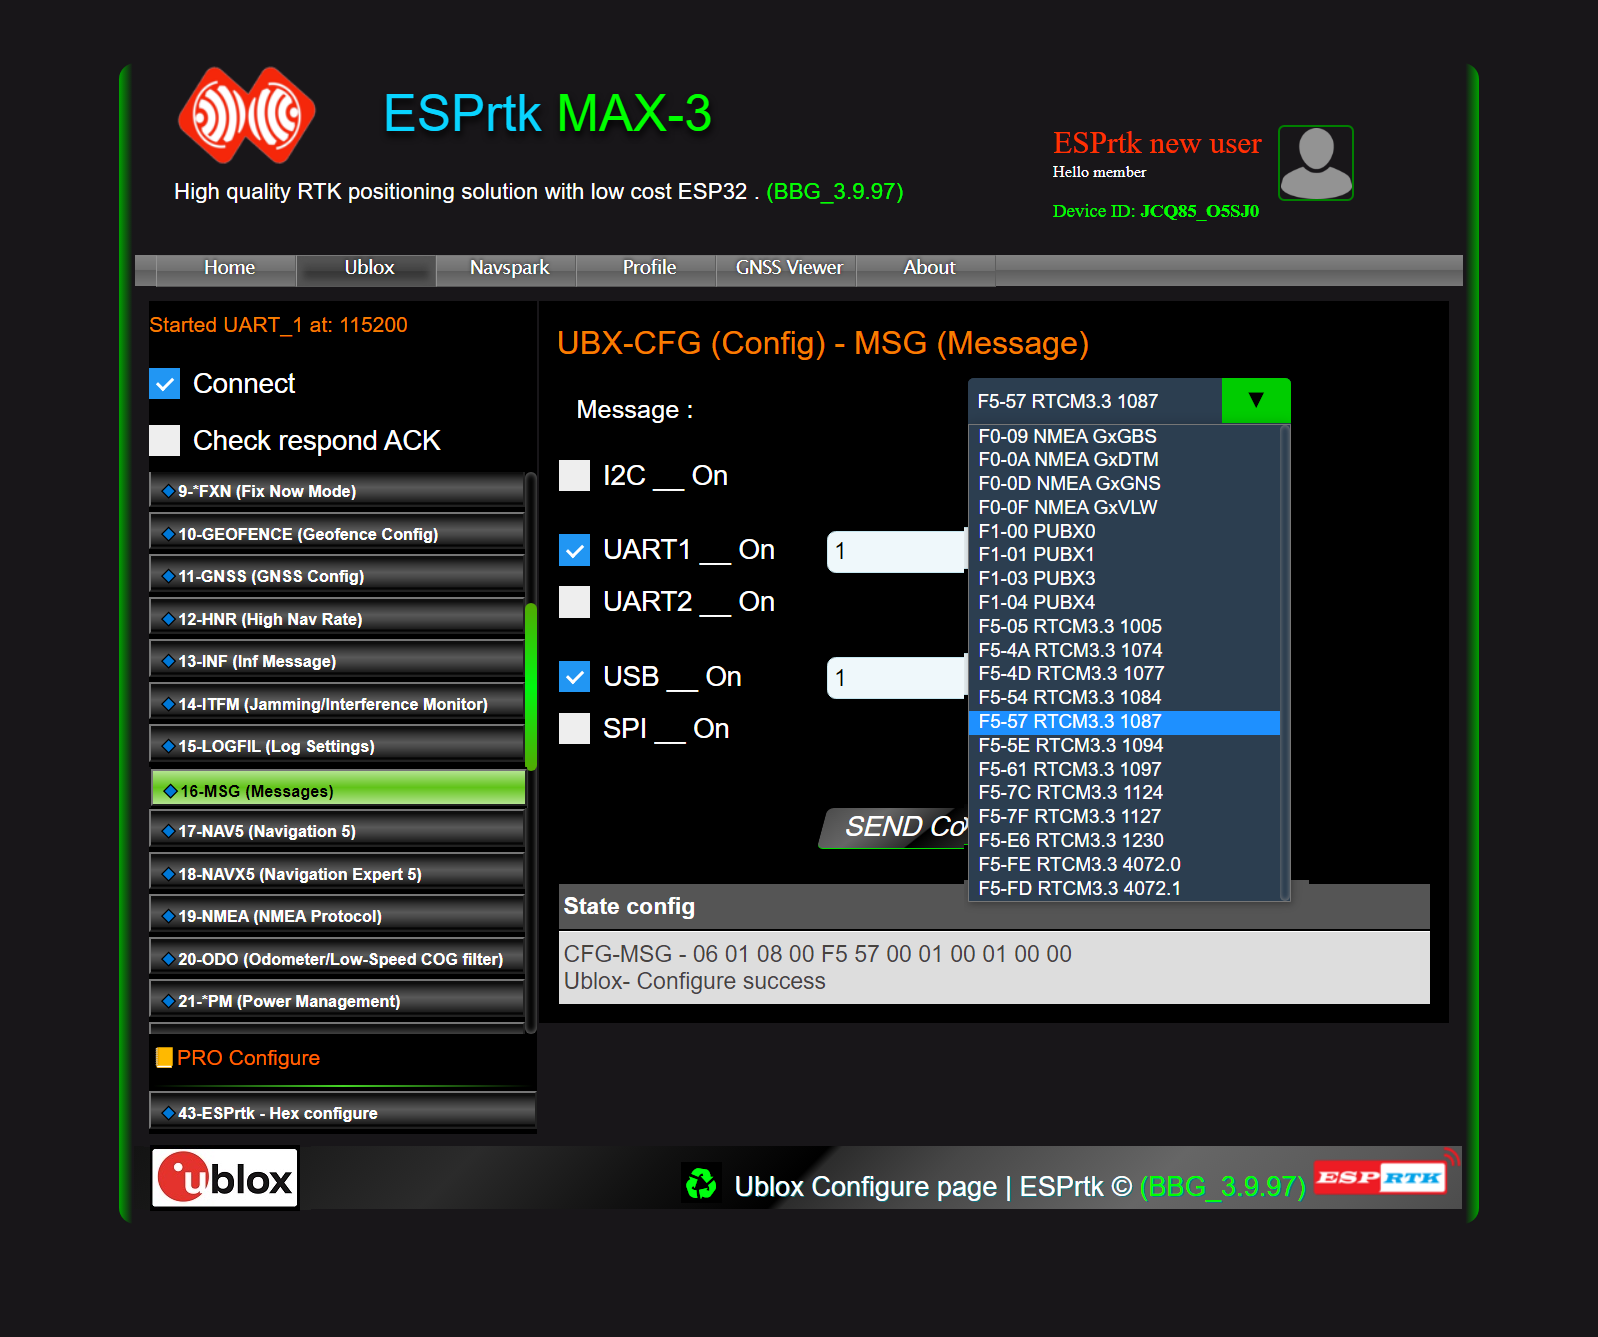
GNSS Configure – F9P RTCM 3 output
Read detail here : Configure F9P/M8P Ublox as BASE Station
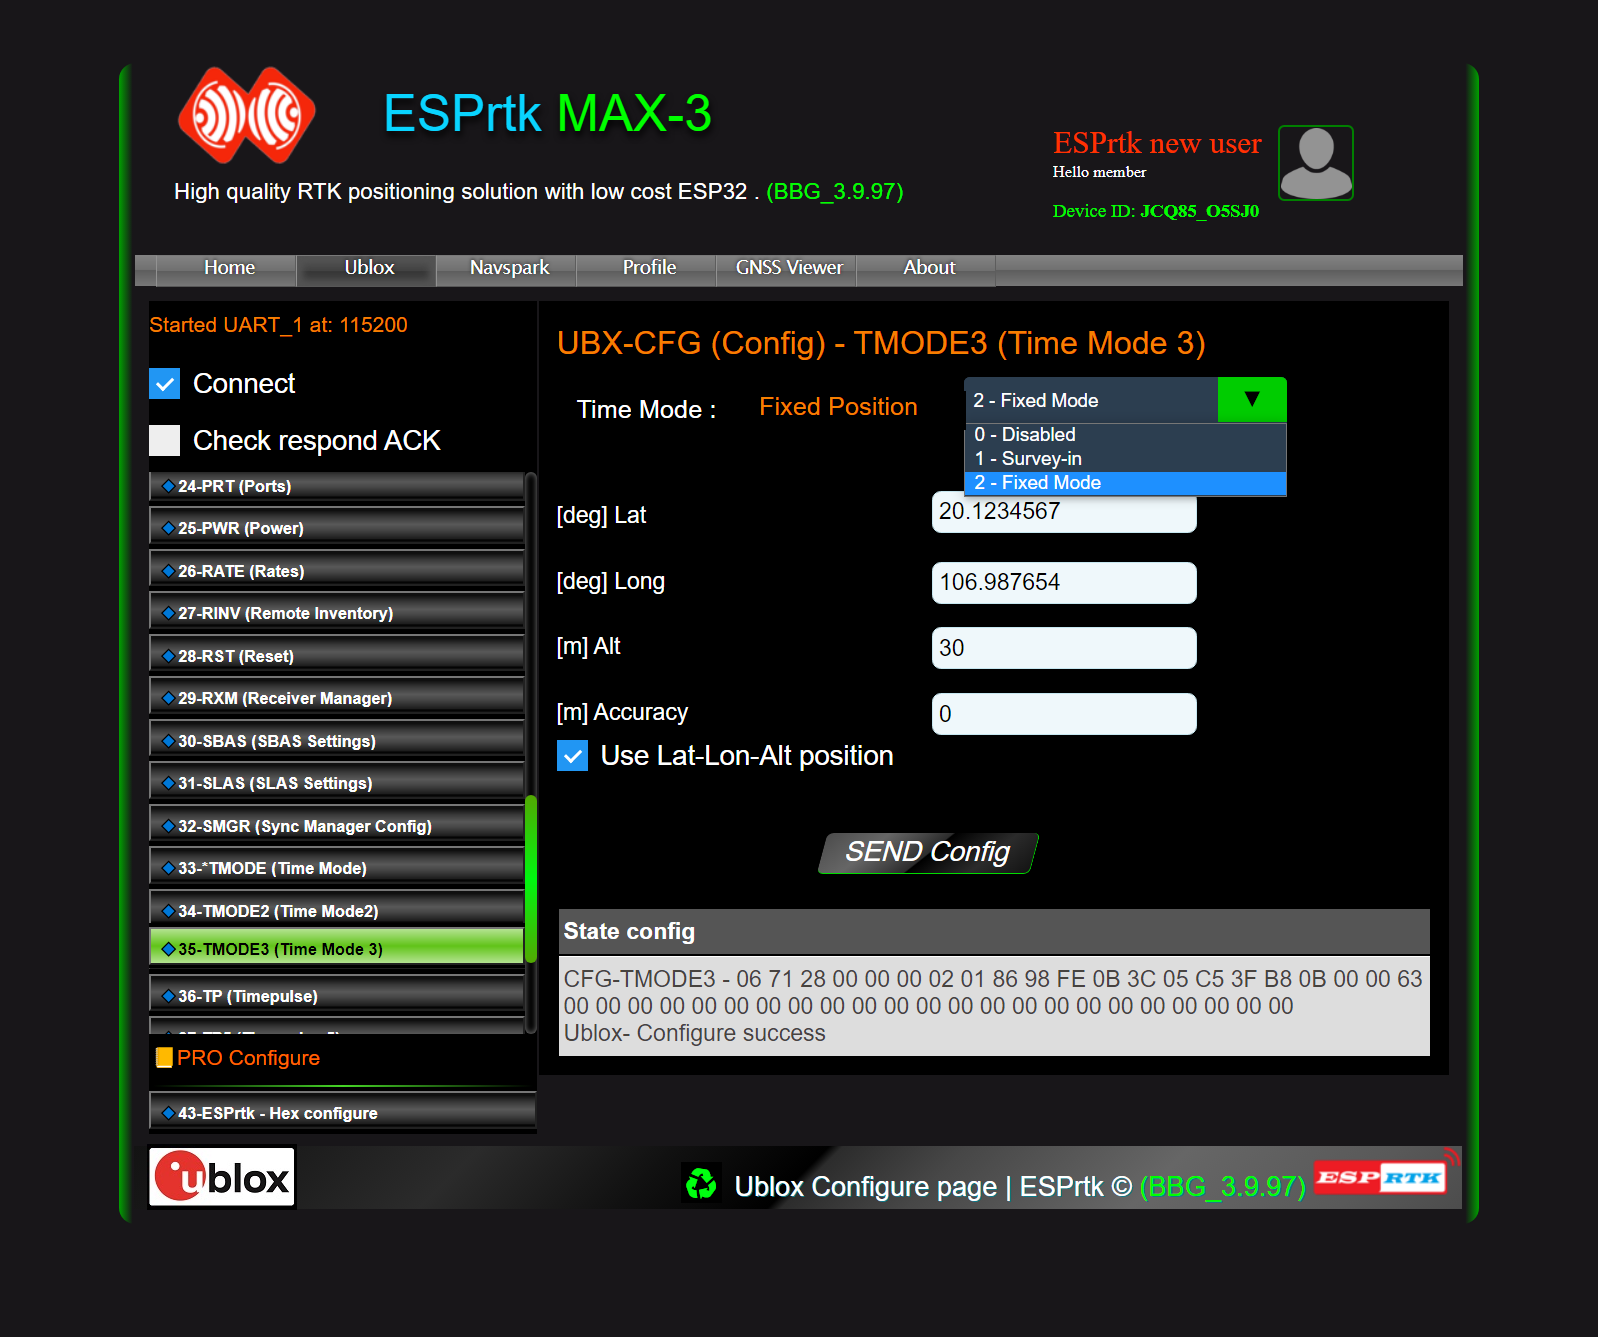
GNSS Configure – F9P Base FIX/Survey mode
Read detail here : Configure F9P/M8P Ublox as BASE Station
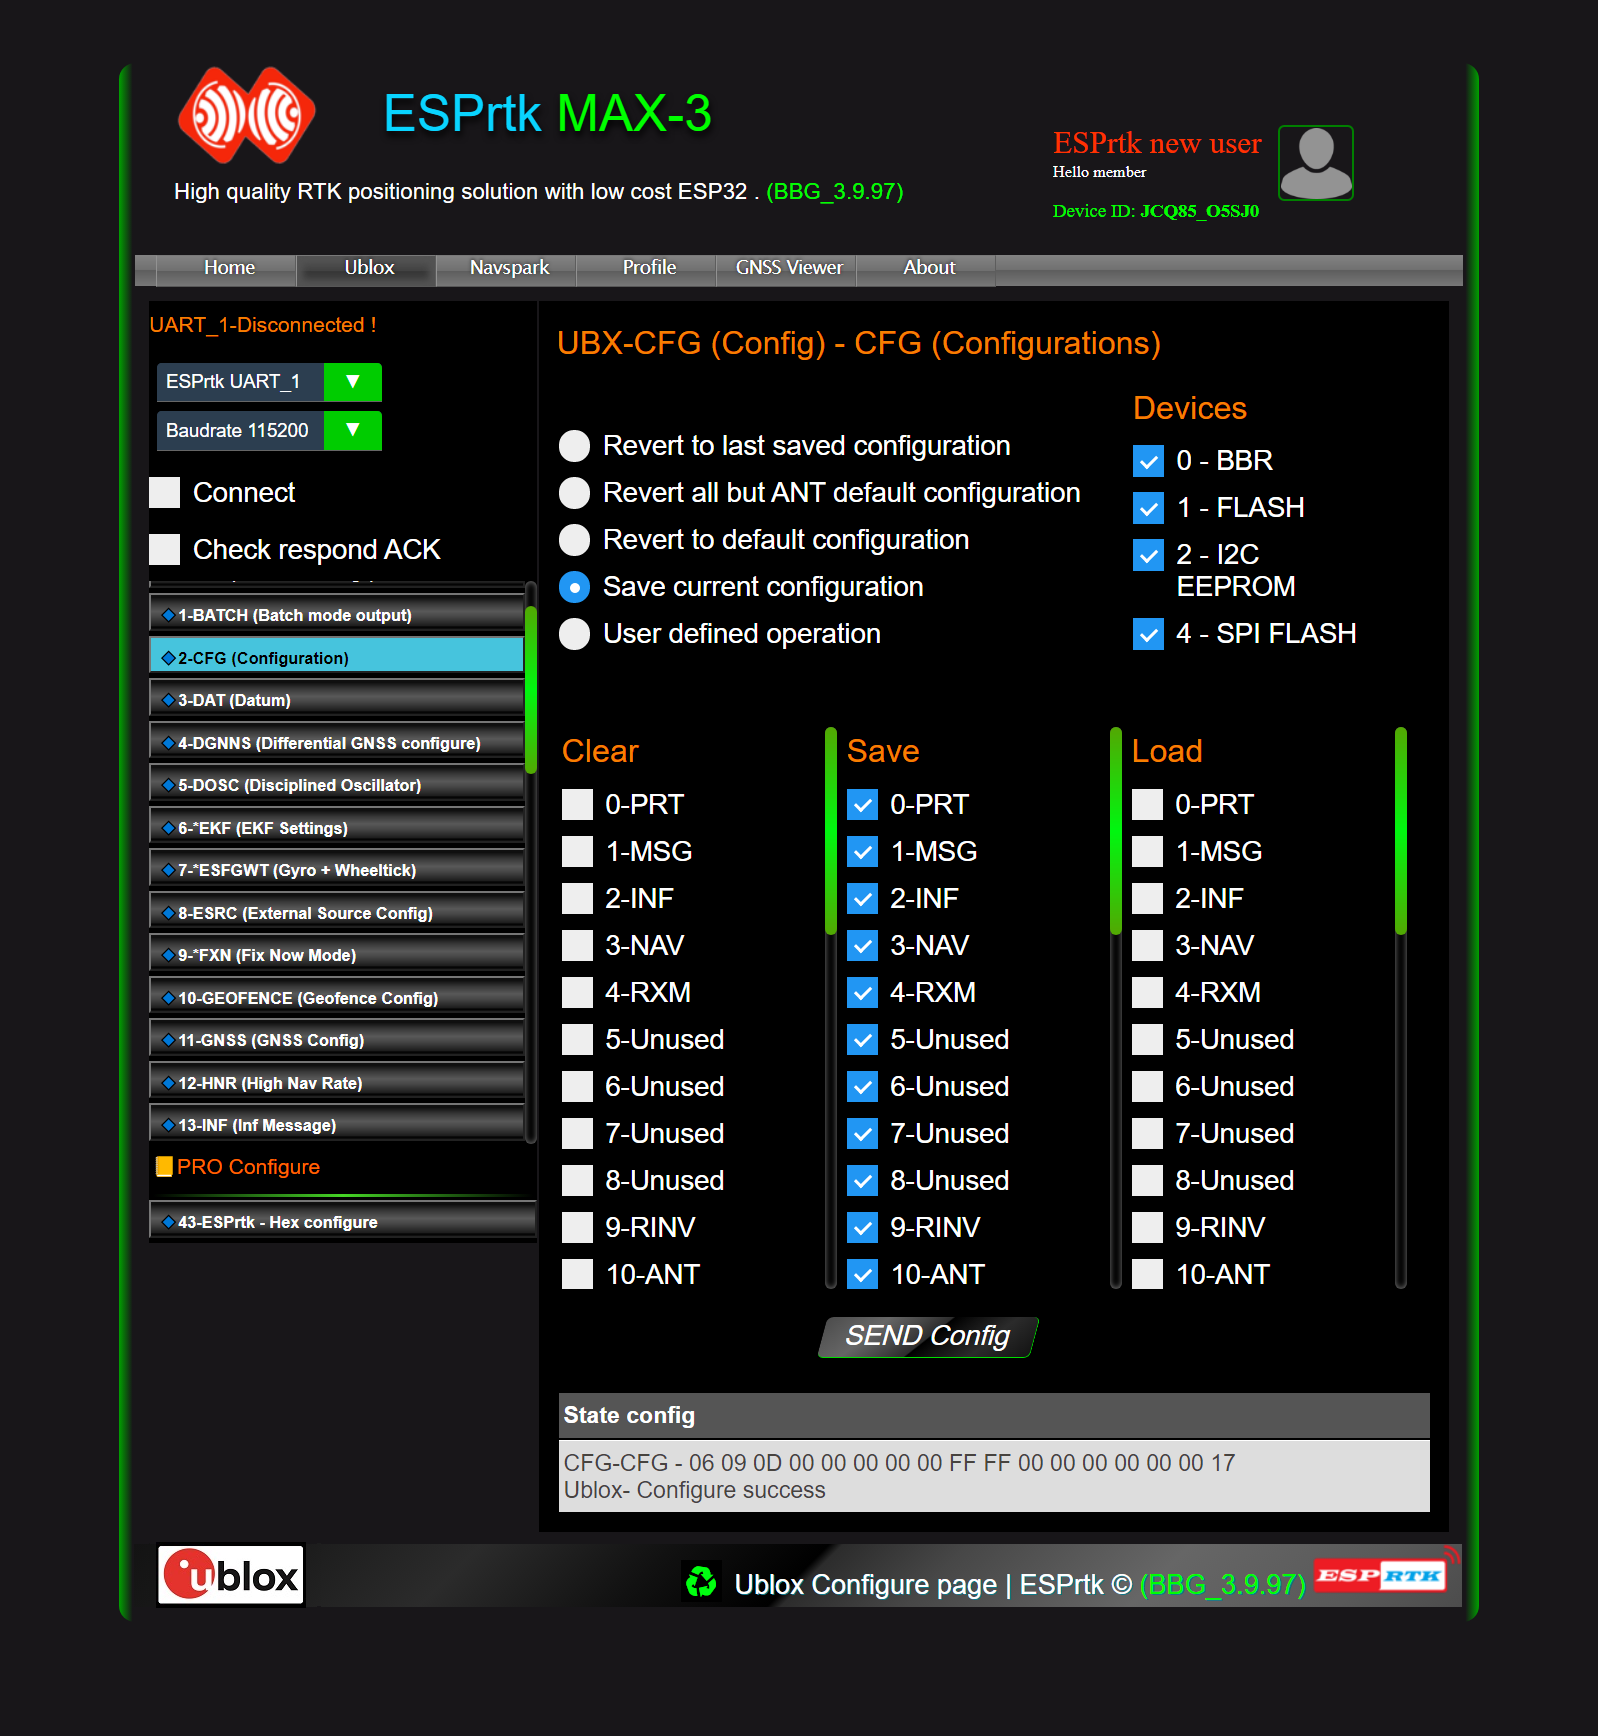
GNSS Configure – F9P Save All configure to Flash
Read detail here : Configure F9P/M8P Ublox as BASE Station
Account for DDNS service
There are many DDNS service providers, either free or purchase.
- DuckDNS
- No-ip
- DynDNS
- Dynu
- ENom
- all-inkl
- selfhost.de
- strato
- freemyip
- afraid.org
- OVH.com
In this article, we choose NO-IP. You can get the service free for 30 days (or even free forever as long as you need confirmation of renewal for your account at the end of the month).
First access NO-IP at: https://www.noip.com/
We go to user account management. (This will be the username and password used to configure DDNS in the Router below).

Then add a new domain name .

In this example, my DDNS account is
- Name: esprtk
- Password: esprtk_caster
- Hostname: esprtk1.myddns.me
(Of course you’ll need to create your own one that’s different from the one I’m using!).
Router Configure
Router Configure – Disble Firewall + Enable NAT

Router Configure – NAT Port

Router Configure – Add DDNS provider

Router Configure – Force DHCP assign a fixed Local IP address by MAC address

Check Port open
Make sure your ESP_CASTER is running when checking the Port status !

Check CASTER Server address

Check with real app and device

Test the actual operation with multi-connection and multi-device support on the same time.
- NTRIP Client Lefebure :1
- NTRIP Client RTKLIB : 3
- NTRIP Client SNIP : 1
- NTRIP Server RTKLIB : 1


Check Admin Dashboard page


Build multi CASTER Server on multi port
Multi CASTER – Hardware prepare

Multi CASTER – NAT Multi Port

Multi CASTER – Force DHCP assign a fixed Local IP address by MAC address

Multi CASTER – Final Full Test

- S1 : http://esprtk.myddns.me:81/admin
- S1: http://esprtk.myddns.me:2101
- S2 : http://esprtk.myddns.me:82/admin
- S2: http://esprtk.myddns.me:2102
- S3 : http://esprtk.myddns.me:83/admin
- S3: http://esprtk.myddns.me:2103
- S4 : http://esprtk.myddns.me:84/admin
- S4: http://esprtk.myddns.me:2104
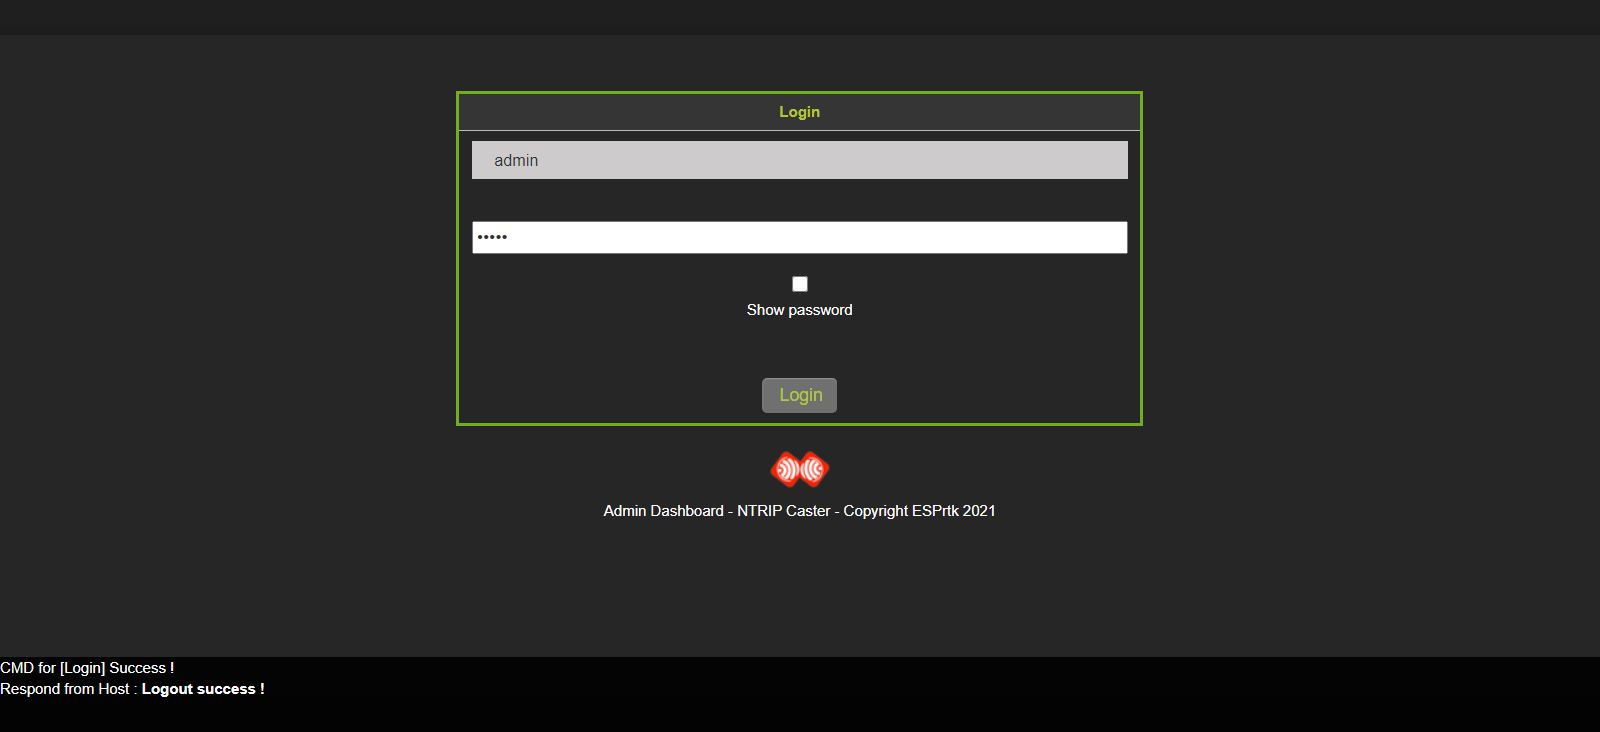
Admin dashboard login:
- Name login : admin
- Password: abc123ABC
NTRIP Client/Server login:
- IP/Port: esprtk.myddns.me:82 (or 192.168.x.x:82 for local network , )
- Mountpoint: Base_0 (or Base_1, Base_2,…)
- Name login: name_0 (or name_1, name_2,…)
- Password: pass_0 ( or pass_1, pass_2,..)
Learn all the powerful features here:
We also created a video tutorial here: https://youtu.be/jYI4_MdHs5E
What we want to emphasize is that this is a server run by only low cost ESP32 module, no need for Raspberry PI computer or a complicated server system !
Hope this project helps all of you.
The Router in our guide may be different from yours. If you have difficulty in setting up DDNS, NAT port, firewall,… please contact us via email : contact@esprtk.com
We will try to help you set up your system successfully for free.
Best regards – ESPrtk Dev Team.
Multi CASTER – 1 year running
We will keep this system of 4 CASTER servers running continuous for 1 year from September 20, 2021 to September 20, 2022 (maybe longer if possible).

Some note :
Because we are making the login account (of the Admin Dashboard page) available to everyone, that means anyone can log in, view and change the configuration content on it.
So, if more than 2 people are logged into the Admin Dashboard page at the same time, the previous login will be automatically logged out, all you need to do is just click the login button again!
Hope you just only login, watch , go around and don’t try to attack this server.
It’s just a lovely ESP32 chip and only supports up to 10 connections at the same time! ( 40 connections for multi 4 server).
We need to keep it working as a demo so everyone can evaluate it’s feature.
Thank you so much for your interested .
Multi CASTER – Heatsink
Hello.
On Admin Dashboard page. You can see the temperatures of ESP32 chip ( internal sensor ). For long time running, using an heatsink will be the solution


For applications that run for long periods of time.
Keeping the ESP32 cool within the standard temperature range will help maintain stability and increase the life of the device. ( uptime ) .
Using a cooling fan, aluminum heatsink combined with the ESP32’s WIFI/Bluetooth power reduction will help lower the temperature.

In the WEB configuration page, go to http://192.168.4.1/system
Here you can manage TX WIFI/Bluetooth/LoRa transmit power (and output PIN, error message… Read more here )
Set the TX WIFI to 10% to 20% and place the ESP32’s WIFI antenna as close to the Router as possible.
Solution automatic fixed local IP address
Hi.
Some users have reported to us via email that their Router does not support setting a fixed local IP address.
Therefore, we have released a new version (3.9.97) that supports automatic fixed local IP address setting.
This feature supports registration of 250 different addresses, in practice you should choose a large value (starting from 250,249,248,247,… → 100 ) to avoid conflicts during registration.

Step 1 : Hardware connection – ETHERNET + Full standards.
For RTK Basestation applications with up to several months or years of continuous uptime, we always recommend users to use the W5500 Ethernet module for their systems to ensure a stable 24-hour connection !.
In addition, it is possible to add 1 buzzer on the ERROR LED pin (3.3V Active Buzzer) and 1 small OLED module to be able to see the operating status, (connection status, error, flow rate, etc.) of the whole. system .
To connect ESPrtk with RTK receiver, Ethernet, OLED …, Click here for more detail.
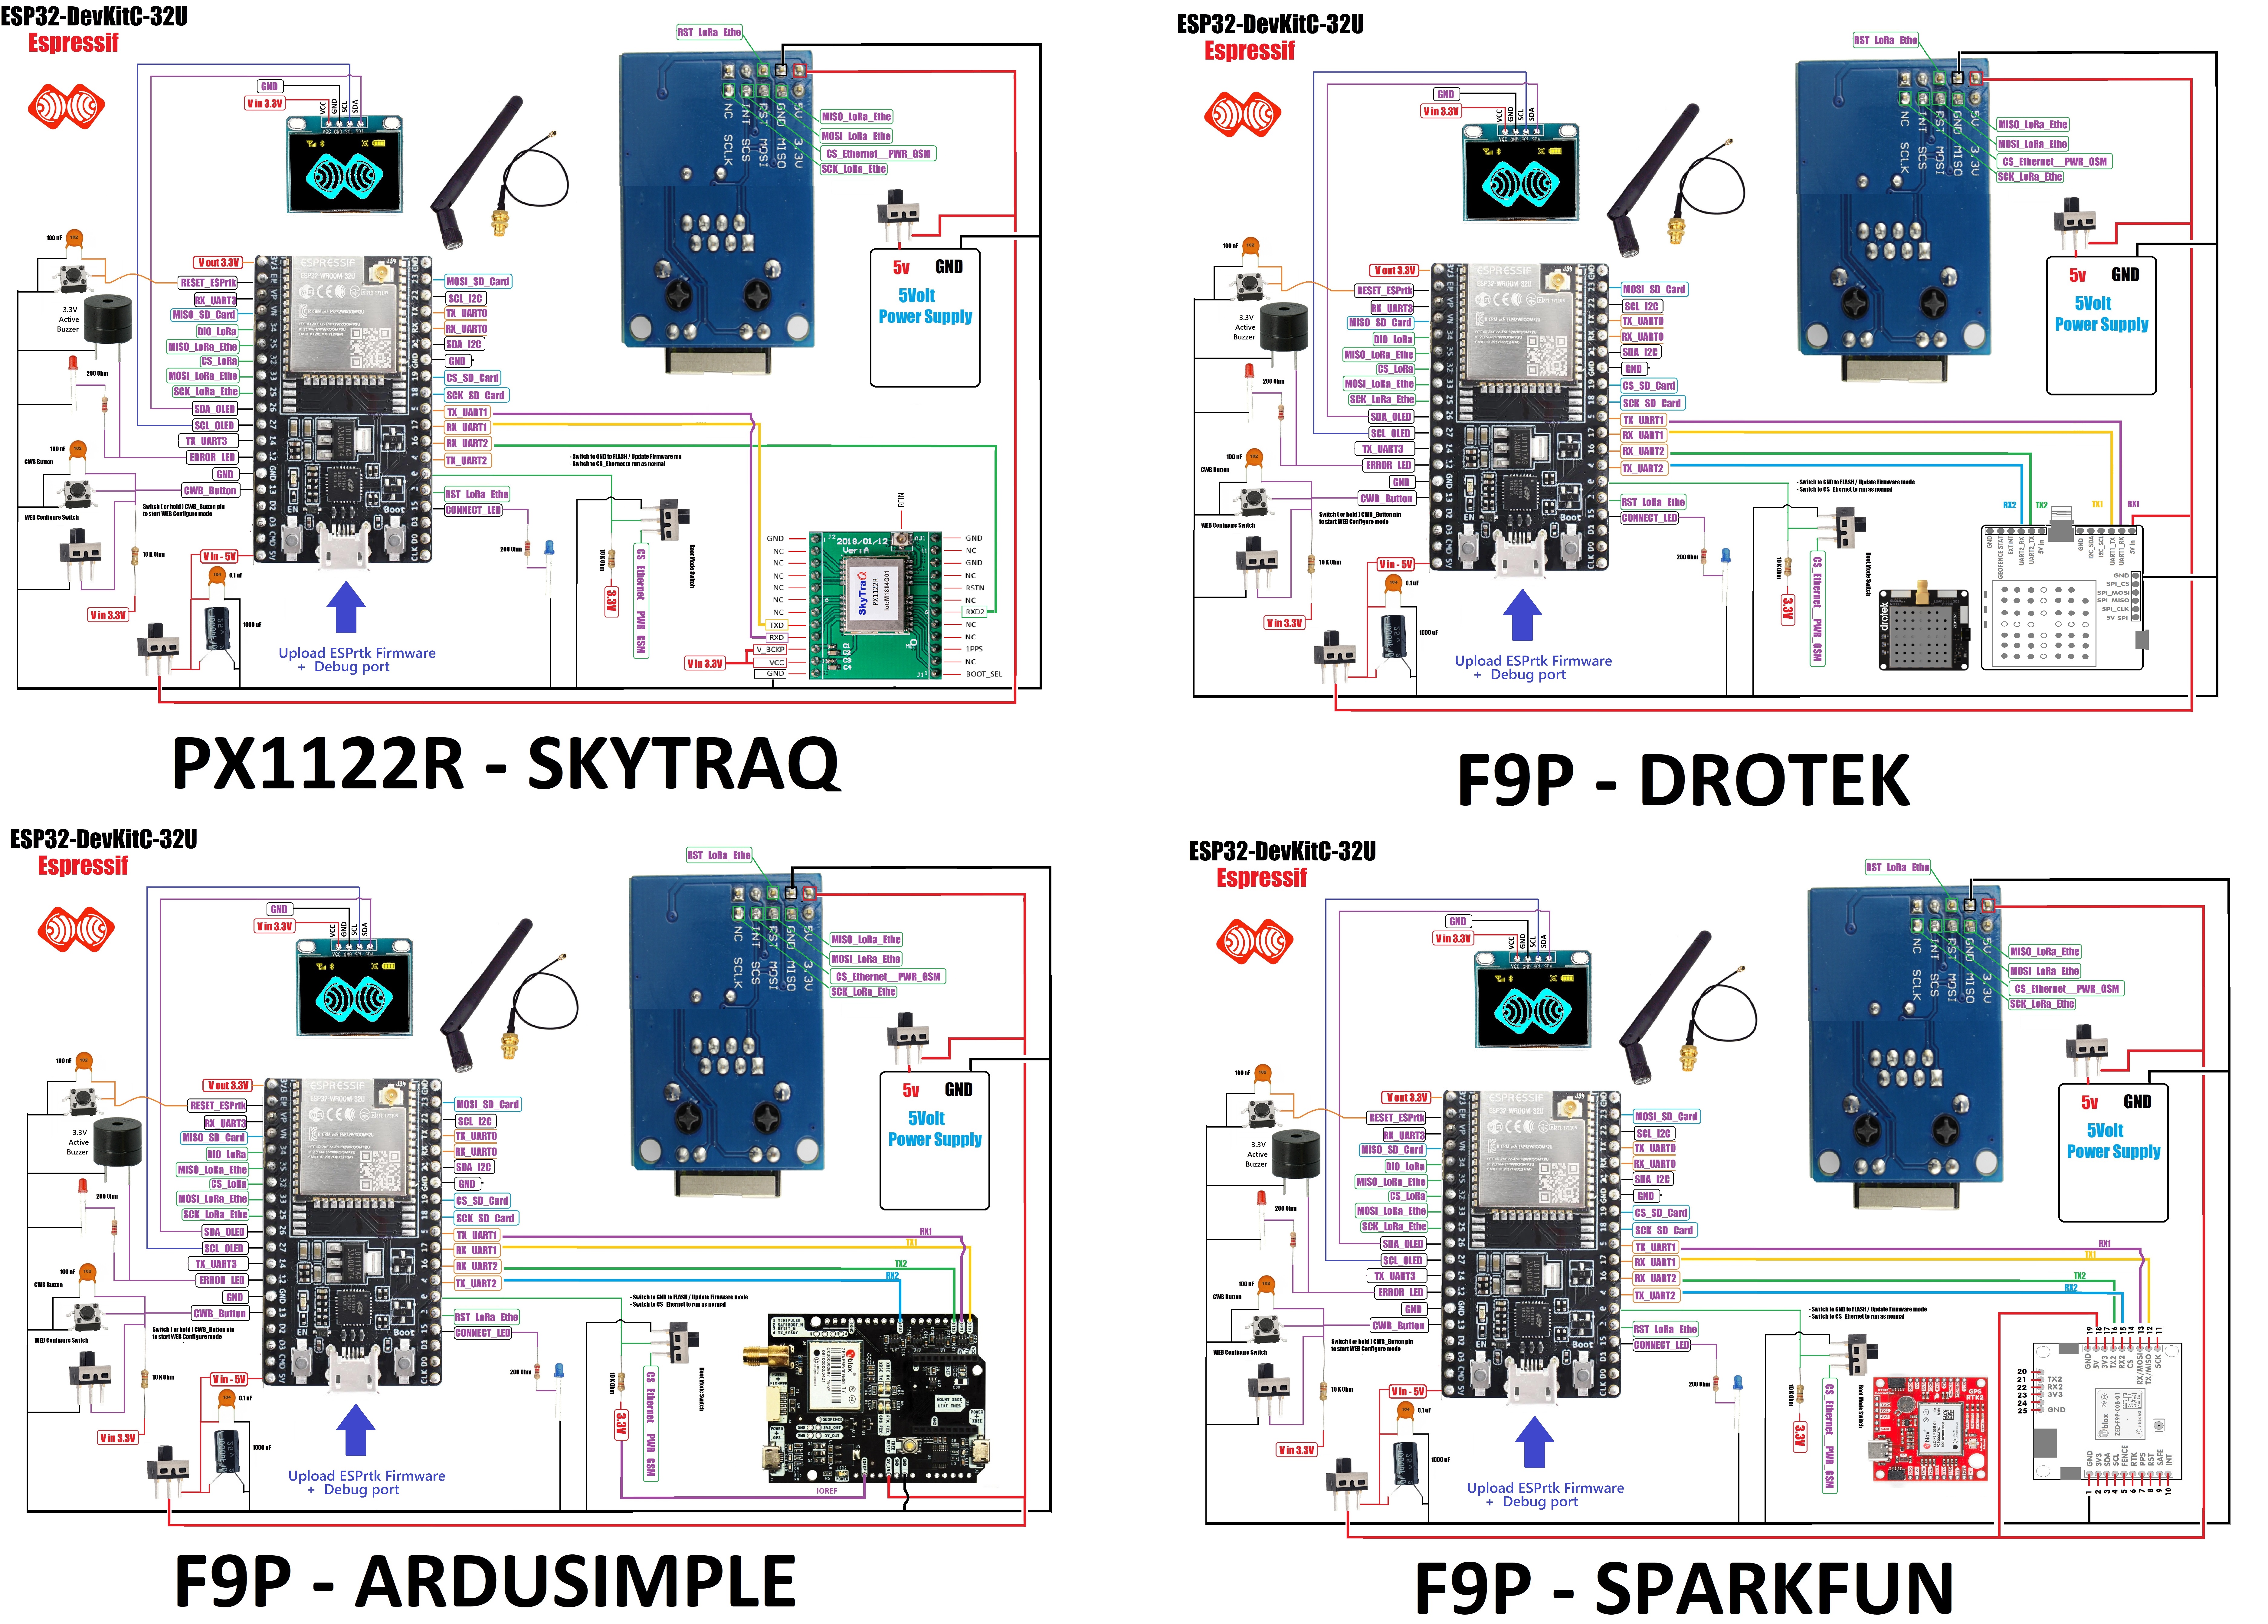
- PX1122R/PX1172R – Navspark (Fullsize)
- F9P – Drotek (Fullsize)
- F9P – Ardusimple (Fullsize)
- F9P – Sparkfun (Fullsize)
- F9P – C099-F9P UBLOX (Fullsize)
ETHERNET select.
New update version 3.9.99
Hi.
New update 3.9.99 has support configuration and remote control for NTRIP CASTER station.
With this function, you can access the configuration tabs of ESPrtk anywhere (without going to the field and using ESP32’s WIFI hotspot function).
You can test this functionality out for yourself by visiting the links below.
Login is only available on caster port 82,83,84.
Profile login:
- Name login : admin
- Password: abc123ABC
| Beta | Description |
|---|---|
| #3.9.99 | Speed up processing or save 16KB RAM space with RAM usage option. (in the System tab). |
| #3.9.99 | Support printing detailed information of RTCM messages 1005,1006,1007,1008,1032,1033. |
| #3.9.99 | Support WEB real-time configuration together with NTRIP CASTER (Ublox/Navspark/Profile/System ). (Access anywhere with internet – remote control) |
| #3.9.99 | Example for our NTRIP CASTER server run at Port 81 with ESP32 here ( Ublox , Navspark , Profile , System ) |
| #3.9.99 | Example for our NTRIP CASTER server run at Port 82 with ESP32 here ( Ublox , Navspark , Profile , System ) |
| #3.9.99 | Example for our NTRIP CASTER server run at Port 83 with ESP32 here ( Ublox , Navspark , Profile , System ) |
| #3.9.99 | Example for our NTRIP CASTER server run at Port 84 with ESP32 here ( Ublox , Navspark , Profile , System ) |
| #3.9.99 | Fixed bug in tab 18 Position Antenna. |
Project – AGOPENGPS
We also created an topic at AGOPENGPS here. let’s join and discuss with us !