Wiznet makers

gavinchang

Published February 02, 2023 ©

92 UCC

25 WCC

61 VAR

0 Contests

4 Followers

0 Following

Original Link

Arduino- Temperature - Send Email Notification

Arduino- Temperature - Send Email Notification

COMPONENTS
PROJECT DESCRIPTION

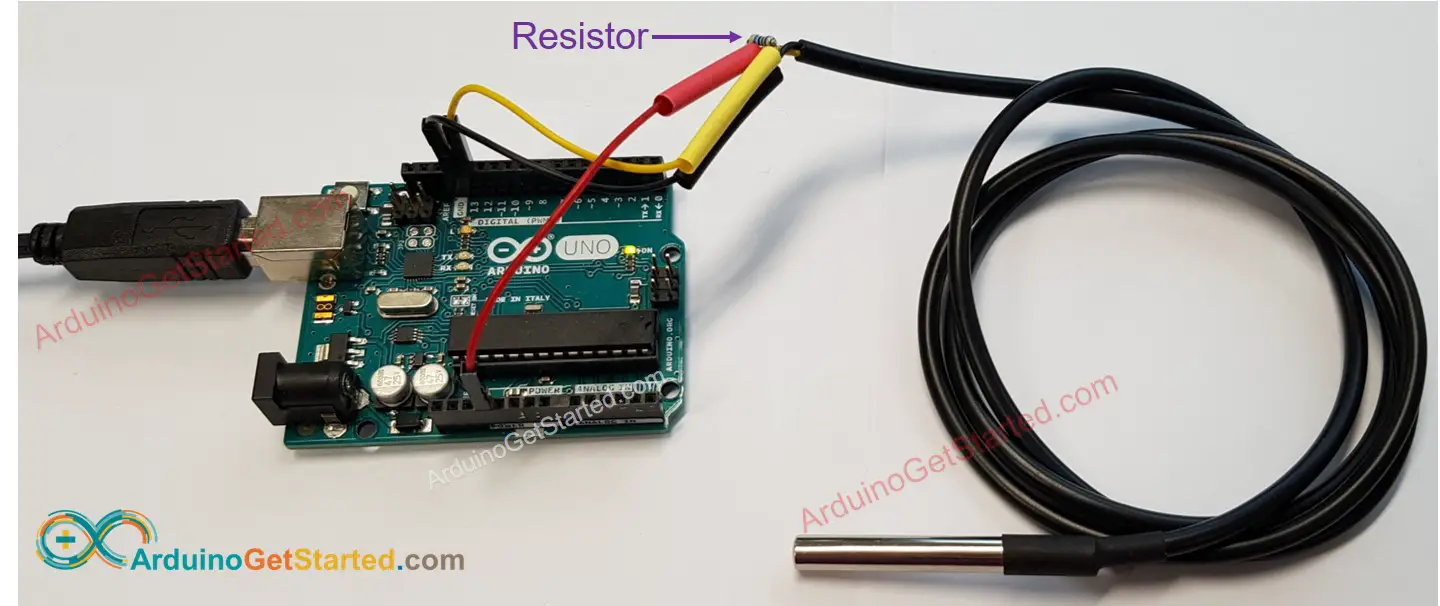
We are going to learn how to use Arduino to send a notification to you via email when the temperature exceeds a threshold. We will use Arduino, the waterproof DS18B20 temperature sensor, and Ethernet Shield.

Alternatives: by making a small modification in the Arduino code:

 
You can also use any other Ethernet or WiFi shield.
 
You can also use other temperature sensor such as LM35, DHT11, DHT22... For more detailed:


Arduino temperature send email

Hardware Required

1×Arduino UNO or Genuino UNO 
1×USB 2.0 cable type A/B 
1×Temperature Sensor DS18B20 
1×4.7 kΩ resistor 
1×Arduino Ethernet Shield 2 
1×Ethernet Cable 
1×Jumper Wires 
1×(Optional) 9V Power Adapter for Arduino 
1×(Optional) Screw Terminal Block Shield for Arduino 

About DS18B20 Temperature Sensor and Sending Email

If you do not know about the DS18B20 temperature sensor (pinout, how it works, how to program ...) and how to send email from Arduino, learn about them in the following tutorials:
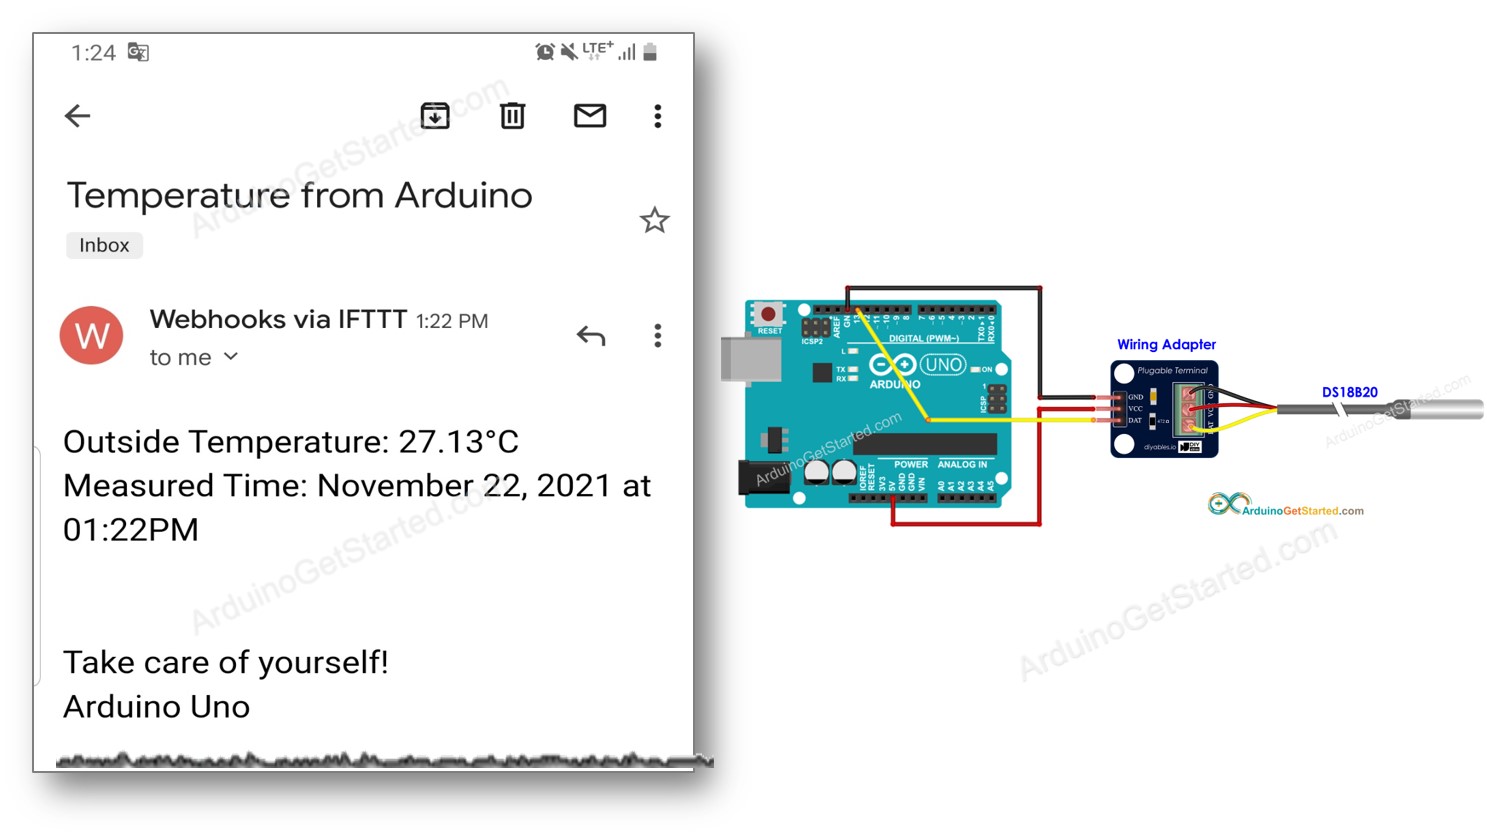
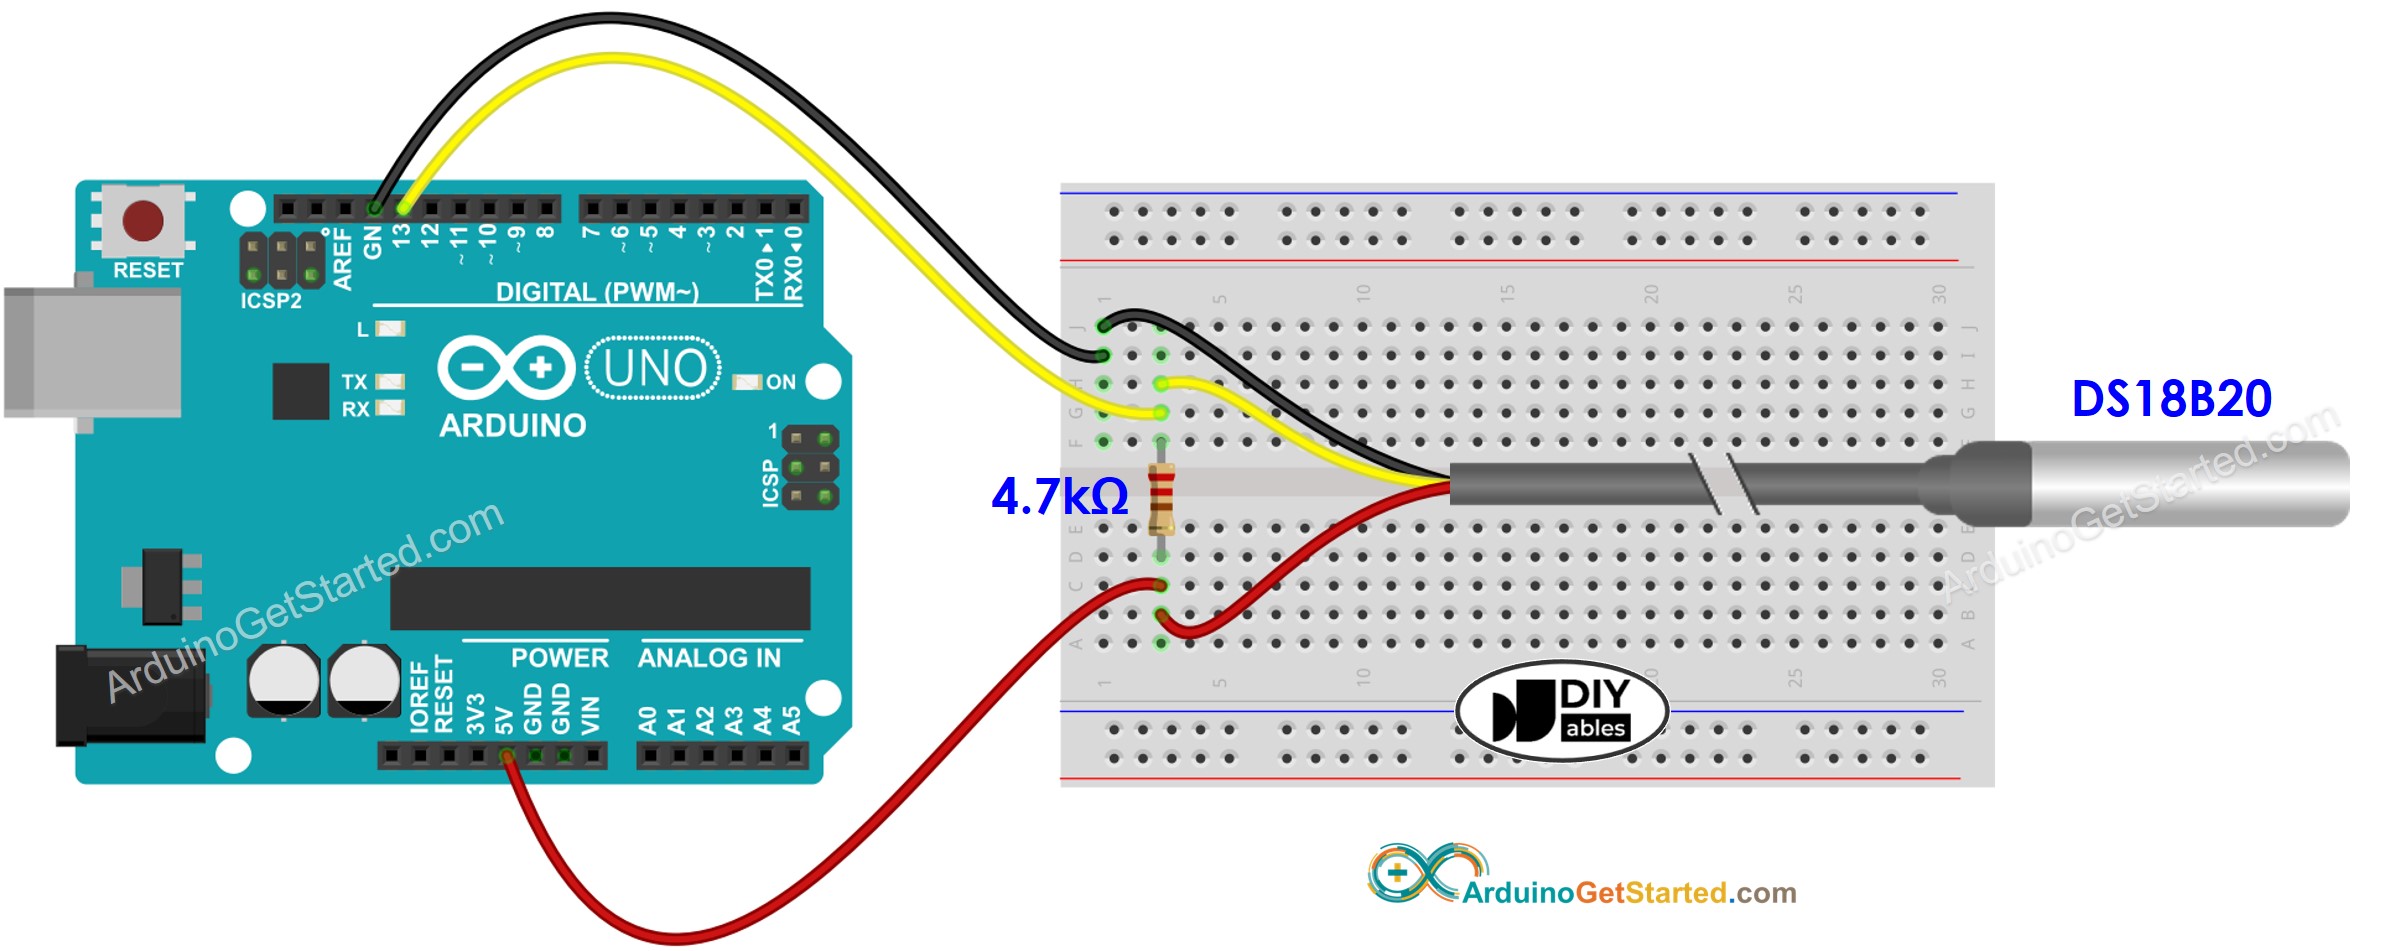
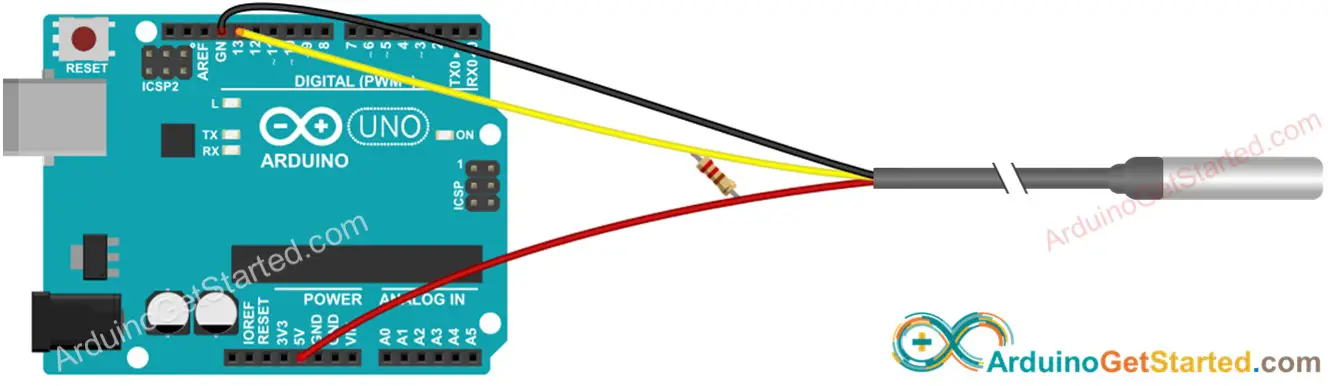


Wiring Diagram

 
Stack Ethernet Shield on Arduino Uno or Mega
 
Connect the temperature sensor to Arduino as below writing diagram
 
With breadboard
Arduino Temperature Sensor Wiring Diagram
Without breadboard
Arduino DS18B20 Wiring Diagram


Arduino one wire temperature sensor Wiring Diagram


What we need to do

We need to do to main tasks:

 
Create an Applet on the IFTTT website
 
Write Arduino code that makes an HTTP request to the Applet when the temperature exceeds a threshold
 

How it works

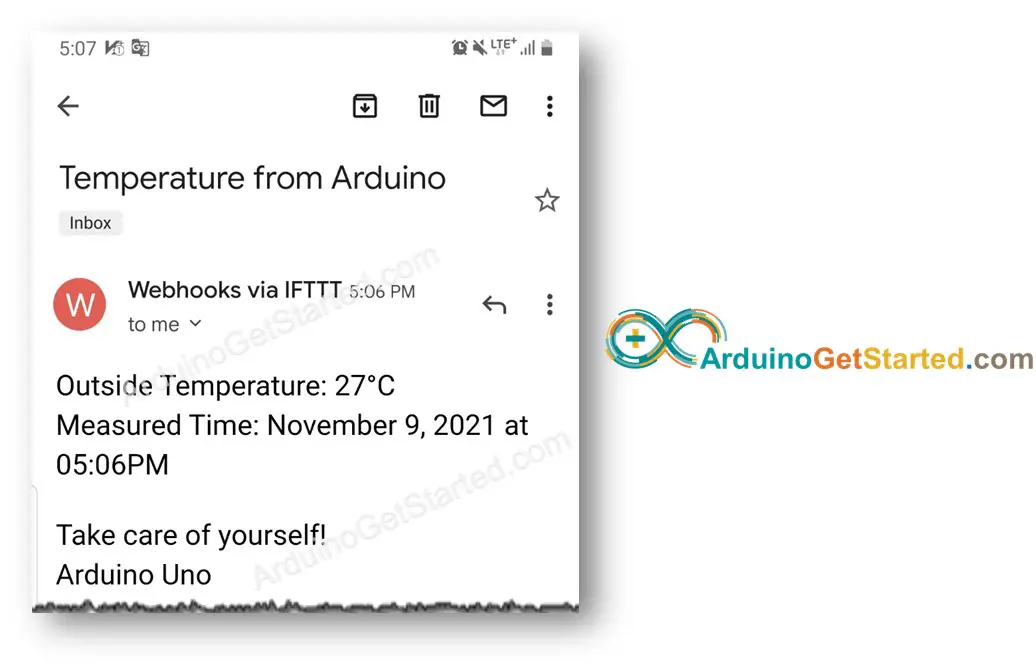
When the temperature exceeds a threshold:

 
Arduino makes an HTTP request to IFTTT Applet we created,
 
The IFTTT Applet will send an email to the email address.

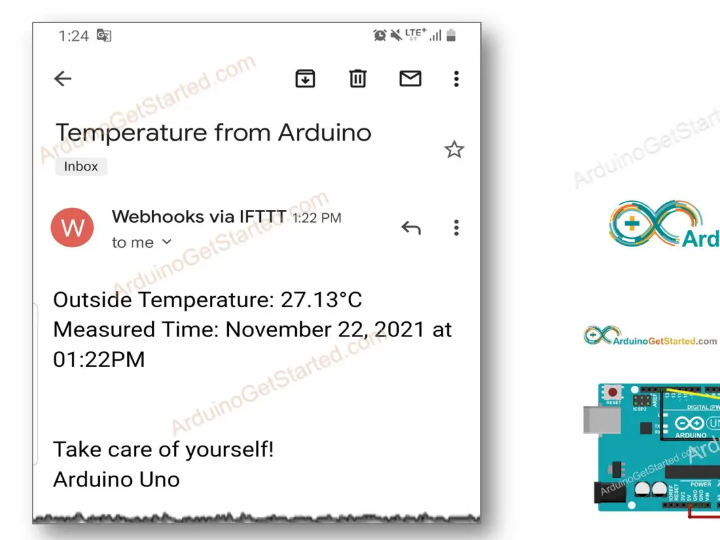
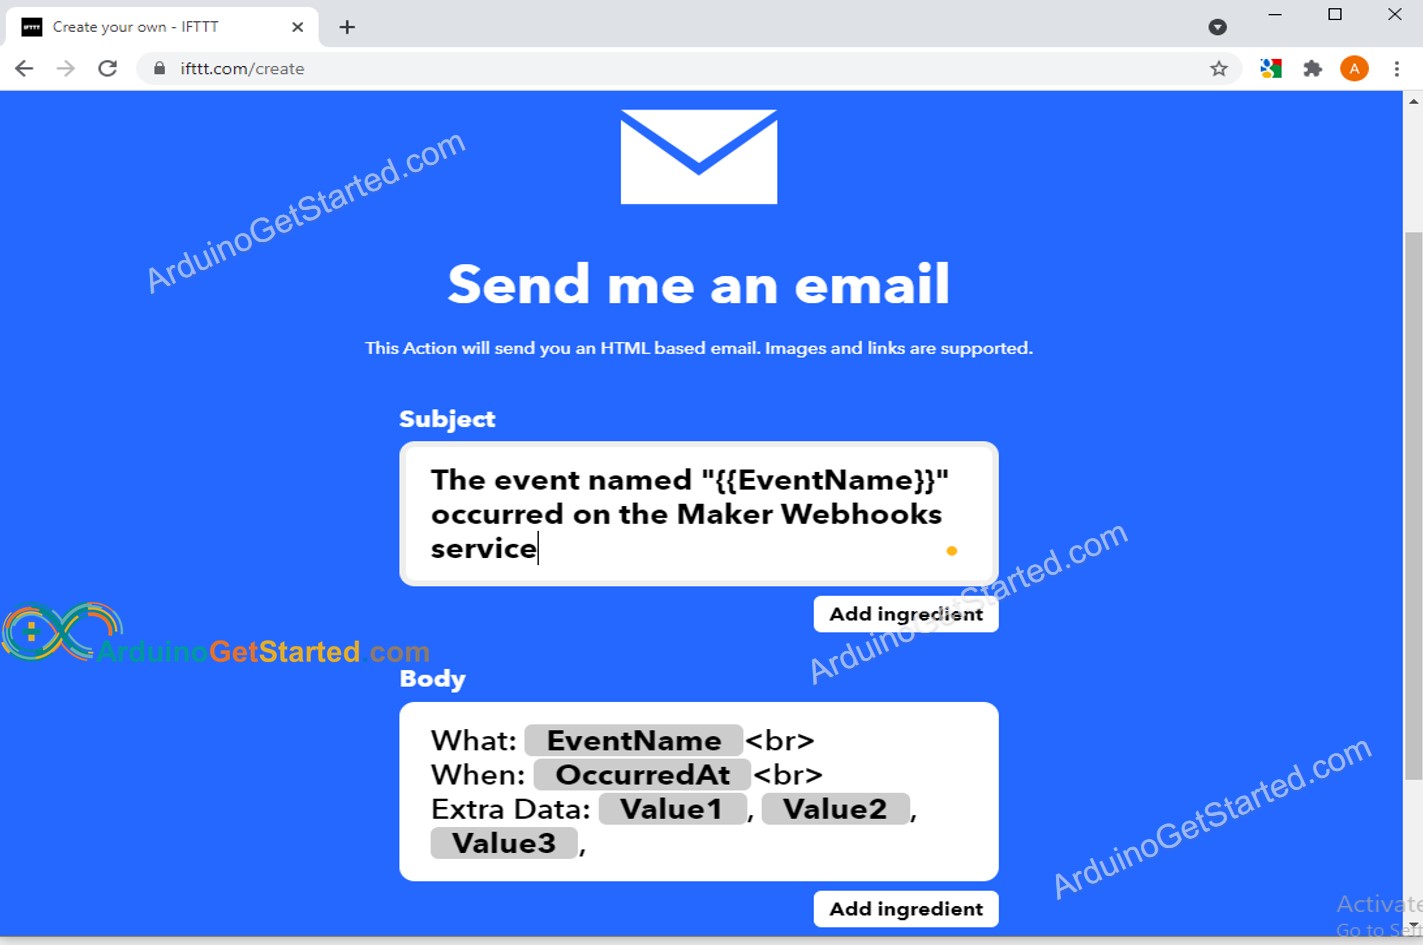
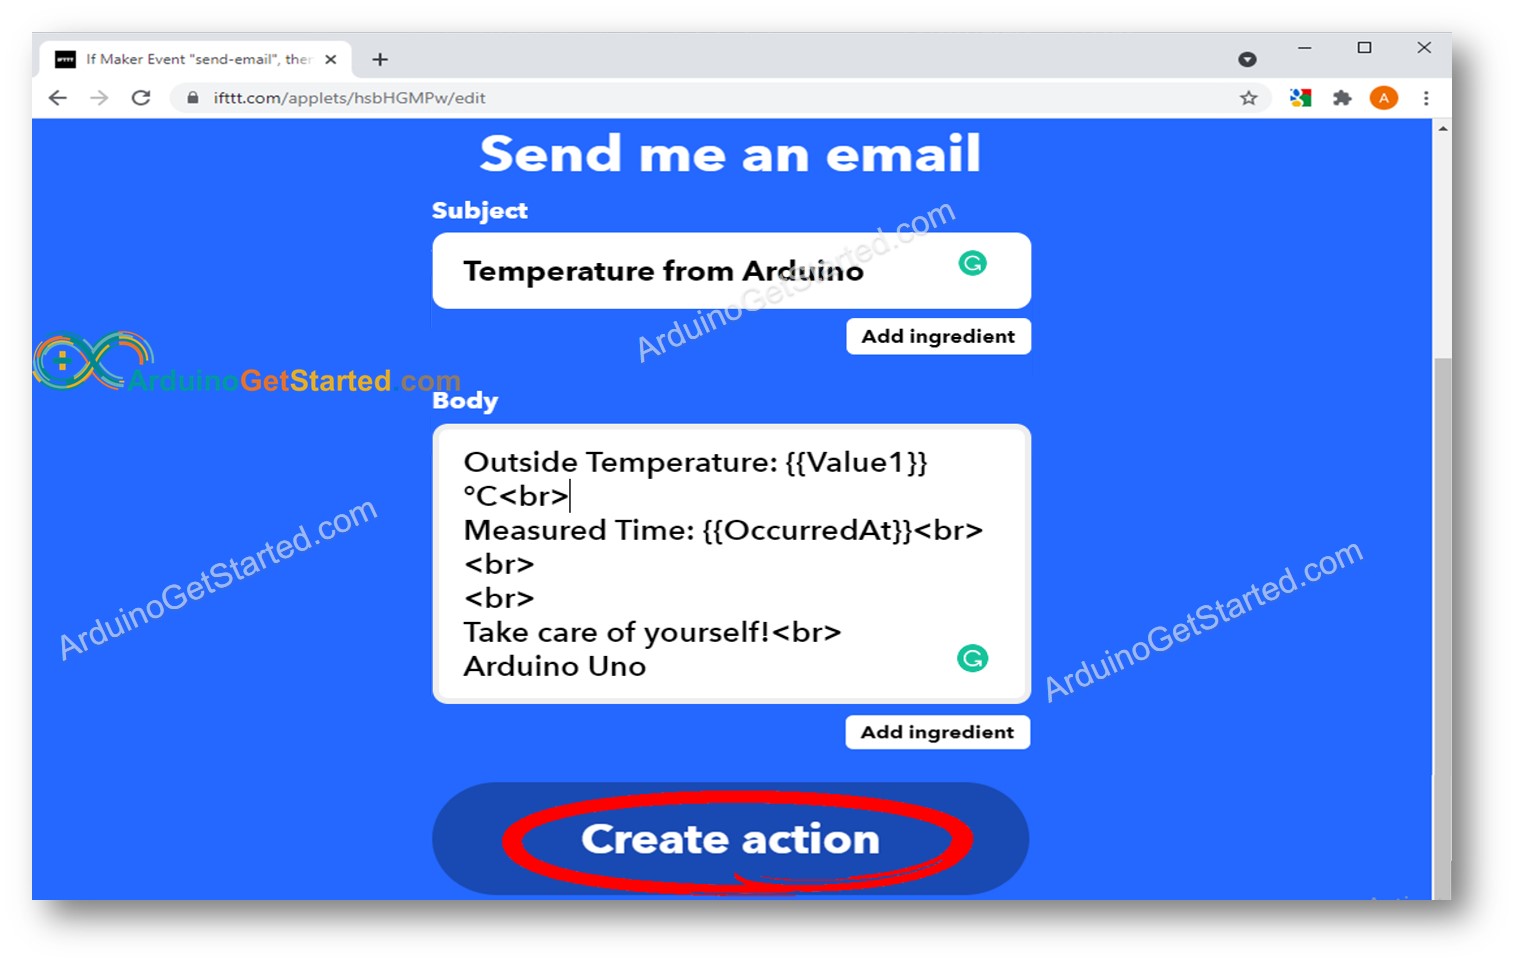
The email address, email subject, and email content are specified when we create the IFTTT Applet.

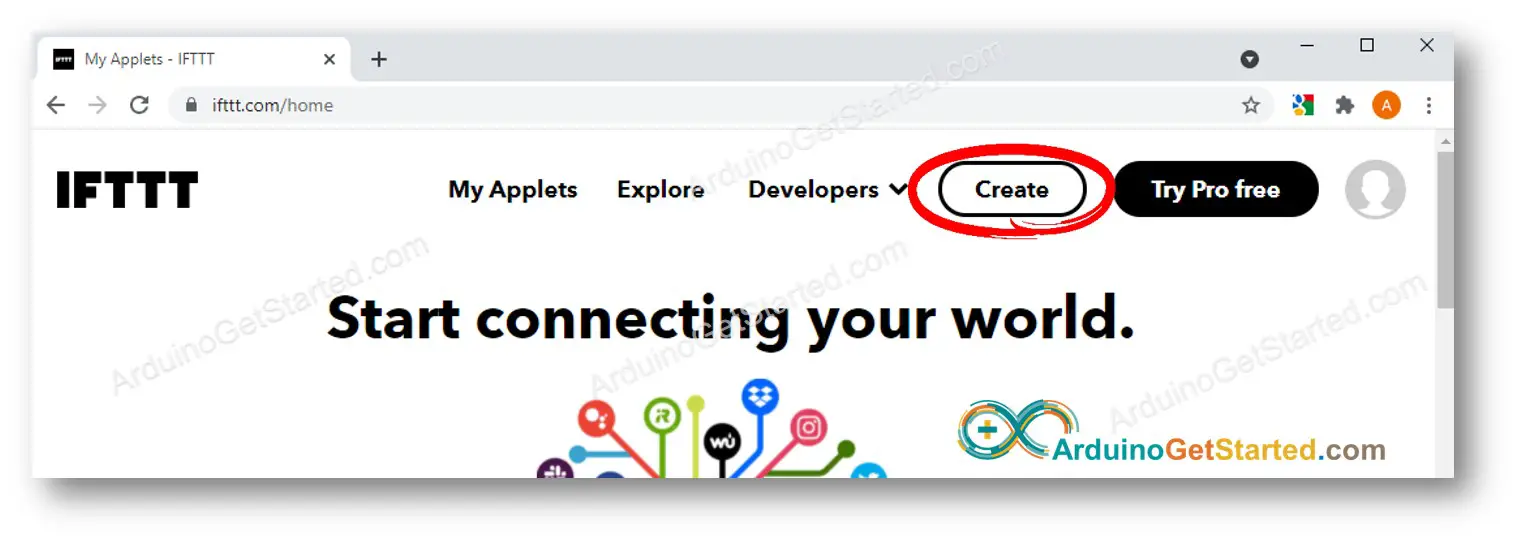
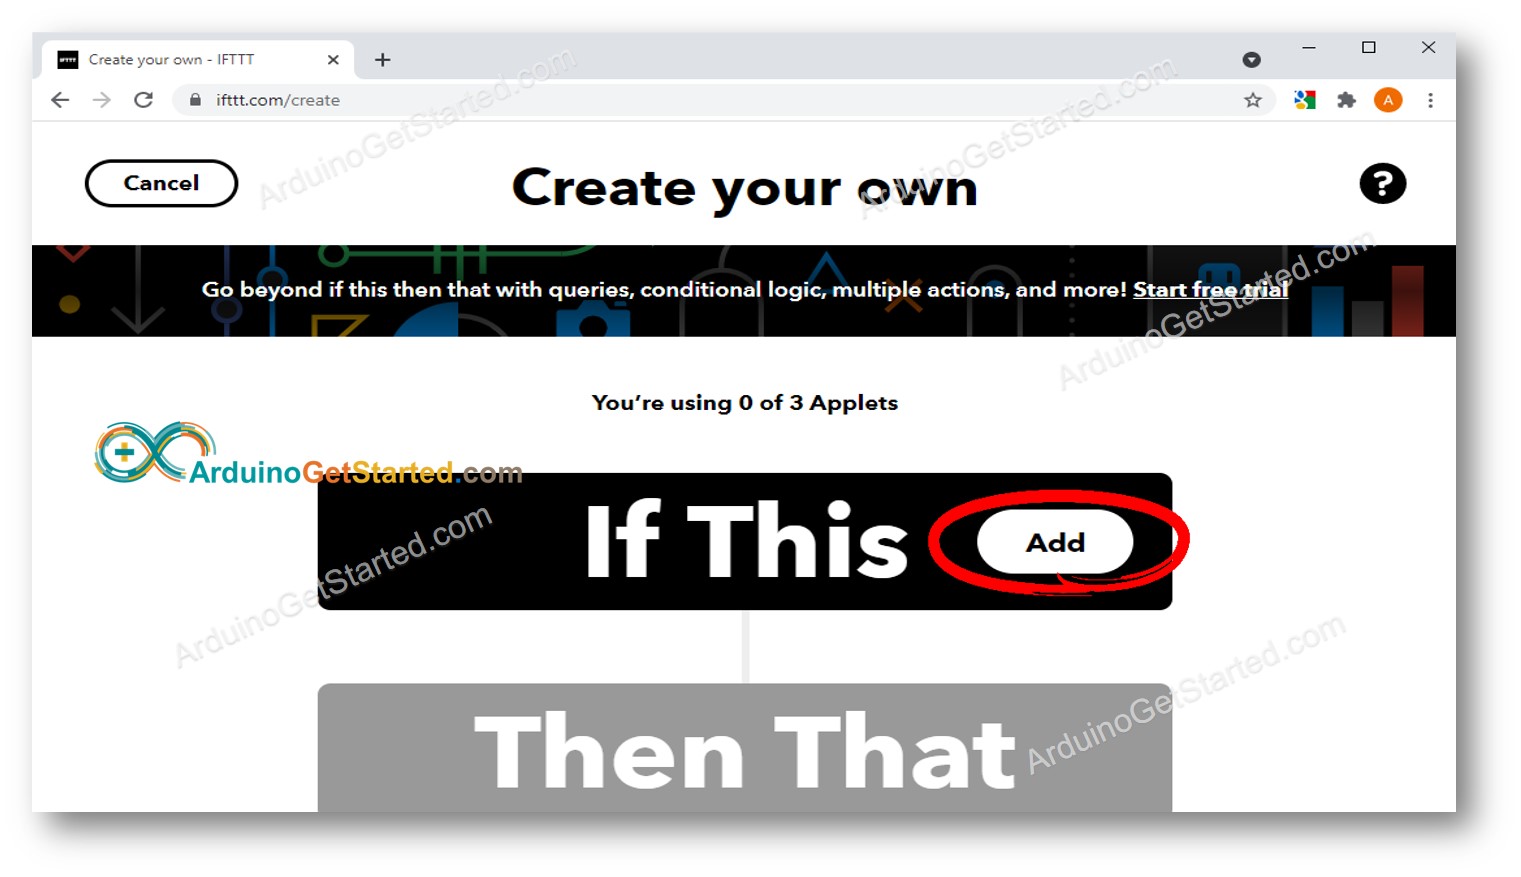
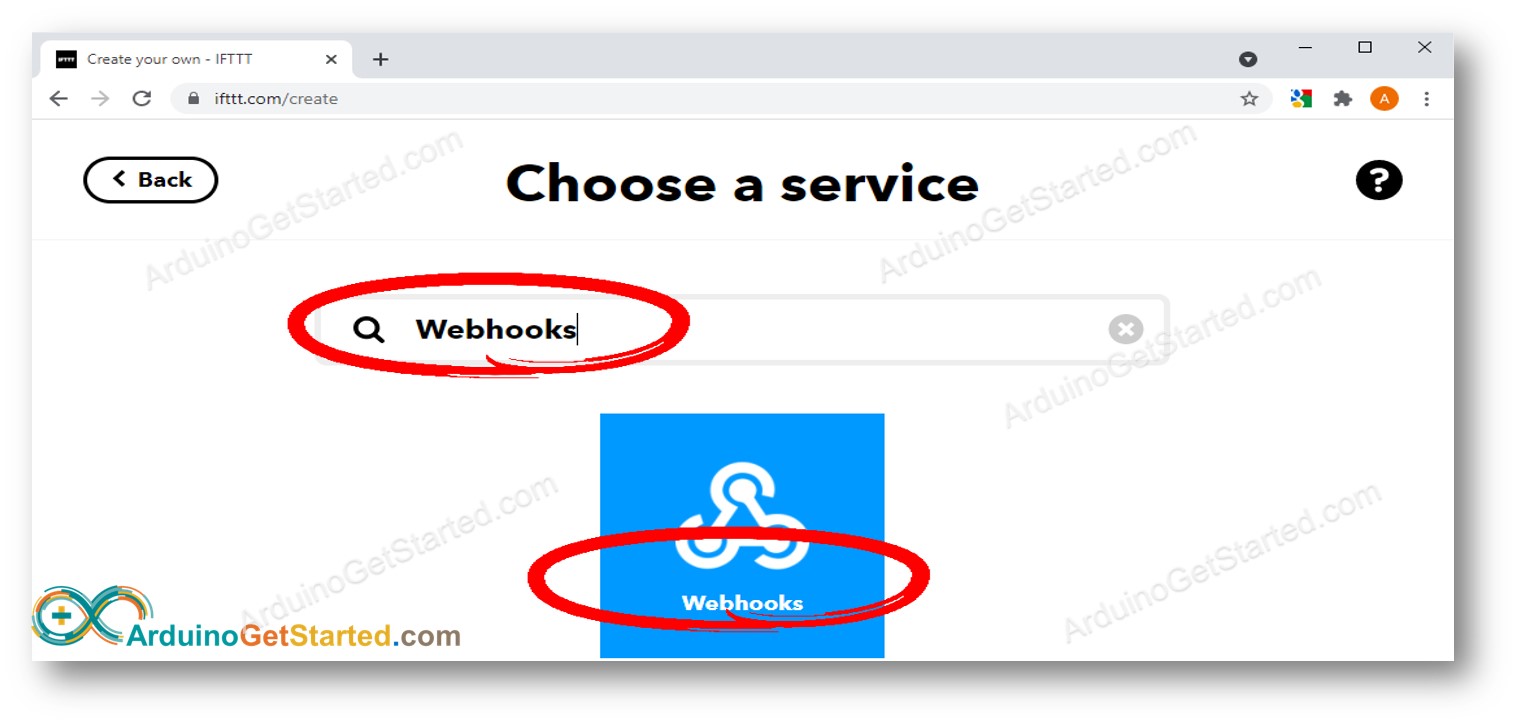
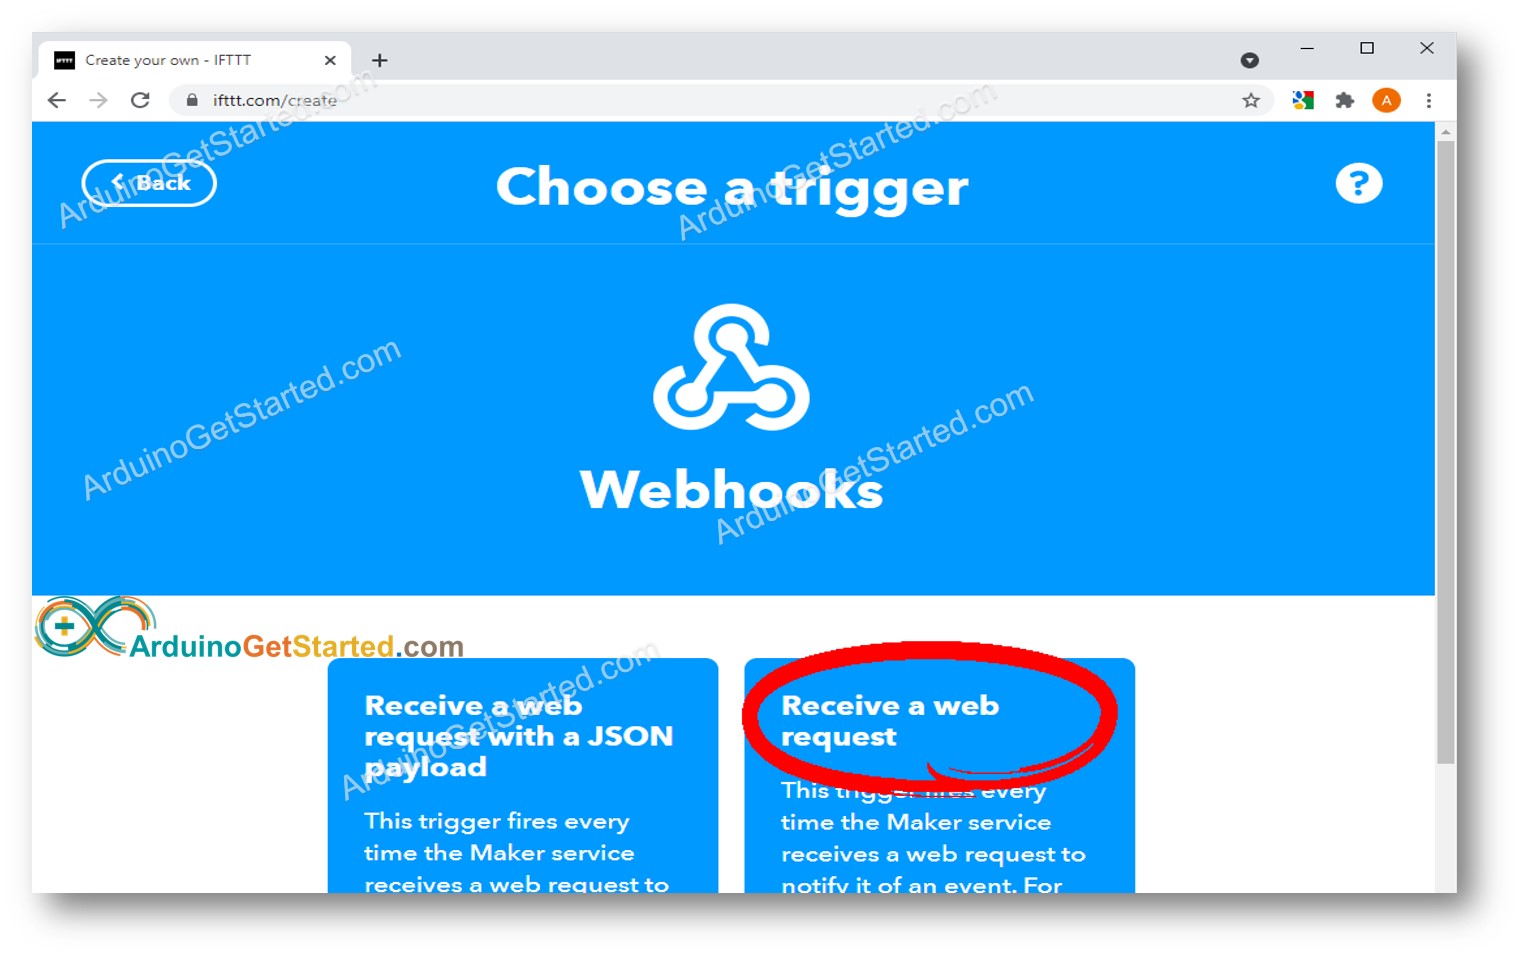
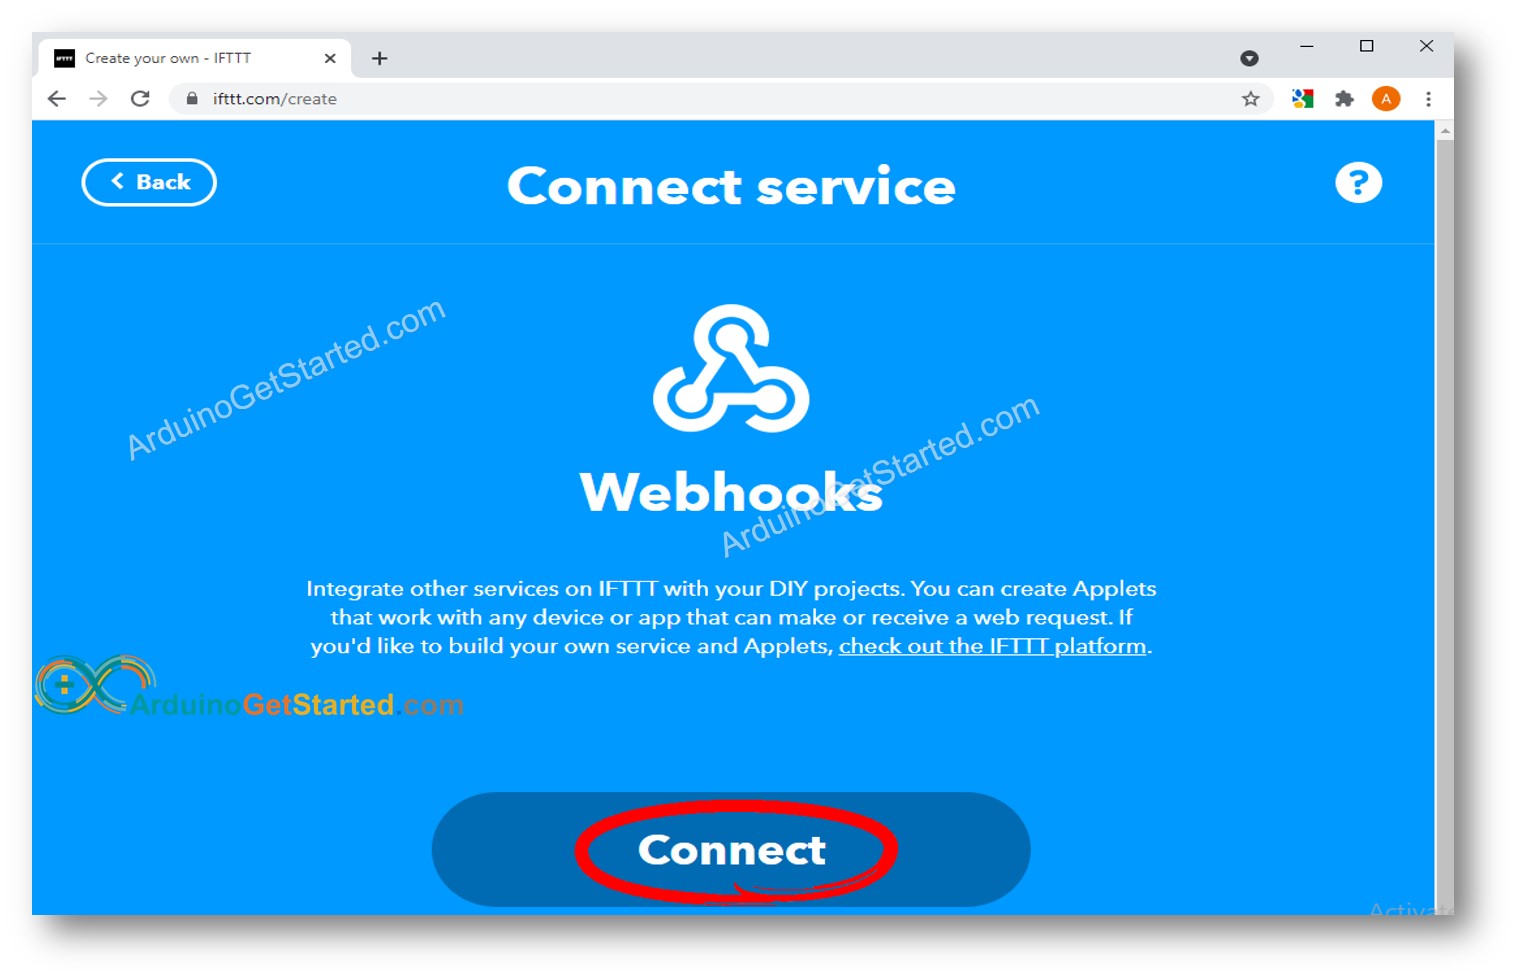
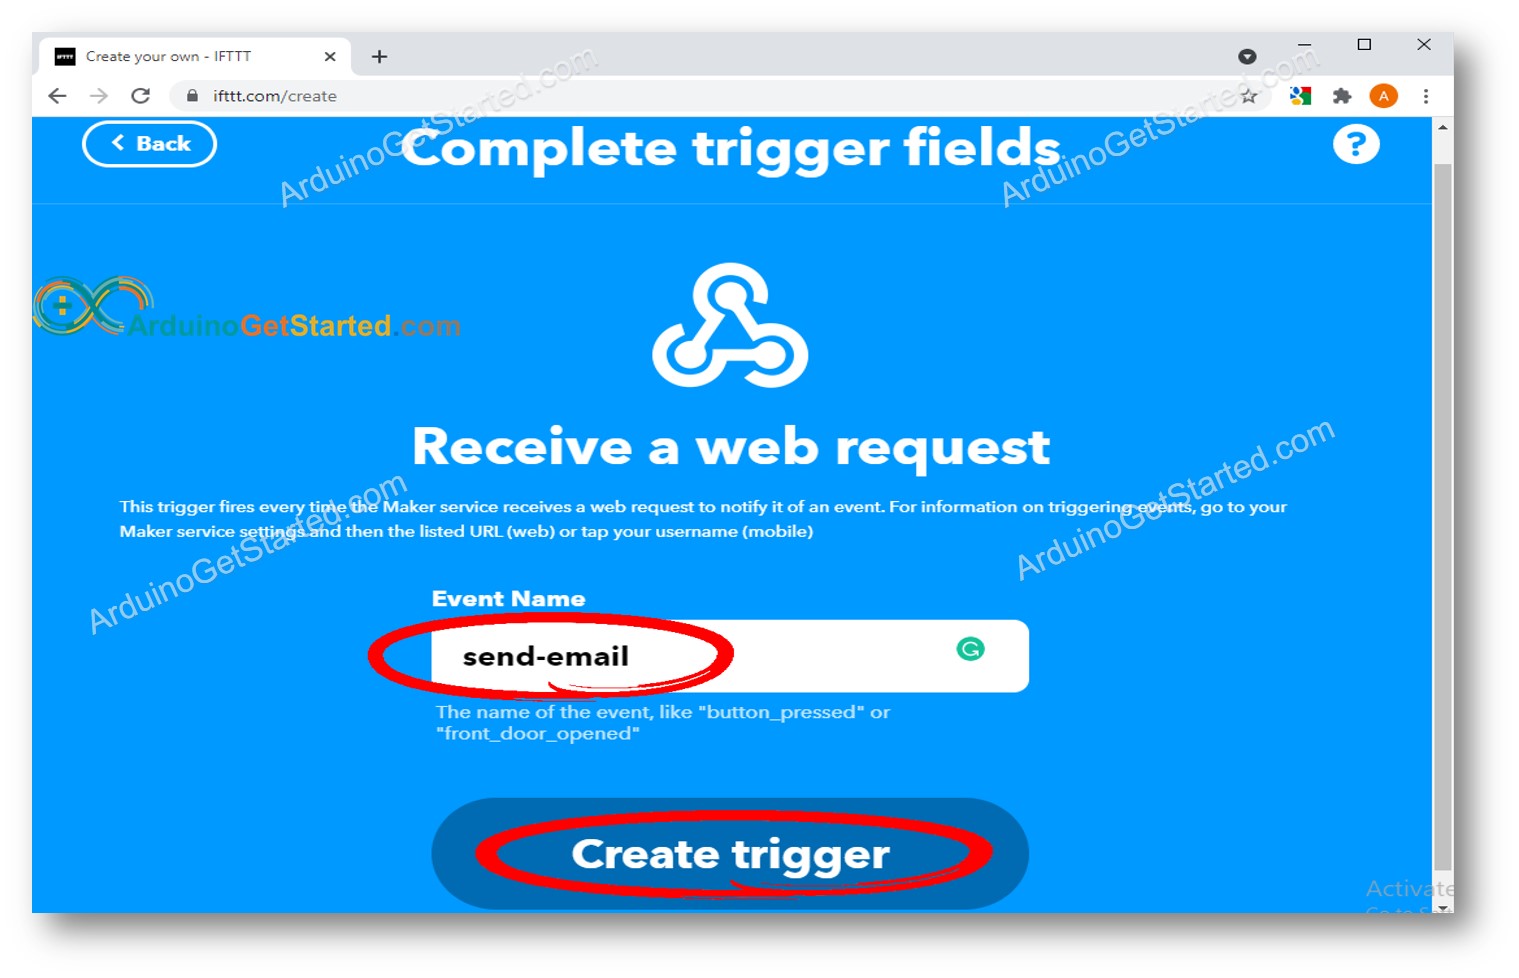
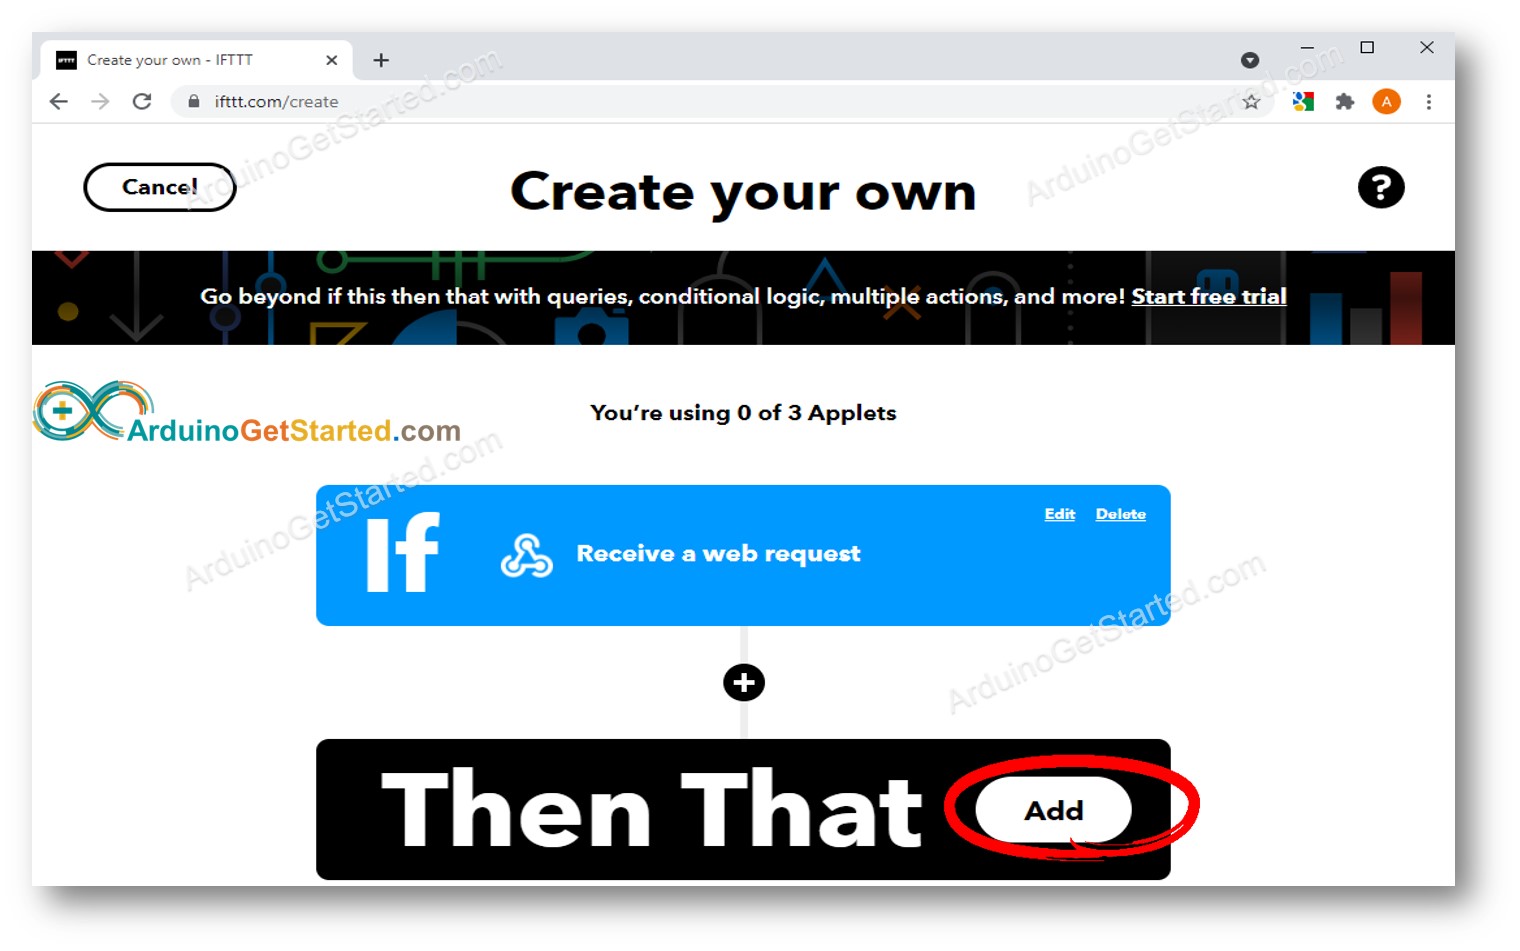
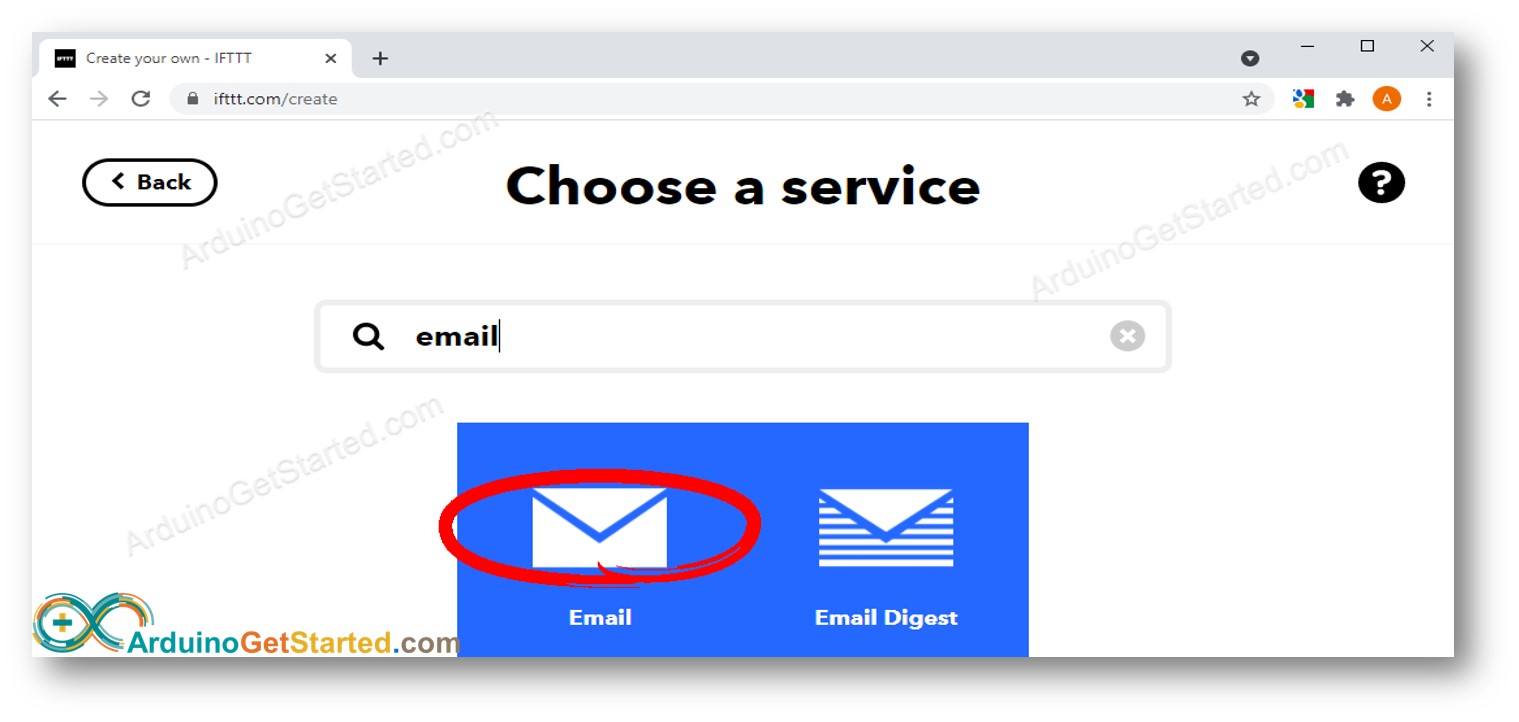
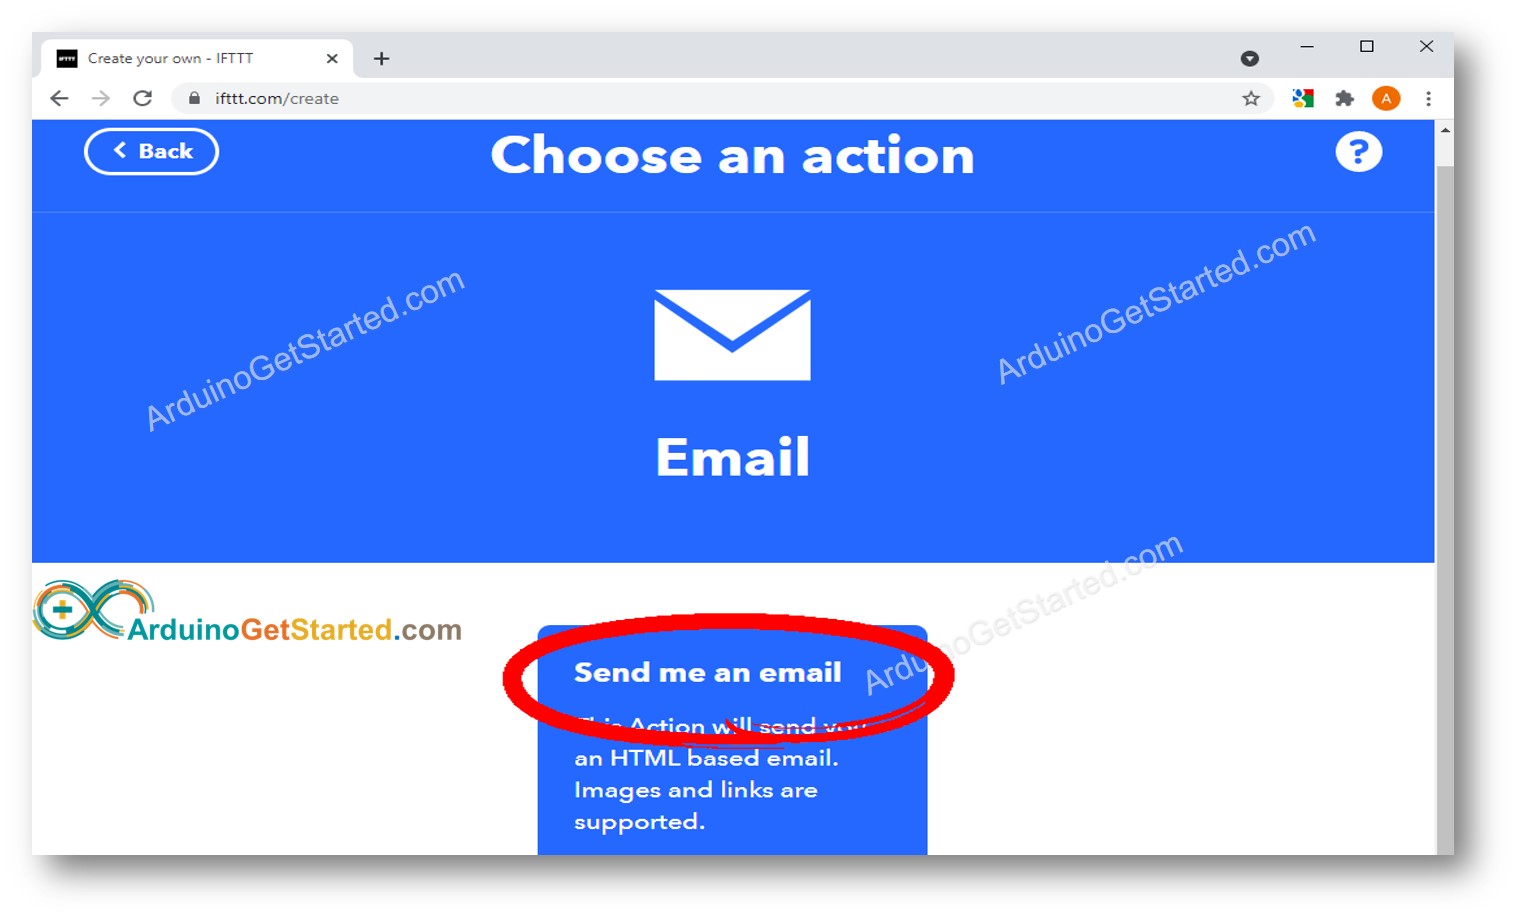
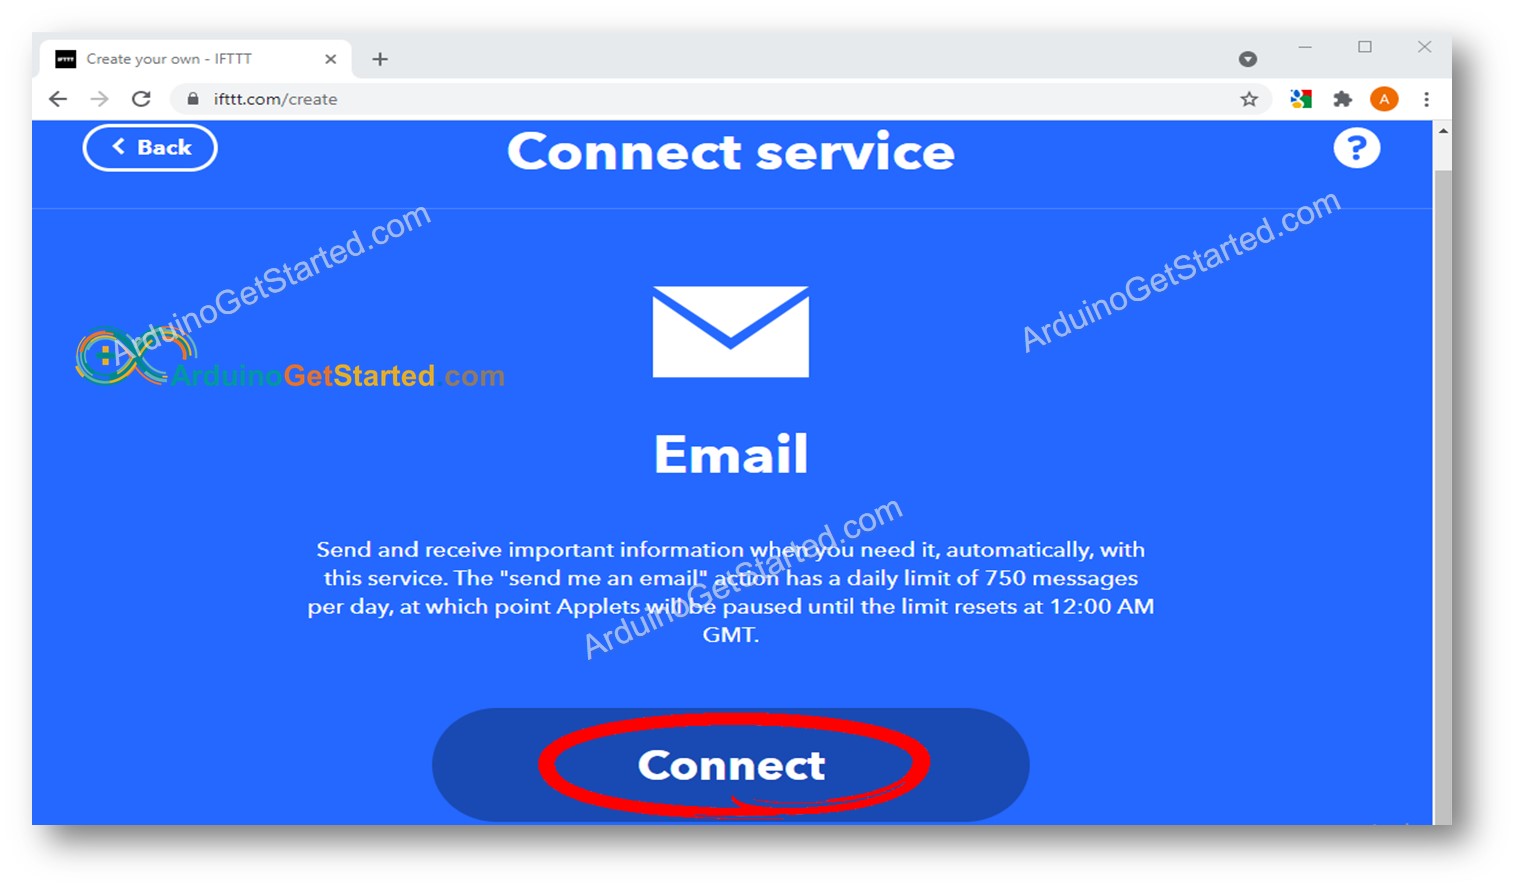
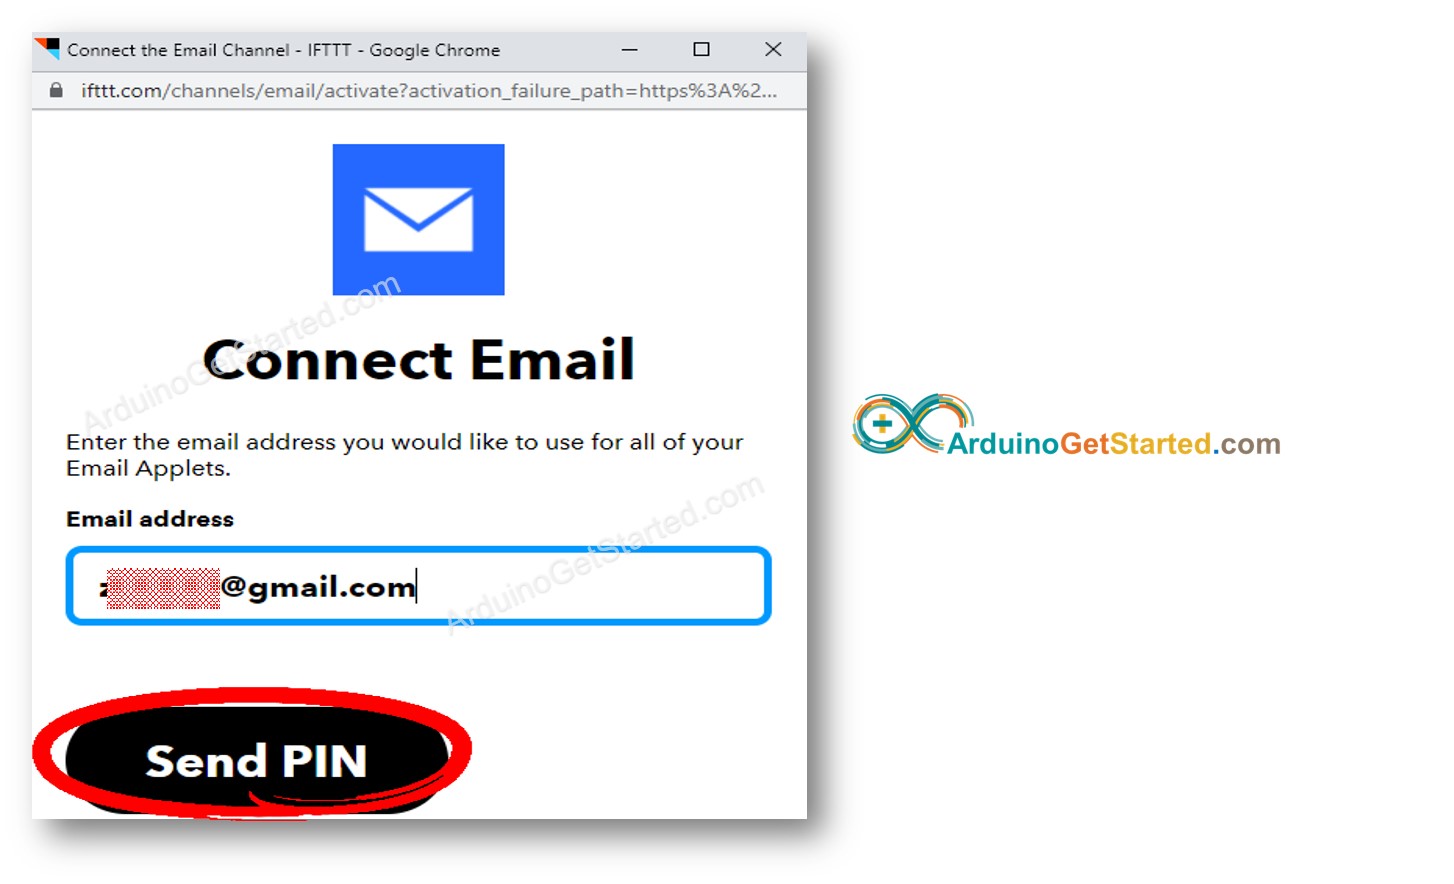
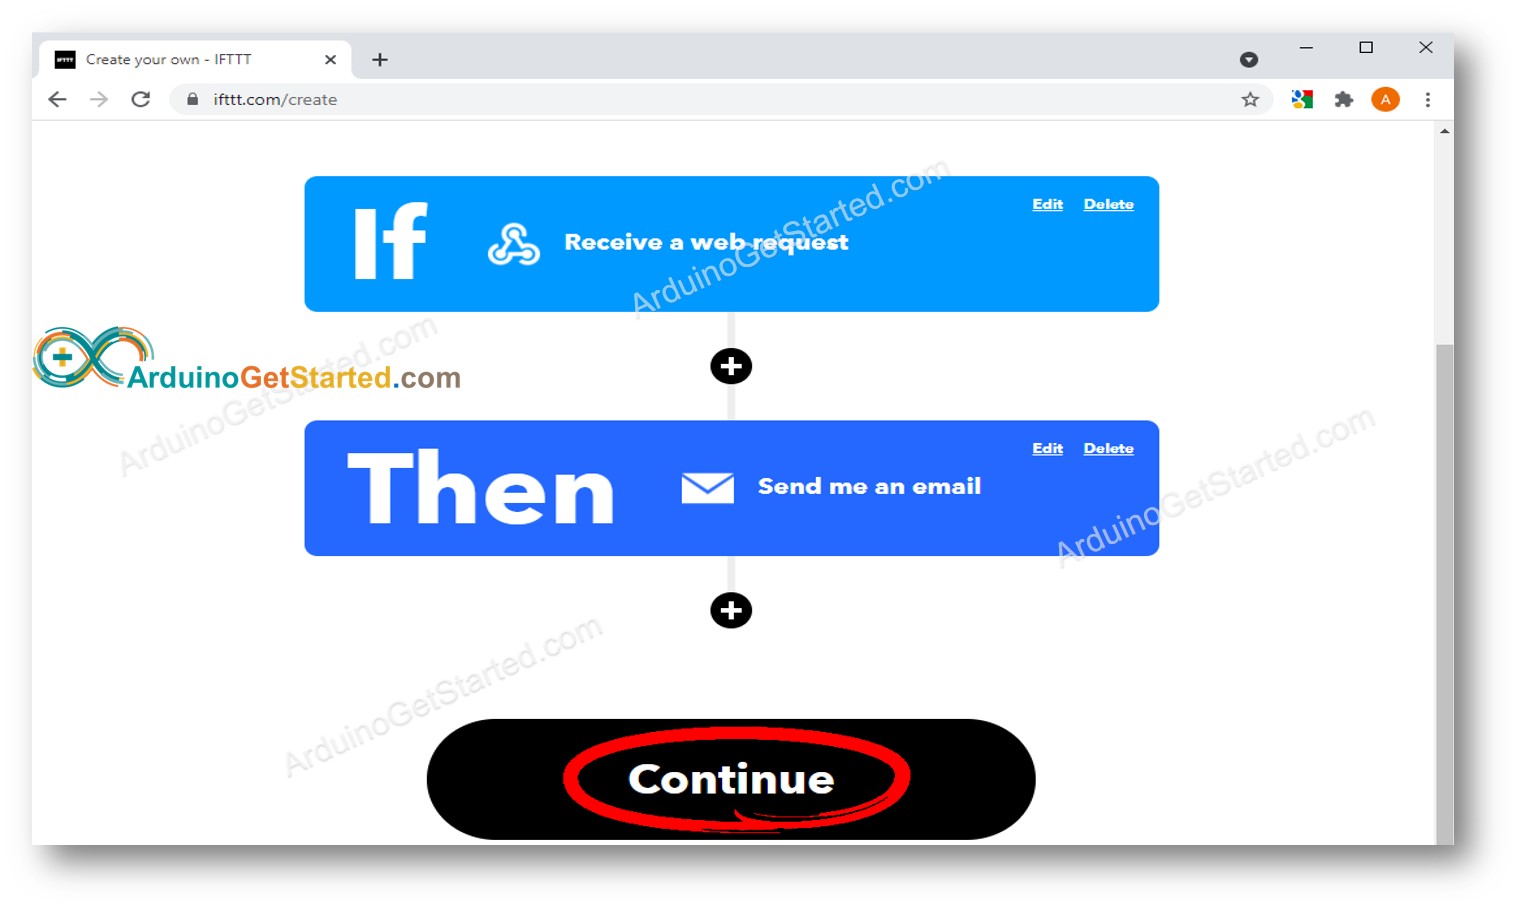
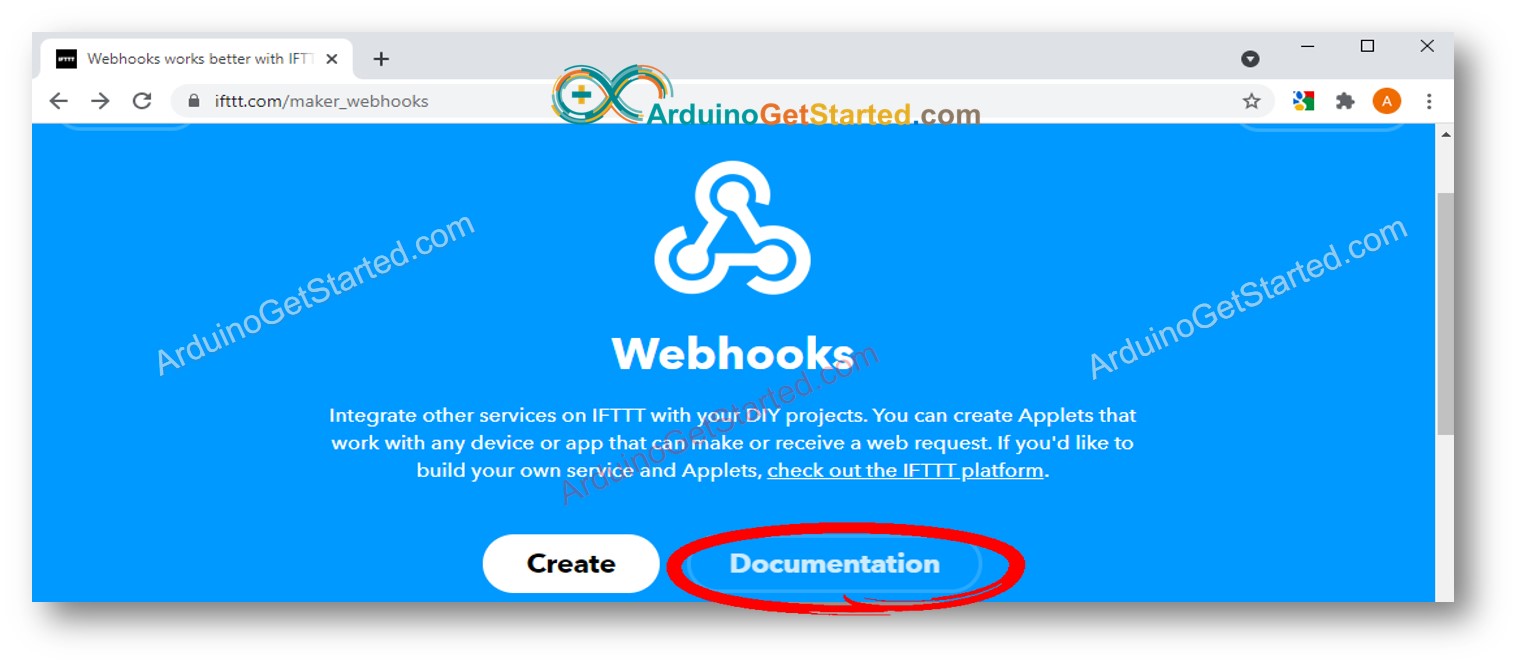
How To Create an IFTTT Applet

 
Create an IFTTT account and Login to IFTTT.
 
Go to IFTTT Home page and click the Create button

Arduino create IFTTT applet

Click the Add button
Arduino adds IFTTT applet
Search for Webhooks, and then click the Webhooks icon
Arduino IFTTT Webhooks
Click the Receive a web request icon
Arduino IFTTT Webhooks Service
Click the Connect button
Arduino
 
Type an event name. You can give any name you want and memorize it to use later. The event name is a part of URL that Arduino will make request to. In this tutorial, we use a name send-email. And then click Create trigger button
Arduino Webhooks create trigger
 
Click the Add button to add the action
Arduino IFTTT create action
 
Search for email, and then click the Email icon
Arduino  Email service
 
Click the Send me an email icon
Arduino send me an email
 
Click the Connnect button
Arduino Connects to email
 
Input your email address and then click the Semd PIN button
Arduino
 
You will receive an email, get the PIN from email and input to Web UI to do verification
 
After that the email subject and content editor appears
Arduino email subject and content editor
 
You can give any subject and content for the email. The below are example
Arduino
 
Subject:
 
Alert from Arduino
 
Content:
 
Hey,
Someone opened your door!

Take care!
Arduino Uno
 
Click the Create Action button
 
Click the Continue button
Arduino
 
Click the Finish button
Arduino

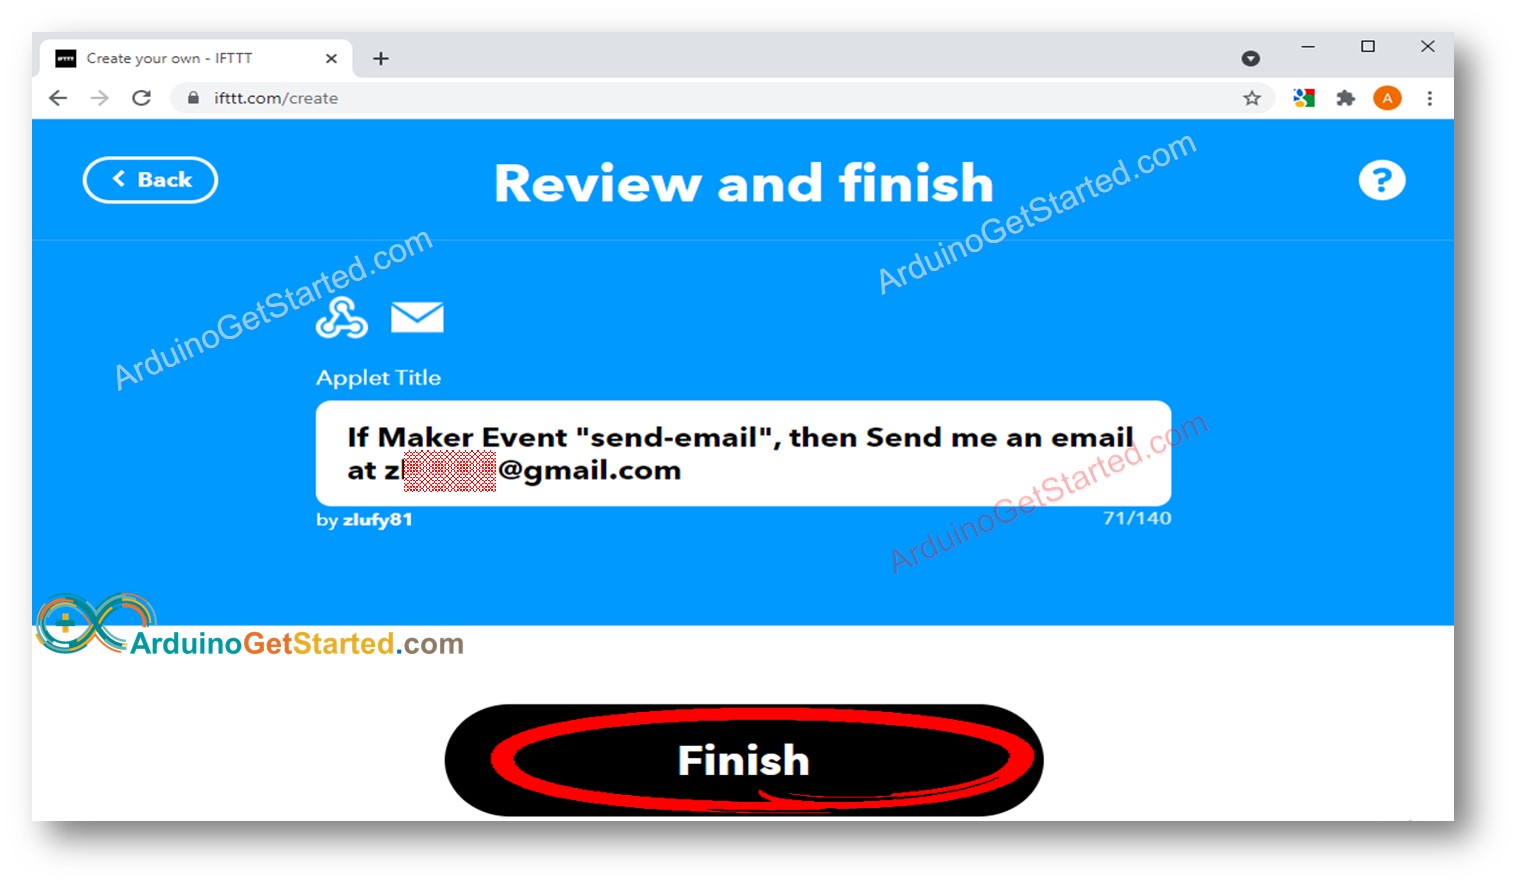
Now you succeeded to create an IFTTT Applet for your Arduino. The next step is to get the IFTTT Webhooks key, which is used to authenticate and identify your Arduino.


Click the Documentation button
Arduino IFTTT Webhooks documentation
 
You will see the Webhooks key as below
Arduino IFTTT webhooks key
 
Copy and wire down your Webhooks to use on Arduino code.

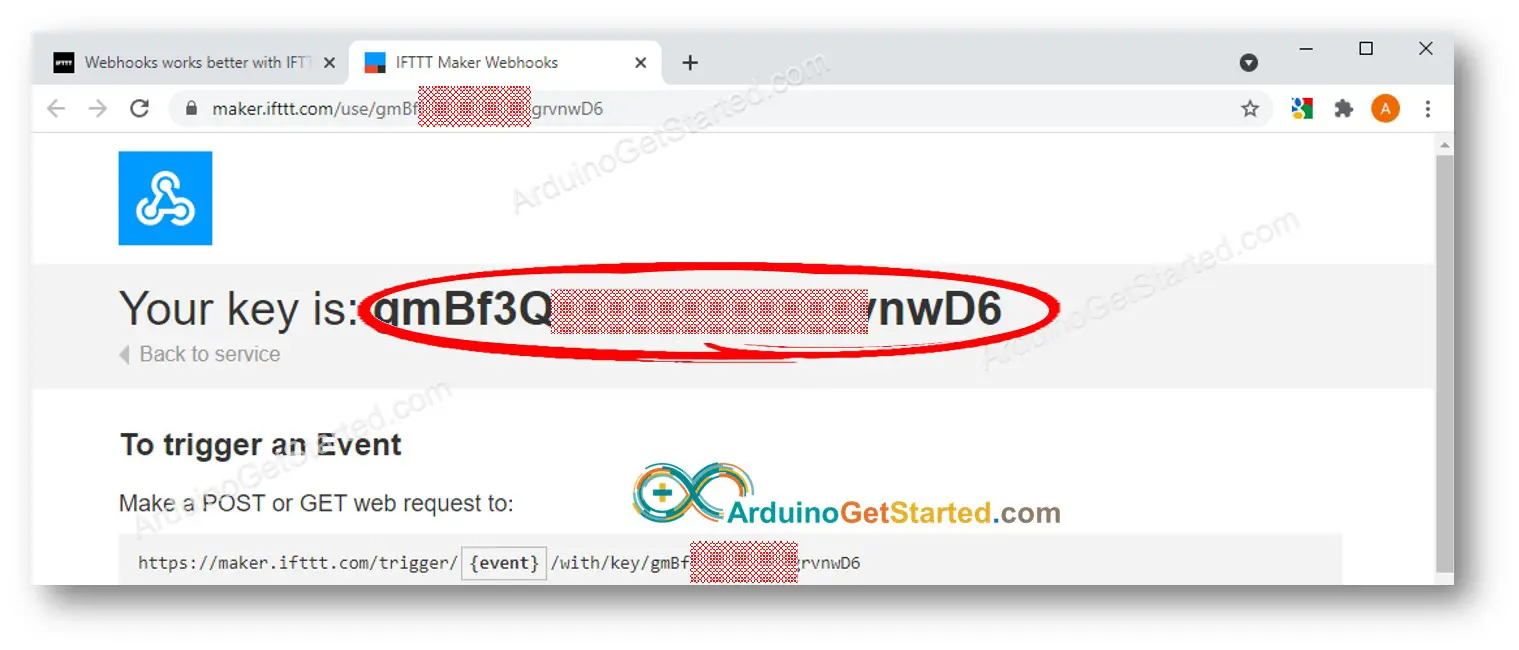
Now, We just need to write Arduino code that makes an HTTP request to the below URL:

 
https://maker.ifttt.com/trigger/send-email/with/key/XXXXXXXXXXXXXXXXXXXXX

※ NOTE THAT:

 
In the URL, the send-email is the event name we used:
 
If you already used this name for another Applet, you can give it any other name.
 
If you use another name, please replace the send-email by your event name
 
Webhooks key is generated by IFTTT. Please keep it secret. You can change it by regenerating it on the IFTTT website.

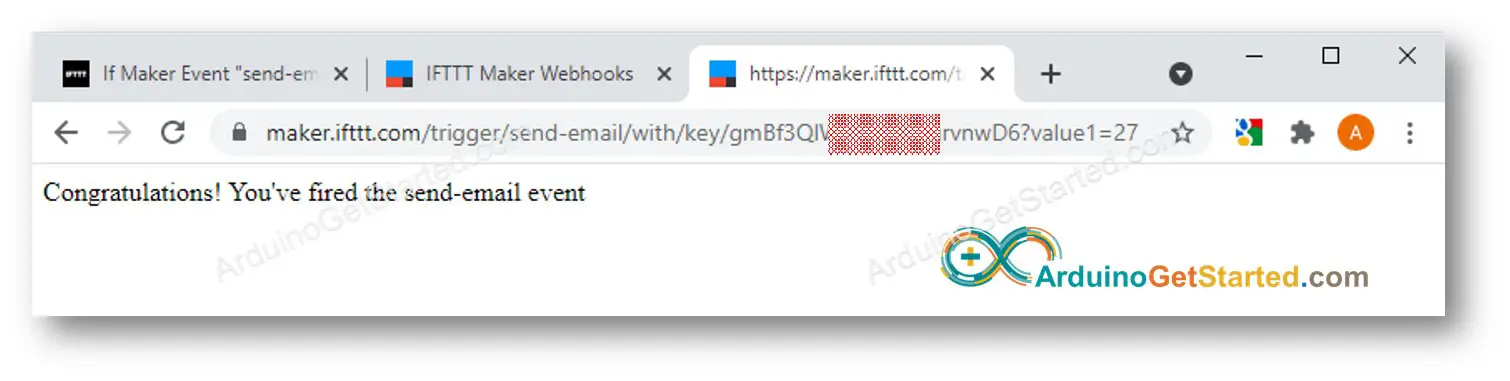
Before writing Arduino code, We can test the IFTTT Applet by doing:

 
Open a web browser
 
Copy the below link:
 
https://maker.ifttt.com/trigger/send-email/with/key/XXXXXXXXXXXXXXXXXXXXX
 
Paste it on the address bar of the web browser
 
Replace XXXXXXXXXXXXXXXXXXXXX with your Webhooks key.
 
Press the enter key on your keyboard. You will see the browser display the message as below image.
Arduino IFTTT applet test
 
And you will receive an email.

Arduino Code

/*
 * Created by ArduinoGetStarted.com
 *
 * This example code is in the public domain
 *
 * Tutorial page: https://arduinogetstarted.com/tutorials/arduino-temperature-send-email-notification
 */

#include <SPI.h>
#include <Ethernet.h>
#include <OneWire.h>
#include <DallasTemperature.h>

#define TEMP_THRESHOLD  27 // °C
#define SENSOR_PIN  13 // Arduino pin connected to DS18B20 sensor's DQ pin

OneWire oneWire(SENSOR_PIN);         // setup a oneWire instance
DallasTemperature DS18B20(&oneWire); // pass oneWire to DallasTemperature library

// replace the MAC address below by the MAC address printed on a sticker on the Arduino Shield 2
byte mac[] = { 0xDE, 0xAD, 0xBE, 0xEF, 0xFE, 0xED };

EthernetClient client;

int    HTTP_PORT   = 80;
String HTTP_METHOD = "GET";
char   HOST_NAME[] = "maker.ifttt.com";
String PATH_NAME   = "/trigger/send-email/with/key/XXXXXXXXXXXXXXXXXXXXX"; // change your Webhooks key

bool isSent = false;

void setup() {
  Serial.begin(9600);
  Serial.println("TEMPERATURE MONITORING via EMAIL STARTED!");

  // initialize the Ethernet shield using DHCP:
  if (Ethernet.begin(mac) == 0) {
    Serial.println("Failed to obtaining an IP address using DHCP");
    while (true);
  }

  DS18B20.begin(); // initialize the sensor
}

void loop() {
  DS18B20.requestTemperatures(); // send the command to get temperatures
  float temperature = DS18B20.getTempCByIndex(0);  // read temperature in Celsius

  Serial.print("Temperature: ");
  Serial.print(temperature); // print the temperature in Celsius
  Serial.println("°C");

  if (temperature >= TEMP_THRESHOLD) {
    if (isSent == false) { // to make sure that Arduino does not send duplicated emails
      sendEmail(temperature);
      isSent = true;
    }
  } else {
    isSent = false; // reset to send if the temperature exceeds threshold again
  }
}

void sendEmail(float temperature) {
  // connect to IFTTT server on port 80:
  if (client.connect(HOST_NAME, HTTP_PORT)) {
    // if connected:
    Serial.println("Connected to server");
    // make a HTTP request:
    String queryString = "?value1=" + String(temperature);
    // send HTTP header
    client.println("GET " + PATH_NAME + queryString + " HTTP/1.1");
    client.println("Host: " + String(HOST_NAME));
    client.println("Connection: close");
    client.println(); // end HTTP header

    while (client.connected()) {
      if (client.available()) {
        // read an incoming byte from the server and print it to serial monitor:
        char c = client.read();
        Serial.print(c);
      }
    }

    // the server's disconnected, stop the client:
    client.stop();
    Serial.println();
    Serial.println("disconnected");
  } else {// if not connected:
    Serial.println("connection failed");
  }
}

Quick Steps

 
Stack Ethernet Shield on Arduino
 
Do wiring as above image
 
Connect Arduino to PC via USB cable
 
Open Arduino IDE, select the right board and port
 
On Arduino IDE, Go to Tools Manage Libraries
Arduino add library
Search “OneWire”, then find the OneWire library by Paul Stoffregen
 
Click Install button to install OneWire library.
Arduino onewire library
Search “Dallas”, then find the DallasTemperature library by Miles Burton.
 
Click Install button to install DallasTemperature library.

Arduino Dallas Temperature library

Copy the above code and open with Arduino IDE
 
Click Upload button on Arduino IDE to upload code to Arduino
 
Put the sensor on hot and cold water, or grasp the sensor by your hand
 
You will receive an email notification as below
Arduino Gmail temperature

Code Explanation

Read the line-by-line explanation in comment lines of source code!


Documents
Comments Write