
Arduino - MySQL
Arduino can collect sensor data and store it on the MySQL database. Arduino can also get data (command) from MySQL database and control LED,
In this tutorial, we are going to learn:
Hardware Required
| 1 | × | Arduino UNO or Genuino UNO | |
| 1 | × | USB 2.0 cable type A/B | |
| 1 | × | Arduino Ethernet Shield 2 | |
| 1 | × | Ethernet Cable | |
| 1 | × | (Optional) 9V Power Adapter for Arduino | |
| 1 | × | (Optional) Screw Terminal Block Shield for Arduino |
Arduino - MySQL
If you do not have much knowledge of the system architecture, two terms: MySQL Database and MySQL Server can be understood as the same. You will find the differences later when you know a lot about the system architecture.
There are two ways for Arduino to interact with the MySQL database:
Let's find the best one.
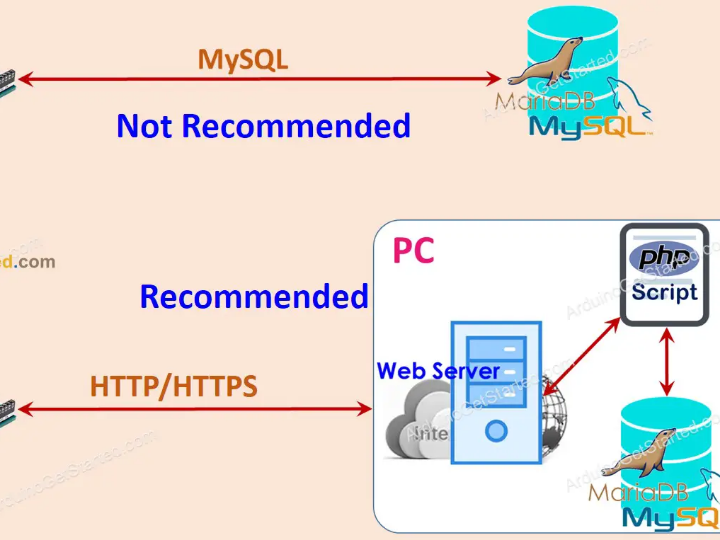
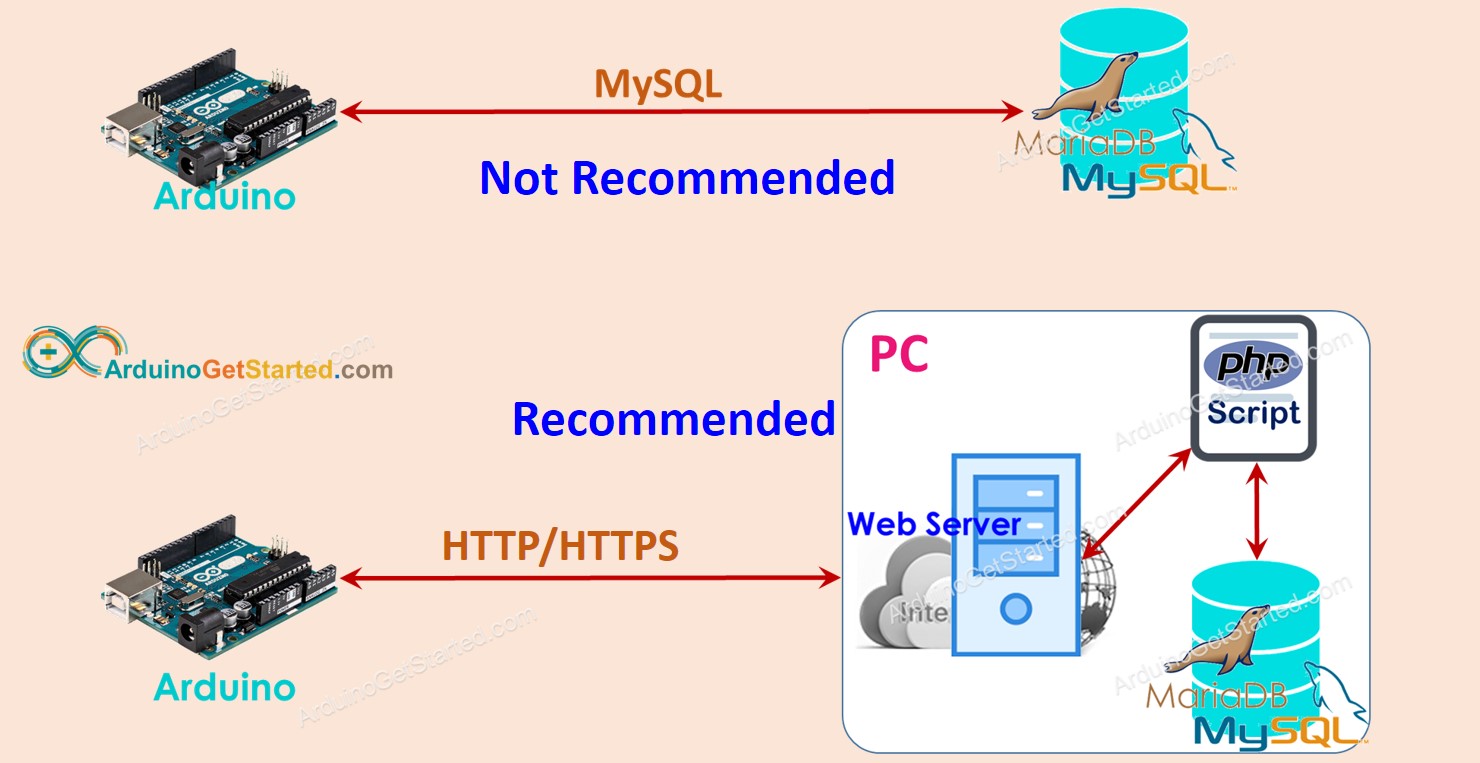
Arduino interacts directly to MySQL Server
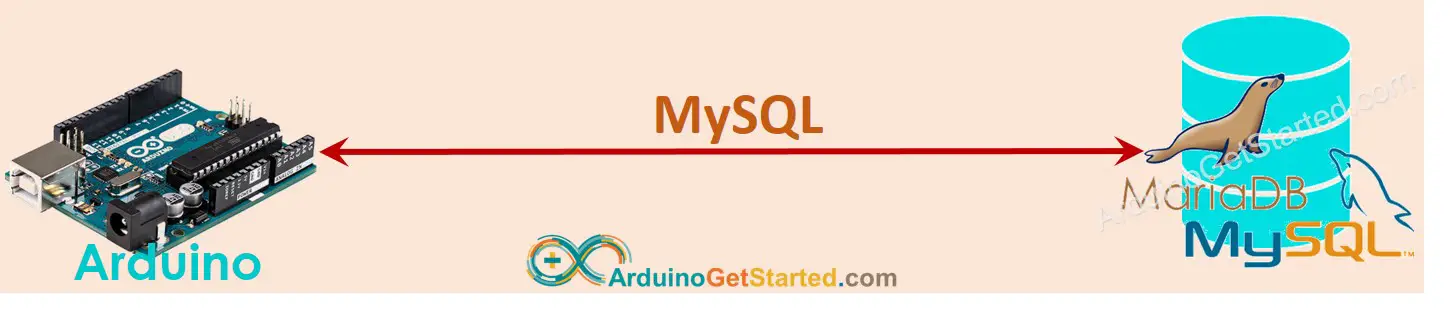
This sounds simpler but there are many disadvantages:
Arduino interacts indirectly to MySQL Server via HTTP/HTTPS
This indirect way solves all problems that the direct way has. Before seeing how the indirect way overcomes the disadvantages of the direct way, let's see how it works first
How it works

In this tutorial, the Web server, MySQL server will be installed on PC.
It looks complicated but not. Now Let's see how the indirect way overcomes the disadvantages of the direct way.
In step 1, we can use another username/password to do authentication between Arduino and Web Server. Please note that the HTTP username/password should be different from the MySQL username/password for security reasons.
With those advantages, the rest of this tutorial will present how to use Arduino with MySQL via indirect way.
Arduino - MySQL via HTTP/HTTPS
We need to do the following step:
Now let's do it step-by-step.
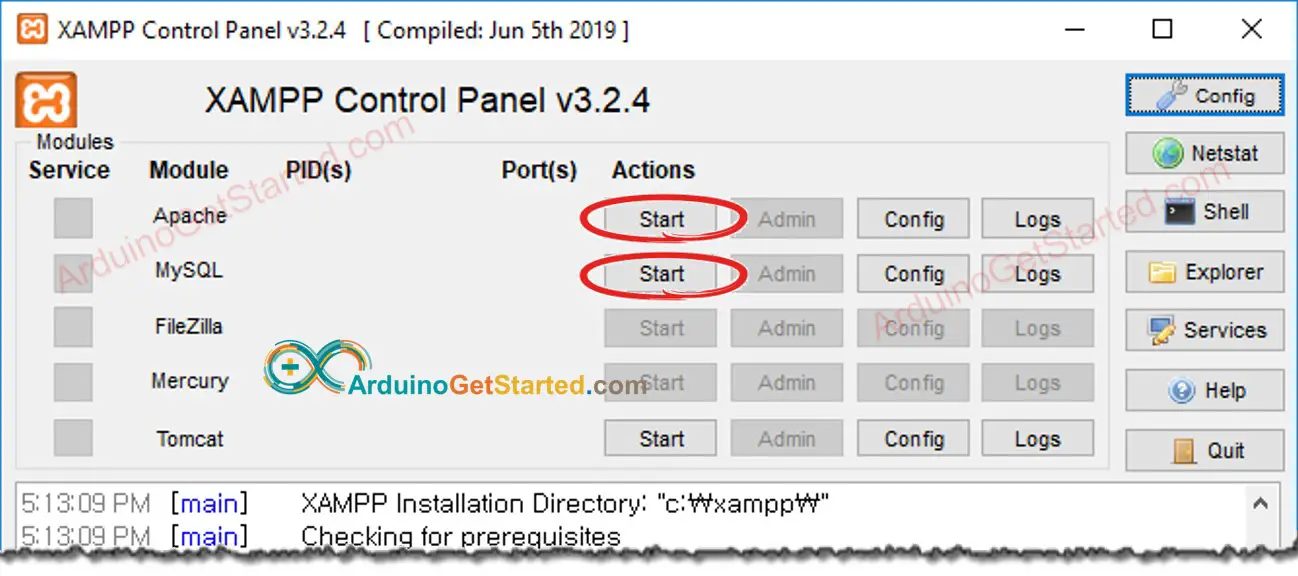
1. Install MySQL server, Web server, and PHP on your PC
Fortunately, the XAMPP package includes all of these. We just need to install one time
After installing, you will see C:\xampp\htdocs folder on your PC. This is where you put PHP code (see later).
2. Enable MySQL and Web server
3. Create a MySQL User account
We will create a MySQL account that can connect to the MySQL database from localhost only.
Let's create a MySQL user account with username is Arduino and password is ArduinoGetStarted.com:
cd C:\xampp\mysql\bin
(e.g. your-root-password) for root account by typing the following command on Command Prompt:
mysqladmin -u root password your-root-password
mysql.exe -u root -p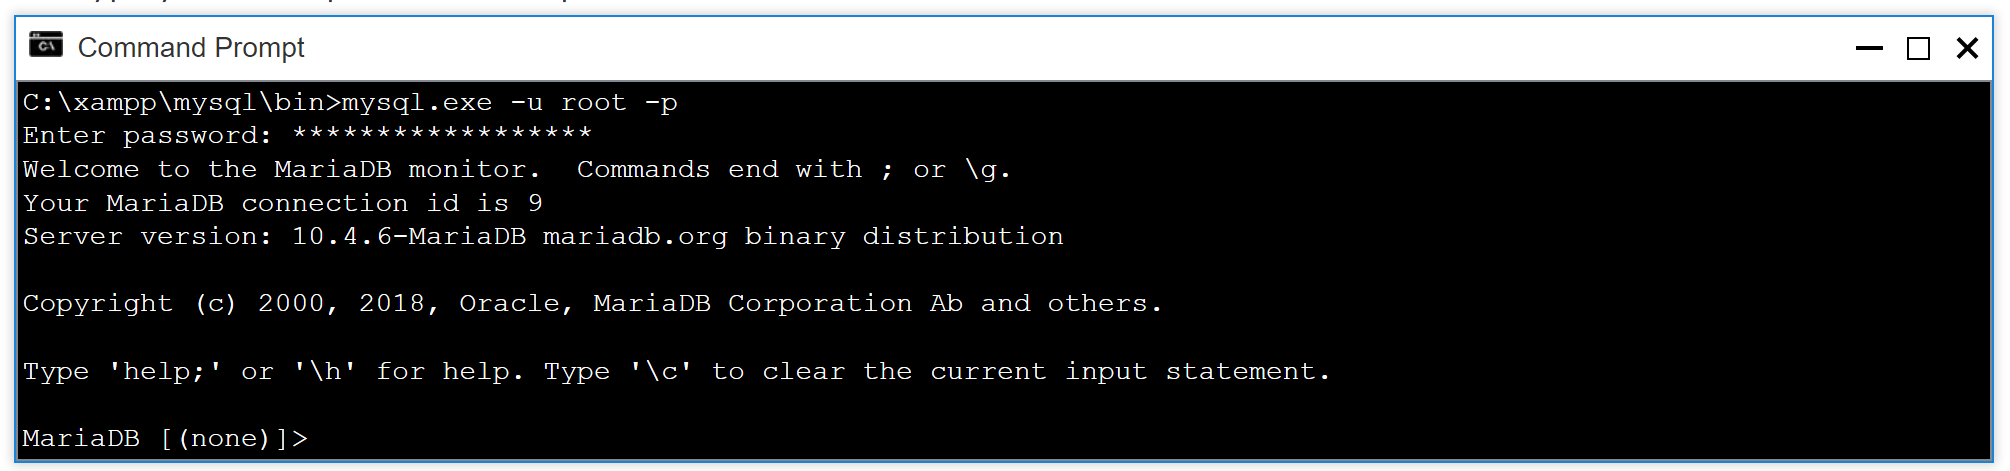
CREATE USER 'Arduino'@'localhost' IDENTIFIED BY 'ArduinoGetStarted.com'; GRANT ALL PRIVILEGES ON *.* TO 'Arduino'@'localhost' WITH GRANT OPTION; FLUSH PRIVILEGES;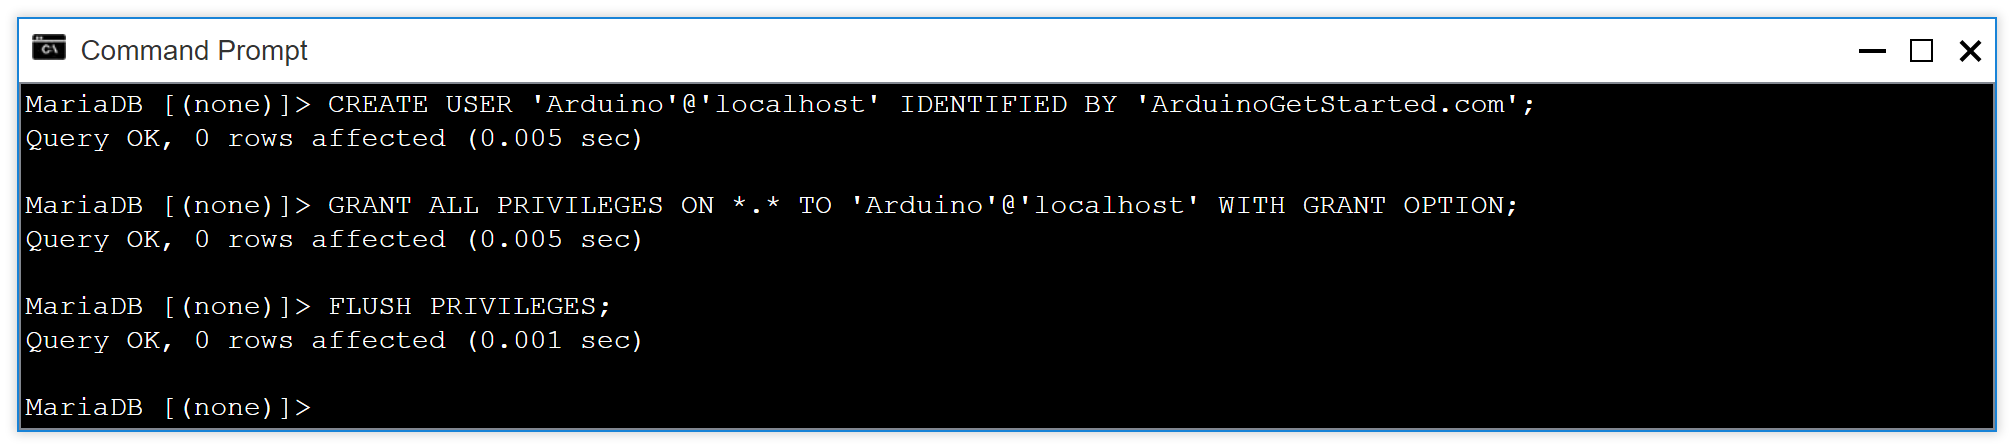
4. Create a MySQL database
Let's create a database named db_arduino by typing the following command on Command Prompt:
CREATE DATABASE db_arduino CHARACTER SET = 'utf8' COLLATE = 'utf8_general_ci';
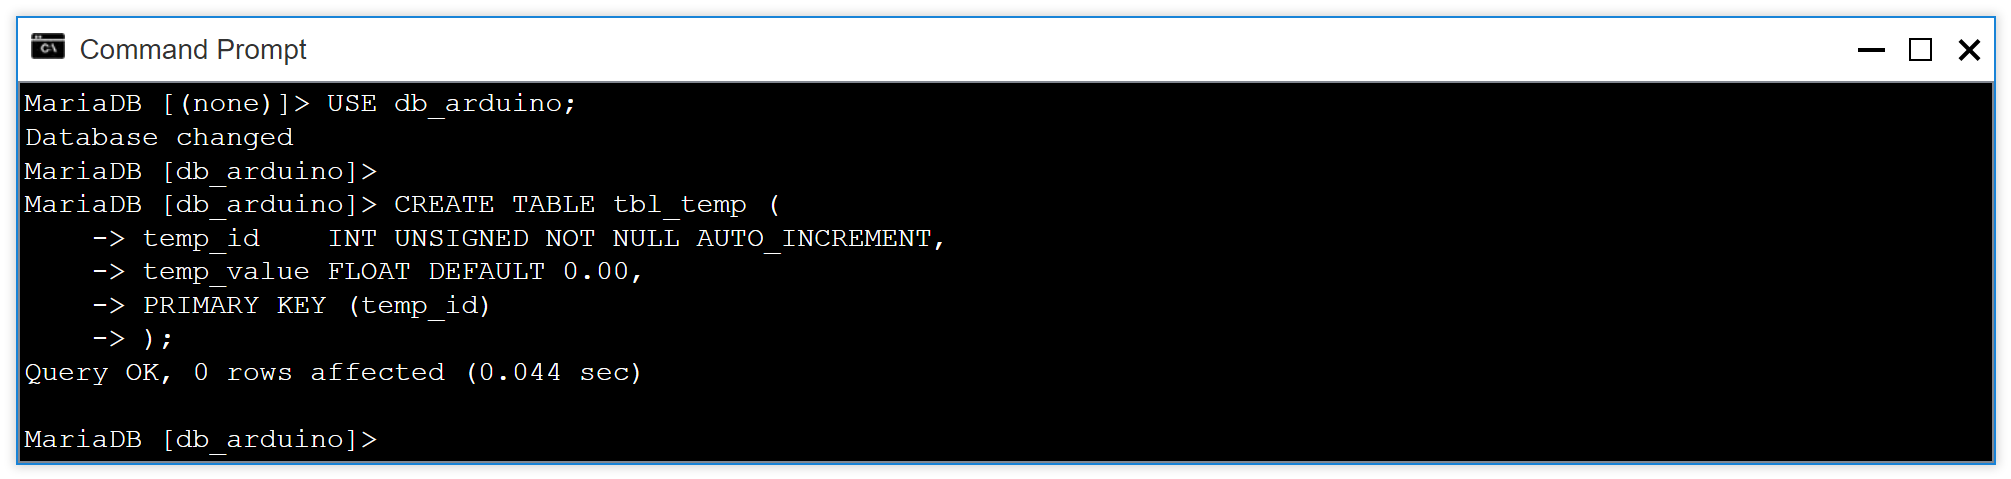
5. Create a MySQL table
Let's create a table named tbl_temp by coping the below commands and paste on Command Prompt:
USE db_arduino;
CREATE TABLE tbl_temp (
temp_id    INT UNSIGNED NOT NULL AUTO_INCREMENT,
temp_value FLOAT DEFAULT 0.00,
PRIMARY KEY (temp_id)
);
6. Write one or more PHP files
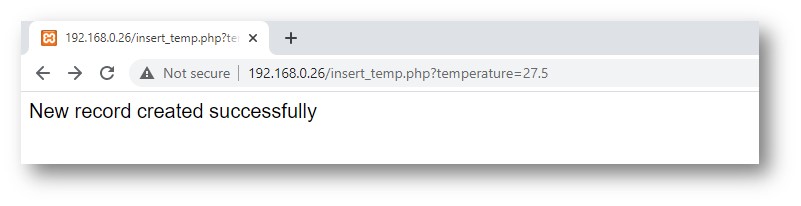
Create a PHP file named insert_temp.php that gets temperature from HTTP Request and inserts it into the database.
<?php
if(isset($_GET["temperature"])) {
  $temperature = $_GET["temperature"]; // get temperature value from HTTP GET
  $servername = "localhost";
  $username = "Arduino";
  $password = "ArduinoGetStarted.com";
  $dbname = "db_arduino";
  // Create connection
  $conn = new mysqli($servername, $username, $password, $dbname);
  // Check connection
  if ($conn->connect_error) {
     die("Connection failed: " . $conn->connect_error);
  }
  $sql = "INSERT INTO tbl_temp (temp_value) VALUES ($temperature)";
  if ($conn->query($sql) === TRUE) {
     echo "New record created successfully";
  } else {
     echo "Error: " . $sql . " => " . $conn->error;
  }
  $conn->close();
} else {
  echo "temperature is not set";
}
?>
SELECT * from tbl_temp;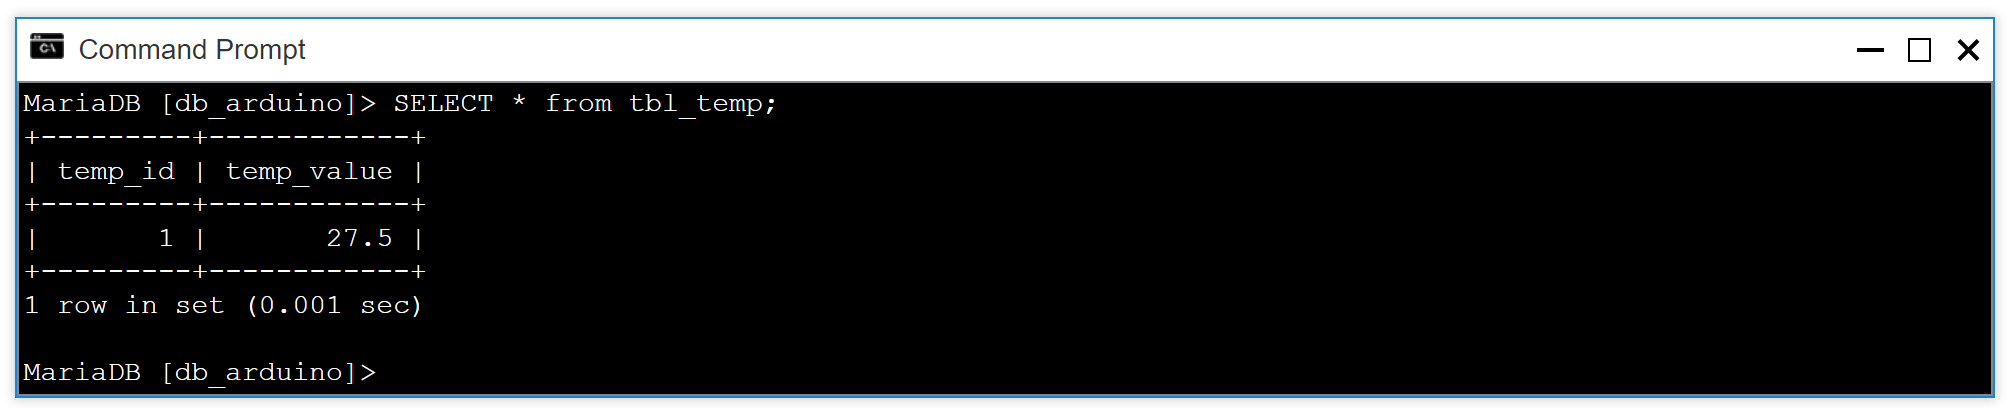
7. Write Arduino code
We will use Arduino Uno and Ethernet Shield for the test
The below Arduino code makes HTTP to your PC to insert a temperature of 29.1°C into the database
/*
* Created by ArduinoGetStarted.com
*
* This example code is in the public domain
*
* Tutorial page: https://arduinogetstarted.com/tutorials/arduino-mysql
*/
#include <SPI.h>
#include <Ethernet.h>
// replace the MAC address below by the MAC address printed on a sticker on the Arduino Shield 2
byte mac[] = { 0xDE, 0xAD, 0xBE, 0xEF, 0xFE, 0xED };
EthernetClient client;
int    HTTP_PORT   = 80;
String HTTP_METHOD = "GET";
char   HOST_NAME[] = "192.168.0.26"; // change to your PC's IP address
String PATH_NAME   = "/insert_temp.php";
String queryString = "?temperature=29.1";
void setup() {
 Serial.begin(9600);
 // initialize the Ethernet shield using DHCP:
 if (Ethernet.begin(mac) == 0) {
   Serial.println("Failed to obtaining an IP address using DHCP");
   while(true);
 }
 // connect to web server on port 80:
 if(client.connect(HOST_NAME, HTTP_PORT)) {
   // if connected:
   Serial.println("Connected to server");
   // make a HTTP request:
   // send HTTP header
   client.println(HTTP_METHOD + " " + PATH_NAME + queryString + " HTTP/1.1");
   client.println("Host: " + String(HOST_NAME));
   client.println("Connection: close");
   client.println(); // end HTTP header
   while(client.connected()) {
     if(client.available()){
       // read an incoming byte from the server and print it to serial monitor:
       char c = client.read();
       Serial.print(c);
     }
   }
   // the server's disconnected, stop the client:
   client.stop();
   Serial.println();
   Serial.println("disconnected");
 } else {// if not connected:
   Serial.println("connection failed");
 }
}
void loop() {
}
Quick Steps
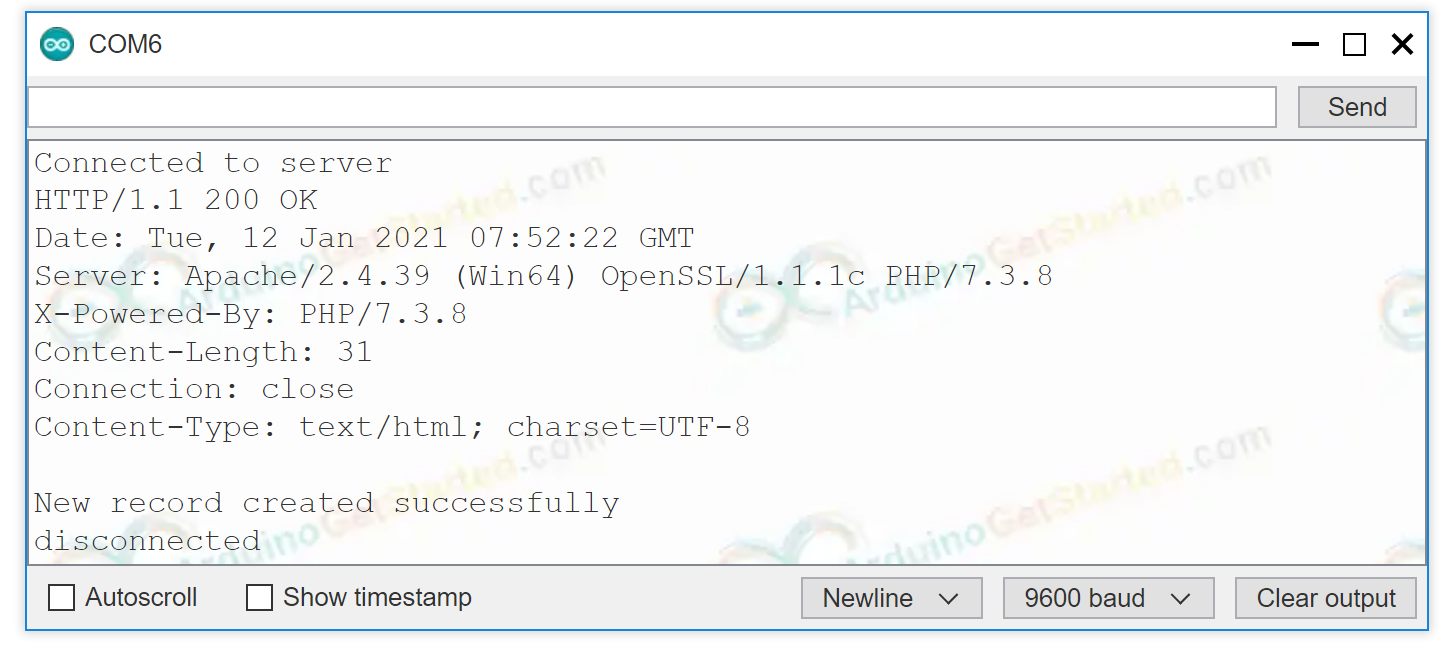
SELECT * from tbl_temp;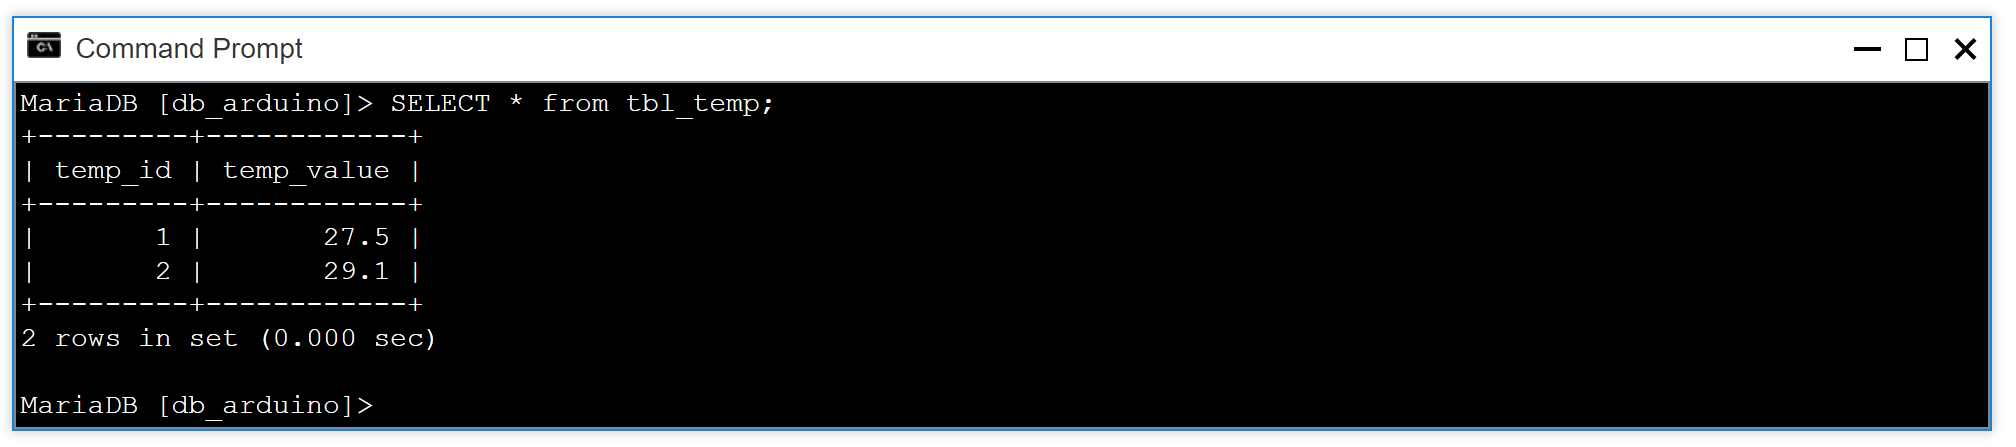
As you can see, the temperature 29.1 is stored in database.
How Arduino insert, update or get data to/from MySQL database
In the above example, we have learned how to insert data into the MySQL database. For updating and getting data from the database, it is similar. You only need to change MySQL queries on the PHP script. You can learn more from W3Schools
Advanced Usage
To increase the security
※ NOTE THAT:
To make a complete system with the highest security level, we need to do more (such as MySQL injection prevention, making HTTPS become REST API, using Json format for data ...). Howerver, this tutorial is dedicated for beginners to learn Arduino. We made it as simple as possible. After learning this tutorial, users can expand it.