
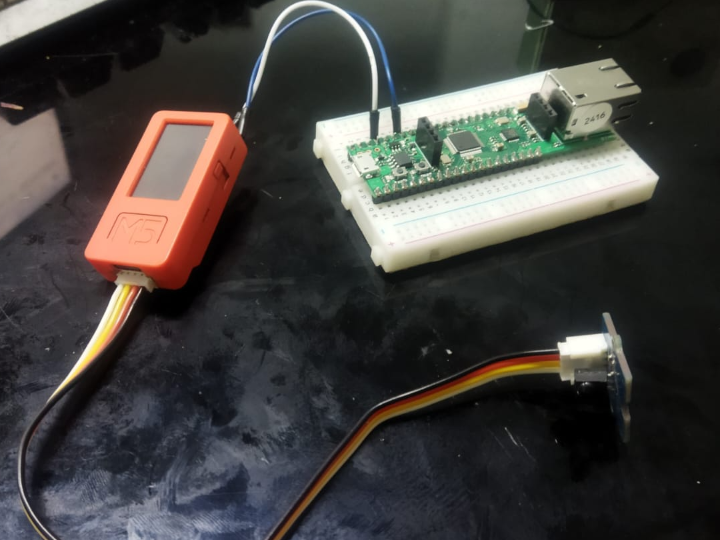
A node based server environment monitor
A server environment monitor that can be expandable using the small form of Surf5 and the easy to connect capability of the POE
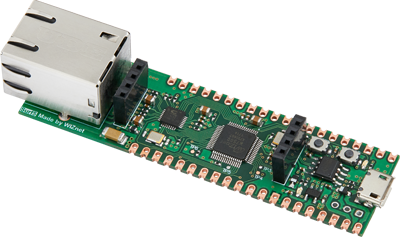
WIZnet - Surf5
x 1

seeed - Grove - Infrared Reflective Sensor v1.2
x 1

ARM - KEIL5
x 1
This project is used to monitor a server room. When the temperature in a server room is failing, it will notify an set the Air conditioner via Infra red sensor
This tutorial will guide you through creating a temperature monitoring system using the DS18B20 temperature sensor and the Surf5 Ethernet module, programmed with Keil5 software. The system will read temperature data from the DS18B20 sensor and send it over Ethernet using the Surf5 module.
Components Needed
- DS18B20 temperature sensor
- Surf5 Ethernet module
- Resistor (4.7k ohm)
- Breadboard and jumper wires
- Ethernet cable
- Power supply (if required by your setup)
Step-by-Step Guide
Setting Up the Hardware
1.1 Connecting DS18B20 to Surf5
The DS18B20 sensor has three pins: Vcc, GND, and Data. Connect them as follows:
- Vcc to 3.3V on Surf5
- GND to GND on Surf5
- Data to a GPIO pin on Surf5 (e.g., PA_08)
- Place a 4.7k ohm resistor between the Data pin and Vcc
Setting Up Keil5
2.1 Install Keil5 Software
- Download and install Keil from the official website.
- follow this guide for surf5 configuration
Configuring Libraries and Middleware
3.1 Add CMSIS and HAL Libraries
- Add CMSIS and HAL libraries for the Surf5 microcontroller.
- Configure the libraries for GPIO, SPI, and Ethernet functionalities.
- Download OneWire and DS18B20 libraries compatible with Keil5.
- Add these libraries to your project.
Writing the Code
4.1 OneWire and DS18B20 Initialization
OneWire_HandleTypeDef hOneWire;
DS18B20_HandleTypeDef hDS18B20;

void DS18B20_Init(void) {
    hOneWire.Instance = GPIOA;
    hOneWire.Pin = GPIO_PIN_8;
    OneWire_Init(&hOneWire);

    hDS18B20.OneWire = &hOneWire;
    DS18B20_Init(&hDS18B20);
}
4.2 Ethernet Initialization
void Ethernet_Init(void) {
    uint8_t mac[6] = {0x00, 0x08, 0xDC, 0x00, 0x00, 0x01};
    uint8_t ip[4] = {192, 168, 1, 100};
    uint8_t gateway[4] = {192, 168, 1, 1};
    uint8_t subnet[4] = {255, 255, 255, 0};

    Ethernet_Init(mac, ip, gateway, subnet);
    httpd_init();
}
4.3 Main Program
int main(void) {
    // System initialization
    SystemInit();

    // Initialize DS18B20
    DS18B20_Init();

    // Initialize Ethernet
    Ethernet_Init();

    while (1) {
        // Request temperature reading
        DS18B20_RequestTemperatures(&hDS18B20);
        float temperature = DS18B20_GetTempC(&hDS18B20);

        // Process HTTP requests and send temperature data
        Ethernet_Process(temperature);
    }
}
4.4 HTTP Server Implementation
void Ethernet_Process(float temperature) {
struct netconn *conn, *newconn;
struct netbuf *buf;
char *data;
u16_t len;
conn = netconn_new(NETCONN_TCP);
netconn_bind(conn, NULL, 80);
netconn_listen(conn);
while (1) {
if (netconn_accept(conn, &newconn) == ERR_OK) {
while (netconn_recv(newconn, &buf) == ERR_OK) {
netbuf_data(buf, (void**)&data, &len);
// Simple HTTP response with temperature data
char response[100];
sprintf(response, "HTTP/1.1 200 OK\r\nContent-Type: text/html\r\n\r\n<!DOCTYPE HTML><html>Temperature: %.2f ℃</html>", temperature);
netconn_write(newconn, response, strlen(response), NETCONN_NOCOPY);
netbuf_delete(buf);
}
netconn_close(newconn);
netconn_delete(newconn);
}
}
}
Compiling and Uploading the Code
- Compile the project in Keil5.
- Upload the compiled code to the Surf5 module using a suitable programmer.
Testing
- Connect the Surf5 module to your network using an Ethernet cable.
- Power up the module.
- Open a web browser and enter the IP address (e.g., 192.168.1.100) to see the temperature readings.
You now have a functional temperature monitoring system using a DS18B20 sensor and a Surf5 Ethernet module programmed with Keil5. You can enhance this project by adding data logging, email alerts, or integrating it with other IoT platforms.
-
main code
