
ESP32: Adding Ethernet with the W5500 module
Devices that need to stay connected without worrying about WiFi interference, the W5500 is my go to choice for adding Ethernet to an ESP32.

Original post: https://blog.hirnschall.net/esp32-w5500-ethernet/
About the original author : https://blog.hirnschall.net/about/
1) Introduction
For maker and embedded projects that need a stable local network, wired Ethernet is often more attractive than Wi-Fi. The original project uses an ESP32-S3 DevKitC-1 with a W5500 module and targets use cases such as industrial sensors, local dashboards, and devices that must remain continuously reachable without worrying about wireless interference. The W5500 is especially well suited here because it connects over SPI and is already supported in the ESP32 Arduino ecosystem.
The key architectural choice is to use ETH.h, not a legacy Ethernet.h workflow. The source article explains that the ESP32 already uses lwIP as its networking stack, while the W5500 also contains a hardware TCP/IP engine. On ESP32, standard libraries such as WebServer, HTTPClient, and mDNS are meant to operate through the ESP32 networking layer, so the clean approach is to attach the W5500 through ETH.h, which Espressif documents as part of its Ethernet support for external SPI-Ethernet modules.
This article reorganizes that idea into a maker.wiznet.io-style guide with practical hardware mapping, SPI and event-flow explanation, a wiring table, a full original example sketch, testing steps, and troubleshooting guidance. The reference build uses a USR-ES1 W5500 breakout, but the same software structure applies to many other W5500 SPI modules once the pin mapping is adjusted.
2) Required Components
The reference project uses an ESP32-S3 DevKitC-1 and a USR-ES1 W5500 breakout board. The original article also notes that the same approach works with other W5500 breakout boards, which makes the project easy to adapt to custom hardware or different ESP32 dev boards.
- ESP32-S3 DevKitC-1, or another ESP32 board supported by Arduino-ESP32
- W5500 Ethernet module, such as USR-ES1
- Ethernet cable connected to a DHCP-enabled LAN
- Jumper wires
- USB cable for upload and serial monitoring
- Arduino IDE with the ESP32 board package installed
3) Hardware Setup
The reference hardware wiring is intentionally simple: the W5500 is connected over SPI and powered from 3.3 V. The original article states that the USR-ES1 module is directly compatible with the ESP32-S3 without level shifting, while the W5500 datasheet describes the chip itself as a 3.3 V device with 5 V tolerant I/O. That combination makes bring-up straightforward, but you should still verify the power requirements of your specific breakout board before applying power.
For a clean first build, wire the power rails first, then the SPI bus, then chip select and the interrupt line. The source article leaves the reset pin unconnected and passes -1 to the driver, relying on normal power-up reset behavior. That is fine for the reference setup and keeps the wiring minimal.
Recommended assembly order:
- Connect
3.3VandGND. - Connect
SCK,MISO, andMOSI. - Connect
CS. - Connect
INT/IRQ. - Leave
RSTopen if you follow the same design. - Plug the RJ45 cable into a network with DHCP.
4) Interface Explanation (SPI / HSPI / UART / RMII)
SPI and HSPI
This project uses SPI, not RMII. WIZnet documents the W5500 as a one-chip Ethernet controller with embedded 10/100 MAC and PHY that connects to an external MCU over SPI, and Espressif separately documents support for external SPI-Ethernet modules in its Ethernet stack. That means the W5500 is fundamentally different from RMII-based solutions such as LAN8720-style PHYs.
The original article creates a dedicated SPIClass object for Ethernet instead of relying on a default shared SPI instance. That is a good practice because it keeps the Ethernet bus explicit and easier to manage if other SPI peripherals are added later. In the reference example, the code uses SPIClass ethSPI(HSPI); and starts it with the chosen GPIO mapping before calling ETH.begin().
WIZnet’s documentation states that the W5500 supports SPI Mode 0 and 3, provides an SPI interface up to 80 MHz, and includes 32 KB of internal memory plus 8 hardware sockets. In practice, stable signal routing matters more than chasing the theoretical maximum bus speed, especially on jumper-wire prototypes.
IRQ / INT line
The interrupt pin is important in this design. The source article explicitly notes that the W5500 uses IRQ to signal incoming data, including DHCP responses, so a wrong or unstable IRQ connection can cause the link to appear alive while IP assignment never completes.
ESP32 event-driven networking
On the ESP32 side, Ethernet is event-driven. Espressif’s Arduino documentation shows that onEvent is called from a separate FreeRTOS task and that the hostname should be set inside ARDUINO_EVENT_ETH_START, after the interface is created but before DHCP finishes. That is why the safest application structure is to keep the event handler lightweight and use flags to tell the main loop when Ethernet is ready.
UART
UART is only used for debugging through the Serial Monitor. It does not participate in Ethernet communication. Its job is to confirm milestones such as interface start, link-up, and IP assignment.
5) Wiring Table
The following table mirrors the pin map used in the reference article for the ESP32-S3 DevKitC-1 and the USR-ES1 W5500 module. On another ESP32 board, the same logic applies even if the GPIO numbers change.
| ESP32-S3 Pin | W5500 Pin | Function | Notes |
|---|---|---|---|
| GPIO12 | SCK | SPI clock | Ethernet SPI clock |
| GPIO13 | MISO | SPI MISO | Data from W5500 to ESP32 |
| GPIO11 | MOSI | SPI MOSI | Data from ESP32 to W5500 |
| GPIO10 | CS | Chip select | Passed to ETH.begin() |
| GPIO14 | INT / IRQ | Interrupt | Important for DHCP and packet events |
Not connected (-1) | RST | Reset | Optional in this reference design |
| 3.3V | VCC | Power | Check breakout-board power design |
| GND | GND | Ground | Common ground required |
6) Software Environment Setup
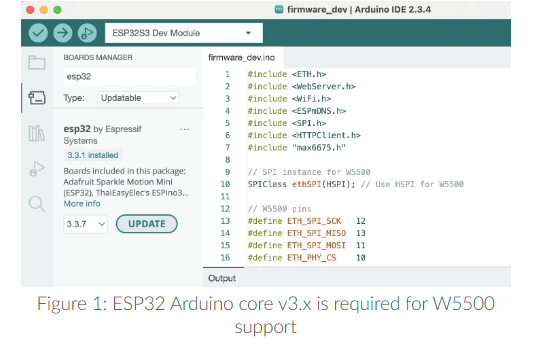
The source article states that W5500 support through ETH.h requires Arduino-ESP32 core v3.x or later and that no extra Ethernet library is needed, because the required support is already included in the core. Espressif’s installation guide shows the normal Boards Manager workflow for installing the esp32 platform, and the ESP32 Ethernet documentation provides the official event-driven model used by this project.
Set up the software environment in this order:
- Install Arduino IDE.
- Open Tools → Board → Boards Manager.
- Search for esp32 and install the Espressif platform.
- Select the correct ESP32 board.
- Use an Arduino-ESP32 3.x-or-newer environment.
- Remove or disable conflicting third-party Ethernet libraries if you installed any earlier. The original article identifies those conflicts as a common reason for silent DHCP failures.
7) Full Code Examples
The sketch below is an original rewrite based on the structure shown in the source article. It keeps the same core approach: a dedicated SPI bus for the W5500, Network.onEvent() for connection state, ETH.begin() for driver startup, optional shutdown of Wi-Fi and Bluetooth in Ethernet-only builds, and a simple WebServer that answers only after the interface is ready. That structure matches both the reference article and Espressif’s event guidance.
#include <WebServer.h>
#include <WiFi.h>
#include <SPI.h>
// Dedicated SPI instance for the W5500
SPIClass ethSPI(HSPI);
// Reference wiring
constexpr int ETH_SPI_SCK = 12;
constexpr int ETH_SPI_MISO = 13;
constexpr int ETH_SPI_MOSI = 11;
constexpr int ETH_PHY_CS = 10;
constexpr int ETH_PHY_IRQ = 14;
constexpr int ETH_PHY_RST = -1; // not connected
const char* HOSTNAME = "esp32-w5500";
WebServer server(80);
volatile bool ethReady = false;
void onNetworkEvent(arduino_event_id_t event, arduino_event_info_t info) {
switch (event) {
case ARDUINO_EVENT_ETH_START:
Serial.println("[ETH] Interface started");
ETH.setHostname(HOSTNAME);
break;
case ARDUINO_EVENT_ETH_CONNECTED:
Serial.println("[ETH] Link up");
break;
case ARDUINO_EVENT_ETH_GOT_IP:
Serial.print("[ETH] IP address: ");
Serial.println(ETH.localIP());
Serial.print("[ETH] MAC address: ");
Serial.println(ETH.macAddress());
ethReady = true;
break;
case ARDUINO_EVENT_ETH_LOST_IP:
Serial.println("[ETH] Lost IP");
ethReady = false;
break;
case ARDUINO_EVENT_ETH_DISCONNECTED:
Serial.println("[ETH] Link down");
ethReady = false;
break;
case ARDUINO_EVENT_ETH_STOP:
Serial.println("[ETH] Interface stopped");
ethReady = false;
break;
default:
break;
}
}
void handleRoot() {
String page;
page.reserve(512);
page += F("<!doctype html><html><head><meta charset='utf-8'>");
page += F("<title>ESP32 W5500 Ethernet</title></head><body>");
page += F("<h1>ESP32 + W5500 Ethernet is running</h1>");
page += F("<p>This page is served over wired Ethernet using ETH.h.</p>");
page += F("<p><strong>IP:</strong> ");
page += ETH.localIP().toString();
page += F("</p>");
page += F("<p><strong>Hostname:</strong> ");
page += HOSTNAME;
page += F("</p>");
page += F("<p>Try <code>/status</code> for JSON output.</p>");
page += F("</body></html>");
server.send(200, "text/html", page);
}
void handleStatus() {
String json = "{";
json += "\"ip\":\"" + ETH.localIP().toString() + "\",";
json += "\"mac\":\"" + ETH.macAddress() + "\",";
json += "\"hostname\":\"" + String(HOSTNAME) + "\",";
json += "\"link\":\"" + String(ETH.linkUp() ? "up" : "down") + "\"";
json += "}";
server.send(200, "application/json", json);
}
void setup() {
Serial.begin(115200);
delay(500);
// Optional for Ethernet-only projects
WiFi.mode(WIFI_OFF);
btStop();
Network.onEvent(onNetworkEvent);
// Start the dedicated SPI bus
ethSPI.begin(ETH_SPI_SCK, ETH_SPI_MISO, ETH_SPI_MOSI, ETH_PHY_CS);
// Start Ethernet via W5500
bool ok = ETH.begin(ETH_PHY_W5500, 0, ETH_PHY_CS, ETH_PHY_IRQ, ETH_PHY_RST, ethSPI);
if (!ok) {
Serial.println("[ETH] Driver start failed");
}
server.on("/", HTTP_GET, handleRoot);
server.on("/status", HTTP_GET, handleStatus);
server.onNotFound([]() {
server.send(404, "text/plain", "Not found");
});
server.begin();
Serial.println("[HTTP] Server started");
}
void loop() {
if (ethReady) {
server.handleClient();
}
delay(2);
}
If you also want mDNS, the original article shows that ESPmDNS.h can be layered onto the Ethernet interface after startup, using the same hostname that is configured in the Ethernet start event.
// after ETH.begin():
if (MDNS.begin("esp32-w5500")) {
Serial.println("[mDNS] responder started");
}
8) Testing Steps
The intended bring-up flow is simple: initialize SPI, register the event handler, start Ethernet, wait for link and DHCP, and then access the web server over the assigned IP. That sequence matches the reference article and the official ESP32 Ethernet event model.
- Upload the sketch.
- Open the Serial Monitor at
115200baud. - Confirm that you see:
[ETH] Interface started[ETH] Link up[ETH] IP address: ...
- Copy the IP address from the Serial Monitor.
- Open the main page:
- Open the JSON endpoint:
- Unplug the Ethernet cable and verify that the disconnect event appears.
- Reconnect the cable and confirm that the device gets an IP address again.
You can also test the JSON endpoint from a terminal:
9) Troubleshooting
Problem: The cable is connected, but no IP address is assigned.
The original article highlights three common causes: the wrong Ethernet library path, an incorrect IRQ pin, or missing DHCP service on the network. A particularly important ESP32-specific point is that code may compile successfully even when the wrong library choice prevents the ESP32 networking layer from actually receiving usable Ethernet traffic.
Problem: The board never reports link-up.
Start with basics: power, ground, RJ45 cable, and the module’s supply requirements. The source article states that the reference USR-ES1 module runs directly at 3.3 V, while the W5500 datasheet describes the chip as a 3.3 V part with 5 V tolerant I/O. If your breakout board differs, verify its power design before proceeding.
Problem: DHCP still fails even though the cable is good.
Double-check the IRQ wiring. The reference article explicitly notes that DHCP responses depend on the interrupt-driven path, so a wrong IRQ pin can create a misleading situation where the physical link appears active but the board never receives an address.
Problem: The sketch runs, but network behavior is unstable on a custom board or long jumper wires.
WIZnet documents SPI Mode 0/3 operation and a high-speed SPI interface, but reliable operation still depends on real signal integrity. Espressif’s Ethernet guide also notes that SPI-Ethernet configuration can vary depending on the specific module and PCB timing conditions. In practice, shorten wires, improve grounding, and treat Ethernet SPI routing as a signal-integrity problem, not just a logical wiring problem.
Problem: Hostname or service discovery is inconsistent.
Espressif’s Arduino documentation states that the hostname must be set after the interface starts and before DHCP completes, which is why it belongs inside ARDUINO_EVENT_ETH_START. Setting it later can make hostname behavior unreliable.
10) Use Cases & Market Potential
The original article positions ESP32 + W5500 as a strong fit for projects where reliable wired connectivity matters more than wireless convenience, including local dashboards, industrial sensors, and always-on embedded devices. That makes the design attractive for fixed installations and maintenance-friendly LAN products.
WIZnet’s datasheet broadens the picture by listing target applications such as serial-to-Ethernet products, security systems, factory and building automation, medical monitoring equipment, and embedded servers. That gives this architecture clear value not only for hobby prototypes but also for early-stage commercial concepts that need deterministic wired networking without the pin cost of RMII-based designs.
For maker projects, this combination is especially useful when you want an ESP32 software experience but need a wired deployment model, for example in gateways, controller panels, protocol bridges, local monitoring appliances, or Ethernet-enabled sensor nodes. That last point is an engineering inference based on the supported use cases and stack architecture.
11) Module/Chip Technical Overview
The W5500 is a hardwired TCP/IP Ethernet controller with embedded 10/100 Ethernet MAC and PHY. WIZnet documents support for protocols such as TCP, UDP, and IPv4, plus 8 independent sockets and 32 KB of internal memory. The datasheet also lists Wake-on-LAN over UDP, power-down mode, SPI Mode 0/3 operation, auto negotiation, and a limitation that is easy to miss in hobby tutorials: the chip does not support IP fragmentation.
From the ESP32 side, Espressif documents Ethernet support for external SPI-Ethernet modules and integrates that path into the upper TCP/IP stack. The practical consequence, and the central lesson of the source article, is that ETH.h makes the W5500 behave like a native ESP32 network interface from the application’s point of view. That is why libraries such as WebServer can be used in nearly the same way they are used over Wi-Fi.
A useful way to summarize the architecture is this:
- W5500 handles the wired Ethernet hardware connection.
ETH.hconnects that hardware path into the ESP32 networking environment.- Your application continues to use familiar ESP32 networking patterns such as event callbacks,
WebServer, and hostname configuration.
That division of roles is what makes the ESP32 + W5500 combination both practical and beginner-friendly for Ethernet-enabled maker projects.
12) Conclusion
This project is a clean and practical way to add wired networking to an ESP32. The hardware is compact, the interface is simpler than RMII-based Ethernet designs, and the software path becomes straightforward once you commit to ETH.h, event-driven bring-up, and careful IRQ wiring. Both the source article and Espressif’s official Ethernet documentation support that design direction.
For maker.wiznet.io readers, the main takeaway is not only that the W5500 works with ESP32, but how to use it correctly: dedicate the SPI bus, register the Ethernet event handler before startup, set the hostname in ARDUINO_EVENT_ETH_START, wait for IP assignment before serving traffic, and avoid legacy library paths that bypass the ESP32 networking model.
Q1. Why use the W5500 Ethernet module with the ESP32?
A. The W5500 is suitable for ESP32 projects that require a stable wired network connection without Wi-Fi interference. It can be connected via SPI, making implementation relatively simple, and offers high practicality as it can be used without additional libraries in the ESP32 Arduino core v3.x environment.
Q2. Why should ETH.h be used instead of Ethernet.h when using the ESP32 and W5500 together?
A. The ESP32 uses its own TCP/IP stack (lwIP), and the W5500 also has a separate TCP/IP stack internally. Using ETH.h allows the W5500 to be properly integrated into the ESP32 network layer, enabling the natural use of ESP32 network functions such as WebServer.h, HTTPClient.h, and mDNS over wired Ethernet.
Q3. What hardware and projects is this approach suitable for? A. Although the original example is based on the ESP32-S3 DevKitC-1 and USR-ES1 W5500 module, the basic method can be applied to most W5500 breakout boards. It is particularly well-suited for projects where stable wired communication is critical, such as industrial sensors, local dashboards, and embedded devices that require constant connectivity.