BRIEF OVERVIEW:
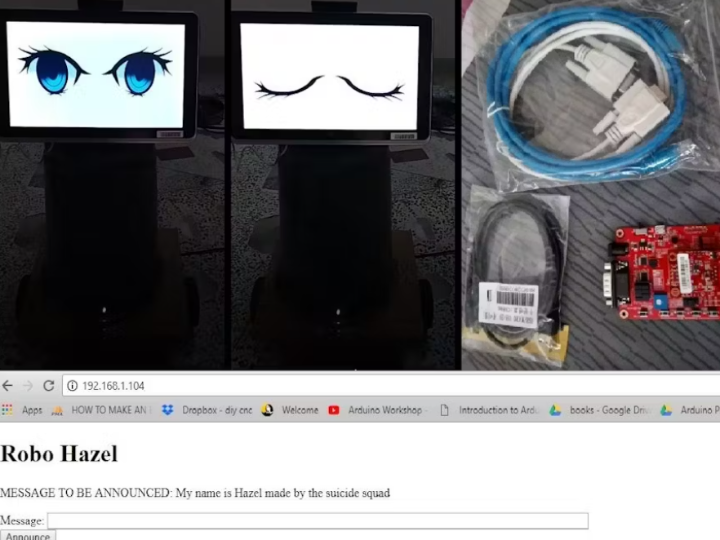
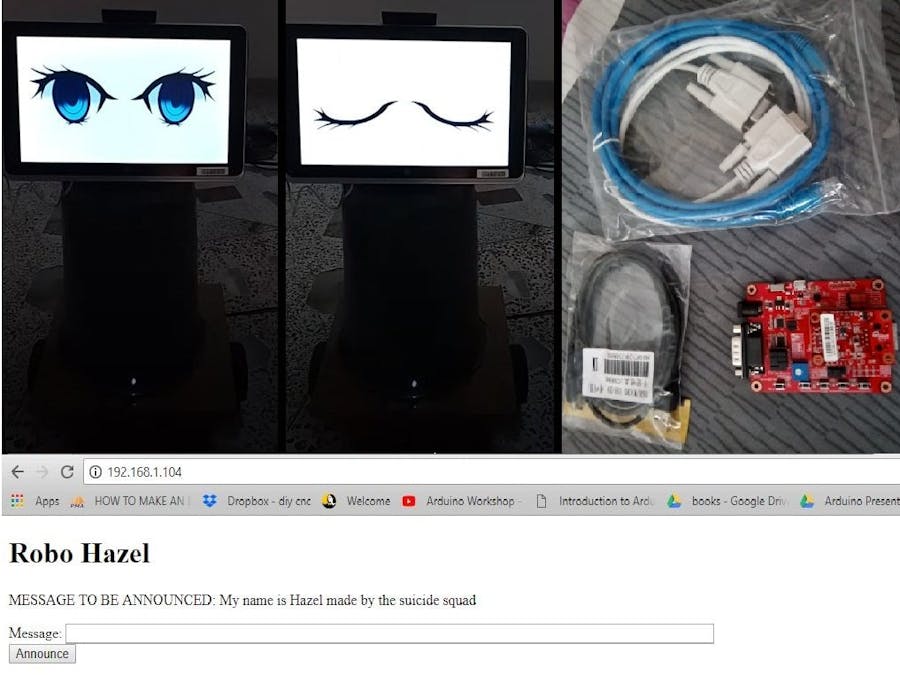
Robo Hazel works by receiving a message from her control page, made using a WIZ750SR (Serial to Ethernet Module by Wiznet), as shown in the screenshot below.

Users can type any text at Hazel's control page and click the Announce button. Hazel is placed anywhere at a starting position; she receives the text (which the user has typed on her control page) with a Python program. Meanwhile, the robot starts moving, and the Python program converts that text into speech. After reaching the final position (her destination), Hazel stops and speaks the text, as shown in the video below. Hazel arrives at the last spot from her initial position by following a line.
A department head can type any message he wants to convey to his employee on Hazel's control page. Hazel will receive this text, convert it into speech, reach to the employee by following a line, convey her message (speaks the text), and the task is automated!
Things We Need
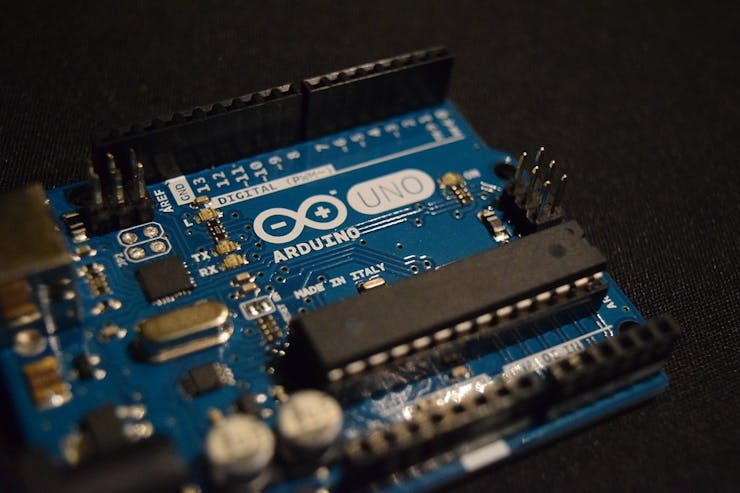
First of all, we need two Arduino UNO:
- One to be used at the user side with WIZ750SR (Serial to Ethernet Module by Wiznet).
- The other one for Hazel's hardware is used to control the robot's locomotion and send signals to the tablet PC to which it is attached serially via USB A to B cable and USB OTG cables. The Python application is stored in the tablet PC, which receives the signals from this Arduino serially. ( Note: If you did not understand this point, don't worry; it will be cleared as you proceed further in this tutorial)
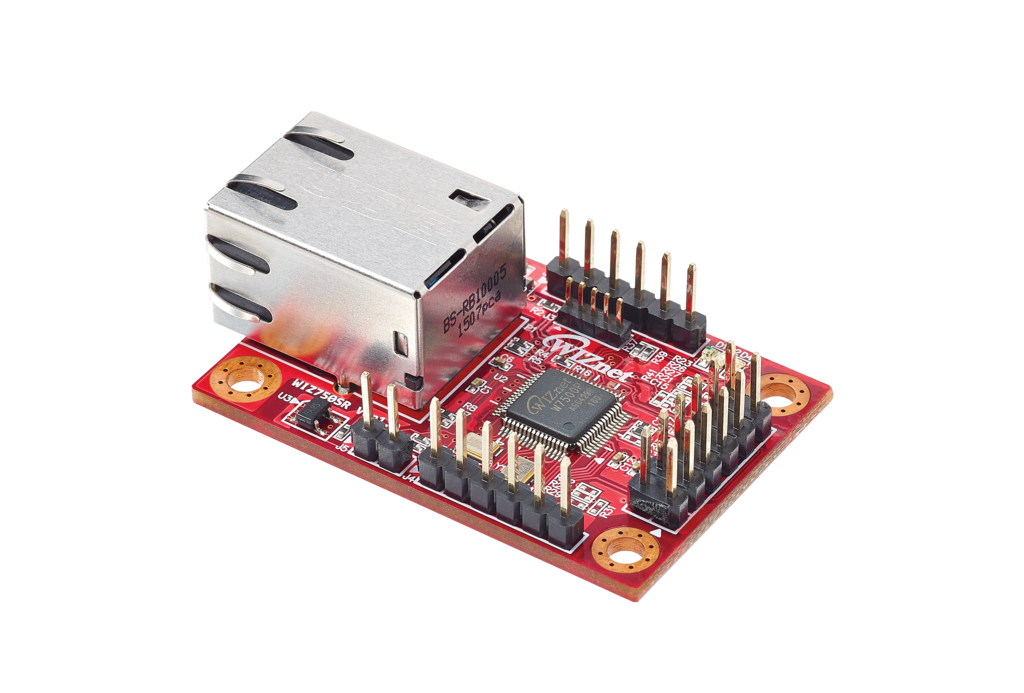
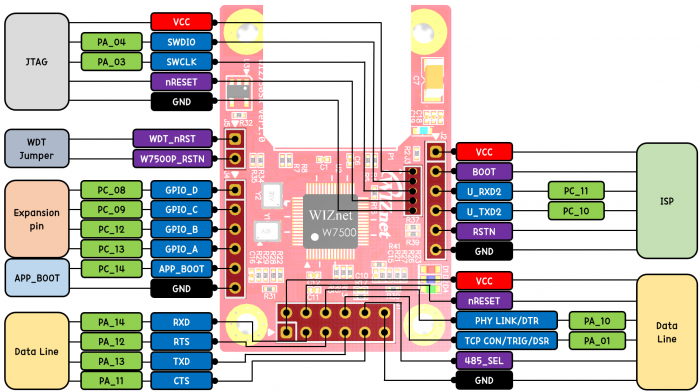
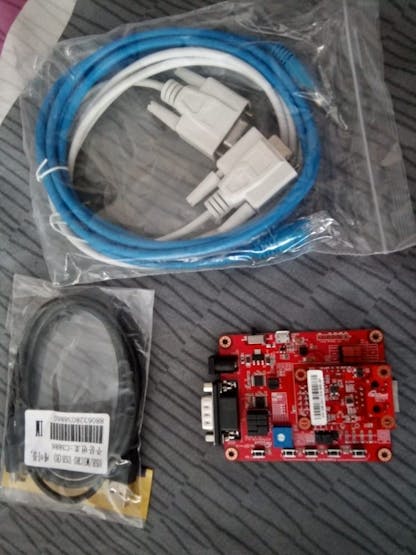
Then, we need a WIZ750SR-TTL-EVB kit. It consists of WIZ750SR-TTL (3.3V TTL ver.), evaluation board, and cables. WIZ750SR is a compact-sized serial to Ethernet module using the W7500P Ethernet MCU (SoC based on ARM Cortex-M0 architecture). Visit the following link for product details, datasheets, and more information.
Then, we need any tablet PC that can be used as a robot's face. I used my Haier Y11B windows tablet PC, but you can use any tablet of your choice.
_j91mp4Bmts.jpg?auto=compress%2Cformat&w=740&h=555&fit=max)
Other components are mentioned in the Things heading of this tutorial.
Block Diagram of System’s Connections
USER SIDE:
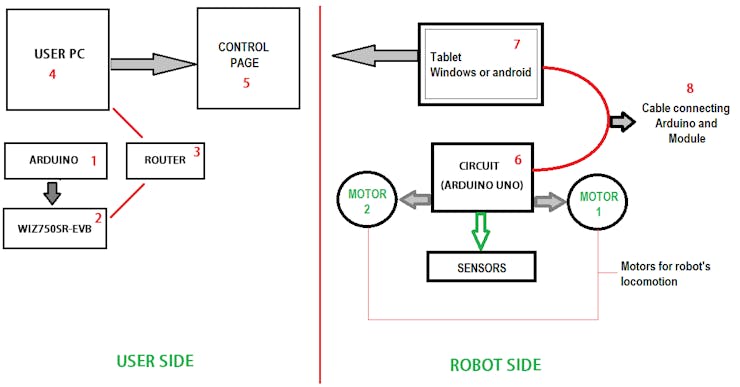
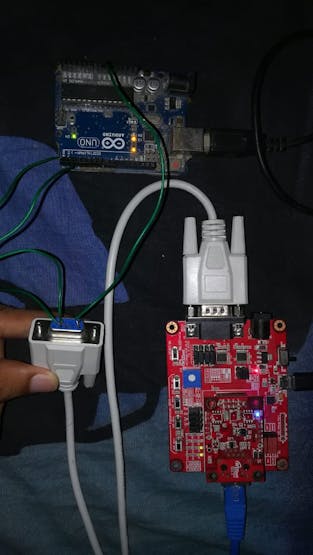
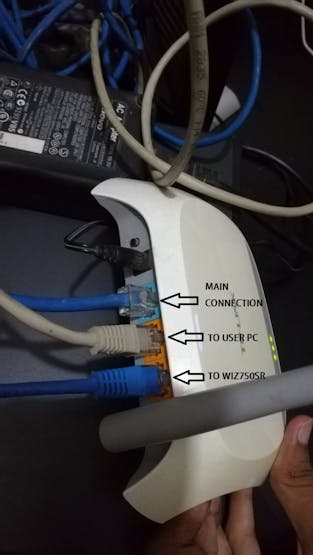
One of our Arduinos (1) is connected to our serial to ethernet module, i.e., WIZ750SR (2), as shown in Figure 1. Then we have a router (3) connected to our module and PC (4), as shown in fig. 2. The control page (5) of our robot (i.e., a server made using Arduino and WIZ750SR) can be opened in a web browser on the user's PC by typing the IP address.
ROBOT SIDE:
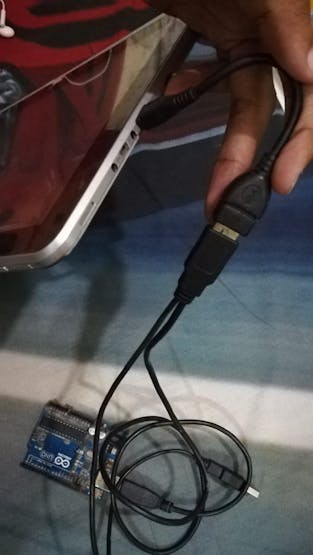
The second Arduino (6) is used on the robot side to control the robot’s locomotion and send the signal to python application in tablet PC (7) with the help of USB A to B and micro USB to OTG cables (8) as shown in fig. 3.
GETTING STARTED:
Configuring WIZnet’s WIZ750SR
We have to configure our WIZ750SR using WIZnet’s configuration tool, which enables product search, product settings, and firmware upload via the network.
WIZ750SR is compatible with WIZ107/108SR and uses the same configuration tools. The tool can be downloaded from the following link.
Now, plug your WIZ750SR module into the WIZ750SR-EVB board and connect it with your router with a LAN cable as shown in fig. 2. A blue LED will glow, indicating that the connection is made. Connect Micro USB Type B Cable with your PC to power on the WIZ750SR-EVB board and open your configuration tool. Your device will be shown when you click the Search button at the top.

You can set the requirements of the device using this configuration tool. For my project, I changed the settings as follows:
- Operation mode: TCP server
- Subnet mask:255.255.255.0
- Local port: 80
- Baud rate: 115200
- Data bit: 8
- Parity: None
- Stop bit: 1
- Flow control: none
- Inactivity timer: 1
I opened the command prompt and type ipconfig; the IPv4 Address was 192.168.1.104. So, I assigned it to my WIZnet device.

You can also use any software like Angry IP Scanner to get your IP address by giving an IP range.

After changing the settings, click the SETTING button in the configuration tool to update new settings.
Configuring WIZ750SR is also explained in WIZnet’s Getting Started Guide.
If you want to use the latest version of the configuration tool, you can download it from the following link:
https://github.com/Wiznet/WIZnet-S2E-Tool
Connecting WIZ750SR with Arduino UNO
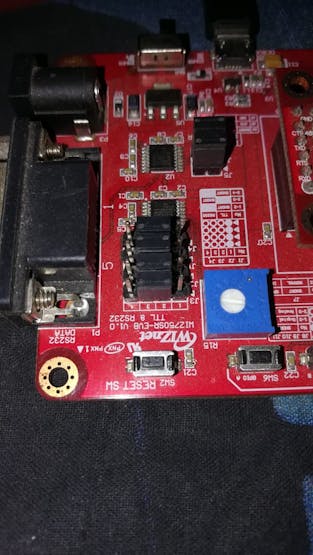
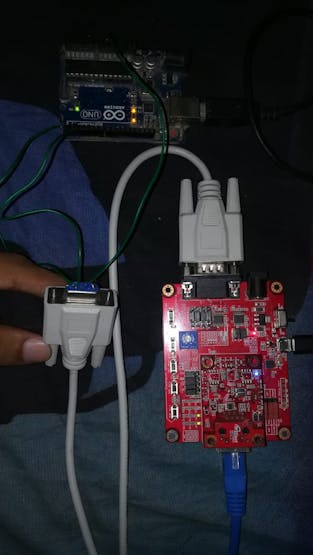
First of all, we have to bypass RS232 converter modules by using the following jumper settings.
Now, connect one end of your serial cable with your WIZ750SR-EVB board. The other end of our serial cable is—a female connector with the following pin configuration.

We now need to go to Arduino's online web editor. Go to the following link:
Or you can download Arduino from the following link:
https://www.arduino.cc/en/Main/Software
Upload the code that I have attached in this tutorial into your Arduino UNO board using Arduino’s web editor.
Now, connect the Rx pin of the female connector with the pin of your Arduino UNO board, the Tx pin of the female connector to the Rx pin of your Arduino, and short the ground pins.
Note: Remove Rx/Tx connections before uploading the code in Arduino.
Now after powering it on, go to the IP address that you have assigned to your WIZ750SR. In my case, it is 192.168.1.104, and I used google chrome web browser to access this IP address.
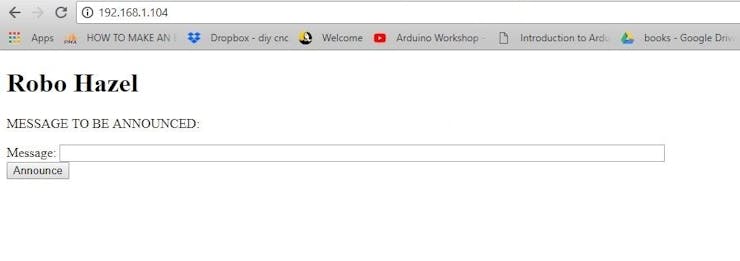
As shown in the screenshot above, we have made a server using Arduino and WIZ750SR serial to ethernet module. Arduino sends serial data, i.e., an HTML form, using Rx/Tx pins to the module, which transmits it across an IP address. Whenever a user types the IP address assigned to WIZ750SR in a web browser, an HTML form is displayed.
You can see nothing written in front of the message TO BE ANNOUNCED heading when we opened this page for the first time. This is because we have not typed any message yet. When we type any message and click the Announce button, the message string is sent in the URL as we have used a GET HTTP Method. To learn about HTTP METHODS (GET and POST), click here.

The URL of this page can be noticed after we have clicked the Announce button in the screenshot below.

Now, our Arduino code reads the URL, filters the message from it, and stores it in the EEPROM of Arduino using the following lines of code:
//Reading the request
         String request = Serial.readStringUntil('\n');
         request.replace('+', ' '); //Removing all the plus signs in message
         //Parsing message from request
         int firstIndex = request.indexOf('Message=');
         int lastIndex = request.indexOf('&_', firstIndex + 1);
         //Saving the parsed message into output variable
         String output=request.substring(firstIndex + 1, lastIndex-1);
         //Checking if the message exists and writing it into Arduino's EEPROM for future use
         if(lastIndex-firstIndex>1){
             output.toCharArray(myStringChar, BUFSIZE);
             strcpy(buf1, myStringChar);
             eeprom_write_string(0, buf1);
         }
If we go to Hazel's control page by typing that IP address again, the following lines will read the last message stored in Arduino's EEPROM and displays it in front of the message TO BE ANNOUNCED heading.
//Reading and displaying the message that was stored in Arduino's EEPROM earlier
        Serial.print("<P>");
        Serial.print("MESSAGE TO BE ANNOUNCED: ");
        eeprom_read_string(0, buf2, BUFSIZE);
        Serial.print(buf2);
        Serial.print("</P>");
Following is the screenshot after reloading the page.

Now, right-click on the page and go to VIEW PAGE SOURCE.
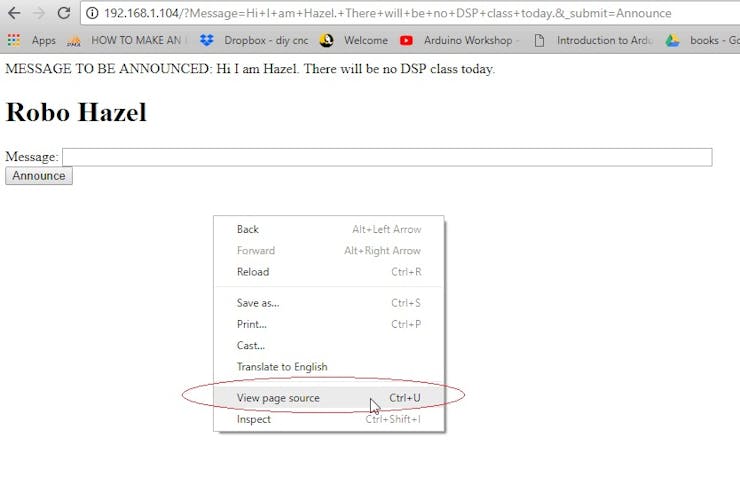
The following tab will be opened.

This is the page source. The paragraph from this page, i.e., a text is spoken by our Hazel, is then scrapped by our robot's python program, where this text is converted into speech (and stored in a temporary audio file) while our robot is walking. It is spoken (the temporary audio file is played) when the robot reaches its targeted location.
So, we have connected between Arduino UNO and WIZ750SR to make a web server and used the EEPROM of Arduino to save text fetched by our robot.
Robo Hazel’s hardware, circuit, and program
Arduino is connected to a tablet PC (which serves as Robo Hazel's face) with USB A to B and micro USB to OTG cables, as shown in the picture below.
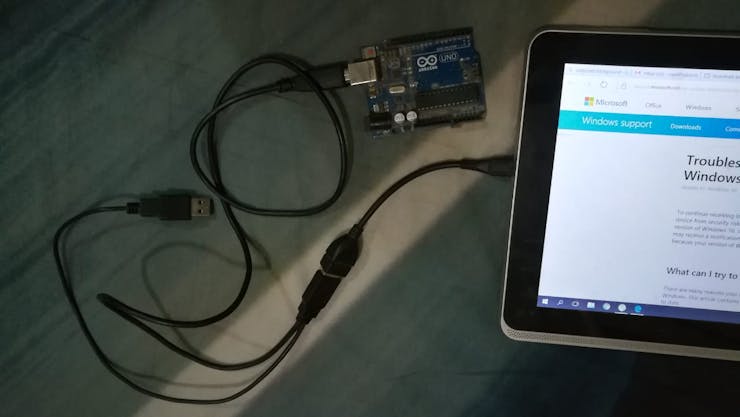
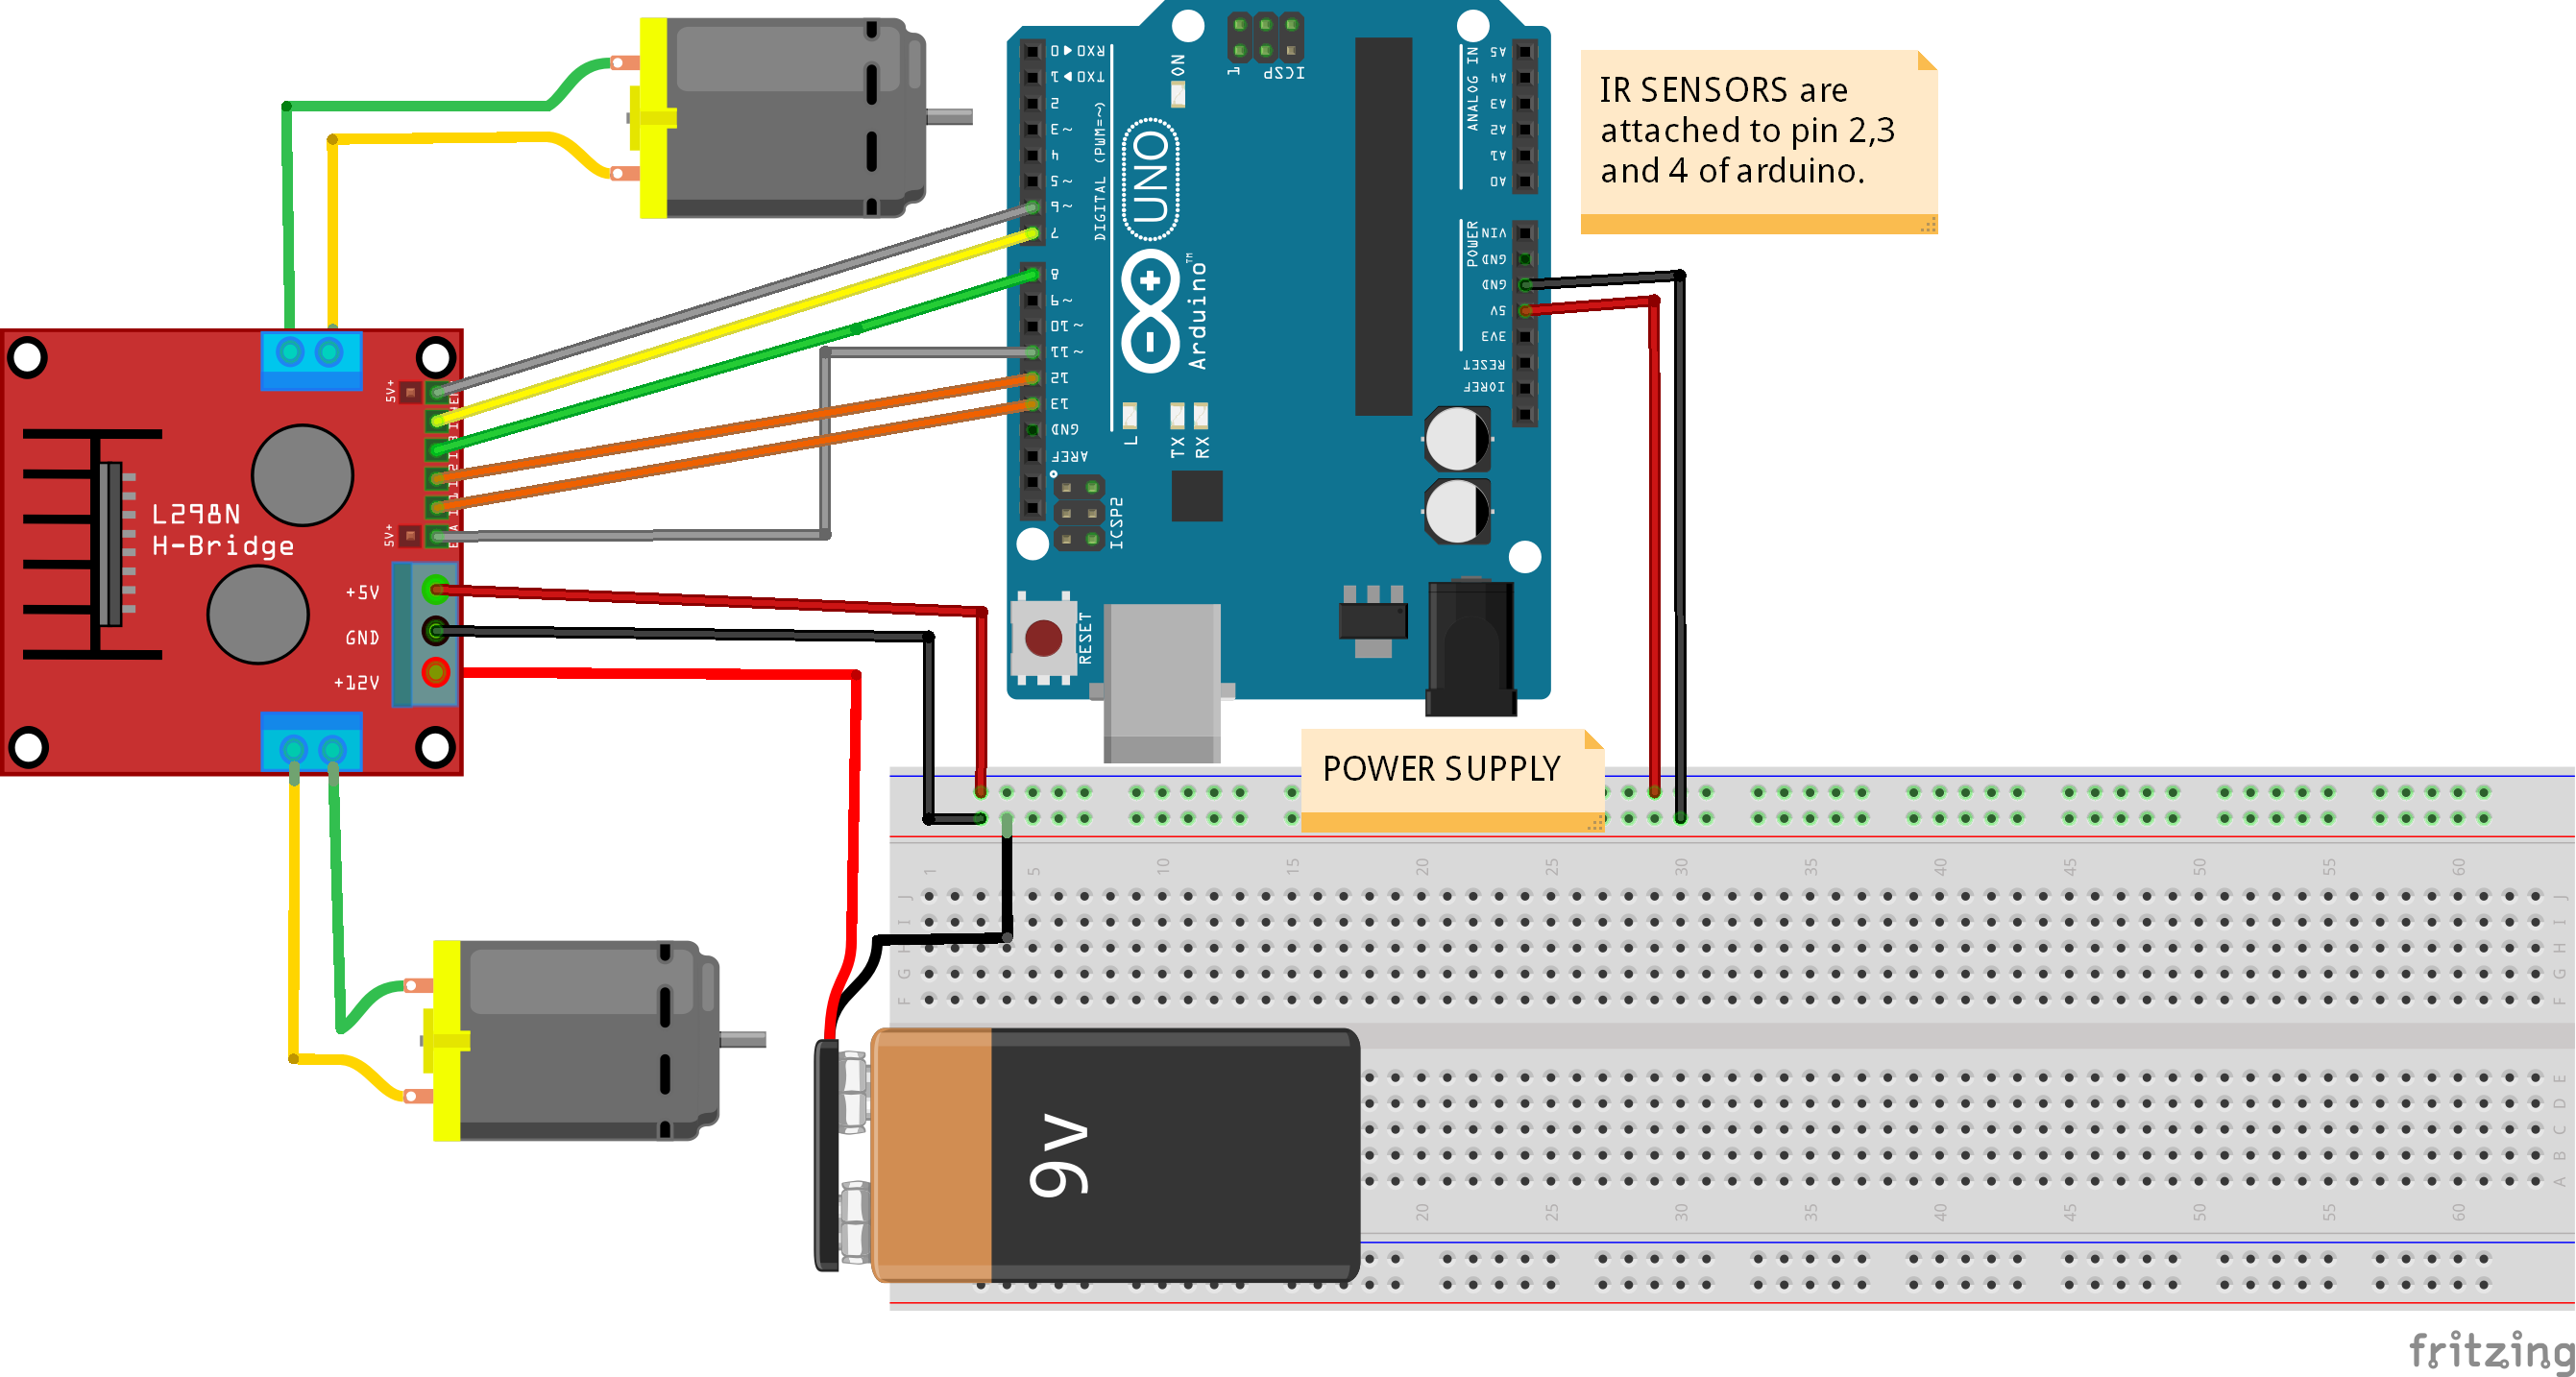
Now, we need two DC motors, a motor driver (L298N H-Bridge), three IR sensors, a battery, a breadboard, and an Arduino UNO. Connect all the components with Arduino UNO according to the following schematic.
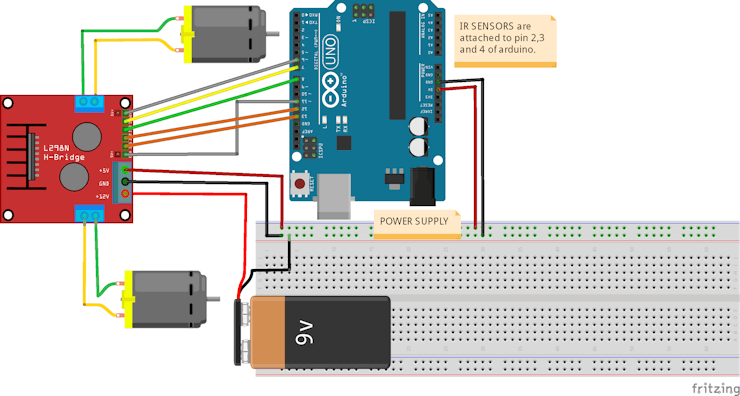
Upload the code for the robot side in your Arduino UNO. I have attached the code in this tutorial using the Arduino Web editor. (https://create.arduino.cc/)
To make the robot's body, we can use a wooden base, a PVC pipe, a plastic dustbin, small wheels, and any tablet holder (to be used as the neck of a robot), as shown in the pictures below.
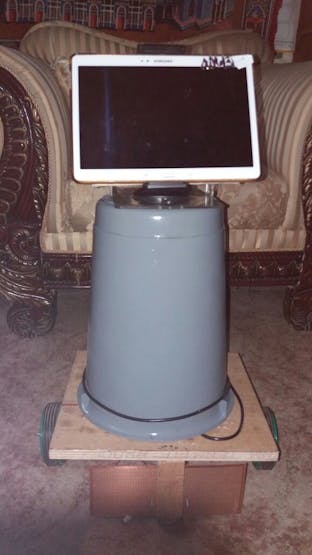
IR sensors are attached at the front of the robot, with which she follows the black line path to reach the final position from its initial position.
Following is the robot’s locomotion test.
SELECTING MOTORS AND BATTERY:
I used high torque DC motors and a 12V - 7A battery for my final product. You have to select motors and batteries, considering the size and weight of your robot's body.
LINE FOLLOWER:
Hazel reaches the targeted location, where she speaks the text, following a black line path using IR sensors. So, now we are going to discuss the line follower part of our robot.
So far, we have seen that Hazel receives the text from its control page with the help of a Python program and converts the text into speech during her journey to the targeted location where it speaks the text.
When the robot is turned on, it prints "Message: Announce" once on the serial port read by the python program in our tablet PC as the Arduino is connected serially with our tablet PC. After reading this message, the python program starts converting the text to speech.
static bool once = false;
   if (once == false)
{
   once = true;
   Serial.println("Message: Announce");
}
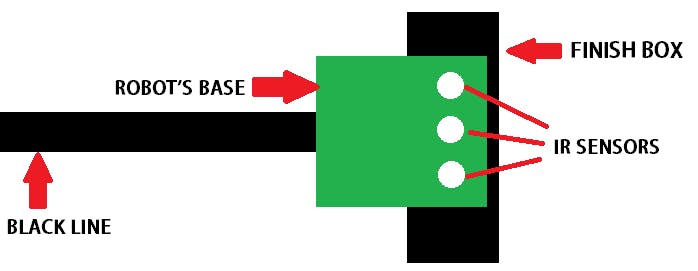
Meanwhile, Hazel reaches the final position by following a black line path with three IR sensors. The following lines of code help her in following a line.
if ((S0sensor == LOW)&&(S1sensor == HIGH)&&(S2sensor == LOW))
  motfwd();
  else if ((S0sensor == HIGH)&&(S1sensor == LOW)&&(S2sensor == LOW))
  motright();
  else if ((S0sensor == LOW)&&(S1sensor == LOW)&&(S2sensor == HIGH))
  motleft();
After reaching the final position, Hazel stops and prints "Signal: 1 1 1," which is again read by the python program, and Hazel speaks the text whenever she gets this signal.
else if ((S0sensor == HIGH)&&(S1sensor == HIGH)&&(S2sensor == HIGH))
  {
   motstop();
  Serial.println("Signal: 1 1 1");
  delay(1000*15);
  }
Hazel stops where all of her three sensors are on a black finish box, as shown in the figure below.
Robo Hazel’s Python Software
The IDE used for Python programming in our project is PyCharm that can be downloaded from:
https://www.jetbrains.com/pycharm/

The program attached in this tutorial can be downloaded and run on our tablet PC attached serially (using cable) with the robot’s hardware (Arduino UNO).
Python program is based on pygame module. This program continuously reads the serial port using the serial module. When Hazel is turned on, she gets a signal 'Message: Announce' from Arduino (Arduino writes it on serial port). She scraps the text to be spoken (i.e., a paragraph) from Hazel's webpage using a web scraping technique. The program then converts the text into speech using gTTS module and saves it in a temporary audio file. Meanwhile, the robot moves towards her final position. Now, when Hazel reaches the targeted location, the python program gets a signal 'Signal: 1 1 1' from Arduino, and only then she stops and speaks the text (plays temporary audio file).
if (ser.isOpen()):
    string=ser.readline().decode('ascii')
    print(string)
    if len(string)>0:
        for i in range(0, len(string)):
            if string[i] == ':':
                check = string[i - 1]
                if check == 'e': #Finds this signal --> Message: Announce, from arduino and starts extracting the message from the webpage and converting it to speech
                    try:
                        url = "http://192.168.1.104"
                        values = {'s': 'basics',
                                  'submit': 'search'}
                        data = urllib.parse.urlencode(values)
                        data = data.encode('utf-8')
                        req = urllib.request.Request(url, data)
                        resp = urllib.request.urlopen(req)
                        respData = resp.read()
                        paragraph = re.findall(r'<p>(.*?)</p>', str(respData))
                        for eachP in paragraph:
                            serial_message = eachP
                    #Exception handling in case of BadStatusLine exception (Extracting the message from error)
                    except Exception as e:
                        output = str(e)
                        for i in range(0, len(output)):
                            if output[i] == '>':
                                break
                        initial = i
                        for j in range(i, len(output)):
                            if output[j] == '<':
                                break
                        final = j
                        serial_message = output[initial + 26:final]
                    #Converting the text to speech
                    tts = gTTS(text=serial_message, lang='en-us')
                    mixer.init()
                    sf = TemporaryFile()
                    tts.write_to_fp(sf)
                    sf.seek(0)
                    mixer.music.load(sf)
                    pygame.time.Clock().tick(10)
                if check == 'l': #Finds this signal --> Signal: 1 1 1, from arduino and the text that was converted into speech earlier is spoken
                    mixer.music.play()
                    while pygame.mixer.music.get_busy():
                        print("Playing")
                        pygame.time.Clock().tick(10)
GRAPHICS:
Adobe Photoshop is used to design the eyes of Robo Hazel. A close and open eye is designed, and they are programmed to blink using Python.


Conclusion
On the whole, a user types any text on Hazel’s control page that is made using WIZ750SR and Arduino UNO. This text is stored in Arduino’s EEPROM, and it is also displayed on her webpage. Now, when the robot is turned on, the Python program gets a signal after which it reads the text (typed by the user on Hazel’s control page) by using a web scraping technique and converts this text to speech, and saves it in a temporary audio file. Meanwhile, Hazel starts moving towards the final position, where she has to speak this text. After reaching the final position, the python application gets a signal from Arduino UNO again; Hazel stops and speaks the text, i.e., the temporary audio file is played.
In this way, I made a prototype of this advanced robotic system that solved the common problem of message delivery in an industry.

