
Relay-Flask-MQTT-WizFi360
Relay-Flask-MQTT-WizFi360
WIZnet - WizFi360
x 1
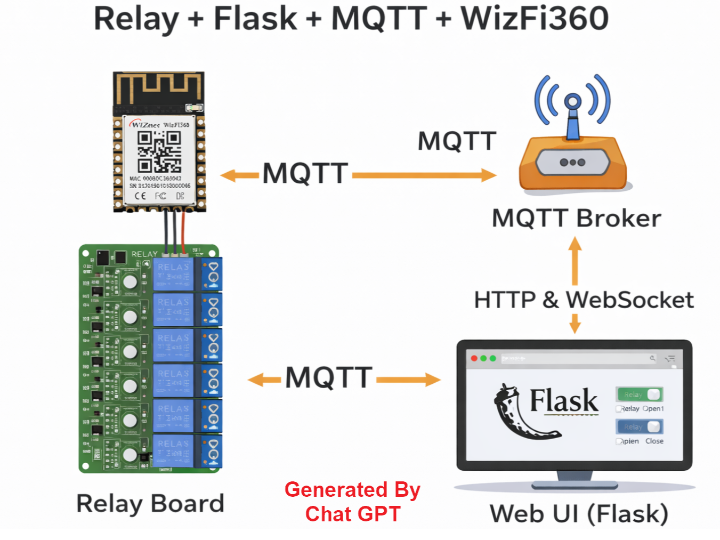
Relay-Flask-MQTT-WizFi360 is a full-stack IoT gateway reference that combines a Flask web server, MQTT messaging, and the WIZnet WizFi360 Wi-Fi module to control an 8-channel relay board remotely. It demonstrates a clean separation between web UI, message broker, wireless network offloading, and hardware control for scalable IoT prototyping.
1️⃣ What Is This Project?
Relay-Flask-MQTT-WizFi360 is not just a relay demo.
It is a complete IoT gateway architecture that connects:
Web browser UI
Flask backend server
MQTT broker
WizFi360 Wi-Fi module
MCU + I2C GPIO expander
8-channel relay board
The communication flow is structured as:
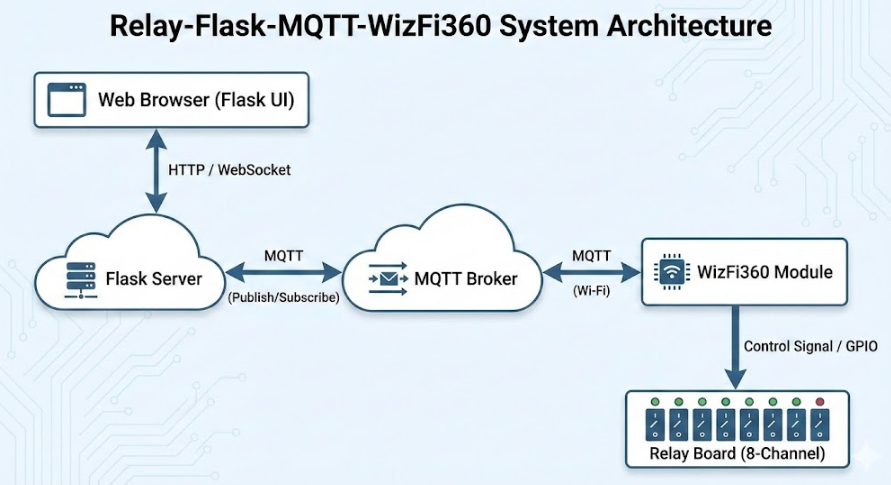
This image was created with Gemini.
This separation of layers makes it an ideal IoT reference platform.
Repository:
https://github.com/mhanuel26/Relay-Flask-MQTT-WizFi360
2️⃣ What Is Flask and Why Is It Important Here?
Flask is a lightweight Python web framework.
In this project, Flask is responsible for:
Rendering the web control interface
Handling HTTP POST requests from users
Publishing MQTT messages
Relaying MQTT messages to the browser using WebSocket (Flask-SocketIO)
From the repository code:
And when a message arrives:
This means Flask acts as:
A real-time bridge between MQTT and the Web UI.
Flask enables rapid prototyping:
No heavy server stack required
Simple Python structure
Easy HTML templating
Fast integration with MQTT libraries
For IoT developers, this dramatically lowers backend complexity.
3️⃣ What Role Does WizFi360 Play?
The WizFi360 is the wireless backbone of the system.
In the device-side code:
WizFi360 handles:
Wi-Fi connectivity
MQTT session establishment
Subscription management
Message reception
The MCU does NOT implement:
TCP/IP stack
Wi-Fi driver
MQTT protocol parsing
All networking is offloaded to WizFi360.
This architectural separation is critical.
4️⃣ Flask + WizFi360 Synergy
The real innovation is not just MQTT relay control.
It is the synergy between:
🔹 Flask (Server Layer)
Rapid web UI deployment
MQTT message bridge
WebSocket real-time update
Easy cloud integration
🔹 WizFi360 (Device Layer)
AT-command-based Wi-Fi control
Built-in MQTT functionality
Hardware network stack offloading
Simplified firmware complexity
Together, they create:
A simplified full-stack IoT platform where backend and device networking are both lightweight and modular.
This dramatically reduces:
Firmware development time
Network debugging complexity
Resource burden on MCU
For rapid IoT prototyping, this combination is extremely powerful.
5️⃣ Code-Level Architecture Breakdown
Flask Configuration (Server)
The system assumes a Mosquitto MQTT broker running locally.
Web interaction:
When a relay button is clicked:
JSON payload received
Relay state updated
MQTT publish triggered
UI updated via WebSocket
Device-Side Logic (WizFi360 + MCU)
Key steps:
UART initialized at 115200 bps
WizFi360 hard reset
Wi-Fi credentials loaded
MQTT broker connection established
Subscribed topic: "relay"
Received JSON parsed
Converted to port_output array
I2C expander updated
This is a clean separation:
MQTT message → JSON → GPIO control
6️⃣ Why This Is a Strong WIZnet Technical Showcase
This project demonstrates:
✅ 1. WizFi360 as an MQTT Client Engine
Shows real-world Pub/Sub integration.
✅ 2. Wi-Fi Offloading Model
MCU does not implement TCP/IP.
✅ 3. Gateway Architecture
Clear Web → MQTT → Device → Hardware flow.
✅ 4. Expandable IoT Design
Relay today. Sensors tomorrow.
✅ 5. Education-Ready Platform
Teaches:
MQTT architecture
Pub/Sub model
Web-to-device integration
Network stack abstraction
7️⃣ Practical Application Areas
Smart home relay switching
Industrial equipment power control
Lab automation
IoT system education
Rapid proof-of-concept prototyping
8️⃣ FAQ (WIZnet-Focused)
Q1. Why use WizFi360 instead of implementing Wi-Fi on the MCU?
Because WizFi360 handles Wi-Fi and MQTT internally via AT commands. This removes the need for TCP/IP stack integration on the MCU, reduces firmware complexity, and accelerates development. It is ideal for rapid IoT prototyping where networking should not dominate firmware resources.
Q2. How does WizFi360 connect to MQTT in this project?
The firmware uses AT-based control through the Adafruit ESP AT library. After Wi-Fi connection, it establishes an MQTT session with the broker using wifi.IO_Con("MQTT", ip=...). All subscribe/publish operations are handled through the module.
Q3. What is the role of Flask in the system?
Flask provides the web UI, HTTP routing, MQTT publishing, and WebSocket-based real-time updates. It acts as a bridge between browser clients and the MQTT broker, making it easy to control devices without writing complex backend infrastructure.
Q4. Is this architecture scalable?
Yes. MQTT Pub/Sub allows multiple devices to subscribe to different topics. By adding device IDs to topics, this structure can scale to dozens or hundreds of relay nodes without redesigning the server.
Q5. Can this be used for commercial IoT systems?
With enhancements such as TLS, authentication, and persistent state storage, this architecture can evolve into a production-ready IoT gateway. WizFi360 already supports secure networking modes, making it suitable for scalable deployments.
9️⃣ Tags
#WizFi360
#WIZnet
#MQTT
#Flask
#IoTGateway
#WebControlledRelay
#WiFiModule
#PubSub
#EmbeddedIoT
#SmartAutomation
Flask + MQTT + WizFi360으로 웹 기반 IoT 릴레이 게이트웨이를 어떻게 구축할 수 있을까?
(Flask와 WizFi360 통합 아키텍처로 구현하는 MQTT 릴레이 제어 시스템)
Summary (40–60 words)
Relay-Flask-MQTT-WizFi360는 Flask 웹 서버와 MQTT 브로커, 그리고 WIZnet WizFi360 Wi-Fi 모듈을 결합해 8채널 릴레이를 원격 제어하는 통합 IoT 게이트웨이 레퍼런스이다. 웹 UI, 메시지 브로커, 무선 네트워크 오프로딩, 하드웨어 제어 계층을 명확히 분리해 확장성과 실습 적합성을 동시에 제공한다.
1️⃣ 프로젝트 개요
이 프로젝트는 단순한 릴레이 제어 예제가 아니다.
웹 → Flask 서버 → MQTT → Wi-Fi 모듈 → MCU → 릴레이
까지 이어지는 완결형 IoT 게이트웨이 구조를 구현한 참조 아키텍처다.
전체 통신 흐름은 다음과 같다:
This image was created with Gemini.
Repository:
https://github.com/mhanuel26/Relay-Flask-MQTT-WizFi360
2️⃣ Flask란 무엇이며, 왜 중요한가?
Flask는 Python 기반의 경량 웹 프레임워크다.
이 프로젝트에서 Flask는:
웹 UI 렌더링
HTTP 요청 처리
MQTT Publish 수행
WebSocket(SocketIO)을 통한 실시간 상태 동기화
를 담당한다.
핵심 코드:
그리고 MQTT 메시지 수신 시:
즉, Flask는
“웹과 MQTT를 연결하는 실시간 브리지”
역할을 수행한다.
Flask의 장점:
서버 설정이 단순
Python 기반으로 빠른 개발 가능
MQTT 라이브러리와 쉽게 통합
HTML 템플릿 확장 용이
IoT 프로토타이핑에 매우 적합한 구조다.
3️⃣ WizFi360의 기술적 역할
이 시스템에서 네트워크의 중심은 WizFi360이다.
디바이스 코드에서:
WizFi360은 다음을 처리한다:
Wi-Fi 연결
MQTT 브로커 접속
Subscribe 처리
메시지 수신
세션 유지
중요한 점은:
MCU가 TCP/IP 스택을 구현하지 않는다는 것이다.
네트워크 복잡성은 전부 WizFi360이 담당한다.
이것이 WIZnet의 오프로딩 모델이다.
4️⃣ Flask + WizFi360 시너지
이 조합의 핵심 가치는 “플랫폼 단순화”에 있다.
🔹 서버 측 단순화 (Flask)
복잡한 Node.js 스택 불필요
빠른 웹 UI 구축
MQTT 브리지 내장
🔹 디바이스 측 단순화 (WizFi360)
Wi-Fi 스택 내장
MQTT 프로토콜 처리
AT 명령 기반 제어
MCU 리소스 최소 사용
결과:
서버도 단순하고, 디바이스도 단순한 IoT 플랫폼
이 구조는 교육용, 데모 키트, 빠른 PoC 개발에 매우 적합하다.
5️⃣ 코드 기반 아키텍처 분석
📌 Flask 서버 설정
Mosquitto 브로커와 연동된다.
릴레이 버튼 클릭 시:
JSON 수신
relayconfig 업데이트
MQTT Publish
브로커 전달
WebSocket으로 UI 동기화
📌 디바이스 측 동작
UART 115200bps 설정
WizFi360 하드 리셋
MQTT 연결
Subscribe 대기
수신 시:
즉:
MQTT → JSON → GPIO 출력
으로 이어지는 명확한 데이터 흐름을 가진다.
6️⃣ WIZnet 기술 홍보 관점에서의 의미
이 프로젝트는 다음을 명확히 보여준다:
✅ WizFi360의 MQTT 실전 활용
실제 Pub/Sub 환경에서 동작하는 사례.
✅ 네트워크 오프로딩 모델
MCU가 TCP/IP를 구현하지 않음.
✅ IoT 게이트웨이 구조 레퍼런스
웹-클라우드-디바이스 연결 구조 완성.
✅ 확장 가능 구조
릴레이 → 센서 → 멀티 디바이스 관리로 확장 가능.
7️⃣ 적용 가능 분야
스마트 홈 전원 제어
산업 장비 원격 ON/OFF
랩 자동화
IoT 교육 실습
프로토타이핑 플랫폼
8️⃣ FAQ (WIZnet 중심)
Q1. 왜 MCU에 직접 Wi-Fi 스택을 구현하지 않고 WizFi360을 사용하는가?
WizFi360은 Wi-Fi와 MQTT 프로토콜을 내부에서 처리한다. MCU는 AT 명령 기반 제어만 수행하므로 TCP/IP 스택 구현이 필요 없다. 이는 펌웨어 복잡성을 줄이고 개발 시간을 단축하며 리소스가 제한된 시스템에 매우 적합하다.
Q2. WizFi360은 MQTT 통신에서 어떤 역할을 수행하는가?
WizFi360은 MQTT 브로커 연결, Subscribe, Publish, 세션 유지 등을 처리한다. 이 프로젝트에서는 브로커와 직접 통신하며 수신 데이터를 UART로 MCU에 전달한다. 네트워크 계층이 완전히 모듈에 오프로딩된다.
Q3. Flask는 왜 IoT 서버에 적합한가?
Flask는 경량 구조로 빠른 웹 UI 구현이 가능하다. MQTT 라이브러리와 쉽게 통합되며, SocketIO를 통해 실시간 상태 동기화도 구현할 수 있다. 복잡한 인프라 없이도 IoT 제어 서버를 구성할 수 있다.
Q4. 이 구조는 확장이 가능한가?
MQTT Pub/Sub 구조는 토픽 기반 확장이 가능하다. 디바이스 ID를 포함한 토픽 설계를 적용하면 다수의 릴레이 장치를 동시에 제어할 수 있다. 서버 구조 변경 없이 확장이 가능하다.
Q5. 상용 IoT 시스템으로 발전 가능한가?
TLS 적용, 사용자 인증, DB 기반 상태 저장을 추가하면 상용 시스템으로 확장할 수 있다. WizFi360은 보안 모드 지원이 가능하므로 산업용 적용도 고려할 수 있다.
9️⃣ 태그
#WizFi360
#WIZnet
#MQTT
#Flask
#IoTGateway
#RelayControl
#WebBasedIoT
#WiFiModule
#PubSubArchitecture
#EmbeddedSystems