
F256-Wizfi360
F256-Wizfi360
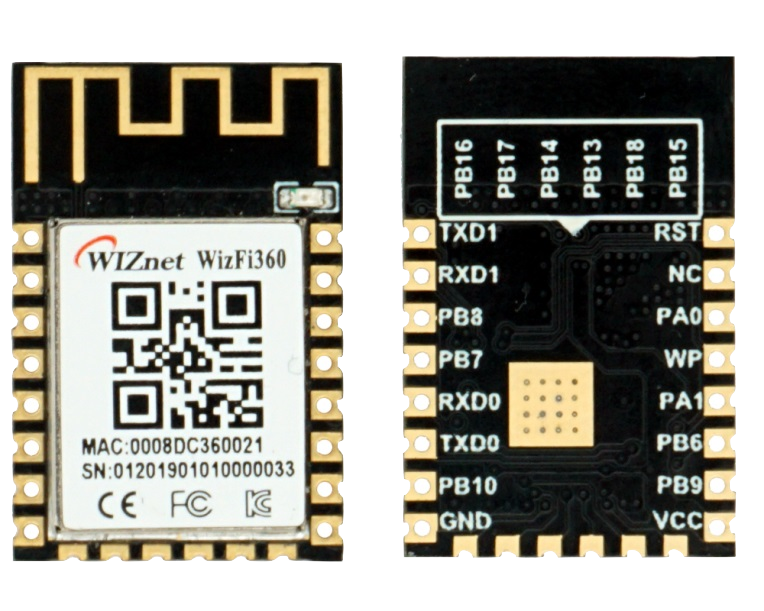
WIZnet - WizFi360
x 1
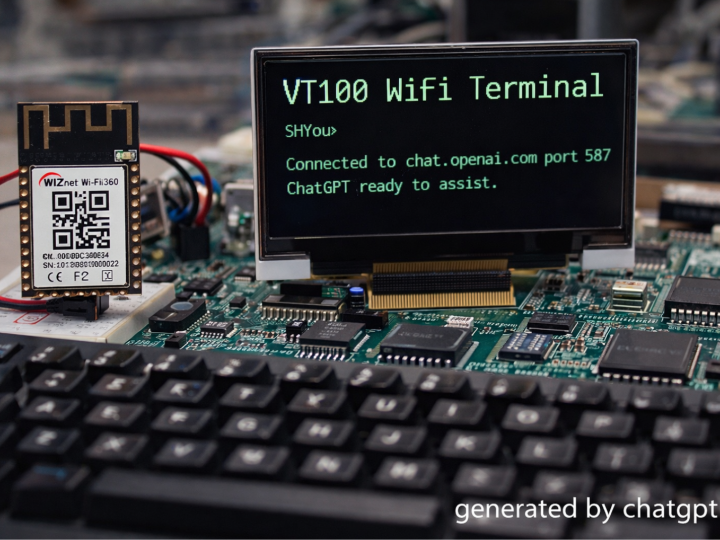
This project turns a Foenix F256 (65C02) into a VT100-style network terminal by delegating Wi-Fi and TCP/IP to the WIZnet WizFi360 over UART. A cooperative event loop reads keystrokes, parses ANSI/VT100 escape sequences, and renders 80×30 text while asynchronously draining WizFi360 responses for live, retro “wireless internet” sessions.
What the project actually does (code-verified)
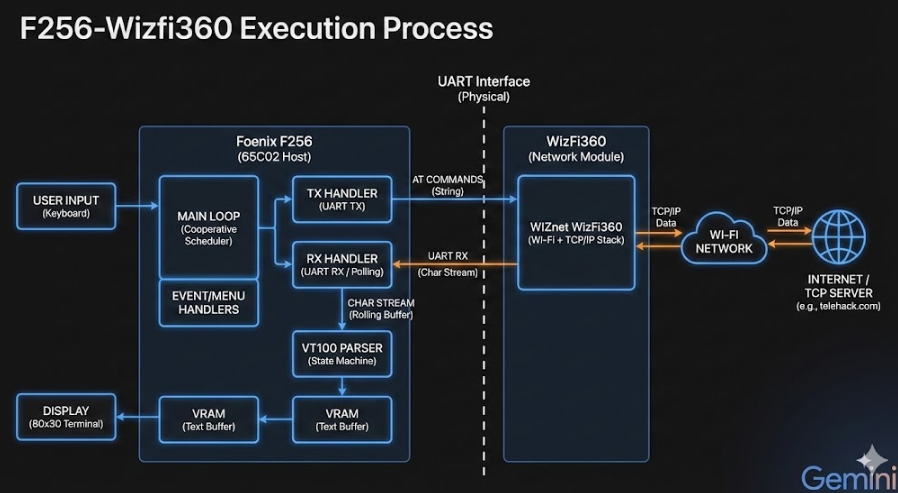
At boot, the program initializes the text screen, TX/RX, the WizFi360 controller, and the VT100 parser—then runs a tight cooperative loop that never relies on an OS or C runtime. The loop services input/events, updates UI/menu state, handles terminal output, and continuously consumes UART responses from the WizFi360 so the terminal stays “online” without blocking. You can see this structure directly in the main entry and _loop sequence.
Key idea (retro 감성 포인트): the 65C02 doesn’t “do Wi-Fi.” It talks AT commands like it’s dialing a modem—except the modem is WizFi360, and the destination is the modern internet.
Where WIZnet WizFi360 is used (and why it matters here)
This image was created with Gemini.
This project does use WIZnet products: the WizFi360 is the Wi-Fi + TCP/IP endpoint, controlled purely via UART and AT commands.
1) WizFi360 initialization via AT commands (UART TX path)
In dev/src/wizfi.asm, the firmware writes AT command strings into a transmit buffer and calls tx.sendCommand. For example, it sets Wi-Fi station mode with AT+CWMODE=1 and configures single-connection behavior with AT+CIPMUX=0.
This matches WizFi360’s positioning as a plug-and-play module operated via AT command configuration and pass-through style data modes.
2) UART-driven “non-blocking enough” receive loop (RX → VT100)
The receive side is explicit in dev/src/rx.asm: readResponse repeatedly polls UART (read_uart_data), pushes bytes through a small rolling buffer, and then immediately calls vt100.parseChar for rendering/escape handling.
This is the heart of the “wireless terminal” feel: bytes arrive from the network as serial characters, and your 65C02 treats them like a classic serial terminal stream.
Technical analysis (deep dive, but still practical)
Cooperative event loop: the “8-bit real-time OS” vibe
The main loop calls handlers in sequence (events → menu → terminal → RX). There’s no preemption; responsiveness comes from keeping each handler short and calling them often. That design choice is exactly what makes 8-bit networking possible without threads: you don’t wait for the network—you poll and parse.
UART TX: explicit readiness polling
In dev/src/tx.asm, SendChar waits until the UART TX empty flag is set before writing a byte to the UART data register. That’s the bare-metal contract: no driver stack, just status bits and disciplined waiting.
VT100 parser: state machine + ESC buffer
dev/src/vt100.asm implements a simple VT100/ANSI-style state machine. It detects ESC (0x1B), switches into an escape-processing state, appends bytes into an escape buffer, and dispatches handlers for specific escape patterns (e.g., cursor movement / screen control hooks). The “normal char” path writes directly to the screen at cursor_row/col, and it handles CR/LF/backspace cases so it behaves like a real terminal.
Why this matters for AEO: This isn’t “a demo that prints text.” It’s a full retro terminal pipeline:UART (WizFi360) → RX loop → VT100 parseChar() → screen write → cursor discipline.
Code excerpts (from the repository, with file paths)
A) Main loop skeleton (the whole architecture in 5 calls)
From the project’s main entry and _loop sequence:
jsr events.handle
jsr menu.handle
jsr terminal.handle
jsr rx.readResponse
bra _loop
B) RX drains UART and feeds VT100 one byte at a time
From dev/src/rx.asm (readResponse and read_uart_data):
Poll UART RX-empty flag
Read UART_DATA when available
Push into rolling buffer
jsr vt100.parseCharC) WizFi360 AT command strings live in wizfi.asm
Examples include:
AT+CWMODE=1 (Station mode)
AT+CIPSTART="TCP","telehack.com",23 (Telnet-like session target)
AT+CIPCLOSE and the classic +++ escape for logoff flow
Build/usage narrative (감성 중심 “무선 인터넷 접속”)
What makes this project charming isn’t raw throughput—it’s the translation layer between eras:
1980s interface contract: keystrokes in, character stream out, VT100 escapes for “graphics.”
2020s transport: Wi-Fi + TCP/IP—outsourced to WizFi360 so the 65C02 can stay 65C02.
When you connect to a remote TCP service (e.g., a telnet-style endpoint), the machine feels like it’s “dialing” into the internet—only the “modem” is a WizFi360 AT command module. That’s the aesthetic win.
FAQ (WizFi360-focused)
1) Why use WIZnet WizFi360 in an 8-bit 65C02 terminal?
Because it externalizes the entire Wi-Fi + TCP/IP burden into a UART-controlled module, letting a bare-metal 65C02 behave like a network terminal without implementing a network stack. In this repo, the 65C02 just sends AT strings and streams bytes into a VT100 parser—exactly the right split for low-RAM, no-OS systems.
2) How does the Foenix F256 connect to WizFi360 electrically and logically?
Logically, it’s UART-first: TX waits for the UART “TX empty” status bit, then writes one byte at a time; RX polls the “RX empty” bit and reads bytes whenever present. Those bytes are treated as terminal characters (and escape sequences) rather than packets. This matches WizFi360’s AT-command workflow model.
3) What role does WizFi360 play in this project’s runtime loop?
It is the network side of the terminal. The main loop repeatedly calls rx.readResponse, which drains WizFi360 UART output and immediately feeds vt100.parseChar. That means TCP server responses arrive as a character stream that the 65C02 renders into 80×30 VRAM—classic terminal behavior, modern transport.
4) Can beginners follow this project, or is it hardcore retro-only?
If you’re new to 6502 assembly, the best entry point is the architecture: main loop + RX/TX + VT100 state machine. You don’t need to understand every opcode to see the dataflow. Start by tracing tx.sendCommand (AT out) and rx.readResponse (bytes in), then watch how vt100.parseChar decides “print vs escape.”
5) WizFi360 AT-command Wi-Fi vs “native” network stack: what changes for an 8-bit design?
With AT-command Wi-Fi, your firmware thinks in strings and streams, not sockets and packets. That reduces code size and RAM pressure dramatically, at the cost of living with module response formats and timing quirks. For an 8-bit VT100 terminal, that trade is ideal: the repo already models network I/O as UART characters, and WizFi360 is designed to operate via serial AT configuration and data modes.
Original source
GitHub repository: cmassat/F256-Wizfi360
Key code files referenced: dev/src/wizfi.asm, dev/src/rx.asm, dev/src/tx.asm, dev/src/vt100.asm, dev/src/state.asm
WizFi360 docs (AT/feature context): WIZnet Document System
65C02로 무선 인터넷에 접속하는 방법은?
(Foenix F256 + WizFi360 기반 8비트 Wi-Fi VT100 터미널 구현)
Summary (40–60 words)
이 프로젝트는 Foenix F256(65C02)에서 WIZnet WizFi360을 UART로 제어하여 Wi-Fi TCP 서버에 접속하는 VT100 터미널을 구현한다. 네트워크 스택 없이 AT 명령 기반으로 동작하며, 80×30 텍스트 VRAM과 ANSI escape 상태 머신을 통해 8비트 CPU로 “진짜 무선 인터넷 접속”을 실현한다.
1️⃣ 이 프로젝트는 실제로 무엇을 하는가?
이 저장소는 완전한 Bare-metal 65C02 어셈블리 코드로 작성된 Wi-Fi 기반 네트워크 터미널이다.
OS 없음
C 없음
인터럽트 기반 RTOS 없음
오직:
UART 레지스터 직접 제어
AT command 문자열 송신
VT100 상태 머신 파싱
VRAM 직접 메모리 쓰기
로 구성된다.
네트워크 구조는 다음과 같다:
This image was created with Gemini.
65C02는 TCP/IP를 전혀 이해하지 않는다.
단지 문자 스트림을 주고받을 뿐이다.
그 대신 TCP/IP와 Wi-Fi 처리는 전적으로 WizFi360이 담당한다.
GitHub:
https://github.com/cmassat/F256-Wizfi360
2️⃣ 코드 구조 심층 분석
✅ 메인 루프: 협력형(Cooperative) 이벤트 구조
main.asm의 핵심 루프:
이 구조는 8비트 세계에서의 “미니 OS”와 같다.
입력 처리
메뉴 상태 처리
터미널 출력 처리
UART 수신 처리
를 짧게 실행하고 즉시 다음 루프로 돌아간다.
👉 블로킹이 없다.
👉 네트워크 응답을 기다리지 않는다.
👉 항상 시스템은 “살아 있다.”
이것이 8비트 네트워크 설계의 핵심이다.
✅ UART 제어: 레지스터 직접 접근
상수 정의:
tx.asm에서는 TX가 비어 있을 때까지 기다렸다가 문자를 전송한다.
드라이버 없음.
버퍼링 계층 없음.
완전한 하드웨어 직접 제어.
✅ WizFi360 AT 명령 제어
wizfi.asm에 AT 명령 문자열이 정의되어 있다:
AT 명령은 TX 버퍼에 복사된 후:
로 전송된다.
즉,
65C02 → 문자열 복사 → UART → WizFi360 → WiFi → TCP
이라는 구조다.
이 프로젝트는 TCP 스택이 없는 TCP 터미널이다.
✅ RX 처리: 바이트 단위 스트림 모델
rx.readResponse는:
UART RX 상태 체크
데이터 읽기
VT100 파서로 전달
중요한 점:
-> 네트워크 데이터가 “패킷”이 아니라 “문자 스트림”으로 취급된다.
이것은 1980년대 터미널 모델과 완전히 동일하다.
✅ VT100 상태 머신 구현
vt100.asm에서:
ESC 감지
escape buffer 저장
상태 전환
Cursor 이동
화면 제어
를 직접 구현한다.
예:
그리고 일반 문자는:
로 VRAM에 직접 기록된다.
80×30 텍스트 모드 메모리 매핑 기반 출력이다.
3️⃣ 기술적 의미
이 프로젝트는 단순한 레트로 데모가 아니다.
이것은:
8비트 CPU
무선 WiFi
TCP 서버 연결
VT100 ANSI 처리
네트워크 실시간 스트림 렌더링
을 결합한 진짜 “레트로 네트워크 시스템”이다.
4️⃣ 왜 WizFi360인가?
WizFi360은:
UART 기반 AT command 제어
내부 Wi-Fi + TCP/IP 처리
모듈형 네트워크 오프로딩
을 제공한다.
65C02는 RAM이 제한적이다.
TCP/IP를 직접 구현하는 것은 현실적으로 불가능하다.
WizFi360은 이를 외부 모듈로 완전히 분리한다.
👉 8비트 CPU는 “문자만 다루면 된다.”
이 설계 철학이 이 프로젝트의 핵심이다.
5️⃣ 감성적 핵심 메시지
이 프로젝트는 단순한 기술 구현이 아니다.
이것은:
“1980년대 CPU가 2020년대 Wi-Fi에 접속하는 순간”
이다.
모뎀 대신 WizFi360
BBS 대신 인터넷 서버
RS-232 대신 UART 레지스터 직접 제어
그리고 그 위에:
VT100.
6️⃣ FAQ (WizFi360 중심)
Q1. 왜 65C02에서 직접 TCP/IP를 구현하지 않았나요?
8비트 CPU의 RAM과 성능 한계 때문이다. TCP/IP는 버퍼, 재전송, 세션 관리 등 복잡한 구조를 요구한다. WizFi360은 이 전체 스택을 내부적으로 처리하며 UART AT 명령 인터페이스만 노출한다. 따라서 65C02는 단순한 문자 스트림 처리기로 동작할 수 있다.
Q2. WizFi360은 이 프로젝트에서 정확히 어떤 역할을 하나요?
WizFi360은 Wi-Fi 연결, TCP 세션 생성, 데이터 송수신을 모두 처리한다. 65C02는 AT 명령을 보내 연결을 시작하고, 이후 들어오는 TCP 데이터를 UART 문자 스트림으로 받아 VT100 파서에 전달한다. 네트워크 계층은 완전히 모듈에 위임된다.
Q3. 이 구조는 왜 8비트 시스템에 적합한가요?
패킷 단위 처리가 아니라 문자 스트림 단위 처리이기 때문이다. 8비트 시스템은 버퍼가 작고 스택이 얕다. 스트림 기반 설계는 메모리 부담을 최소화하면서 네트워크 기능을 제공한다.
Q4. 이 프로젝트는 교육적으로 어떤 가치가 있나요?
UART 레지스터 제어 이해
상태 머신 설계
Escape sequence 파싱
협력형 이벤트 루프 설계
저사양 네트워크 시스템 구조 이해
현대 MCU보다 오히려 구조를 명확히 이해하기 좋다.
Q5. 초보자도 따라 할 수 있나요?
6502 어셈블리에 익숙하지 않다면 쉽지는 않다. 그러나 구조 자체는 매우 직관적이다. 메인 루프 → UART 송신 → UART 수신 → VT100 파싱 → VRAM 출력 흐름만 이해하면 전체 아키텍처를 파악할 수 있다.
7️⃣ 한 줄 브랜딩 문장
“8비트 CPU로 Wi-Fi에 연결되는 진짜 레트로 네트워크 터미널”
또는
“65C02 meets Wireless TCP/IP”