
Arduino Uno Board Controlled Over Home Network , XAMPP Server Used - IOT Application
A beginner-friendly IoT project that turns any Arduino Uno into a network-controlled device using a XAMPP local server and W5500 Ethernet Shield — no cloud subs
Arduino Uno IoT Control System Over Home Network with XAMPP Server and W5500 Ethernet Shield
A beginner-friendly IoT project that turns any Arduino Uno into a network-controlled device using a XAMPP local server and W5500 Ethernet Shield — no cloud subscription, no external services, just a home network and a browser.
PROJECT DESCRIPTION
1. Project Background and Technical Goals
Most introductory IoT tutorials rely on cloud platforms, external APIs, or complex MQTT brokers — creating unnecessary barriers for makers who simply want to control hardware from another device on the same home network. This project was initiated to demonstrate the simplest possible path from "Arduino with a pin" to "Arduino pin controlled remotely from any browser on the LAN."
The architecture is deliberately minimal: a XAMPP server (Apache + PHP) runs on a PC already present on the home network. The Arduino Uno, equipped with a W5500-based Ethernet Shield, connects to this server as an HTTP client and polls for pin state commands every 10 seconds. A second client — a smartphone or PC browser — submits commands through a separate PHP interface. The two clients never communicate directly; instead, they share state through a plain text file (newfile.txt) managed by the server's PHP scripts.
The primary technical goal is to demonstrate that any maker can implement a fully functional IoT control loop — command input, state persistence, hardware actuation — using only tools available in a standard maker workshop: an Arduino Uno, an Ethernet Shield, and a PC capable of running XAMPP. No programming beyond basic Arduino sketches and simple PHP is required.
2. Key Technical Elements and Selection Reasons (Methodology)
Components were selected for maximum accessibility and zero external dependencies.
Arduino Uno (ATmega328P): Selected as the hardware control node due to its universal availability, breadboard-friendly form factor, and native compatibility with the W5500 Ethernet Shield via the SPI bus. Its digital output pins serve as the switchable endpoints — pin state changes are verified with a multimeter to confirm voltage transitions between 0V and +5V.
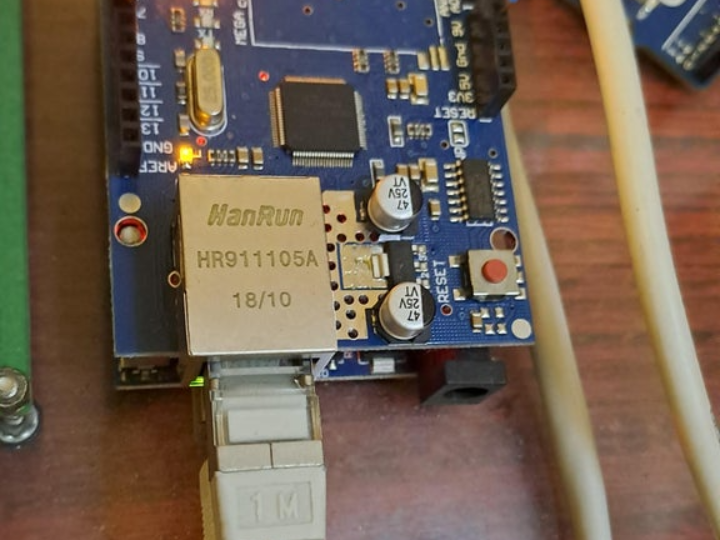
W5500 Ethernet Shield: The WIZnet W5500 chip at the heart of this shield provides a fully hardwired TCP/IP stack accessible to the Arduino over SPI. This hardware-level TCP/IP implementation is essential: it allows the Arduino Uno — a microcontroller with no built-in networking — to function as a full HTTP client, initiating TCP connections, sending HTTP GET requests, and parsing server responses, all without requiring any TCP/IP software stack to run on the ATmega328P itself. The shield stacks directly onto the Arduino Uno, requiring no wiring other than an Ethernet cable to the router.
XAMPP Server (Apache + PHP): XAMPP provides a one-click local web server environment on Windows. Apache handles HTTP requests from both the Arduino client and the browser-based control client. PHP scripts manage the shared state file (newfile.txt). XAMPP was chosen because it requires no Linux expertise, no port forwarding, and no internet connectivity — it runs entirely within the local home network.
Smartphone / PC Browser (Control Client): Any device with a web browser on the same LAN serves as the control interface. No app installation is required. The browser accesses a PHP page (index1.php) hosted on the XAMPP server, which presents a checkbox-based UI for selecting which Arduino pins to toggle.
3. In-depth Analysis of Hardware Operating Principles (Hardware Mechanics)
The system operates on a two-client, shared-file architecture where the Arduino and the human controller never communicate directly — they both speak to the XAMPP server, which mediates state through a text file.
W5500 SPI Connection to Arduino Uno: The W5500 Ethernet Shield connects to the Arduino Uno via the hardware SPI bus (pins 11, 12, 13 for MOSI/MISO/SCK, pin 10 for Chip Select). The W5500 initializes its internal hardware TCP/IP stack at startup, after which the Arduino can open TCP sockets and make HTTP requests using the standard Arduino Ethernet library — treating network communication as straightforwardly as reading a sensor.
10-Second Polling Cycle: The Arduino firmware (webclient02.ino) initiates an HTTP GET request to the XAMPP server's index.php every 10 seconds. This polling interval is a deliberate trade-off: short enough to provide near-real-time response for typical home automation use cases (under 10 seconds from command submission to pin actuation), while long enough to avoid overwhelming the XAMPP server or congesting the home network with rapid request cycles.
Shared-File State Architecture:
- newfile.txt is the single source of truth for pin state. It holds a simple string representing the desired on/off state for each Arduino output pin.
- index.php serves Arduino clients: it reads newfile.txt and returns the current pin state data in the HTTP response body, which the Arduino parses to update its output pins.
- index1.php serves human control clients: it receives form submissions (checkbox states) from the browser, writes the corresponding command string to newfile.txt, and returns a confirmation page. The updated state is also reflected on the controlling smartphone's browser.
Pin Actuation Verification: When the Arduino receives a command to set a pin HIGH (e.g., "switch 5 ON"), it drives that digital output pin to +5V. The project uses a multimeter connected to the pin to provide direct, unambiguous confirmation that the network command produced the intended hardware change — a valuable verification step that makes the cause-effect relationship between network command and physical pin state immediately visible.
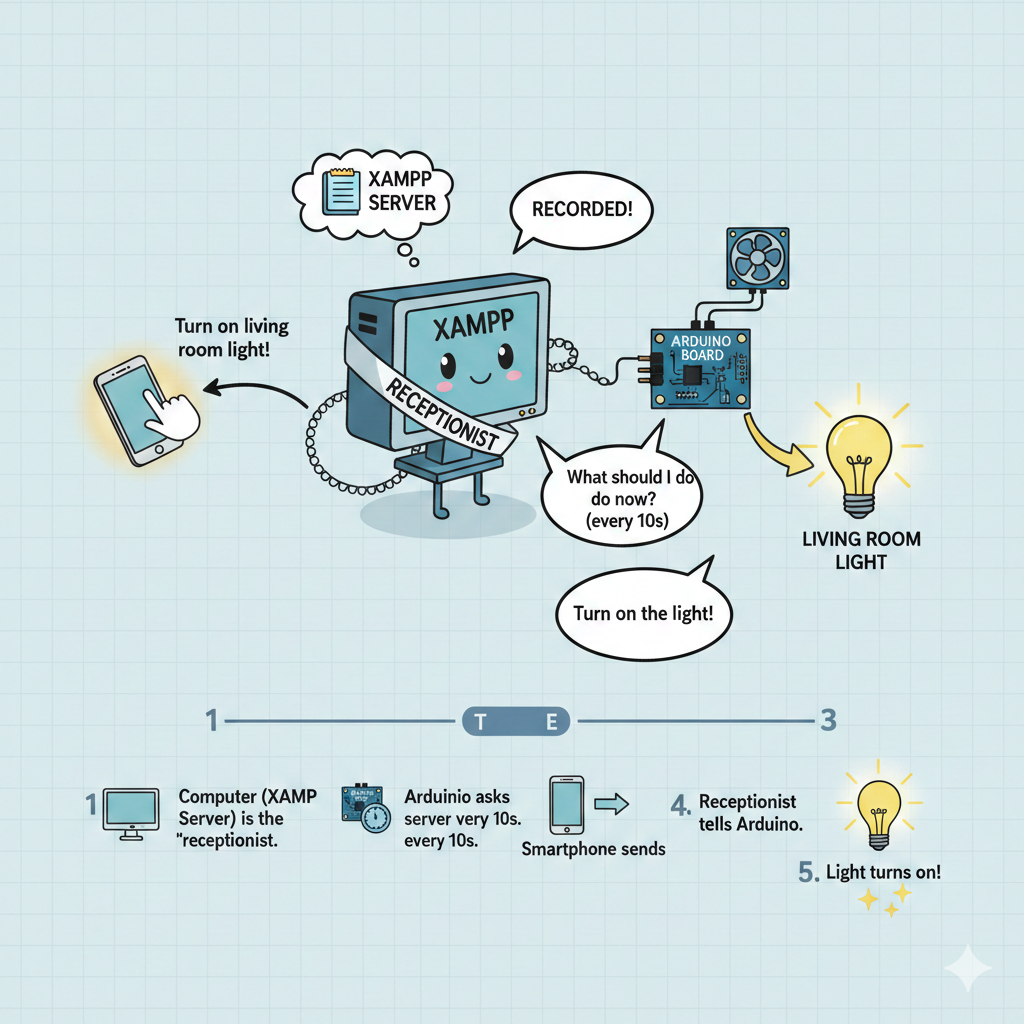
How Does It Actually Work?

1️⃣ Your Computer (XAMPP Server) acts as a "receptionist" sitting in the center of your home
2️⃣ Arduino Board (a small computer) is connected to actual devices like lights or fans. This Arduino is also connected to that receptionist (server), and every 10 seconds it asks, "Receptionist, what should I do now?"
3️⃣ From your smartphone (or computer), you send a signal saying "Turn on the living room light!" The receptionist receives it and records it
4️⃣ When Arduino asks again 10 seconds later, "Is there any new instruction?", the receptionist tells it "Turn on the light!"
5️⃣ Arduino receives the command and the living room light turns on ✨
4. Communication Interface: The Role and Necessity of W5500 Ethernet Shield
The W5500 is the enabling technology that bridges the gap between a bare microcontroller and a networked HTTP client. Without it, the Arduino Uno has no mechanism to participate in TCP/IP communication at all.
Hardware TCP/IP Stack on Arduino Uno: The Arduino Uno's ATmega328P has no native Ethernet capability. The W5500 Ethernet Shield adds this capability by placing the entire TCP/IP stack — IP address management, TCP connection handling, HTTP request framing — inside the W5500 chip's dedicated hardware logic. The Arduino sketch communicates with the W5500 over SPI, issuing high-level socket commands: "open a connection to this IP:port," "send this HTTP request string," "read the response." The W5500 handles all low-level protocol work internally, making the resulting Arduino sketch simple enough for beginners.
HTTP Client Architecture: The Arduino operates as a pure HTTP client — it never acts as a server and is never directly addressable by the browser user. This eliminates the need for the Arduino to have a fixed or known IP address from the human controller's perspective. The control flow is always: browser → XAMPP server (known fixed address) → newfile.txt → Arduino poll. This architecture also means that the Arduino can be on any subnet or behind any NAT, as long as it can reach the XAMPP server — a significant simplification for home network environments where device IP assignments may vary.
Wired Ethernet Reliability via W5500: The choice of wired Ethernet over Wi-Fi for the Arduino node is significant in an IoT control context. W5500-based wired connectivity provides deterministic latency and eliminates the reconnection overhead that Wi-Fi clients incur after idle periods. For a polling-based system where every 10-second cycle must successfully complete an HTTP transaction, the W5500's stable, always-on connection guarantees that poll cycles complete reliably without dropped connections or reconnection delays.
Group-Based Multi-Device Scalability: The two-client "group" model (one Arduino + one controller per group, each group sharing a PHP file pair) is directly extensible. Multiple independent groups can run on the same XAMPP server by creating additional index.php / index1.php / newfile.txt file sets, each with a unique group identifier. Each additional W5500-equipped Arduino simply targets its own group's PHP endpoint. No changes to the server infrastructure are required to add new device groups.
5. Software Implementation and Optimization (Software & Coding)
The software stack spans two environments: Arduino C++ firmware and server-side PHP scripts.
Arduino Firmware (webclient02.ino): The sketch uses the standard Arduino Ethernet library, which abstracts W5500 SPI communication into a high-level EthernetClient object. Key operations:
- Network initialization: Assigns a static IP address to the W5500 at startup. A static IP ensures the Arduino can always be reached at a known address by the XAMPP server if bidirectional communication is needed in future extensions.
- Polling loop: Every 10 seconds, opens a TCP connection to the XAMPP server's IP on port 80, sends a formatted HTTP GET request for
index.php, reads the response body, parses the pin state string, and closes the connection. - Pin actuation: Maps parsed state values to
digitalWrite()calls. A state value indicating "switch 5 ON" drives digital pin 5 HIGH (+5V); "switch 5 OFF" drives it LOW (0V).
Server-Side PHP (index.php / index1.php / newfile.txt):
- newfile.txt stores a plain-text representation of the desired pin state — for example, a comma-separated string of 0/1 values for each controllable pin. The file approach avoids the need for a database while still providing persistent state that survives server restarts.
- index.php reads newfile.txt and outputs its contents as the HTTP response body. The Arduino reads this response and updates pins accordingly. If the Arduino's current pin state already matches the file contents, no change occurs — the poll is idempotent.
- index1.php renders a checkbox-based HTML form for the controller. On form submission, it writes the new pin state string to newfile.txt via
file_put_contents()and refreshes the display to show the updated state. The same updated state is also visible on any device (smartphone, PC) that reloads the page.
Extension Path: The project explicitly positions itself as "IOT Application #1," indicating a foundation for further development. Natural extensions include adding more Arduino pins, replacing the 10-second poll with a shorter interval for time-sensitive control, adding sensor data reporting (Arduino writes sensor readings to the server for the browser client to display), and deploying multiple groups for a whole-home automation network.
6. Project Result and Conclusion
This project demonstrates that a complete IoT control loop — remote command input, server-side state persistence, and hardware pin actuation — can be implemented with three components: an Arduino Uno, a W5500 Ethernet Shield, and a PC running XAMPP.
Technical Achievement: The system achieves bidirectional communication between a human controller (browser) and a hardware device (Arduino) entirely within the home LAN, with no internet connectivity, no cloud dependency, and no external accounts required. Pin state changes are confirmed with a multimeter, providing direct physical evidence that network commands produce the intended hardware response within 10 seconds of submission.
Accessibility: The entire project can be assembled and running in under an hour by a maker with basic Arduino experience. The only networking concept required is knowing the XAMPP server's local IP address. The W5500 Ethernet Shield's hardware TCP/IP stack eliminates the need to understand TCP/IP programming — the Arduino Ethernet library handles all socket operations transparently.
Scalability: The group-based architecture allows unlimited expansion to additional W5500-equipped Arduinos, each controlling independent sets of pins, all managed through the same XAMPP server. The PHP + text file approach can be upgraded to a MySQL database for more structured state management as complexity grows.
Conclusion: By pairing Arduino Uno with the W5500 Ethernet Shield and a locally-hosted XAMPP server, this project delivers an accessible, dependency-free IoT foundation that any maker can build, understand, and extend — demonstrating that hardware network control requires neither cloud infrastructure nor advanced networking knowledge.
한국어 설명
1. 프로젝트 배경 및 기술적 목표
대부분의 IoT 튜토리얼은 클라우드 플랫폼, 외부 API, 복잡한 MQTT 브로커에 의존하여, 단순히 같은 홈 네트워크 내의 다른 기기에서 하드웨어를 제어하고 싶은 메이커에게 불필요한 진입 장벽을 만듭니다. 이 프로젝트는 가장 간단한 방법으로 "Arduino의 핀"을 "LAN의 어떤 브라우저에서도 원격 제어 가능한 핀"으로 만드는 것을 목표로 시작되었습니다.
구조는 의도적으로 최소화되어 있습니다. XAMPP 서버(Apache + PHP)가 홈 네트워크에 이미 있는 PC에서 실행됩니다. W5500 기반 이더넷 쉴드를 장착한 Arduino Uno는 이 서버에 HTTP 클라이언트로 접속하여 10초마다 핀 상태 명령을 폴링합니다. 두 번째 클라이언트 — 스마트폰 또는 PC 브라우저 — 는 별도의 PHP 인터페이스를 통해 명령을 제출합니다. 두 클라이언트는 직접 통신하지 않고, 서버의 PHP 스크립트가 관리하는 일반 텍스트 파일(newfile.txt)을 통해 상태를 공유합니다.
핵심 목표는 모든 메이커가 표준 메이커 작업 환경에서 구할 수 있는 도구들만으로 완전한 IoT 제어 루프를 구현할 수 있음을 증명하는 것입니다. 기본 Arduino 스케치와 간단한 PHP 이상의 프로그래밍 지식은 필요 없습니다.
2. 핵심 기술 요소 및 선정 이유 (Methodology)
외부 의존성 없이 최대한 접근 가능한 부품들로 구성되었습니다.
Arduino Uno (ATmega328P): 보편적인 구입 가능성, 브레드보드 친화적 폼팩터, SPI 버스를 통한 W5500 이더넷 쉴드와의 네이티브 호환성을 이유로 하드웨어 제어 노드로 선정되었습니다. 디지털 출력 핀이 전환 가능한 엔드포인트로 사용됩니다 — 핀 상태 변화는 0V와 +5V 사이의 전압 전환을 확인하기 위해 멀티미터로 검증됩니다.
W5500 이더넷 쉴드: 이 쉴드의 핵심인 WIZnet W5500 칩은 SPI를 통해 Arduino에서 접근 가능한 완전한 하드웨어 TCP/IP 스택을 제공합니다. 이 하드웨어 레벨의 TCP/IP 구현이 핵심입니다. 내장 네트워킹 기능이 없는 Arduino Uno가 완전한 HTTP 클라이언트로 동작할 수 있게 해줍니다 — TCP 연결 시작, HTTP GET 요청 전송, 서버 응답 파싱이 모두 ATmega328P에서 TCP/IP 소프트웨어 스택을 실행하지 않고 가능합니다. 쉴드는 Arduino Uno 위에 직접 적층되며, 라우터로의 이더넷 케이블 연결 외에는 별도 배선이 필요 없습니다.
XAMPP 서버 (Apache + PHP): XAMPP는 Windows에서 원클릭으로 로컬 웹 서버 환경을 제공합니다. Apache가 Arduino 클라이언트와 브라우저 기반 제어 클라이언트 양쪽의 HTTP 요청을 처리합니다. PHP 스크립트가 공유 상태 파일(newfile.txt)을 관리합니다. Linux 전문 지식, 포트 포워딩, 인터넷 연결이 필요 없이 홈 네트워크 내에서만 완전히 동작하기 때문에 선정되었습니다.
스마트폰 / PC 브라우저 (제어 클라이언트): 같은 LAN의 웹 브라우저가 있는 모든 기기가 제어 인터페이스로 사용됩니다. 앱 설치가 필요 없습니다. 브라우저가 XAMPP 서버에서 호스팅되는 PHP 페이지(index1.php)에 접근하며, 체크박스 기반 UI로 어떤 Arduino 핀을 토글할지 선택합니다.
3. 하드웨어 작동 원리에 대한 심층 분석 (Hardware Mechanics)
시스템은 2-클라이언트, 공유 파일 구조로 동작합니다. Arduino와 인간 제어자는 직접 통신하지 않고, 둘 다 XAMPP 서버에 통신하며, 서버가 텍스트 파일을 통해 상태를 중재합니다.
Arduino Uno에 대한 W5500 SPI 연결: W5500 이더넷 쉴드는 하드웨어 SPI 버스(MOSI/MISO/SCK용 핀 11, 12, 13, 칩 선택용 핀 10)를 통해 Arduino Uno에 연결됩니다. W5500은 시작 시 내부 하드웨어 TCP/IP 스택을 초기화하며, 이후 Arduino는 표준 Arduino Ethernet 라이브러리를 사용하여 센서를 읽는 것만큼 간단하게 TCP 소켓을 열고 HTTP 요청을 할 수 있습니다.
10초 폴링 주기: Arduino 펌웨어(webclient02.ino)가 10초마다 XAMPP 서버의 index.php에 HTTP GET 요청을 시작합니다. 이 폴링 간격은 의도적인 트레이드오프입니다. 일반적인 홈 자동화 사용 사례에 충분히 빠른 응답(명령 제출 후 10초 이내 핀 작동)을 제공하면서, XAMPP 서버를 과부하 시키거나 급속한 요청 사이클로 홈 네트워크를 혼잡하게 하지 않을 만큼 충분히 긴 주기입니다.
공유 파일 상태 아키텍처:
- newfile.txt 는 핀 상태의 단일 진실 공급원입니다. 각 Arduino 출력 핀의 원하는 on/off 상태를 나타내는 간단한 문자열을 저장합니다.
- index.php 는 Arduino 클라이언트를 서비스합니다. newfile.txt를 읽고 HTTP 응답 본문에서 현재 핀 상태 데이터를 반환하며, Arduino가 이를 파싱하여 출력 핀을 업데이트합니다.
- index1.php 는 인간 제어 클라이언트를 서비스합니다. 브라우저에서 폼 제출(체크박스 상태)을 수신하고, 대응하는 명령 문자열을 newfile.txt에 기록하며, 확인 페이지를 반환합니다. 업데이트된 상태는 제어 스마트폰의 브라우저에도 반영됩니다.
핀 작동 검증: Arduino가 핀을 HIGH로 설정하는 명령을 수신하면(예: "스위치 5 ON") 해당 디지털 출력 핀을 +5V로 구동합니다. 프로젝트는 핀에 연결된 멀티미터를 사용하여 네트워크 명령이 의도된 하드웨어 변화를 만들었다는 직접적인 확인을 제공합니다.
실제로 어떻게 작동하나요?
1️⃣ 당신의 컴퓨터 (XAMPP 서버)가 거실 중앙에 앉아있는 "안내원" 역할을 합니다
2️⃣ Arduino 보드 (작은 컴퓨터)는 실제 불이나 선풍기 같은 기기에 연결되어 있어요. 이 Arduino도 그 안내원(서버)과 연결되어 있고, 10초마다 "안내원님, 지금 뭘 해야 하나요?" 하고 묻는 거예요
3️⃣ 당신의 스마트폰 (또는 컴퓨터)에서 "거실 불 켜!" 하고 신호를 보내면, 안내원이 그걸 받아서 기록해둡니다
4️⃣ Arduino가 10초 후에 "뭔가 새로운 지시가 있나요?" 하고 다시 물을 때, 안내원이 "불을 켜!" 라고 알려줍니다
5️⃣ Arduino가 그 명령을 받아서 거실 불이 켜집니다 ✨
4. 통신 인터페이스: W5500 이더넷 쉴드의 역할과 필요성
W5500은 베어 마이크로컨트롤러와 네트워크 연결된 HTTP 클라이언트 사이의 간극을 메우는 핵심 기술입니다.
Arduino Uno의 하드웨어 TCP/IP 스택: Arduino Uno의 ATmega328P는 네이티브 이더넷 기능이 없습니다. W5500 이더넷 쉴드는 전체 TCP/IP 스택 — IP 주소 관리, TCP 연결 처리, HTTP 요청 구성 — 을 W5500 칩의 전용 하드웨어 로직 내부에 배치하여 이 기능을 추가합니다. Arduino 스케치는 SPI를 통해 W5500과 통신하며 높은 수준의 소켓 명령을 내립니다. W5500이 모든 저수준 프로토콜 작업을 내부적으로 처리하여, 결과적인 Arduino 스케치는 초보자도 이해할 수 있을 만큼 단순해집니다.
HTTP 클라이언트 아키텍처: Arduino는 순수 HTTP 클라이언트로 동작합니다 — 서버로 동작하지 않으며 브라우저 사용자가 직접 주소 지정할 수 없습니다. 이를 통해 Arduino가 알려진 고정 IP 주소를 가질 필요가 없어집니다. 제어 흐름은 항상 브라우저 → XAMPP 서버(알려진 고정 주소) → newfile.txt → Arduino 폴링입니다. 이 구조는 Arduino가 어떤 서브넷이나 NAT 뒤에 있어도 XAMPP 서버에 접근할 수 있는 한 동작 가능합니다 — 기기 IP 할당이 가변적인 홈 네트워크 환경을 위한 중요한 단순화입니다.
W5500을 통한 유선 이더넷 신뢰성: IoT 제어 맥락에서 Wi-Fi 대신 유선 이더넷을 선택하는 것은 중요합니다. W5500 기반 유선 연결은 결정적 지연시간을 제공하고 유휴 기간 후 Wi-Fi 클라이언트에 발생하는 재연결 오버헤드를 없애줍니다. 매 10초 주기마다 HTTP 트랜잭션이 성공적으로 완료되어야 하는 폴링 기반 시스템에서, W5500의 안정적인 상시 연결은 폴링 주기가 연결 끊김이나 재연결 지연 없이 신뢰성 있게 완료됨을 보장합니다.
그룹 기반 다기기 확장성: 2-클라이언트 "그룹" 모델(Arduino 하나 + 제어자 하나, 각 그룹이 PHP 파일 쌍 공유)은 직접 확장 가능합니다. 고유한 그룹 식별자를 가진 추가 index.php / index1.php / newfile.txt 파일 세트를 생성하는 것만으로 같은 XAMPP 서버에 여러 독립 그룹을 운영할 수 있습니다. 추가 W5500 장착 Arduino는 각자의 그룹 PHP 엔드포인트를 타겟으로 합니다.
5. 소프트웨어 구현 및 최적화 (Software & Coding)
소프트웨어 스택은 두 가지 환경에 걸쳐 있습니다: Arduino C++ 펌웨어와 서버 사이드 PHP 스크립트.
Arduino 펌웨어 (webclient02.ino): 스케치는 W5500 SPI 통신을 고수준 EthernetClient 객체로 추상화하는 표준 Arduino Ethernet 라이브러리를 사용합니다. 네트워크 초기화 시 W5500에 고정 IP 주소를 할당합니다. 10초마다 XAMPP 서버 IP의 포트 80으로 TCP 연결을 열고, index.php에 대한 HTTP GET 요청을 전송하고, 응답 본문을 읽어 핀 상태 문자열을 파싱하고, 연결을 닫습니다. 파싱된 상태 값을 digitalWrite() 호출에 매핑합니다.
서버 사이드 PHP (index.php / index1.php / newfile.txt):
- newfile.txt는 원하는 핀 상태의 일반 텍스트 표현을 저장합니다. 파일 접근 방식은 데이터베이스 필요 없이 서버 재시작 후에도 지속적 상태를 제공합니다.
- index.php는 newfile.txt를 읽고 내용을 HTTP 응답 본문으로 출력합니다. Arduino가 이 응답을 읽어 핀을 업데이트합니다. Arduino의 현재 핀 상태가 이미 파일 내용과 일치하면 변경이 일어나지 않습니다 — 폴링은 멱등적입니다.
- index1.php는 제어자를 위한 체크박스 기반 HTML 폼을 렌더링합니다. 폼 제출 시
file_put_contents()를 통해 새 핀 상태 문자열을 newfile.txt에 기록하고 표시를 새로 고쳐 업데이트된 상태를 보여줍니다.
확장 경로: 프로젝트는 명시적으로 "IOT 애플리케이션 #1"로 포지셔닝하며, 추가 Arduino 핀, 더 짧은 폴링 간격, 센서 데이터 보고(Arduino가 센서 수치를 서버에 기록하여 브라우저 클라이언트가 표시), 전체 홈 자동화 네트워크를 위한 다중 그룹 배포 등의 자연스러운 확장을 안내합니다.
6. 프로젝트 결과 및 결론
이 프로젝트는 완전한 IoT 제어 루프 — 원격 명령 입력, 서버 사이드 상태 지속성, 하드웨어 핀 작동 — 를 Arduino Uno, W5500 이더넷 쉴드, XAMPP를 실행하는 PC 세 가지 부품만으로 구현할 수 있음을 증명합니다.
기술적 성과: 인터넷 연결, 클라우드 의존성, 외부 계정 없이 홈 LAN 내에서 완전히 인간 제어자(브라우저)와 하드웨어 장치(Arduino) 간의 양방향 통신을 달성합니다. 핀 상태 변화는 멀티미터로 확인되며, 네트워크 명령이 제출 후 10초 이내에 의도된 하드웨어 반응을 일으킨다는 직접적인 물리적 증거를 제공합니다.
접근성: 기본 Arduino 경험이 있는 메이커라면 1시간 이내에 조립하고 실행할 수 있습니다. 필요한 유일한 네트워킹 개념은 XAMPP 서버의 로컬 IP 주소를 아는 것뿐입니다. W5500 이더넷 쉴드의 하드웨어 TCP/IP 스택이 TCP/IP 프로그래밍을 이해할 필요를 없애줍니다.
확장성: 그룹 기반 구조는 W5500 장착 Arduino를 추가하는 것만으로 무제한 확장이 가능하며, 각각 독립적인 핀 세트를 제어하고 모두 같은 XAMPP 서버를 통해 관리됩니다.
결론: Arduino Uno와 W5500 이더넷 쉴드, 로컬 호스팅 XAMPP 서버를 결합하여, 모든 메이커가 구축하고 이해하고 확장할 수 있는 접근 가능하고 의존성 없는 IoT 기반을 완성하였습니다 — 하드웨어 네트워크 제어에 클라우드 인프라나 고급 네트워킹 지식이 필요하지 않음을 증명합니다.