W55RP20 Web I/O example
A Web I/O example for the W55RP20-EVB-Pico board

How to Test Web I/O example
1 Setup board configuration
Setup board to W55RP20_EVB_PICO in CMakeLists.txt in WIZnet-PICO-C-EXTRAS/ directory.
# Set board
#set(BOARD_NAME WIZnet_Ethernet_HAT)
#set(BOARD_NAME W5100S_EVB_PICO)
#set(BOARD_NAME W5500_EVB_PICO)
set(BOARD_NAME W55RP20_EVB_PICO)
#set(BOARD_NAME W5100S_EVB_PICO2)
#set(BOARD_NAME W5500_EVB_PICO2)
2 Setup board configuration
Setup network configuration such as IP in 'w5x00_webio.c' which is the Web I/O example in 'WIZnet-PICO-C/examples/webio/' directory.
Setup IP and other network settings to suit your network environment.
/* Network */
static wiz_NetInfo g_net_info =
    {
        .mac = {0x00, 0x08, 0xDC, 0x12, 0x34, 0x56}, // MAC address
        .ip = {192, 168, 11, 2},                     // IP address
        .sn = {255, 255, 255, 0},                    // Subnet Mask
        .gw = {192, 168, 11, 1},                     // Gateway
        .dns = {8, 8, 8, 8},                         // DNS server
        .dhcp = NETINFO_STATIC                       // DHCP enable/disable
};
3 Build and Run
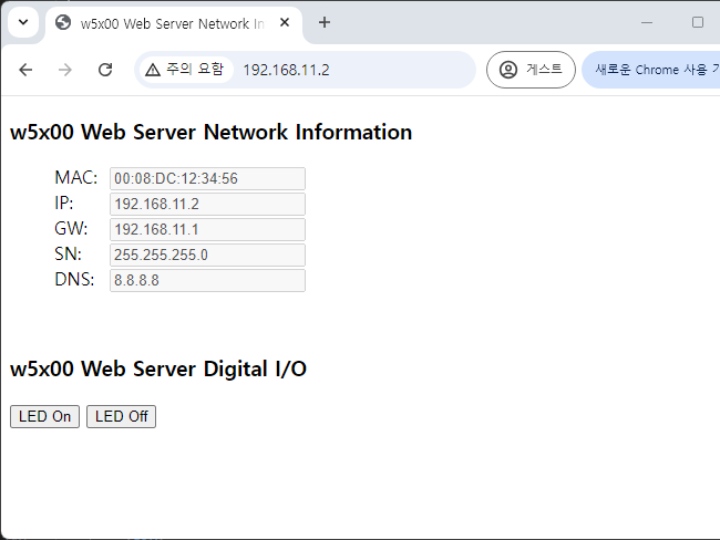
Connect to the open Web I/O, you can see the output on the web page. When connecting to the Web I/O, you need to enter is the IP that was configured in Step 3. And you can view the network information through the web page and control the user LED with the LED on/off buttons.


