
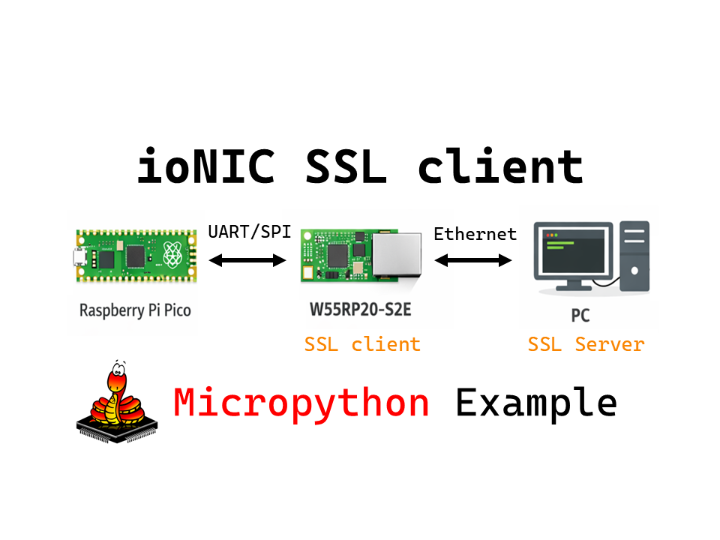
W55RP20-S2E SSL client Example (MicroPython)
This example demonstrates SSL client on W55RP20 S2E via UART/SPI using MicroPython on a Raspberry Pi Pico (Master)

WIZnet - W55RP20
x 1
micropython - MicroPython
x 1
How to SSL Client Example (MicroPython)
This program demonstrates data loopback applications using the W55RP20 S2E board via UART or SPI interface. The Raspberry Pi Pico (Host) configures the W55RP20 S2E as an SSL TCP Client (OP4) using AT commands. It connects to a secure server (SSL/TLS) and enters Data Mode to echo back any data received.
Step 1: Prepare software
The following software is required to run and test the MicroPython example.
- Thonny : An integrated development environment for MicroPython. used to write, upload, and run code.
- SSL Server Tool: A PC tool or script capable of accepting SSL/TLS connections (e.g., OpenSSL
s_server, a Python SSL Server script, or a compatible terminal).- Note: Standard Hercules only supports plain TCP/UDP. You need an SSL-capable server for this test.
Step 2: Prepare hardware
1. Connect GPIO13 according to the selected UART/SPI mode of the W55RP20 EVB Pico, as illustrated below.
| GPIO13 Pin | Desc |
| LOW(GND) | UART mode (default) |
| HIGH(3.3V) | SPI mode |
2. Connect the Raspberry Pi Pico and the W55RP20 EVB Pico using jumper wires as shown below, depending on the selected UART/SPI mode.
- Important Note on Mode Switching: In this example setup, GPIO 13 of the W55RP20 EVB Pico is physically connected to GPIO 13 of the Raspberry Pi Pico. The Host Pico sets the mode (High/Low) automatically based on the software configuration.
- If you change the
MODEin the code (e.g., UART ↔ SPI): You MUST reset both boards (Raspberry Pi Pico and W55RP20 EVB Pico) to ensure the mode is switched and recognized correctly.
If UART mode :
| Raspberry Pi Pico | W55RP20 EVB Pico |
| GPIO4 (UART_TX) | GPIO5 (UART_RX) |
| GPIO5 (UART_RX) | GPIO4 (UART_TX) |
| GPIO13 (MODE_SEL) | GPIO13 (MODE_SEL) |
| GND | GND |
If SPI mode :
| Raspberry Pi Pico(Master) | W55RP20 EVB Pico(Slave) |
| GPIO2 (SPI_CLK) | GPIO2 (SPI_CLK) |
| GPIO3 (SPI_TX) | GPIO4 (SPI_RX) |
| GPIO4 (SPI_RX) | GPIO3 (SPI_TX) |
| GPIO5 (SPI_CS) | GPIO5 (SPI_CS) |
| GPIO26 (SPI_INT) | GPIO26 (SPI_INT) |
| GPIO13 (MODE_SEL) | GPIO13 (MODE_SEL) |
| GND | GND |
3. Connect the Raspberry Pi Pico to your PC (desktop or laptop) using a 5-pin Micro USB cable.
4. Connect the W55RP20 EVB Pico to your PC (desktop or laptop) using a USB Type-C cable.
Step 3: Setup Example
- Raspberry Pi Pico (Master) : Getting started with Raspberry Pi Pico (MicroPython)
Please refer to the link below to install the MicroPython firmware on the Raspberry Pi Pico.
- W55RP20 EVB Pico : Getting started with W55RP20 EVB Pico
Please refer to the link below for instructions on how to use the W55RP20 S2E.
Step 4: Upload Code
- Raspberry Pi Pico
Open Thonny IDE and connect to the Raspberry Pi Pico. Upload the following driver and example files to the Pico's storage.
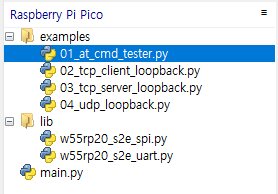
Required Files:
w55rp20_s2e_uart.py(Required for UART mode)w55rp20_s2e_spi.py(Required for SPI mode)
Example Application Files (Choose one to test):
07_ssl_client.py
Configuration: Before running an example, open the Python file you intend to use and modify the User Configuration section at the top.
# 07_ssl_client.py
#
# SSL/TLS TCP Client Example
# - Supports both SPI and UART communication modes
# - Configure W55RP20-S2E module as SSL TCP client (OP=4)
# - Connect to SSL server and send initial message
# - Continuously receive and display server responses

import time

# -------------------------------------------------------------------------
# Configuration
# -------------------------------------------------------------------------
MODE = "spi"   # Set to "spi" or "uart"

# IP Configuration Mode
USE_DHCP = True  # True: DHCP (IM=1), False: Static IP (IM=0)

# Network Configuration
LOCAL_IP    = "192.168.11.123"  # Local IP (Used when USE_DHCP=False)
SUBNET_MASK = "255.255.255.0"   # Subnet Mask (Used when USE_DHCP=False)
GATEWAY     = "192.168.11.1"    # Gateway (Used when USE_DHCP=False)
DNS_SERVER  = "168.126.63.1"    # DNS Server (Used when USE_DHCP=False)

# Remote Server Configuration
REMOTE_HOST = "192.168.11.2"    # Server hostname or IP
REMOTE_PORT = "8443"            # Server port
.
.
Step 5: Run
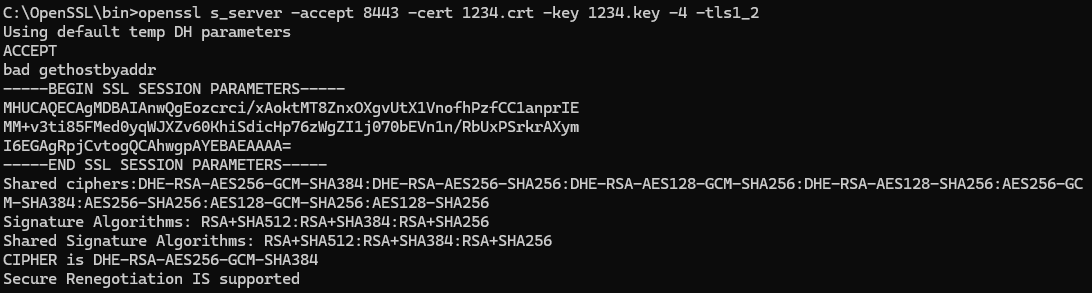
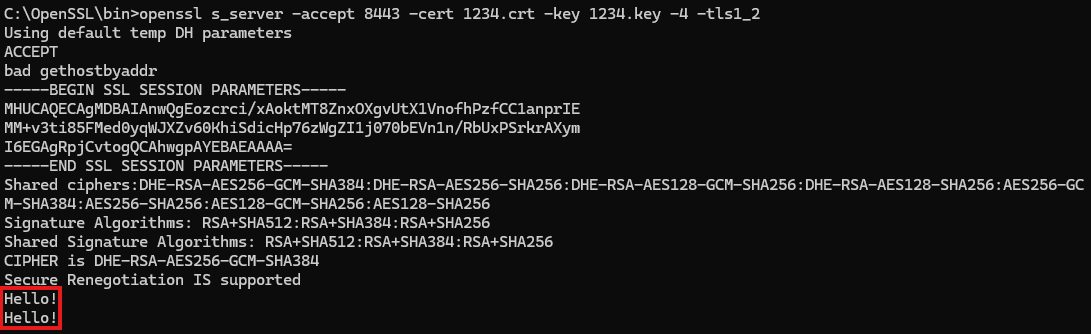
PC (SSL Server):
- Start your SSL Server tool listening on Port 8443.
- (Example using OpenSSL:
openssl s_server -accept 8443 -cert cert.pem -key key.pem)
Pico (Thonny):
- Open
07_ssl_client.py. - Update
REMOTE_HOSTto your PC's IP address. - Run the script (F5).
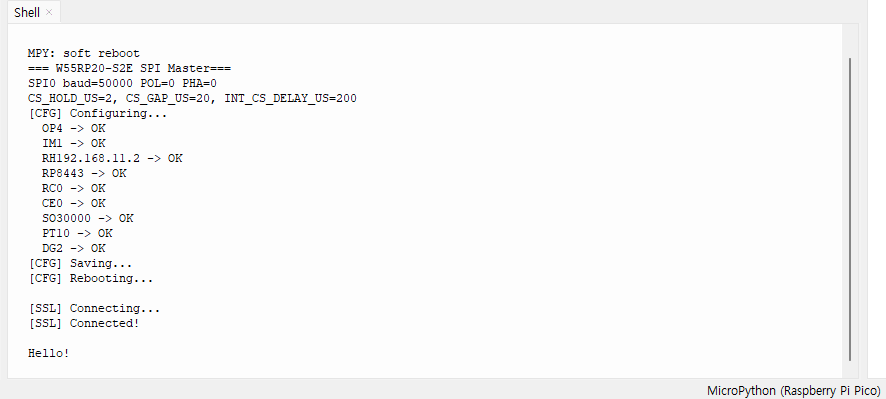
Result:
- Type a message in your PC's SSL Server console.
- Verify that the message appears in Thonny and is echoed back to the PC.
-
GitHub : W55RP20-S2E_master_Micropython
