
Tell me when my room has cooled!
Temperature logging with WizFi360-EVB-Pico, Adafruit.io, with an email action to say the room is cool.

WIZnet - WizFi360-EVB-Pico
x 1

adafruit - DHT22 temperature-humidity sensor
x 1

seeed - Grove - OLED Display 1.12'' V2
x 1

Adafruit - Circuitpython
x 1
firmware and programming
adafruit - Adafruit IO
x 1
online service for IOT
Heatwave
In July 2022, temperature records broke 40C in England, reaching a max of 40.3°C (104.5°F). Even in the relatively cool city of Newcastle, where I live, the temperature reached 37°C (98.5°F). This smashed the temperature record of 32°C (89.5°F) set in 30 years ago. The strange observation was that the flat seemed to stay warm for a long time. I was born in Australia, which is a lot hotter, but was used to the housing losing heat quickly at night. This didn't seem to be happening.
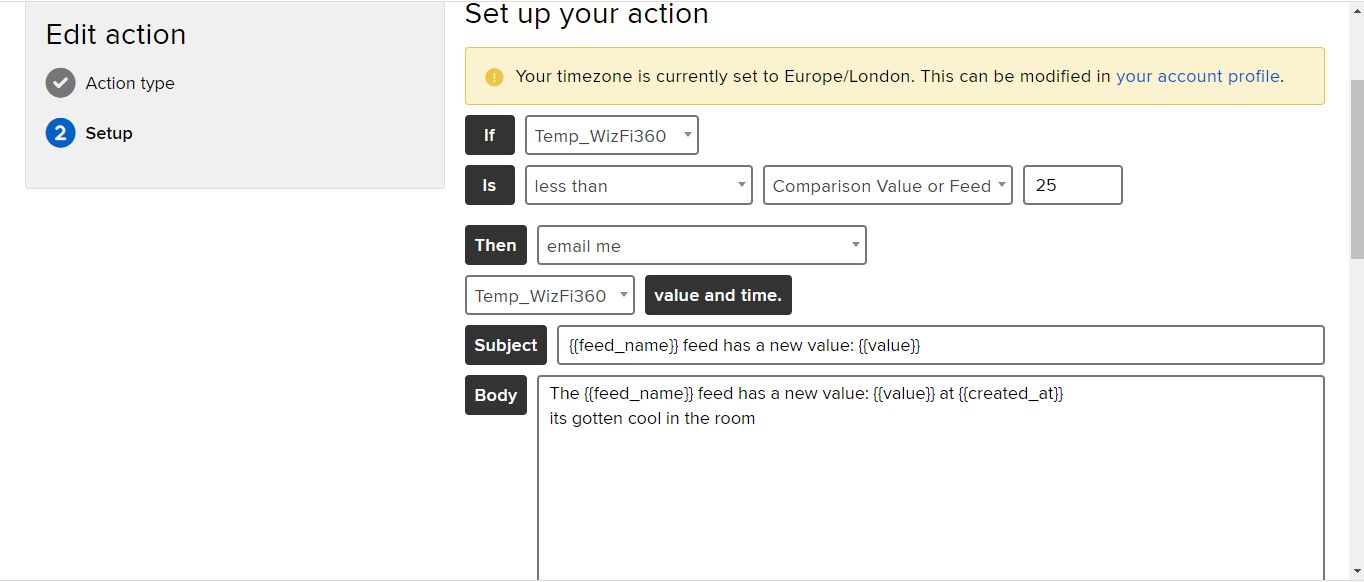
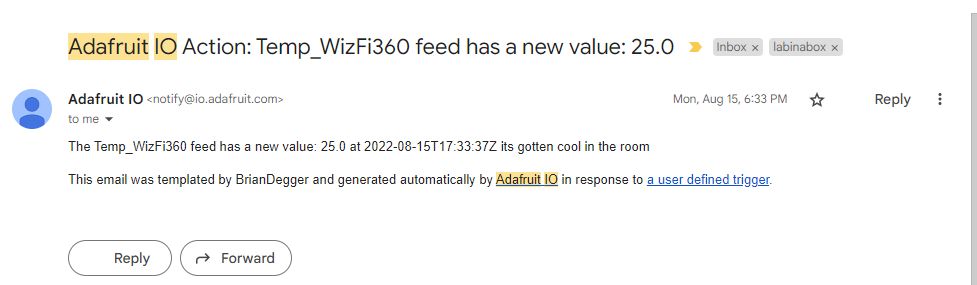
I was interested in putting something together something that could tell me how warm it was inside my flat and keeping track of the temperature as it slowly decreased. Using the adafruit.io service, with the WizFi360-EVB-Pico, I set up an email alert that told me when the indoor temperature decreased past 25°C.
Microcontroller
Perfect time to use that WizFi360-EVB-Pico. I was familiar with the adafruit.io service, but not with how to use this microcontroller to access adafruit.io. From a github search, I discovered https://github.com/ronpang and their example http in a folder of https://github.com/ronpang/WizFi360-cpy where an incrementing number is uploaded to a feed on adafruit.io.
For the example, the microcontroller needs to have CircuitPython installed using the rp2040 firmware. Circuitpython is a version of python designed for microcontrollers, supported by Adafruit. It comes with core builtins and external libraries for different sensors. It needs to be downloaded from https://circuitpython.org/board/raspberry_pi_pico/
There is no specific page for the WizFi360-EVB-Pico, but this works fine, as long as it is realised that some of the pins are being used for the WizFi360 chip.
This is easy to load on the microcontroller, and easier with the wiznet development board, which has 2 buttons, rather than simply the RUN button found on the Pico.
- BOOTSEL
- RUN
Hold them both down, and then release the run button, this puts you into ufmode (RPI-RP2)
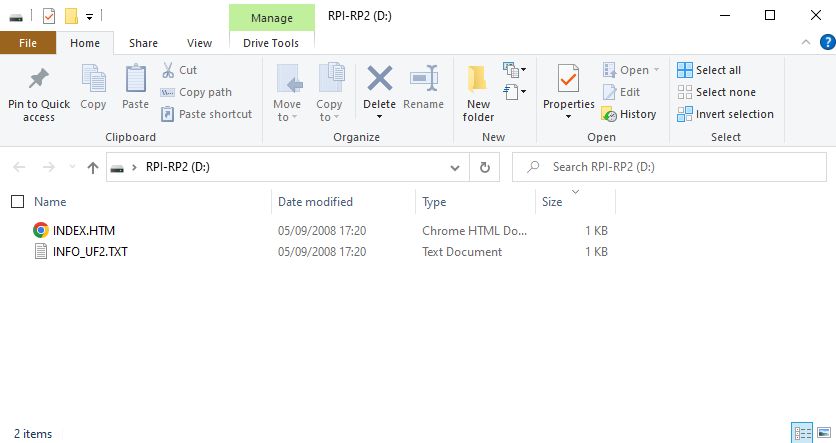
Then drop the uf2 file on the drive.
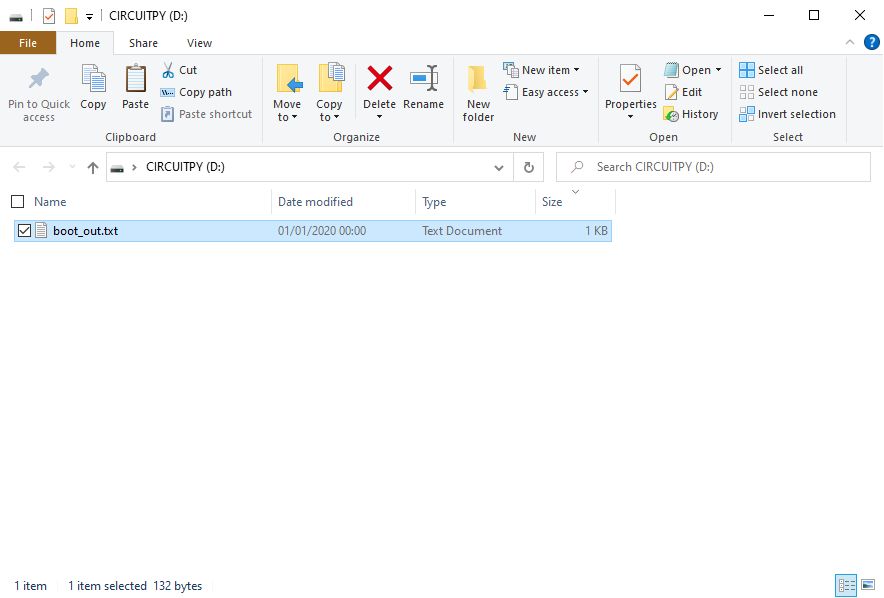
Press RUN and the CIRCUITPY drive boots. Here is what it looks like after the rest of the files are loaded.
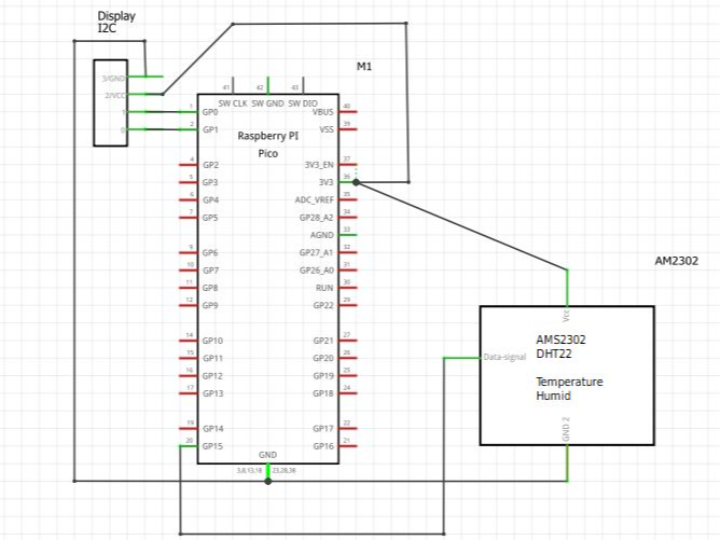
Input/Output
Display - 0.91inch 32x92 pixels SSD1306

- board.GP1(Pin2) --> SCK
- board.GP0(Pin1) --> SDA
- GND
- 3.3V --> VCC
Sensor - AM2302 Temperature/Humidity
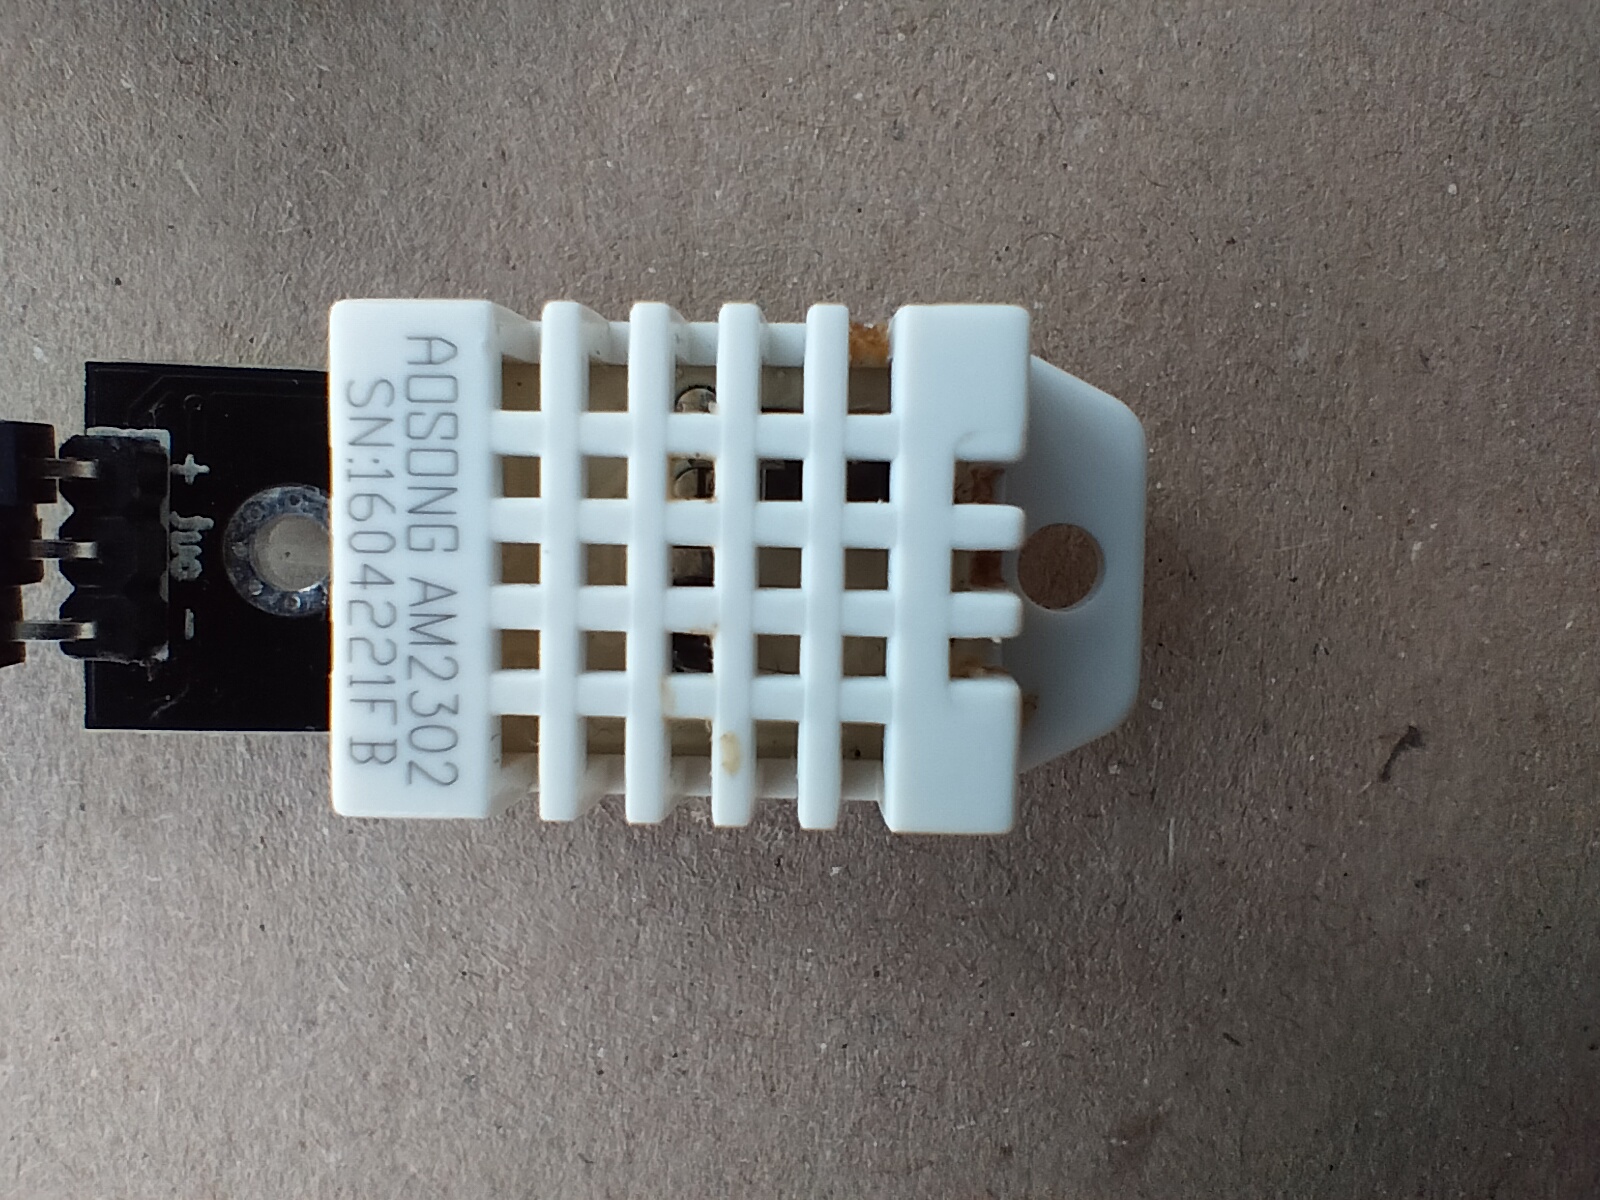
- board.GP15(Pin20) --> centre pin
- + --> to 3.3v
- - --> to Ground
Required Libraries
- adafruit_display_text [directory]
- adafruit_espatcontrol [directory]
- adafruit_dht.py
- adafruit_displayio_ssd1306.py
- adafruit_framebuf.mpy
- adafruit_requests.mpy
- adafruit_ssd1306.mpy
- font5x8.bin
These are found in my repository together with the code files. https://github.com/sctv/WizFiCompetitionFiles
I dragged and dropped the files onto the CircuitPython drive and use Thonny (https://thonny.org/) as the Python Ide to edit the files.
Code
I made a number of changes to the initial code.
- Added:
- reading the AMS2302/DHT22
- a text representation of the sensor values on a display
- a heartbeat led flash that gives an indication that the results are being posted online.
- if connected through a serial (such as to Thonny), the posting of the data can be seen.
- Credentials:
- renaming the secretscopy.py to secrets.py
- updating the secrets.py with my wifi credentials and adafruit.io credentials
code.py
# SPDX-FileCopyrightText: 2021 ladyada for Adafruit Industries
# SPDX-License-Identifier: MIT


#Modified @iheartelectro (Brian Degger)

# Note, you must create a feed called that corresponds to the feed referenced in your AdafruitIO account.
# Your secrets file must contain your aio_username and aio_key

# libraries
import time
import board
import busio
import adafruit_dht
from digitalio import DigitalInOut
from digitalio import Direction
import terminalio
import displayio
import adafruit_ssd1306
from adafruit_display_text import label

text = "HELLO WORLD"
font = terminalio.FONT
color = 0x0000FF

i2c = busio.I2C(board.GP1, board.GP0) #i2c bus for the display
display = adafruit_ssd1306.SSD1306_I2C(128, 32, i2c)

# Make the display context
display.fill(0) #blank
display.show()

#test display
# Set a pixel in the origin 0,0 position.
display.pixel(0, 0, 1)
# Set a pixel in the middle 64, 16 position.
display.pixel(64, 16, 1)
# Set a pixel in the opposite 127, 31 position.
display.pixel(127, 31, 1)
display.show()


# ESP32 AT
from adafruit_espatcontrol import (
    adafruit_espatcontrol,
    adafruit_espatcontrol_wifimanager,
)

#Pins
dht = adafruit_dht.DHT22(board.GP15) #set up DHT22 on GP15/Pin 20
led = DigitalInOut(board.LED) 		# set up the Pico Led Pin
led.direction = Direction.OUTPUT 	# set to Output

# Get wifi details and more from a secrets.py file
try:
    from secrets import secrets
except ImportError:
    print("WiFi secrets are kept in secrets.py, please add them there!")
    raise

# Pins setup with WizFi360 through UART connection
RX = board.GP5 #TX pin for WizFi360-EVB-PICO
TX = board.GP4 #RX pin for WizFi360-EVB-PICO
resetpin = DigitalInOut(board.GP20) #Reset pin for WizFi360-EVB-PICO
rtspin = False #RTS pin
uart = busio.UART(TX, RX, baudrate=11520, receiver_buffer_size=2048) #Serial settings

# Debug Level
# Change the Debug Flag if you have issues with AT commands
debugflag = False
status_light = False #only if board has neopixel

print("ESP AT commands")
# For Boards that do not have an rtspin like WizFi360-EVB-PICO set rtspin to False.
esp = adafruit_espatcontrol.ESP_ATcontrol(
    uart, 115200, reset_pin=resetpin, rts_pin=rtspin, debug=debugflag
)
wifi = adafruit_espatcontrol_wifimanager.ESPAT_WiFiManager(esp, secrets, status_light) #Class that handles HTTPs and MQTT (more information from lib)

temperature = dht.temperature #get temperature
humidity = dht.humidity       #get humidity
temp=str(temperature)
humid=str(humidity)
display.fill(0)
display.text('Readings Aquired', 10, 0, 1)
display.text('Temperature: '+temp+' C', 10, 10, 1)
display.text('Humidity: '+humid+'%', 10, 20, 1)

display.show()
print(dht.temperature)        #print temperature
print(dht.humidity)           #print humidity
while True:
    try:
        led.value = False #only for boards with integrated neopixel
        temperature = dht.temperature #get temperature
        humidity = dht.humidity       #get humidity

        print("Posting temperature...", end="") #Posting temperature to Adafruit.io
        data = temperature #counter result = input data
        feed = "temp-wizfi360" # Adafruit IO feed, the name on adafruit io needs to be lowercase, - only special char
        payload = {"value": data} # Json format
        # HTTP Post method to Adafruit IO
        response = wifi.post(
            "https://io.adafruit.com/api/v2/" #address to adafruit io
            + secrets["aio_username"] #input adafruit io name for "secret"
            + "/feeds/"
            + feed #feed = "test"
            + "/data",
            json=payload, # counter
            headers={"X-AIO-KEY": secrets["aio_key"]}, #input adafruit io key from "secret"
        )
        print(response.json()) #send data and print the data that you sent
        response.close() #close the connection
        print("OK")
        print(str(dht.temperature) + 'C') #print to serial to see if the senor is working

        print("Posting humidity...", end="") #Posting humidity to Adafruit.io
        data = humidity #counter result = input data
        feed = "humid-wizfi360" # Adafruit IO feed, the name on adafruit io needs to be lowercase, - only special char
        payload = {"value": data} # Json format
        # HTTP Post method to Adafruit IO
        response = wifi.post(
            "https://io.adafruit.com/api/v2/" #address to adafruit io
            + secrets["aio_username"] #input adafruit io name for "secret"
            + "/feeds/"
            + feed #feed = "test"
            + "/data",
            json=payload, # counter
            headers={"X-AIO-KEY": secrets["aio_key"]}, #input adafruit io key from "secret"
        )
        print(response.json()) #send data and print the data that you sent
        response.close() #close the connection
        print("OK")
        print(str(dht.humidity) +'%' )

    except (ValueError, RuntimeError, adafruit_espatcontrol.OKError) as e:
        print("Failed to get data, retrying\n", e)
        wifi.reset()
        continue
    response = None
    temp=str(temperature)
    humid=str(humidity)
    display.fill(0)
    display.text('Readings Posted', 10, 0, 1)
    display.text('Temperature: '+temp+' C', 10, 10, 1)
    display.text('Humidity: '+humid+'%', 10, 20, 1)
    display.show()
    led.value = True 	#Turn led on
    time.sleep(10)
    led.value = False 	#Turn led off
    time.sleep(5)
IOT setup
I set up an account on https://io.adafruit.com/ where the feeds are set up, values posted and plotted. In these examples replace USER with your own AccountName
- https://io.adafruit.com/USER/feeds is where the feeds are set up, and top right key symbol is where you get the APIKey for the credentials to input into secrets.py

- https://io.adafruit.com/USER/feeds/temp-wizfi360 is where the incoming feed is plotted
- https://io.adafruit.com/USER/actions where the action to email is set up.
secrets.py
# SPDX-FileCopyrightText: 2021 ladyada for Adafruit Industries
# SPDX-License-Identifier: MIT

# This file is where you keep secret settings, passwords, and tokens!
# If you put them in the code you risk committing that info or sharing it

secrets = {
    "ssid": "xxx", #Router's (AP) name
    "password": "yyyy", #Router's (AP) password
    "timezone": 0,  # this is offset from UTC
    "github_token": "abcdefghij0123456789",
    "aio_username": "aaaa", #user name for adafruit io
    "aio_key": "bbbb", #key for adafruit io
}
Results
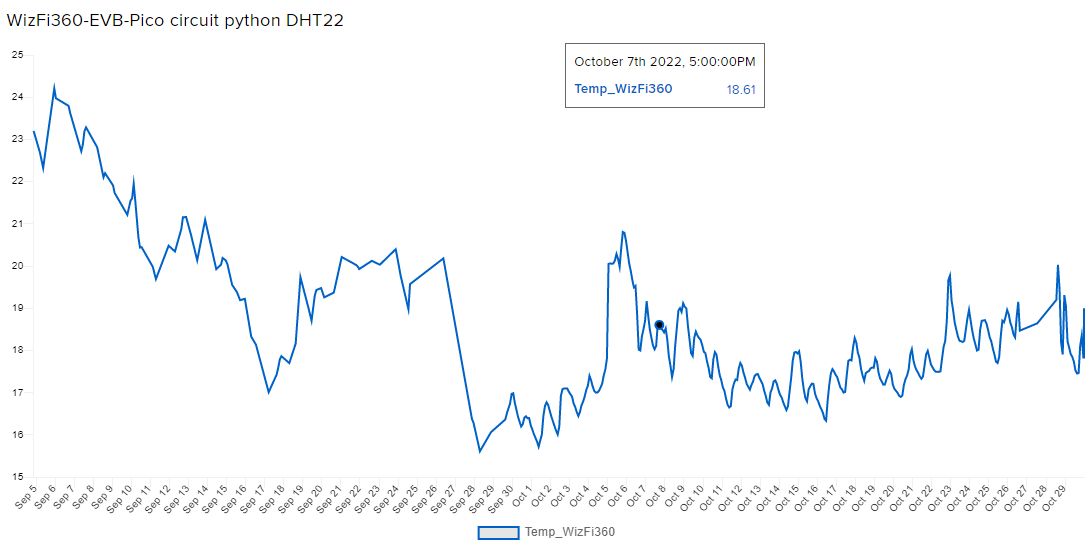
I got the programming, wiring and logging done on August 11, when it was 28C at 9:30pm. That night overnight (indoor) temperatures exceeded 26°C. It took till August the 15th at 6:33pm to get below 25°C. Now I realise these temperatures are pretty modest when compared to the Global South, however they are still exceptional for these times and climes.
Final Thoughts
- Thanks to WizNet for the chance to evaluate the WizFi-EVB-Pico,
- I like that the form-factor is the same width as the original Pico.
- The two buttons (RUN and BOOTSEL) mean its easier to load the UF2, without unplugging.
- Unmodified CircuitPython Pico firmware works out of the box
- I used the HTTP way of posting to Adafruit.io, there is also a MQTT way.
- A later version of the library adafruit_espatcontrol didn't work. The one included with the @RonPang test example does. Want to document this for CircuitPython github.
- I noticed during the writeup that Wiznet has posted MicroPython examples as well as a modified library.
Future Directions
- Project needs a nice little 3d printed box (looking to see if any come out of the competition).
- Battery-powered, and more sensible logging.
- Combine the Humidity and Temperature measurements to get a comfort index that can be displayed on the screen.
-
codebase
Where the files live.

-
Circuit Diagram
