
The W5100Sio-M module controls relays via a web page.
The W5100Sio-M module controls relays via a web page.
1. Introduction
HTTP (Hypertext Transfer Protocol) is an application-layer protocol for distributed, collaborative, hypermedia information systems. Based on the TCP/IP communication protocol, it transmits data and forms the foundation of data communication on the World Wide Web (WWW). HTTP was initially designed to provide a method for publishing and receiving HTML pages. Resources requested via HTTP or HTTPS are identified by Uniform Resource Identifiers (URIs). This is a brief introduction to the HTTP protocol. For a more in-depth understanding of this protocol, please refer to the introduction on the Mozilla website: HTTP Overview - HTTP | MDN
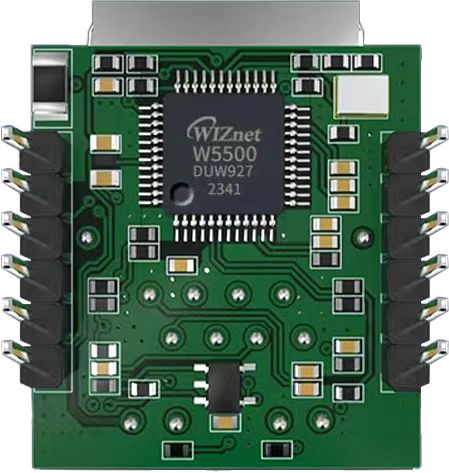
The W5100Sio-M is a high-performance SPI-to-Ethernet module from W5100, featuring the following characteristics:
Simple Design: Integrates MAC, PHY, 16KB cache, and RJ45 Ethernet port. It connects directly to the main controller via a 4-wire SPI interface, operates on 3.3V power, and its compact size is ideal for embedded systems.
Easy to Use: Users no longer need to port complex TCP/IP protocol stacks to the MCU; they can directly develop based on application-layer data.
Abundant Resources: Provides rich MCU application examples and hardware reference designs for direct reference, significantly shortening development time. Hardware compatibility with the W5500io-M module facilitates solution development and iteration.
Wide Applications: Widely used in industrial control, smart grids, charging piles, security and fire protection, new energy, and energy storage.
2 Project Environment
2.1 Hardware Environment
- W5100Sio-M
- STM32F103VCT6 EVB
- Network cable
- Several DuPont wires
- Switch or router
2.2 Software Environment
- Development Environment: Keil uVision 5
- Freescale Serial Port Assistant
- Example Link: https://www.w5100S.com
- Browser
3 Hardware Connection and Solution
3.1 W5100S Hardware Connection
//W5100S_SCS ---> STM32_GPIOD7 /*W5100S chip select pin*/
//W5100S_SCLK ---> STM32_GPIOB13 /*W5100S clock pin*/
//W5100S_MISO ---> STM32_GPIOB14 /*W5100S MISO pin*/ 4. //W5100S_MOSI ---> STM32_GPIOB15 /*MOSI pin of W5100S*/
//W5100S_RESET ---> STM32_GPIOD8 /*RESET pin of W5100S*/
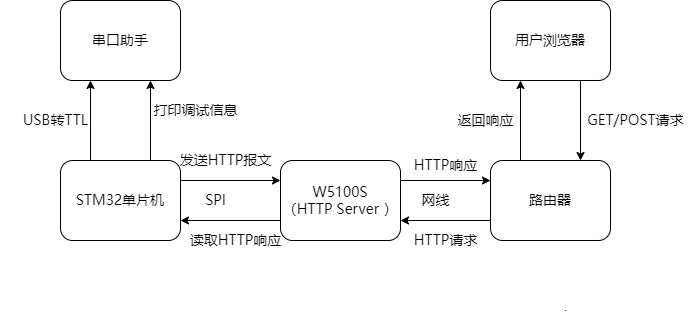
//W5100S_INT ---> STM32_GPIOD9 /*INT pin of W5100S*/3.2 Scheme Diagram
4. Example Modification
4.1 Webpage Content Modification
Add two buttons to the webpage by modifying the webpage.h file.
Web Interface:
A form containing two buttons (ON and OFF) has been added to index_page.
The form's action is set to control.cgi, and the method is post.
Each button's name attribute is cmd, and its value is ON or OFF respectively.
The following is the modified code:
#ifndef _WEBPAGE_H_
#define _WEBPAGE_H_

const char index_page[] =
"<html>"
"<head>"
"<title>WIZnet Relay Control</title>"
"<meta name='viewport' content='width=device-width, initial-scale=1'>"
"<style>"
"  body {"
"    font-family: Arial, sans-serif;"
"    background: linear-gradient(to bottom, #f5f7fa, #c3cfe2);"
"    height: 100vh;"
"    margin: 0;"
"    display: flex;"
"    justify-content: center;"
"    align-items: center;"
"    text-align: center;"
"  }"
"  .container {"
"    background: white;"
"    border-radius: 15px;"
"    box-shadow: 0 10px 30px rgba(0,0,0,0.1);"
"    padding: 40px;"
"    width: 90%;"
"    max-width: 500px;"
"  }"
"  h1 {"
"    color: #2c3e50;"
"    margin-bottom: 30px;"
"  }"
"  .btn-group {"
"    display: flex;"
"    justify-content: center;"
"    gap: 20px;"
"    margin-top: 20px;"
"  }"
"  .btn {"
"    border: none;"
"    color: white;"
"    padding: 15px 30px;"
"    text-align: center;"
"    text-decoration: none;"
"    display: inline-block;"
"    font-size: 18px;"
"    border-radius: 8px;"
"    cursor: pointer;"
"    transition: all 0.3s ease;"
"    width: 120px;"
"  }"
"  .btn-on {"
"    background: #2ecc71;"
"  }"
"  .btn-on:hover {"
"    background: #27ae60;"
"    transform: translateY(-2px);"
"    box-shadow: 0 5px 15px rgba(46, 204, 113, 0.4);"
"  }"
"  .btn-off {"
"    background: #e74c3c;"
"  }"
"  .btn-off:hover {"
"    background: #c0392b;"
"    transform: translateY(-2px);"
"    box-shadow: 0 5px 15px rgba(231, 76, 60, 0.4);"
"  }"
"  .status {"
"    margin-top: 30px;"
"    padding: 15px;"
"    border-radius: 8px;"
"    background: #f8f9fa;"
"    font-weight: bold;"
"  }"
"</style>"
"</head>"
"<body>"
"<div class='container'>"
"  <h1>Relay Control Panel</h1>"
"  <form action='control.cgi' method='post'>"
"    <div class='btn-group'>"
"      <button type='submit' name='cmd' value='ON' class='btn btn-on'>Turn ON</button>"
"      <button type='submit' name='cmd' value='OFF' class='btn btn-off'>Turn OFF</button>"
"    </div>"
"  </form>"
"  <div class='status' id='status'>Current Status: Idle</div>"
"</div>"
"<script>"
"  document.querySelector('form').addEventListener('submit', function(e) {"
"    e.preventDefault();"
"    const formData = new FormData(this);"
"    const cmd = formData.get('cmd');"
"    "
"    // Update status display"
"    document.getElementById('status').textContent = "
"      `Current Status: ${cmd === 'ON' ? 'Turning ON...' : 'Turning OFF...'}`;"
"    "
"    // Show success message"
"    setTimeout(() => {"
"      document.getElementById('status').textContent = "
"        `Success! Relay is now ${cmd === 'ON' ? 'ON' : 'OFF'}`;"
"    }, 1000);"
"    "
"    // Submit form"
"    fetch('control.cgi', {"
"      method: 'POST',"
"      body: formData"
"    });"
"  });"
"</script>"
"</body>"
"</html>";

#endif

html
4.2 HTTP processing file modification
CGI Processing:
The `http_post_cgi_handler` handles the `control.cgi` request, using `get_http_param_value` to retrieve the value of the `cmd` parameter. Based on this value, it controls the relay's on/off state and prints the result via serial port to a webpage.
When the `ON` button is clicked, the relay turns on and prints "Relay ON".
When the `OFF` button is clicked, the relay turns off and prints "Relay OFF".
#include "httpUtil.h"
#include "httpParser.h"
#include <stdio.h>
#include <string.h>

// 响应页面
const char success_page[] = "<html><head><meta http-equiv='refresh' content='3;url=/'></head>"
                           "<body><h1 align='center'>Command executed successfully!</h1>"
                           "<p align='center'>Returning to main page in 3 seconds...</p></body></html>";

uint8_t http_get_cgi_handler(uint8_t * uri_name, uint8_t * buf, uint32_t * file_len)
{
   uint8_t ret = HTTP_OK;
   uint16_t len = 0;

   // 处理获取状态的请求
   if(strcmp((const char *)uri_name, "status.cgi") == 0)
   {
       // 返回当前状态(这里简化为固定值)
       len = sprintf((char *)buf, "OK");
       *file_len = len;
   }
   else
   {
       // 其他GET请求
       ret = HTTP_FAILED;
   }

   return ret;
}

uint8_t http_post_cgi_handler(uint8_t * uri_name, st_http_request * p_http_request, uint8_t * buf, uint32_t * file_len)
{
   uint8_t ret = HTTP_OK;
   uint16_t len = 0;

   // 处理控制命令
   if(strcmp((const char *)uri_name, "control.cgi") == 0)
   {
       uint8_t *cmd = get_http_param_value((char*)p_http_request->URI, "cmd");
       if(cmd)
       {
           if(strcmp((char*)cmd, "ON") == 0)
           {
         printf("--------------Relay ON--------------\r\n");//可添加控制继电器开的逻辑
                 fflush(stdout);
               len = sprintf((char *)buf, "%s", success_page);
           }
           else if(strcmp((char*)cmd, "OFF") == 0)
           {
        printf("--------------Relay OFF--------------\r\n");//可添加控制继电器关的逻辑
                 fflush(stdout);
               len = sprintf((char *)buf, "%s", success_page);
           }
           else
           {
               len = sprintf((char *)buf, "<html><body><h1>Invalid Command</h1></body></html>");
           }
       }
       else
       {
           len = sprintf((char *)buf, "<html><body><h1>No Command Received</h1></body></html>");
       }

       *file_len = len;
   }
   else
   {
       // 其他POST请求
       ret = HTTP_FAILED;
   }

   return ret;
}

__attribute__((weak)) uint8_t predefined_get_cgi_processor(uint8_t * uri_name, uint8_t * buf, uint16_t * len)
{

   return 0;
}

__attribute__((weak)) uint8_t predefined_set_cgi_processor(uint8_t * uri_name, uint8_t * uri, uint8_t * buf, uint16_t * len)
{

   return 0;
}
4.3 HTTP Server File Modification
Ensure that http_post_cgi_handler is called correctly.
// ... (在 http_process_handler 函数中)
       case METHOD_POST :
           mid((char *)p_http_request->URI, "/", " HTTP", (char *)uri_buf);
           uri_name = uri_buf;
           find_http_uri_type(&p_http_request->TYPE, uri_name);

           // 确保识别为CGI类型
           p_http_request->TYPE = PTYPE_CGI;

The `httpServer_run` function is the core runtime function of the W5100S HTTP server, employing a state machine design pattern to manage the HTTP connection lifecycle. By monitoring changes in the socket state, the function implements the complete process of receiving, parsing, processing, and sending responses to HTTP requests.
void httpServer_run(uint8_t seqnum)
{
uint8_t s; // socket number
uint16_t len;
uint32_t gettime = 0;
http_request = (st_http_request *)pHTTP_RX; // HTTP请求缓冲区
parsed_http_request = (st_http_request *)pHTTP_TX; // 解析后的请求缓冲区
s = getHTTPSocketNum(seqnum); // 获取硬件Socket编号
/* 根据Socket状态执行不同处理 */
switch (getSn_SR(s))
{
case SOCK_ESTABLISHED:
// 已建立连接,处理HTTP请求
break;
case SOCK_CLOSE_WAIT:
// 连接关闭等待,断开连接
break;
case SOCK_CLOSED:
// 连接已关闭,重新初始化Socket
break;
case SOCK_INIT:
// Socket初始化,开始监听
break;
case SOCK_LISTEN:
// 监听状态,等待连接
break;
default:
break;
}
}
Core state handling logic
1. Connection Established State (SOCK_ESTABLISHED)
This state handles the receipt of HTTP requests and the generation of responses:
case SOCK_ESTABLISHED:
   // 清除连接中断标志
   if (getSn_IR(s) & Sn_IR_CON)
   {
       setSn_IR(s, Sn_IR_CON);
   }

   // HTTP处理子状态机
   switch (HTTPSock_Status[seqnum].sock_status)
   {
       case STATE_HTTP_IDLE:
           // 接收HTTP请求数据
           if ((len = getSn_RX_RSR(s)) > 0)
           {
               len = recv(s, (uint8_t *)http_request, len);
               http_request[len] = '\0'; // 字符串终止符

               // 解析HTTP请求
               parse_http_request(parsed_http_request, http_request);

               // 处理HTTP请求并生成响应
               http_process_handler(s, parsed_http_request);

               // 等待发送缓冲区清空
               while (getSn_TX_FSR(s) != getSn_TxMAX(s))
               {
                   if (get_httpServer_timecount() - gettime > 3)
                   {
                       printf("发送超时\r\n");
                       break;
                   }
               }

               // 更新状态
               if (HTTPSock_Status[seqnum].file_len > 0)
                   HTTPSock_Status[seqnum].sock_status = STATE_HTTP_RES_INPROC;
               else
                   HTTPSock_Status[seqnum].sock_status = STATE_HTTP_RES_DONE;
           }
           break;

       case STATE_HTTP_RES_INPROC:
           // 发送剩余的响应数据
           send_http_response_body(s, 0, http_response, 0, 0);
           if (HTTPSock_Status[seqnum].file_len == 0)
               HTTPSock_Status[seqnum].sock_status = STATE_HTTP_RES_DONE;
           break;

       case STATE_HTTP_RES_DONE:
           // 响应发送完成,重置状态
           HTTPSock_Status[seqnum] = (st_http_socket){STATE_HTTP_IDLE, 0, {0}, 0, 0, 0};
           http_disconnect(s);
           break;
   }
   break;
2. Connection Close Waiting State (SOCK_CLOSE_WAIT)
Handling connection close requests:
case SOCK_CLOSE_WAIT:
   printf("> HTTPSocket[%d] : ClOSE_WAIT\r\n", s);
   disconnect(s); // 主动断开连接
   break;

3. Connection closed (SOCK_CLOSED)
Reinitialize the Socket and start listening:
case SOCK_CLOSED:
   printf("> HTTPSocket[%d] : CLOSED\r\n", s);
   if (socket(s, Sn_MR_TCP, HTTP_SERVER_PORT, 0x00) == s)
   {
       printf("> HTTPSocket[%d] : OPEN\r\n", s);
       listen(s); // 开始监听
   }
   break;
4. Initialization State (SOCK_INIT)
Start listening for connections:
case SOCK_INIT:
   listen(s); // 启动监听
   break;
5. Function Verification
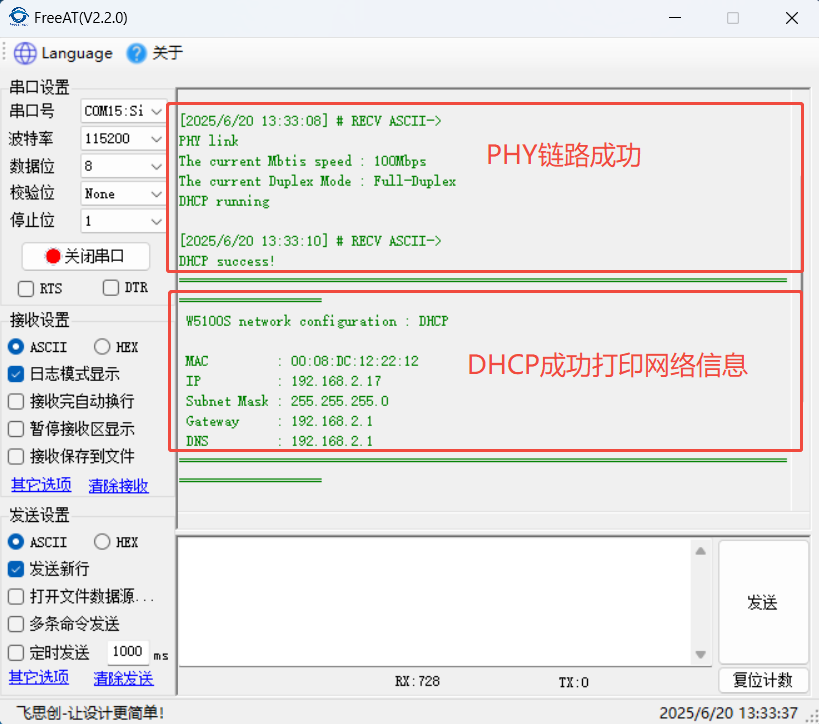
After hardware connection is complete, the following information will be printed upon power-on after programming:
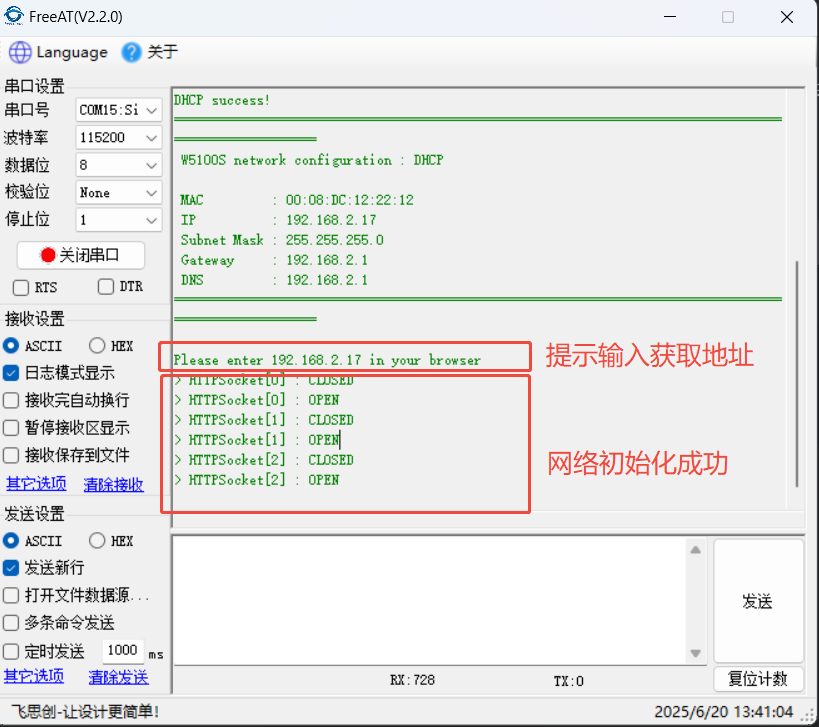
Next, enter the address in your browser to access the webpage.
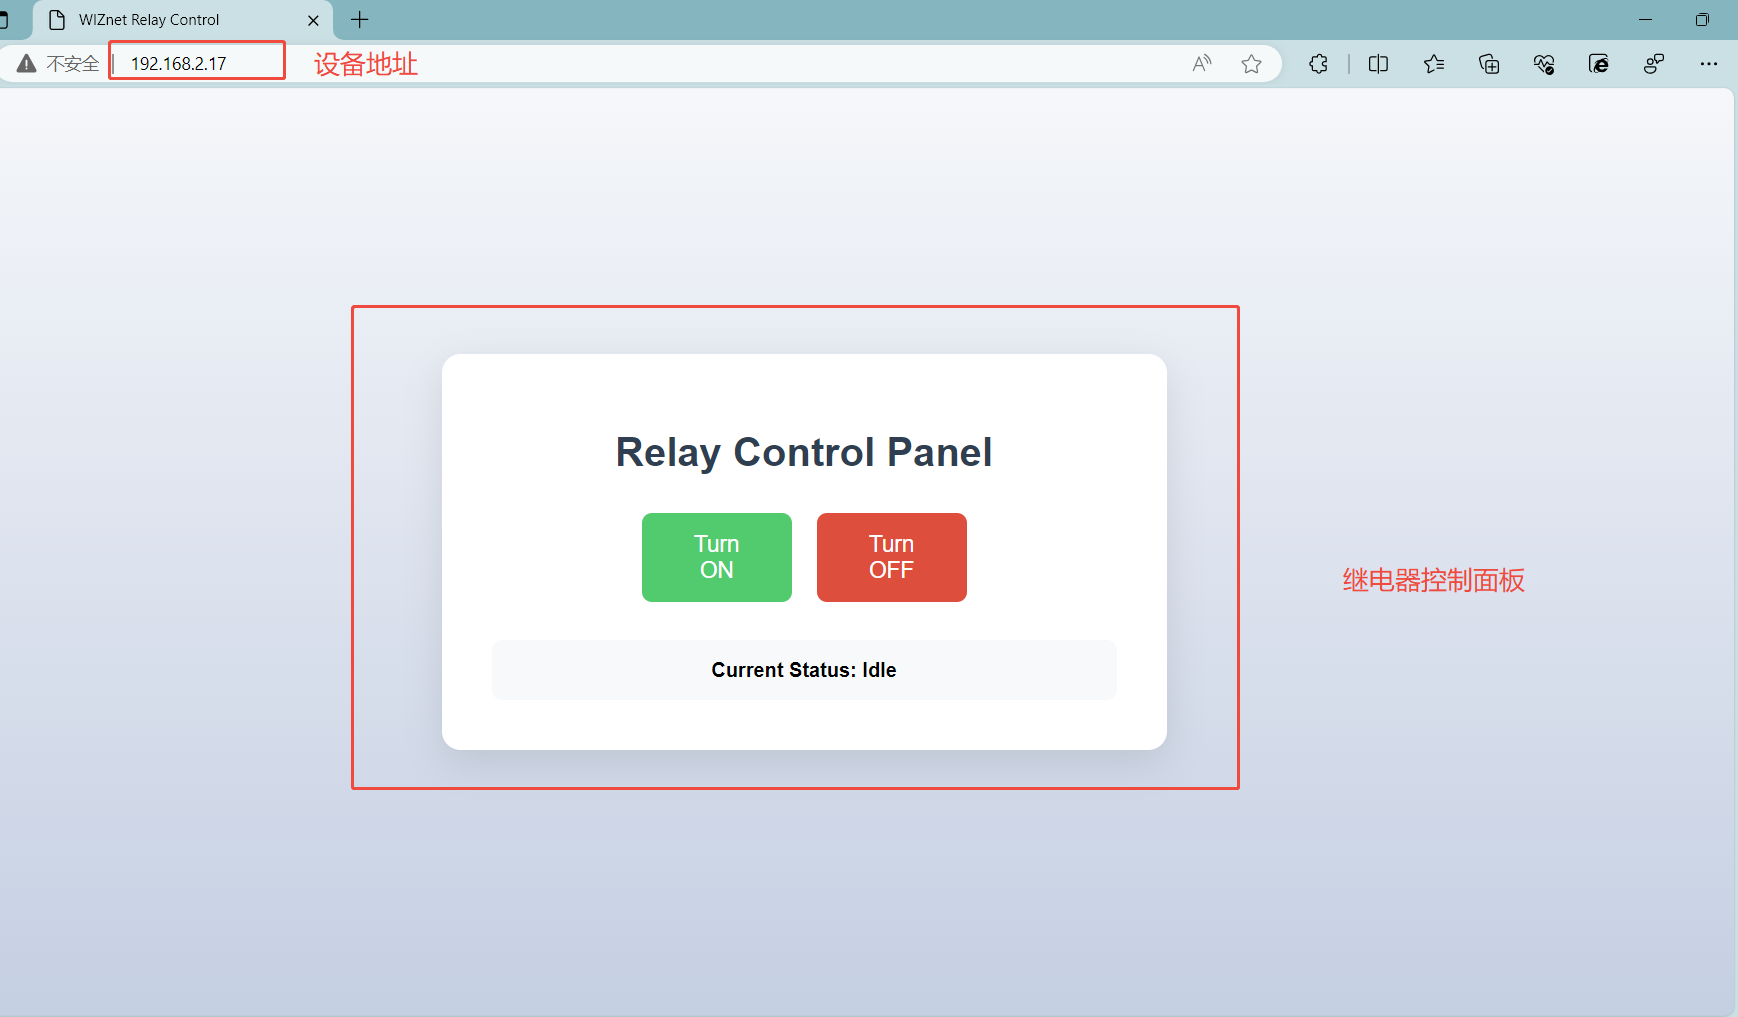
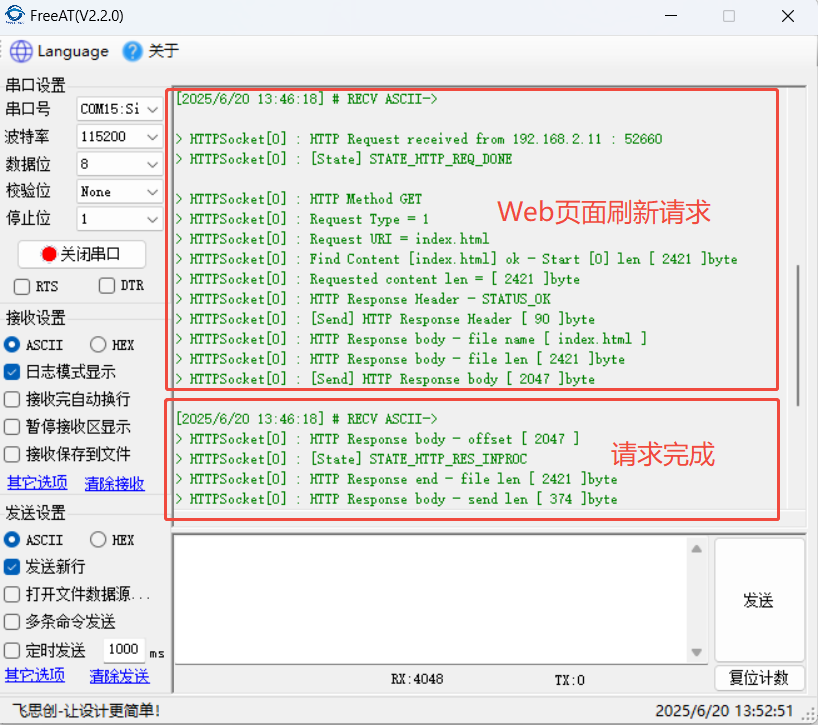
Clicking the control button will display a message indicating successful command execution. Refresh the webpage after 3 seconds.

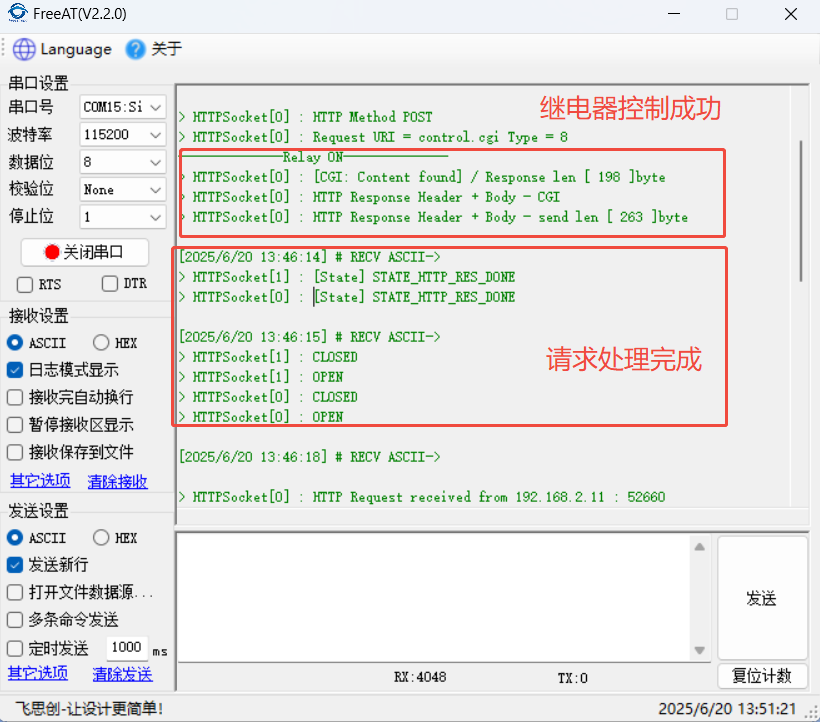
Clicking "Turn ON" on the webpage will print the following information via the serial port:
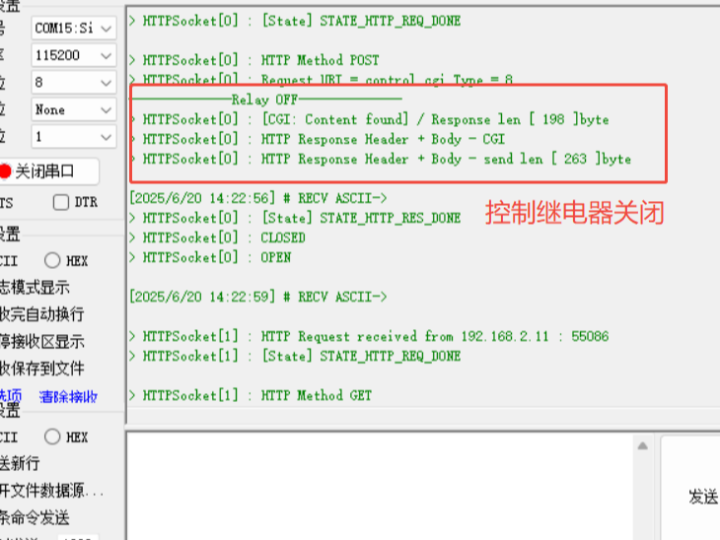
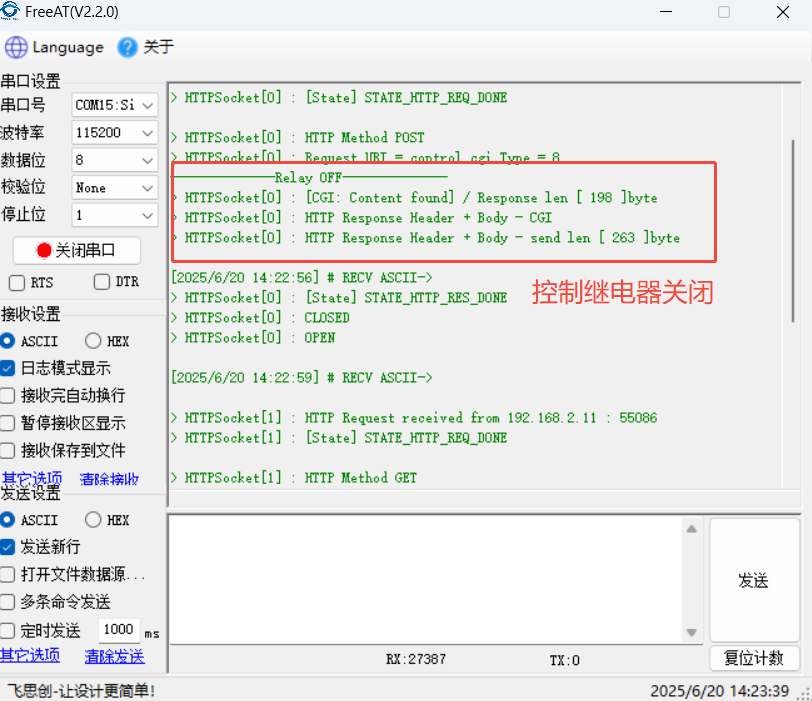
Clicking "Turn OFF" on the webpage will print the following information via the serial port:
6. Conclusion
This project successfully implemented remote control of relays via a web page by combining the W5100Sio-M module with an STM32 microcontroller, verifying the feasibility of an Ethernet-based embedded web server solution. Thank you for your patience in reading! If you have any questions during the reading process, or would like to learn more about this product and its applications, please feel free to leave a message via private message or in the comments section. We will reply to your message as soon as possible to provide you with more detailed answers and assistance!
————————————————
Copyright Notice: This article is an original article by CSDN blogger "Playing with Ethernet," and is licensed under CC 4.0 BY-SA. Please include the original source link and this statement when reprinting.
Original Link: https://blog.csdn.net/2301_81684513/article/details/148852087