


Getting Started with WIZnet Ethernet Development in ESP-IDF
WSM Component Configuration Guide (Complete in 10 Minutes)
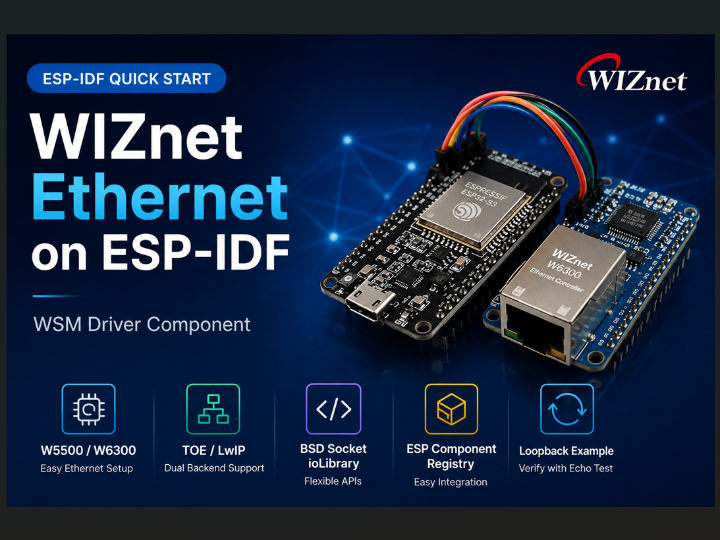
Table of Contents
0.Overview
1. What Is the WSM Driver Component?
2. Adding the WSM Driver Component to Your Project
3. Configuring the WSM Driver Component (menuconfig)
4. Using the WSM Driver Component in Your Own Project
5. Introduction to Loopback example
6. Running the Loopback Example — TOE + Wi-Fi
7. Running the Loopback Example — LwIP + Wi-Fi
8. Explore More Examples
0.Overview
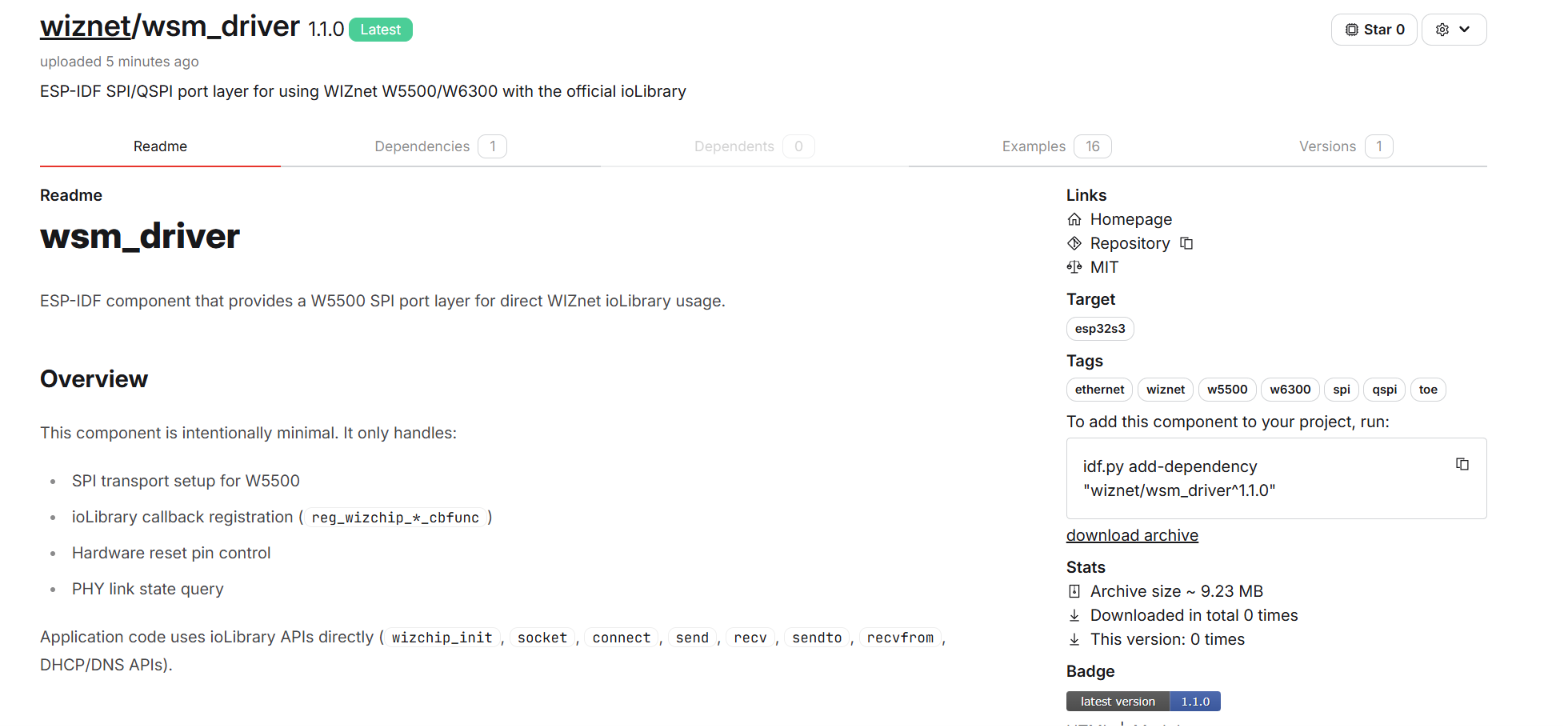
https://components.espressif.com/components/wiznet/wsm_driver
https://github.com/Wiznet/wsm_driver
This is a practical guide covering how to add the WSM Driver Component to your ESP-IDF project, configure it, and use it.
At the end, you will run the examples/loopback example provided by the repository to verify that the Component is working properly.
Previously, using the W5500/W6300 required developers to manually configure SPI settings, chip initialization, ioLibrary integration, and other settings for each project.
The WSM Driver Component provides these common tasks as a single ESP-IDF Component, allowing developers to focus on network configuration and application code development.
This document provides a step-by-step guide to adding and configuring the WSM Driver Component in an ESP-IDF project, verifying its operation using examples/loopback, and applying it to your own project.
Naming Guide
This document uses the product name WSM Driver Component.
The GitHub repository and ESP Component Registry are published under the namewsm_driver, so
usewsm_driveras-is in commands and code.
Category Actual Name (Enter as-is) GitHub Repository https://github.com/Wiznet/wsm_driverComponent Registry wiznet/wsm_driver(components.espressif.com)Public Header wsm_driver.hKconfig Symbol CONFIG_WSM_DRIVER_*menuconfig Menu Component config → WIZnet WSM Driver
Document Flow: Install (Chapter 2) → Configure (Chapter 3) → Use (Chapter 4) → Example (Chapter 5) → Run (Chapters 6–7)
1. What Is the WSM Driver Component?
WSM stands for WIZnet SoM Module.
The WSM Driver Component is an ESP-IDF component that sits between ESP-IDF and the WIZnet chip.
Your application uses standard BSD socket code, unchanged.
On the TOE backend you can also call the official WIZnet ioLibrary API directly.
Application  (BSD socket API)
    ↓
WSM Driver Component  (wsm_driver)
    ↓  TOE: chip's hardware TCP/IP  |  ETH: LwIP + esp_eth (MACRAW)
W5500 / W6300
> On the TOE backend both APIs are linked in, but do not drive the same hardware socket through both.
> Calling the ioLibrary API directly also means handling the `close()` rename on your side (see §4-2).
Using the WSM Driver Component makes it easy to get started with the following:
- W5500 / W6300 initialization — Initialize the chip with a single function call
- Network configuration — Configure IP · Subnet · Gateway settings in one place
- BSD Socket — keep using the socket code you already know (the TOE backend can also call ioLibrary directly)
- ESP-IDF project integration — Add it with a single
idf.py add-dependencycommand
The following tasks are handled by the Component, so you do not need to implement them yourself.
- Configure the SPI · QSPI transport layer for W5500 / W6300
- Register ioLibrary callbacks (
reg_wizchip_*_cbfunc) - Control the hardware RESET pin
- Check PHY link status
Supported Scope
| Item | Details |
|---|---|
| Supported Target | ESP32-S3 |
| Supported Chips | W5500 (standard SPI), W6300 (QSPI: Single 1-bit / Quad 4-bit) |
| ESP-IDF | v6.0 or later (hard requirement — v5.x cannot be built) |
| Current Version | 1.1.0 |
| License | MIT (ioLibrary_Driver has a separate license) |
Supported Boards
The WSM Driver Component can be used across WIZnet's ESP32-S3-based EVB and SoM product families.
The Component currently supports ESP32-S3-based products using either the W5500 or W6300, as listed below.
| Category | Product Name | MCU | WIZnet IC | Features |
|---|---|---|---|---|
| EVB | ESP32-W6300-EVB | ESP32S3 | W6300 | Wi-Fi, Bluetooth, Ethernet |
| ESP32-W5500-EVB | ESP32S3 | W5500 | Wi-Fi, Bluetooth, Ethernet | |
| SoM | WSM-W63E(comming soon...) | ESP32S3 | W6300 | Wi-Fi, Bluetooth, Ethernet |
| WSM-W55E(comming soon...) | ESP32S3 | W5500 | Wi-Fi, Bluetooth, Ethernet |
This Quick Start is based on the ESP32-S3 + W5500/W6300 configuration.
Two Network Backends
The WSM Driver Component allows you to select which side owns the TCP/IP stack in menuconfig.
- TOE (hardware TCP/IP) — The chip handles TCP/IP. IPv4 TCP/UDP only.
- esp_eth MACRAW + software LwIP — The chip is used only as an Ethernet MAC, while the ESP32-S3's LwIP owns the stack.
Both Backends use the same initialization function and the same socket code.
Therefore, you can compare TOE and LwIP using the same application code by changing only the Backend configuration.
See Chapter 7 for detailed differences.
Requirements
- ESP32-S3 board + W5500 or W6300 module (EVB / SoM)
- RJ45 LAN cable, USB cable
- ESP-IDF v6.0 or later (on v5.x, the build is stopped by
#error) - TCP test tool: Hercules, etc.
- (Optional) 2.4 GHz Wi-Fi AP — required only for the simultaneous operation test in Chapter 6,7
Wiring
Pins are automatically applied according to the selected chip (Component Kconfig defaults).
| Signal | W5500 (SPI) | W6300 (QSPI) |
|---|---|---|
| MOSI / D0 | 11 | 11 |
| MISO / D1 | 13 | 13 |
| SCLK | 12 | 12 |
| CS | 10 | 10 |
| RESET | 9 | 21 |
| INT | 14 | 8 |
| IO2 (D2) | — | 14 (Quad mode only) |
| IO3 (D3) | — | 9 (Quad mode only) |
The RESET / INT pins differ depending on the chip. If the selected chip does not match the actual wiring, SPI communication will not work.
2. Adding the WSM Driver Component to Your Project
If you are starting a new project, using the Registry is recommended.
It requires only a single command, and there is no need to manage submodules separately.
1) Create a New ESP-IDF Project
#ESP-IDF V6.0.2

idf.py create-project my_project
cd my_project
2) Add the Component
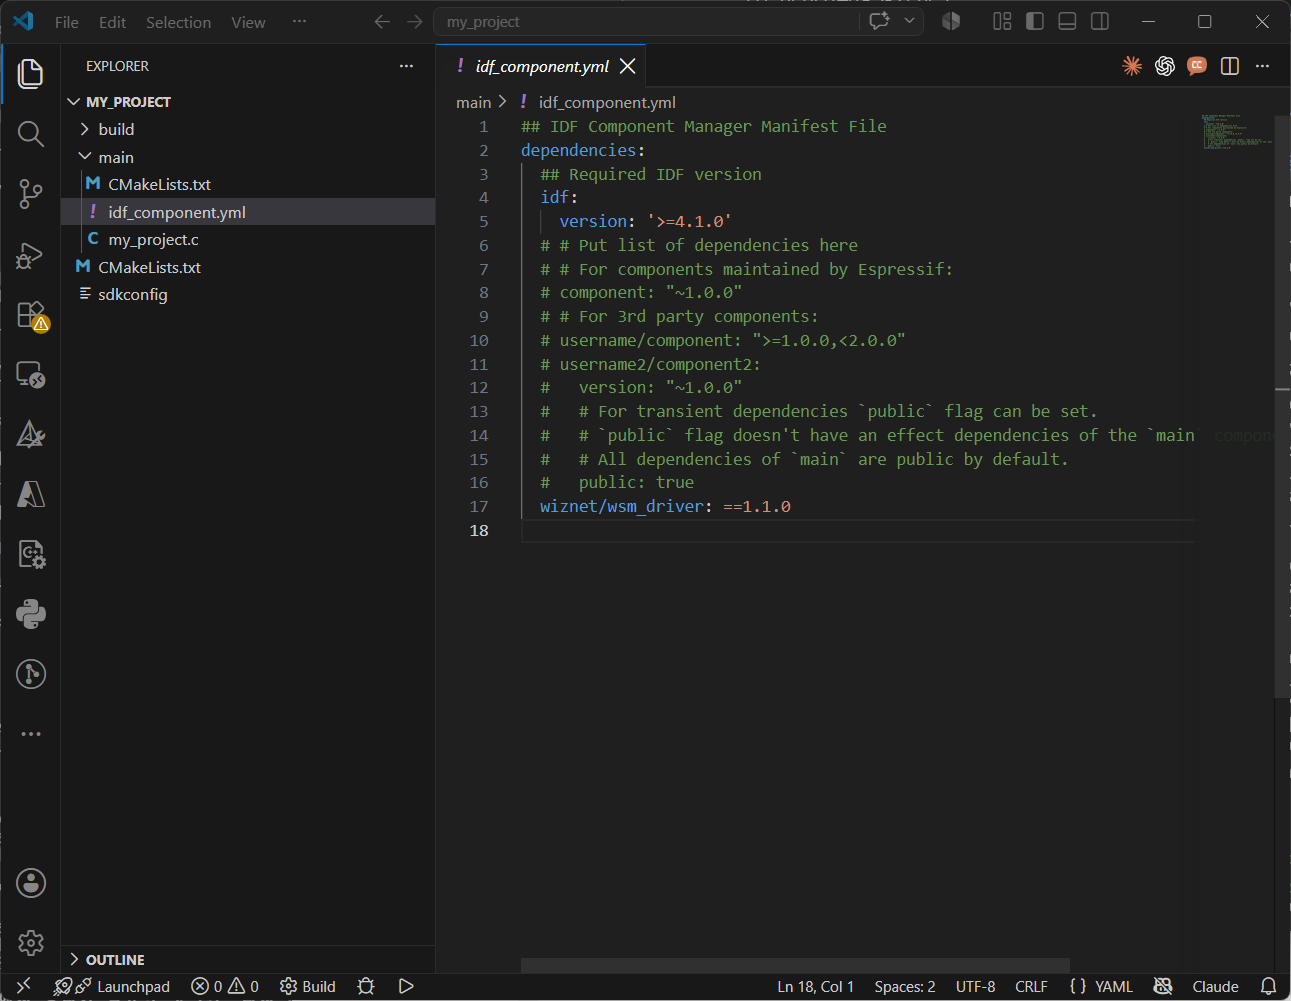
idf.py add-dependency "wiznet/wsm_driver==1.1.0"This command automatically creates main/idf_component.yml and records the dependency.
3) Set the Target
idf.py set-target esp32s3
idf.py set-targetregenerates sdkconfig, so it must be run beforemenuconfig.
After set the target, the Component is automatically downloaded to the following path:
managed_components/wiznet__wsm_driver/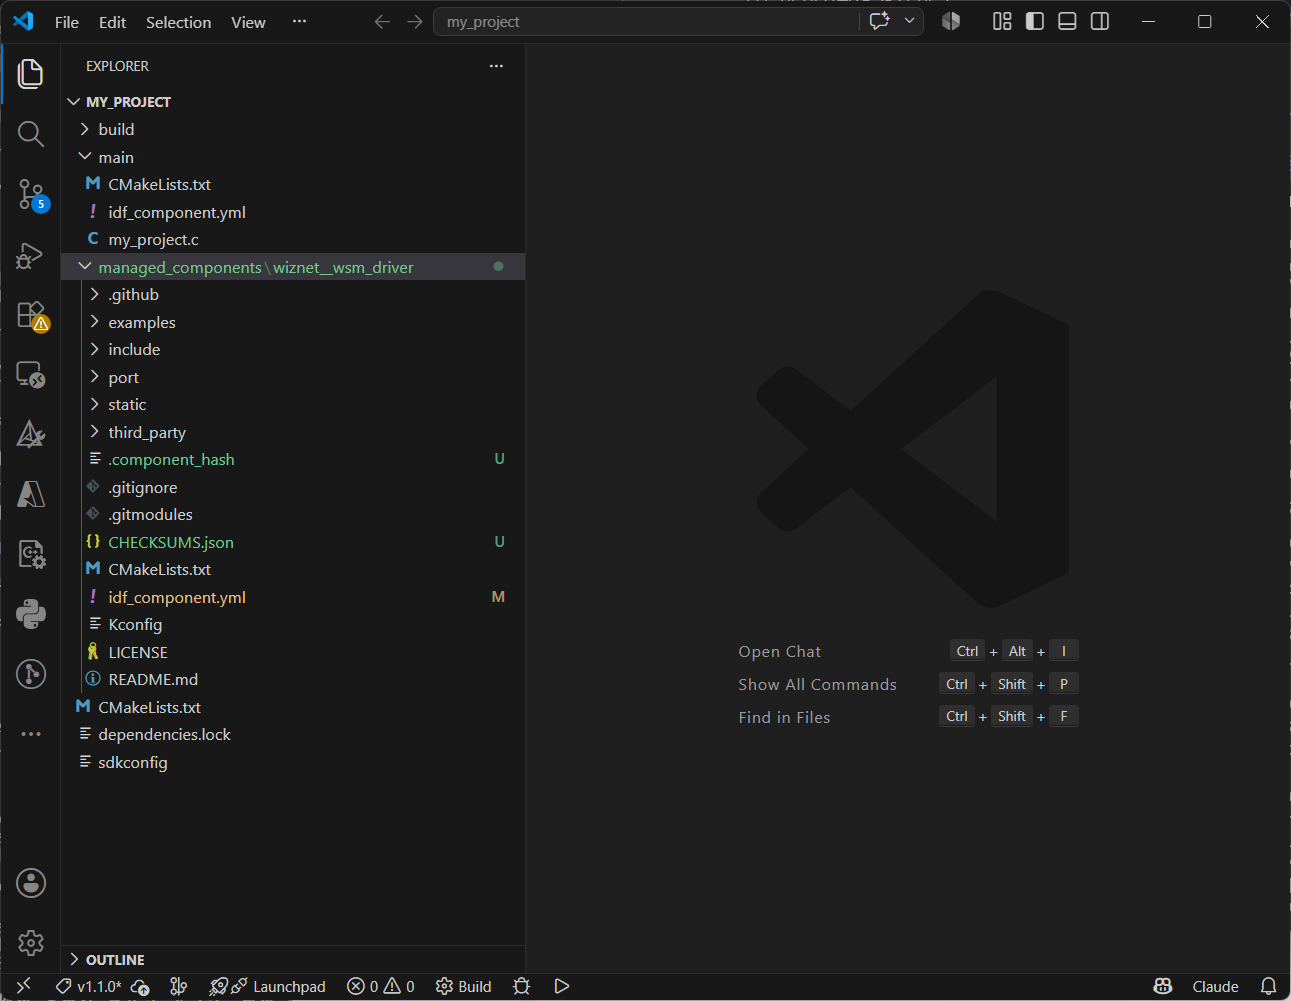
This directory also contains all examples, so you can immediately refer to them or reuse their code.
managed_components/wiznet__wsm_driver/examples/loopback/main/main.c✅ Success Criteria: If main/idf_component.yml is created and managed_components/wiznet__wsm_driver/ appears after the build, the Component has been added successfully.
💡 For most projects, using the ESP Component Registry is sufficient.
The Git Clone method is recommended only when you need to modify the WSM Driver Component directly or test the latest development version.
3. Configuring the WSM Driver Component (menuconfig)
idf.py menuconfig

# Main > Component config > WIZnet WSM Driver
All configuration options are grouped under a single menu shown below.
The WIZnet chip and Network backend options are displayed, with the Backend set to TOE (hardware TCP/IP).
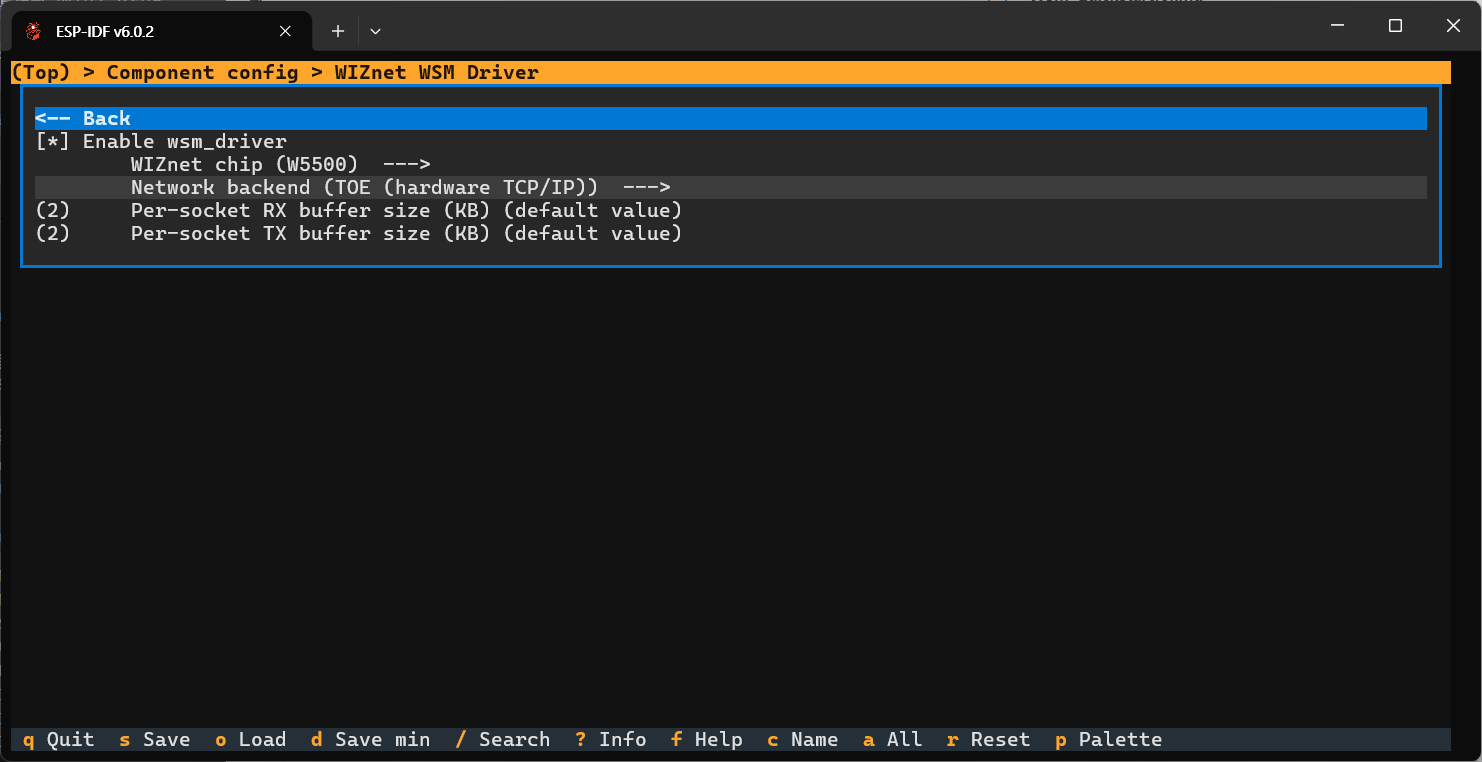
There are three items you must check.
| Item | Default | Description |
|---|---|---|
| ① WIZnet chip | W5500 | Select the option that matches your board. The SPI pins and clock are changed automatically according to the chip. |
| ② Network backend | TOE (hardware TCP/IP) | Select whether the TCP/IP stack is owned by the chip or by the ESP32-S3's LwIP. |
| ③ W6300 QSPI mode | Quad | W6300 only. If IO2/IO3 are not wired, change this to Single. |
The SPI host, clock, and GPIOs are automatically determined according to the selected chip and are not exposed in menuconfig at all.
If you use custom wiring, you must directly modify the corresponding default values in the Component'sKconfig.The per-socket RX / TX buffer sizes are configurable options exposed in menuconfig, as shown in the tree above
(2 KB by default for each, range 1–16 KB). For the Quick Start, leave them at their default values.
When changing the Backend, run
idf.py fullcleanand then rebuild.
✅ Success Criteria: Configuration is complete when the three items above match your board.
4. Using the WSM Driver Component in Your Own Project
Once the WSM Driver Component has been added and configured, you can use it directly in your own ESP-IDF application.
Initialize the WSM Driver
WIZnet Ethernet bring-up requires **only one function call: `wiznet_net_init()`**.
After initialization, you can use standard BSD socket APIs such as `socket()`, `bind()`, `send()`, and `recv()`.
① Prepare network information (wiz_NetInfo)
    ↓
② wiznet_net_init()      ← SPI initialization + chip reset + network configuration in one call
    ↓
③ socket()
    ↓
④ send() / recv()
wiznet_net_init() works under the same name for both the TOE and LwIP Backends.
Therefore, the code below can be used as-is even when switching Backends.
#include "net_backend.h"      /* wiznet_net_init(), wiznet_net_is_up() */
#include "lwip/sockets.h"     /* Standard BSD sockets — include after net_backend.h */

/* ① Network information — ioLibrary standard wiz_NetInfo */
static const wiz_NetInfo g_net_info = {
    .mac = {0x00, 0x08, 0xDC, 0x12, 0x34, 0x56},  /* WIZnet OUI */
    .ip  = {192, 168, 11, 2},
    .sn  = {255, 255, 255, 0},
    .gw  = {192, 168, 11, 1},
    .dns = {8, 8, 8, 8},
#if _WIZCHIP_ > W5500
    .ipmode = NETINFO_STATIC_ALL,
#endif
    .dhcp = NETINFO_STATIC,
};
static const uint16_t port = 5000;

void app_main(void)
{
    /* ② Bring-up in one line */
    wiznet_net_init(&g_net_info);

    while (!wiznet_net_is_up()) { }

    /* ③ Use standard BSD sockets as-is */
    int s = socket(AF_INET, SOCK_STREAM, IPPROTO_TCP);

    /* ④ Then use bind() / listen() / accept() / connect() / send() / recv() */
    int opt = 1;
    setsockopt(s, SOL_SOCKET, SO_REUSEADDR, &opt, sizeof(opt));
    struct sockaddr_in addr = {
        .sin_family = AF_INET,
        .sin_port = htons(port),
        .sin_addr.s_addr = htonl(INADDR_ANY),
    };
    if (bind(s, (struct sockaddr *)&addr, sizeof(addr)) < 0 ||
        listen(s, 1) < 0) {
        close(s);
        return;
    }

    while (1) {
        struct sockaddr_in src;
        socklen_t sl = sizeof(src);
        int c = accept(s, (struct sockaddr *)&src, &sl);
        if (c < 0) {
            continue;
        }
        while (1) {
            int n = recv(c, buf, 256, 0);
            if (n <= 0) {
                break;
            }
            int off = 0;
            while (off < n) {                 /* echo back, handle partial sends */
                int w = send(c, buf + off, n - off, 0);
                if (w < 0) {
                    break;
                }
                off += w;
            }
        }
        close(c);
    }
}
Include
net_backend.hbeforelwip/sockets.h.
If the order is reversed, the build will fail due to aSOCK_STREAMname conflict.
Add the Component Dependency
To use the code above, you must tell the ESP-IDF build system that the main component depends on the WSM Driver Component.
Therefore, add wsm_driver to REQUIRES in idf_component_register() in main/CMakeLists.txt.
idf_component_register(SRCS "main.c"
                       INCLUDE_DIRS "."
                       REQUIRES wsm_driver)
With the TOE Backend, standard BSD socket calls are automatically connected to the chip's hardware sockets, so standard socket code can be used without modification. examples/loopback uses this method.
This automatic connection is implemented by intercepting lwIP socket entry points at the link stage (
-Wl,--wrap=lwip_*) and is always enabled in the TOE Backend (CONFIG_WSM_DRIVER_SOCKET_WRAP, defaulty).
This symbol is not exposed in menuconfig, so it cannot be disabled or changed.
The TOE limitations still apply: eight hardware sockets and IPv4 TCP/UDP only.
Build and Verify Your Application
idf.py build
idf.py -p COMXX flash monitor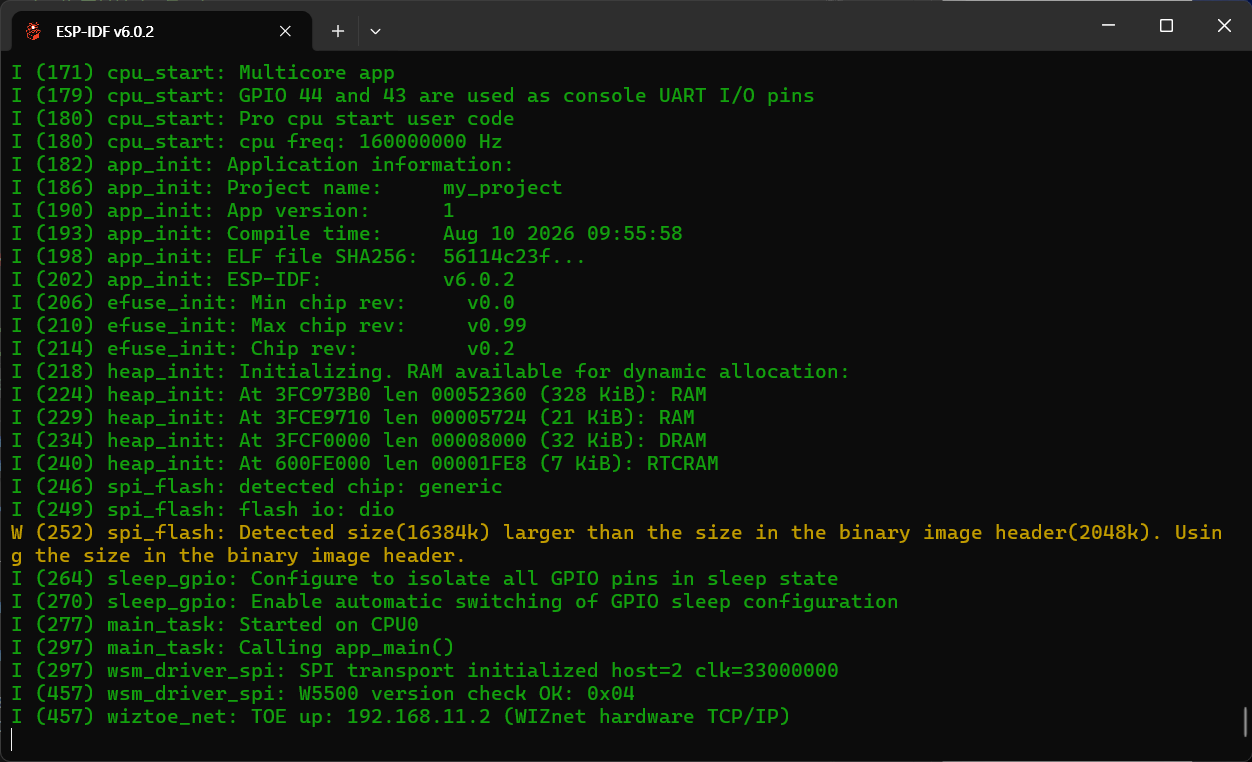
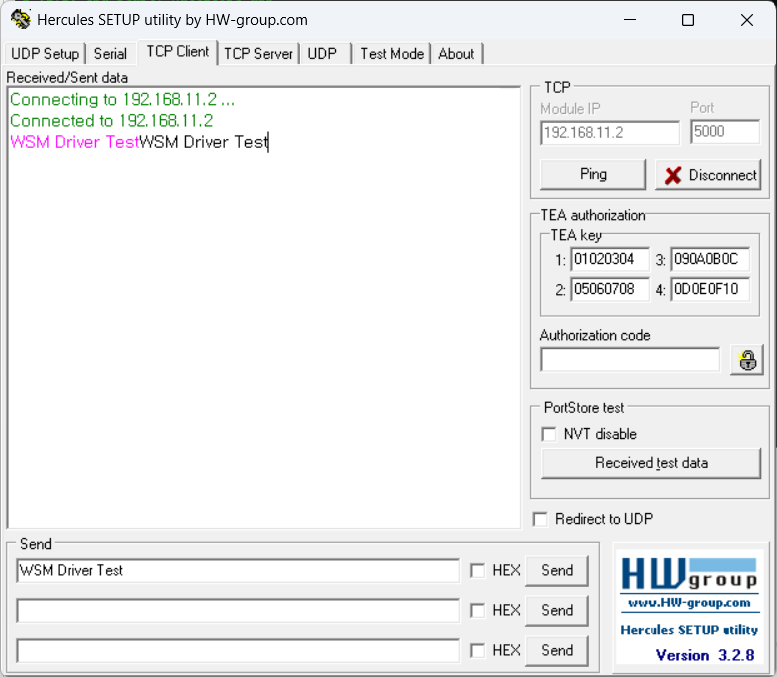
✅ Success Criteria
The setup is ready for testing when the code builds and runs successfully, and the configured IP address is correctly displayed in the log.
Configure Tera Term in TCP Client mode and connect to the configured IP address and port. Once the connection is established, send data and verify that the transmitted data is successfully looped back.
5. Introduction to Loopback example
Up to this point, we have covered how to use the Component.
Now, we will use the example provided by the repository to verify that the configuration and wiring above actually work.
examples/loopback is the representative example for verifying Component operation among the available examples. There are three reasons for choosing it.
It is written using standard BSD socket code, directly demonstrating the usage described in Section 4.
It builds with both the TOE and LwIP Backends without changing the application code (Chapter 7).
It runs the same Echo engine on both Ethernet and Wi-Fi, allowing simultaneous operation to be verified (Chapter 6,7).
Because it is an Echo (loopback) server, if the transmitted data is returned unchanged, the Component is working properly.
We will proceed using the default TCP Server mode, so there is nothing to change separately.
📌 There Are Only Two Places to Modify in the Quick Start
What You Want to Change Where to Configure It IP · Port · Wi-Fi SSID/PASS examples/loopback/inc/net_config.hChip · Backend · QSPI Mode idf.py menuconfig(Chapter 3)/* ---- Wi-Fi STA config (fill in your AP credentials) ---- */ #define WIFI_SSID "your-ssid" #define WIFI_PASS "your-password"Do not modify anything other than these two locations.
The following values are defined in examples/loopback/inc/net_config.h. You can proceed with the default values as-is.
#define NET_IP_ADDR           {192, 168, 11, 2}    /* Static IP (not DHCP) */
#define NET_SUBNET_MASK       {255, 255, 255, 0}
#define NET_GATEWAY           {192, 168, 11, 1}

#define LOOPBACK_PORT         5000                 /* Ethernet echo port */
#define WIFI_LOOPBACK_PORT    5001                 /* Wi-Fi echo port */
There is only one thing to check: Make sure the PC is on the same Subnet.
Set the wired network adapter to a static address in the 192.168.11.x/24 range (for example, 192.168.11.100), or modify NET_IP_ADDR to match the PC's network range.
If you change any values in
net_config.h, you must rebuild the project.
Ethernet verification works normally even if the Wi-Fi settings are left empty.
6. Running the Loopback Example — TOE + Wi-Fi
Build → Flash → Monitor
cd managed_components/wiznet__wsm_driver/examples/loopback
idf.py set-target esp32s3
idf.py menuconfig          # Check the three items in Chapter 3
idf.py build

idf.py -p COMx flash monitor            # Windows
idf.py -p /dev/ttyUSB0 flash monitor    # Linux / macOS
To exit the monitor, press Ctrl+].
The two lines wiztoe_net: TOE up: 192.168.11.2 (WIZnet hardware TCP/IP) and [eth] TCP server listening on port 5000.
I (522) wiztoe_net: TOE up: 192.168.11.2 (WIZnet hardware TCP/IP)
I (525) loopback: [eth] waiting for link...
I (527) loopback: [eth] loopback: TCP SERVER on port 5000
I (528) loopback: [eth] TCP server listening on port 5000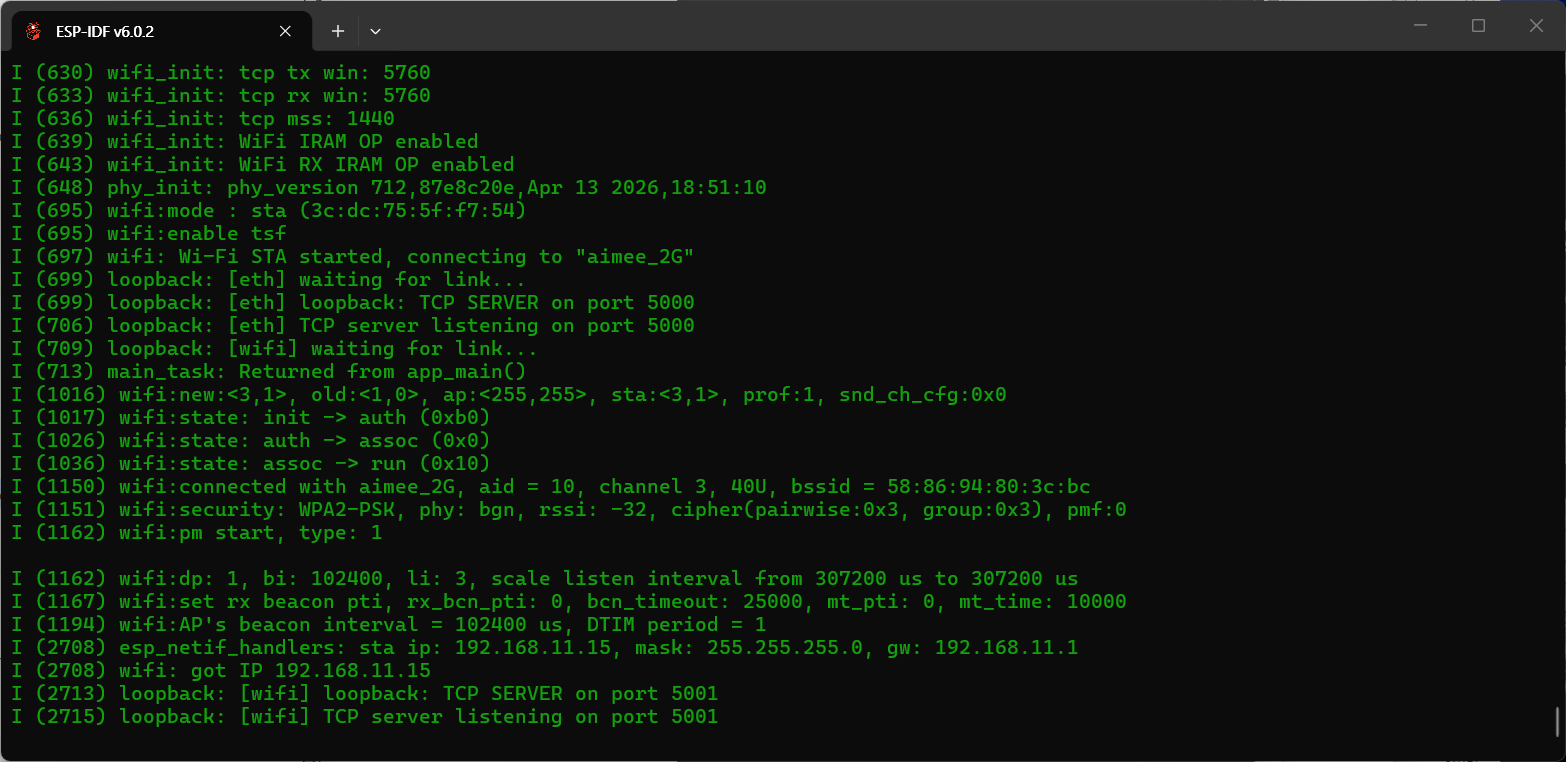
✅ Success Criteria
TOE up: 192.168.11.2is displayed.- The Ethernet TCP server starts on port
5000. - If Wi-Fi is configured, a Wi-Fi IP address is assigned and the Wi-Fi Loopback server starts on port
5001.
Verify TOE + Wi-Fi Simultaneous Operation
If Wi-Fi credentials were configured, keep the Ethernet connection open and launch two Hercules instances.
Use the two connections simultaneously:
| Interface | IP | Port |
|---|---|---|
| Ethernet (TOE) | 192.168.11.2 | 5000 |
| Wi-Fi | IP shown in the serial log | 5001 |
For example:
Send data through both connections and verify that each connection echoes the transmitted data correctly.
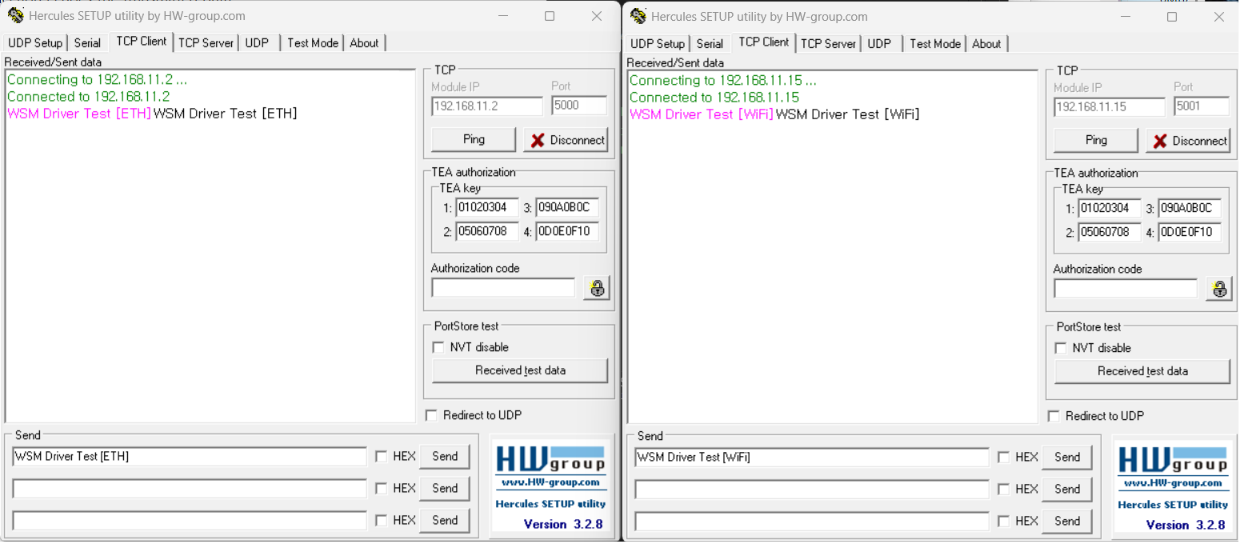
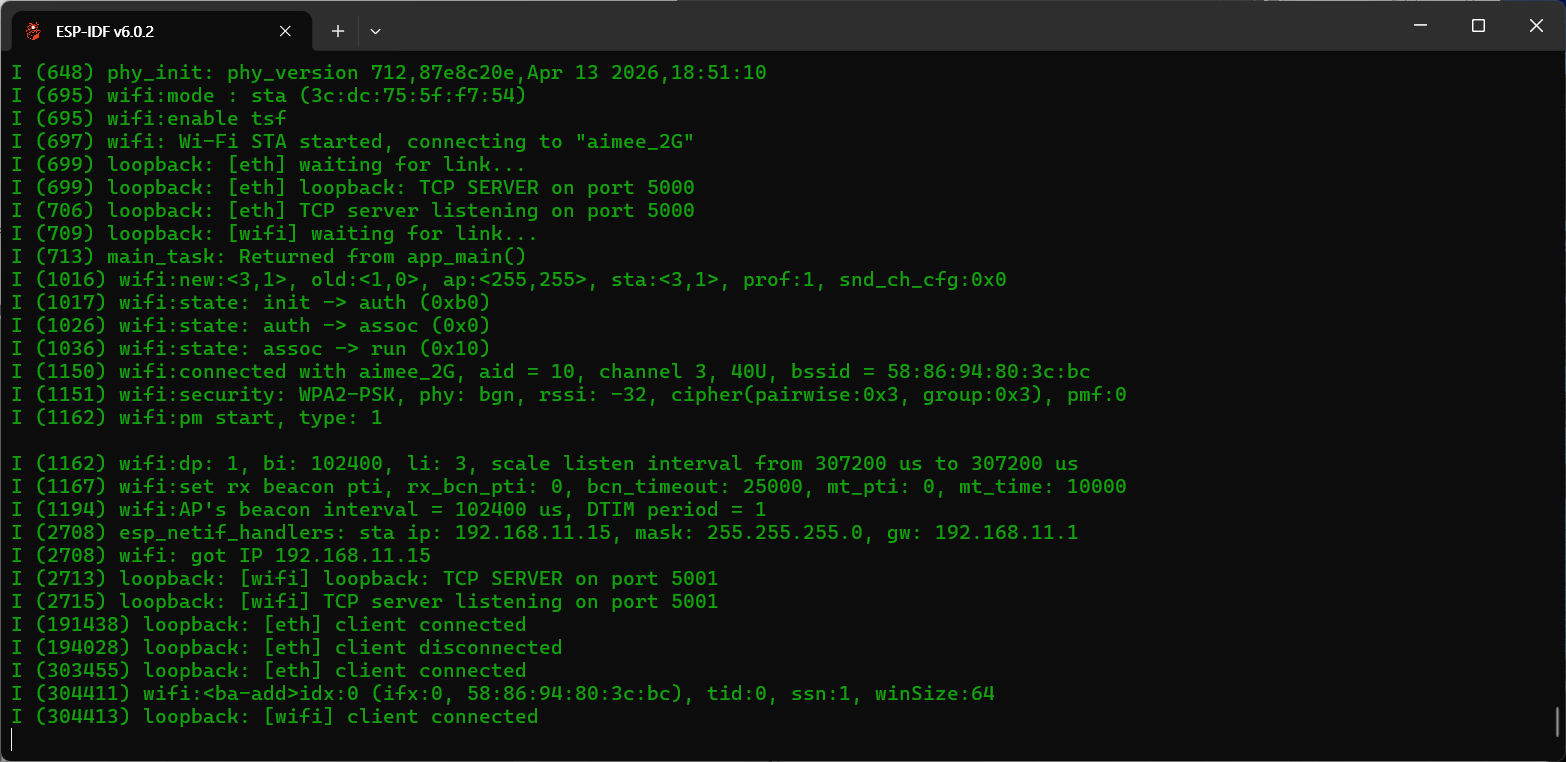
✅ Success Criteria
TOE + Wi-Fi simultaneous operation is successful when:
- Ethernet Echo works on port
5000. - Wi-Fi Echo works on port
5001. - Both connections remain active and operate independently.
[eth]and[wifi]activity can be observed in the serial log.
If Wi-Fi is not configured,
wifi: disconnected — reconnectingmay be displayed repeatedly. This does not affect Ethernet operation.
7. Running the Loopback Example — LwIP + Wi-Fi
Switch only the Ethernet Backend from TOE to LwIP.
The Loopback application code, `net_config.h`, Ethernet IP address, ports, and Wi-Fi settings remain unchanged.
Change the Backend
idf.py fullclean
idf.py menuconfig
Then select:
Component config
└── WIZnet WSM Driver
    └── Network backend
        └── esp_eth MACRAW + software LwIP
After saving the configuration, rebuild and flash:
idf.py build

idf.py -p COMx flash monitor            # Windows
idf.py -p /dev/ttyUSB0 flash monitor    # Linux / macOS
With the LwIP Backend, the log tag changes from wiztoe_net to w5500_eth or w6300_eth.
The Ethernet interface also waits for the actual PHY link before starting.
I (...) w5500_eth: Ethernet started
I (...) loopback: [eth] waiting for link...
I (...) w5500_eth: Ethernet link up
I (...) loopback: [eth] TCP server listening on port 5000
The LwIP Backend waits for the actual Ethernet link status.
If the LAN cable is not connected, it is normal for the system to remain at[eth] waiting for link....
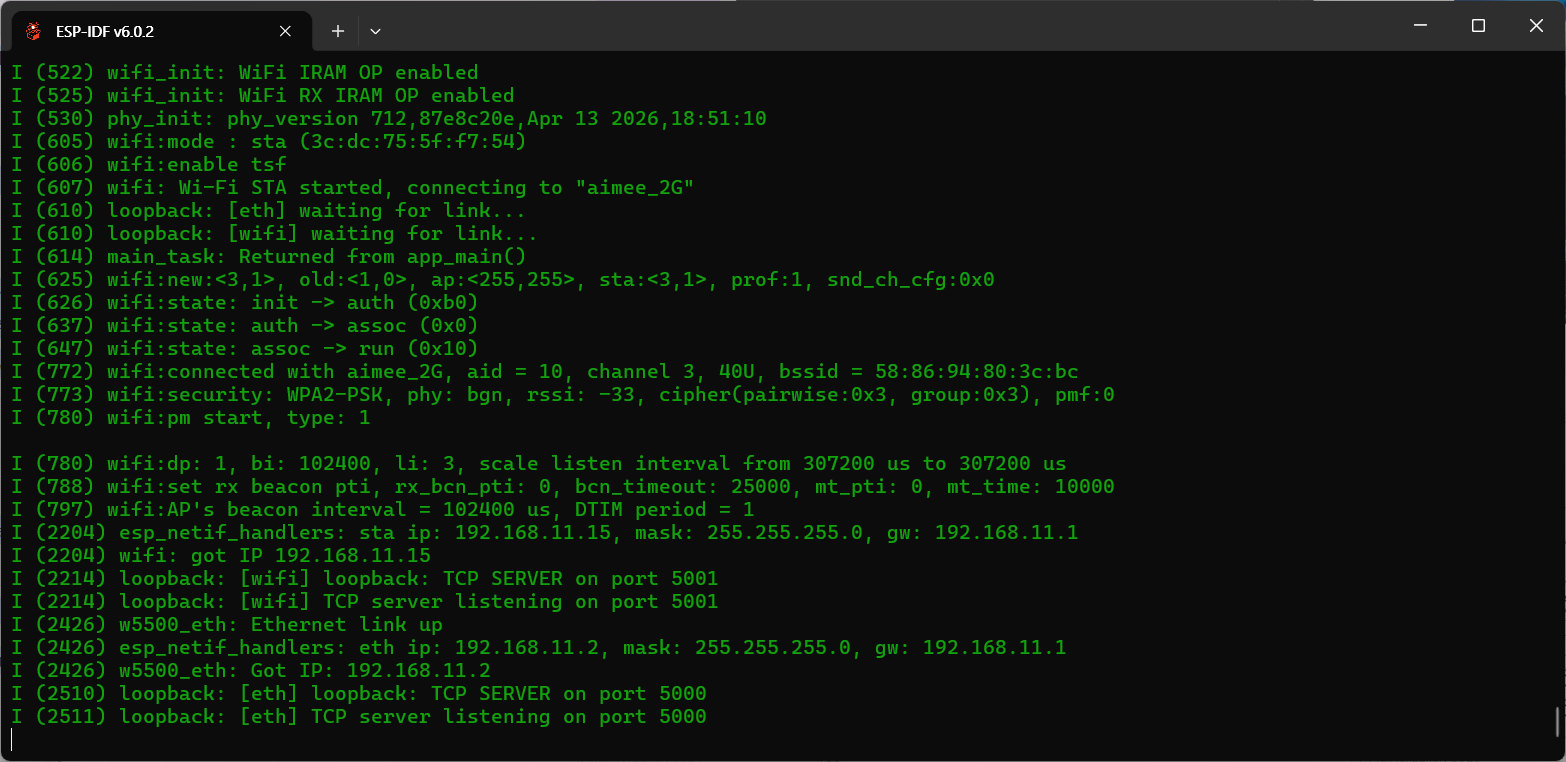
✅ Success Criteria
Ethernet link upis displayed.- The Ethernet TCP server starts on port
5000. - If Wi-Fi is configured, the Wi-Fi Loopback server continues to run on port
5001.
Verify LwIP + Wi-Fi Simultaneous Operation
Use the same two Hercules connections from Chapter 6.
| Interface | IP | Port |
|---|---|---|
| Ethernet (LwIP) | 192.168.11.2 | 5000 |
| Wi-Fi | IP shown in the serial log | 5001 |
Send data through both connections and verify that each connection echoes the transmitted data correctly.
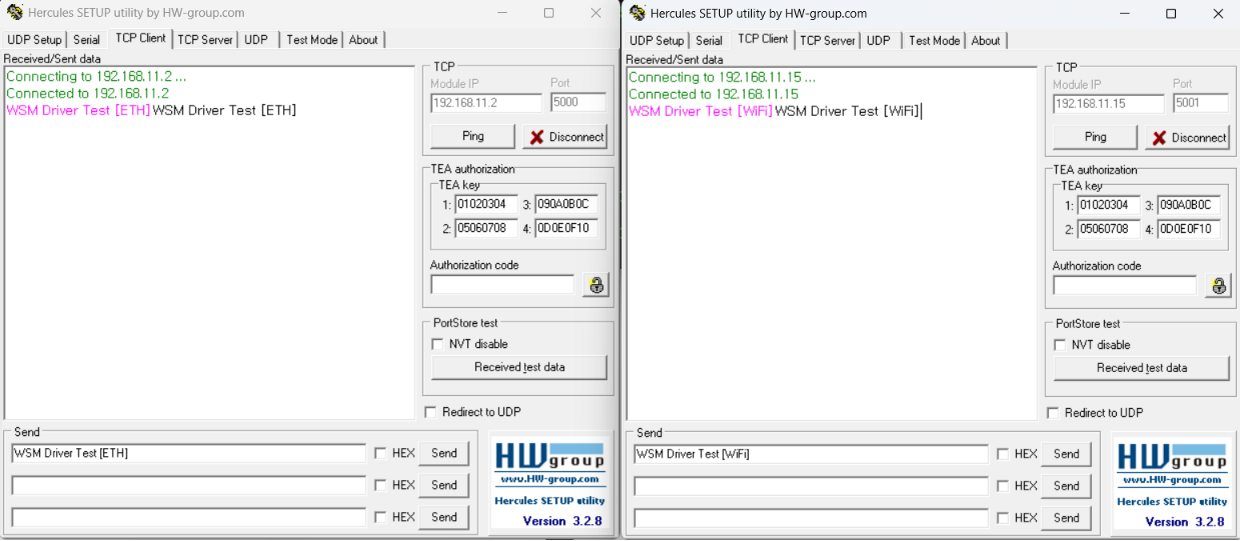
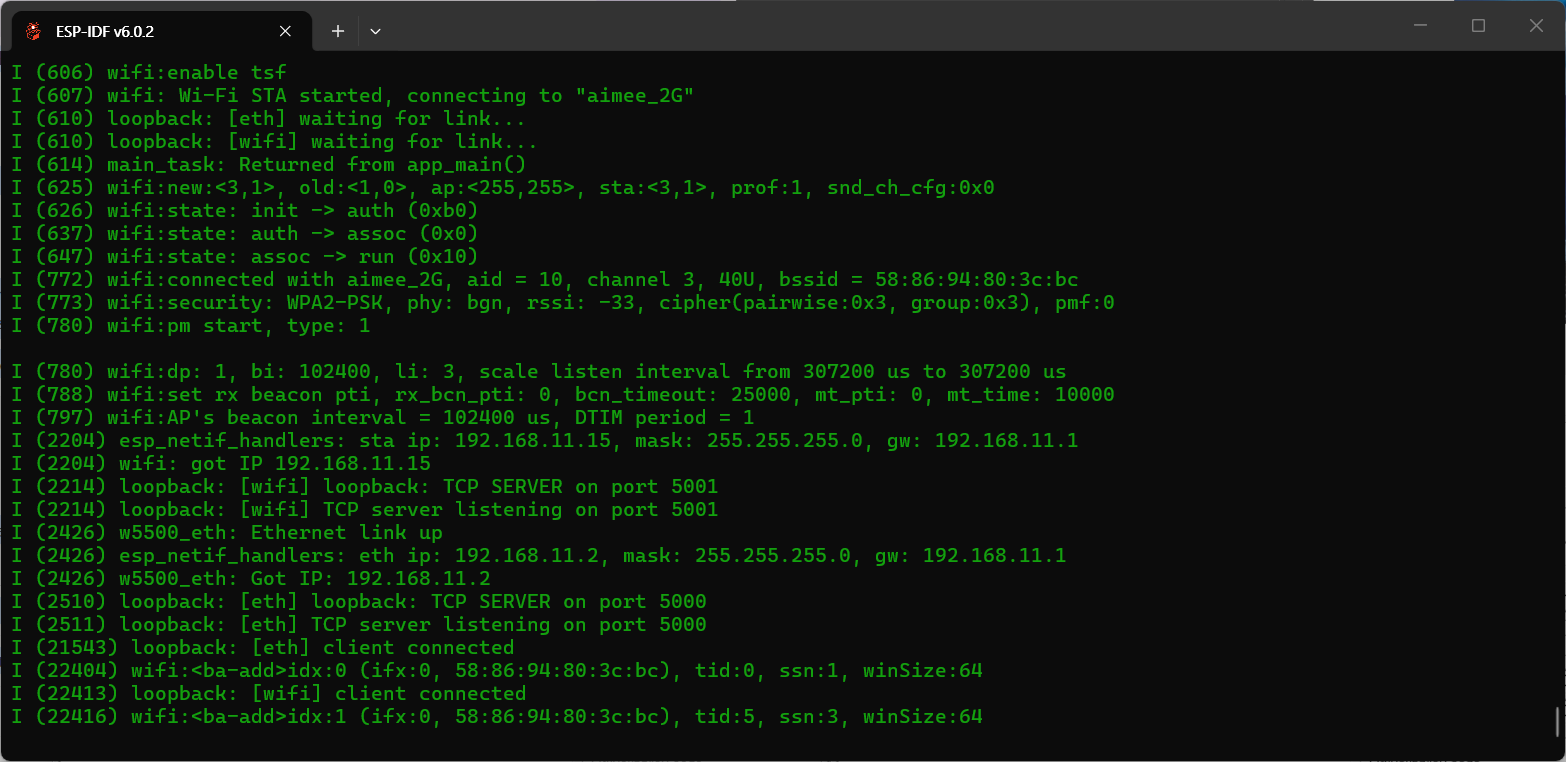
✅ Success Criteria
LwIP + Wi-Fi simultaneous operation is successful when:
- Ethernet Echo works on port
5000. - Wi-Fi Echo works on port
5001. - Both connections remain active and operate independently.
[eth]and[wifi]activity can be observed in the serial log.
At this point, the same Loopback application has been verified with both supported Ethernet Backends:
TOE + Wi-Fi   ✓
LwIP + Wi-Fi  ✓
8. Explore More Examples
After completing the Quick Start, you can explore additional examples provided with the WSM Driver Component.
Each example demonstrates how the same Component can be used for different Ethernet applications.
Representative Examples
The repository provides 16 examples, all of which can be built using idf.py -C examples/<name> build.
Unless otherwise specified, they work with either W5500 or W6300 selected in menuconfig.
| Example | Description |
|---|---|
examples/loopback | TCP Server Echo (used in Chapter 6) · Can switch to TCP Client / UDP modes |
examples/tcp_server_multi_socket | Serves the same port using all hardware sockets |
examples/udp | UDP Echo server or client (selected in menuconfig) |
examples/udp_multicast | UDP multicast reception (224.0.0.5:30000) |
examples/dhcp_dns | DHCP address assignment + DNS lookup |
examples/sntp | Retrieves network time from time.google.com |
examples/tftp | TFTP client file read |
examples/http | HTTP web server (port 80) |
examples/mqtt | MQTT publish / subscribe / bidirectional mode (selected in menuconfig) |
examples/netbios | NetBIOS name service responder |
examples/network_install | PHY link · cable connection check |
examples/upnp | IGD discovery + port mapping (serial menu) |
examples/tcp_client_over_ssl | mbedTLS TLS client (certificate verification disabled for demonstration purposes) |
examples/tcp_server_over_ssl | mbedTLS TLS Echo server (ECDHE-RSA) |
examples/pppoe | Establishes a PPPoE session — W5500 only |
examples/w6300_loopback | W6300-only reference (chip fixed to W6300) |
pppoeworks only with W5500. Because the vendor PPPoE driver uses W5500 registers that are not available on W6300, selecting W6300 causes the build to stop with#error.
Endpoint values (static IP · port · peer address) are defined in
examples/<name>/inc/net_config.h.
The only exception isw6300_loopback, where they are defined inmain/main.c.
Appendix A. Troubleshooting
| Symptom | Cause | Solution |
|---|---|---|
wsm_driver requires ESP-IDF v6.0 or later during build | ESP-IDF is v5.x | Upgrade ESP-IDF to v6.0 or later, then run idf.py fullclean → rebuild |
ioLibrary_Driver submodule not found ... during build | Missing submodule | Run git submodule update --init --recursive, then rebuild |
WIZnet WSM Driver menu is missing in menuconfig | Target is not ESP32-S3 | Run idf.py set-target esp32s3, then run idf.py menuconfig again |
SOCK_STREAM redefinition error | Incorrect include order | Include net_backend.h before lwip/sockets.h |
Repeated wizchip id/version check failed (continuing), no SPI response | Selected chip does not match the actual hardware (RESET/INT pins differ by chip) | Set WIZnet chip to match the board, then run idf.py fullclean → rebuild. Compare the wiring with the table in Chapter 1 |
| No SPI response at all with W6300 | QSPI mode mismatch (Quad selected but IO2/IO3 not wired) | Change W6300 QSPI mode to Single, or wire IO2(14)/IO3(9) |
| Backend was changed, but behavior remains unchanged or a link error occurs | Clean build was not performed | Run idf.py fullclean, then idf.py build |
Stops at [eth] waiting for link... (LwIP Backend) | Ethernet Link Down | Check the LAN cable and hub port. It will proceed automatically when Ethernet link up appears |
Unable to connect to 192.168.11.2:5000 from Hercules | PC subnet mismatch or firewall | Set the PC to 192.168.11.x/24 and add Hercules as a firewall exception |
Repeated wifi: disconnected — reconnecting (Chapter 6,7) | SSID/PASS still contain placeholders, or the AP supports only 5 GHz | Modify net_config.h, then rebuild. Use a 2.4 GHz AP |
Success Criteria
ping 192.168.11.2is an auxiliary method for checking network connectivity.
Final operation verification is based on the Echo result in Hercules.
Appendix B. References
- GitHub Repository:
https://github.com/Wiznet/wsm_driver - ESP Component Registry:
wiznet/wsm_driver(current version1.1.0)
— https://components.espressif.com/components/wiznet/wsm_driver - Component Overview:
README.mdin the repository root - TCP Test Tool: Hercules