
Summary of ping test(ICMP) on W5500
Complete initialization of the main control board W5500 (static IP configuration) and perform a ping test through a LAN computer.
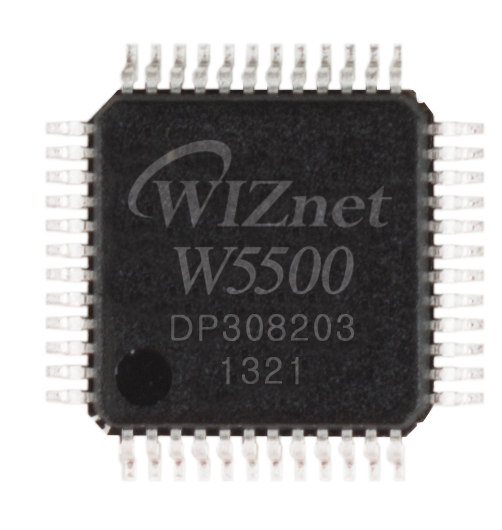
WIZnet - W5500
x 1

Arduino - Arduino IDE
x 1
Summary
This blog post tests the first basic task using the Arduino IDE software. It involves configuring the software by adding and installing the development board library files, downloading the software package, and manually adding the library files. The test code, which is provided, sets up the network card MAC address, static IP, DNS server, gateway, and subnet mask. It also configures the LED and serial port. The code outputs the network card settings and performs a DNS lookup. In the main loop, it sends ping requests and prints the reply information. Running the program shows the configured static IP address in the serial output, allows pinging the network, and can be captured using packet capture tools.
1. Configuration software
1.1. Add development board library files

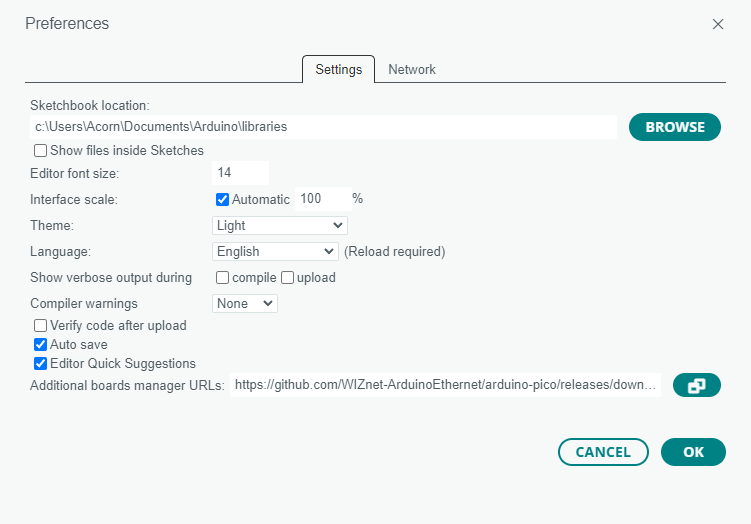
Enter the link below in additional boards manager URLs.
1.2. Install development board library files

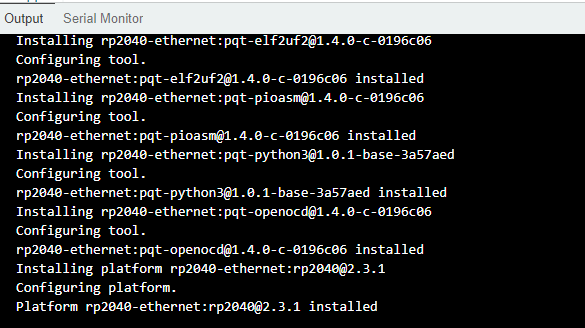
When you enter wiznet, a library that can use ehternet is added to RP2040 + Pico.
1.3. Download the software package

Go to the above GitHub site and download the file.
Link : https://github.com/andrew-susanto/Arduino-Ethernet-Icmp
1.4. Add library

Add the library file manually and copy the downloaded file to the file below.
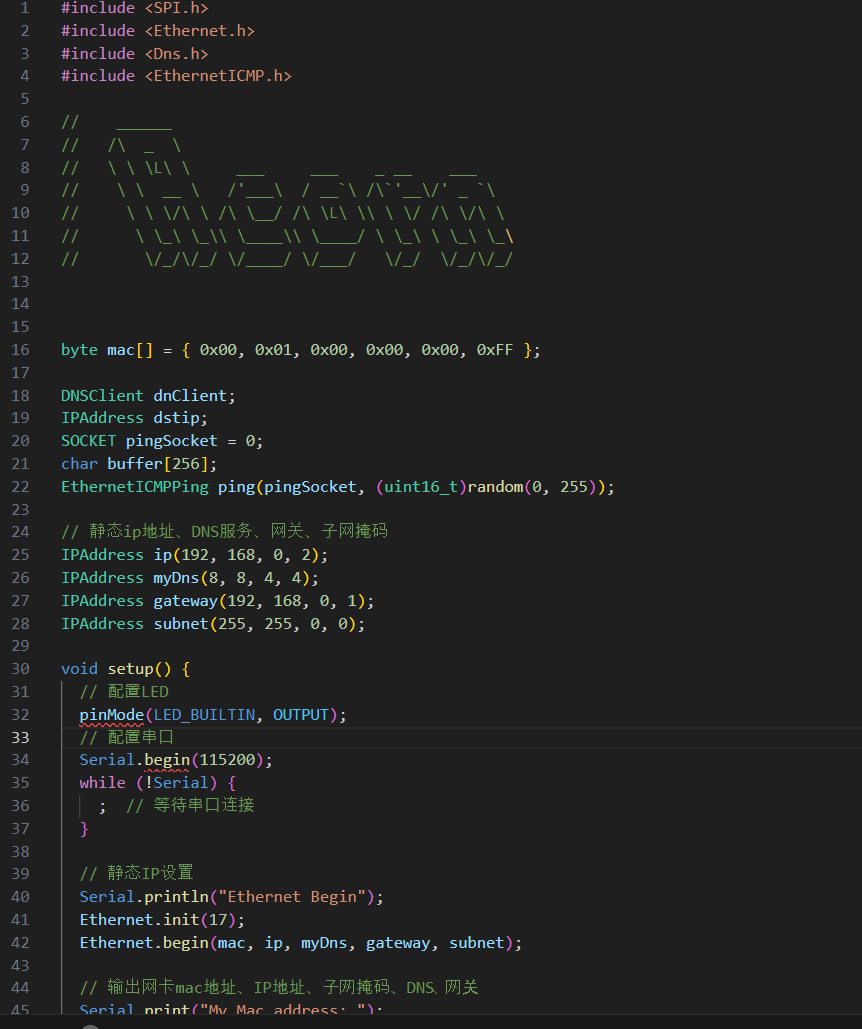
2. Software
code:
#include <SPI.h>
#include <Ethernet.h>
#include <Dns.h>
#include <EthernetICMP.h>

// 网卡mac地址
byte mac[] = { 0x00, 0x01, 0x00, 0x00, 0x00, 0xFF };

DNSClient dnClient;
IPAddress dstip;
SOCKET pingSocket = 0;
char buffer[256];
EthernetICMPPing ping(pingSocket, (uint16_t)random(0, 255));

// 静态ip地址、DNS服务、网关、子网掩码
IPAddress ip(192, 168, 1, 205);
IPAddress myDns(192, 168, 1, 1);
IPAddress gateway(192, 168, 1, 1);
IPAddress subnet(255, 255, 255, 0);

void setup() {
  // 配置LED
  pinMode(LED_BUILTIN, OUTPUT);
  // 配置串口
  Serial.begin(115200);
  while (!Serial) {
    ;  // 等待串口连接
  }

  // 静态IP设置
  Serial.println("Ethernet Begin");
  Ethernet.init(17);
  Ethernet.begin(mac, ip, myDns, gateway, subnet);

  // 输出网卡mac地址、IP地址、子网掩码、DNS、网关
  Serial.print("My Mac address: ");
  byte macBuffer[6];               // 设置mac地址存储buff
  Ethernet.MACAddress(macBuffer);  // 读取mac地址
  for (byte octet = 0; octet < 6; octet++) {
    Serial.print(macBuffer[octet], HEX);
    if (octet < 5) {
      Serial.print('-');
    }
  }
  Serial.println("");

  Serial.print("My IP address: ");
  Serial.println(Ethernet.localIP());

  Serial.print("My subnet: ");
  Serial.println(Ethernet.subnetMask());

  Serial.print("My DNS address: ");
  Serial.println(Ethernet.dnsServerIP());

  Serial.print("My GateWay address: ");
  Serial.println(Ethernet.gatewayIP());

  dnClient.begin(Ethernet.dnsServerIP());

  const char domains[] = "www.eeworld.com.cn";
    if (dnClient.getHostByName(domains, dstip) == 1) {
    Serial.print(domains);
    Serial.print(" = ");
    Serial.println(dstip);
  }
  else Serial.println(F("dns lookup failed"));

}

void loop() {

  EthernetICMPEchoReply echoReply = ping(dstip, 4);
  if (echoReply.status == SUCCESS)
  {
    sprintf(buffer,
            "Reply[%d] from: %d.%d.%d.%d: bytes=%d time=%ldms TTL=%d",
            echoReply.data.seq,
            echoReply.addr[0],
            echoReply.addr[1],
            echoReply.addr[2],
            echoReply.addr[3],
            REQ_DATASIZE,
            millis() - echoReply.data.time,
            echoReply.ttl);
  }
  else
  {
    sprintf(buffer, "Echo request failed; %d", echoReply.status);
  }
  Serial.println(buffer);

  digitalWrite(LED_BUILTIN, HIGH);  // turn the LED on (HIGH is the voltage level)
  delay(100);                      // wait for a second
  digitalWrite(LED_BUILTIN, LOW);   // turn the LED off by making the voltage LOW
  delay(500);                      // wait for a second
}
IN VSCode
Once you have completed setting up the Arduino environment, onboarding and using the serial monitor are also possible on vscode. Personally, I recommend onboarding in vscode because vscode allows custom modification through the c_cpp_properties.json file at the path setting stage.
c_cpp_properties.json

If you specify the Ethernet.h and EthernetICMP library paths below and compile them, it will work without problem.
3. Operation
3.1. Obtain static IP
After downloading the program, the serial port outputs the configured static IP address.

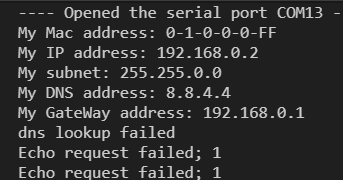
Above: Results of posts on the blog
Below: Results of running VSCode on my computer.
I'm not sure why, but w5500-evb-pico is unable to connect to the DNS address.
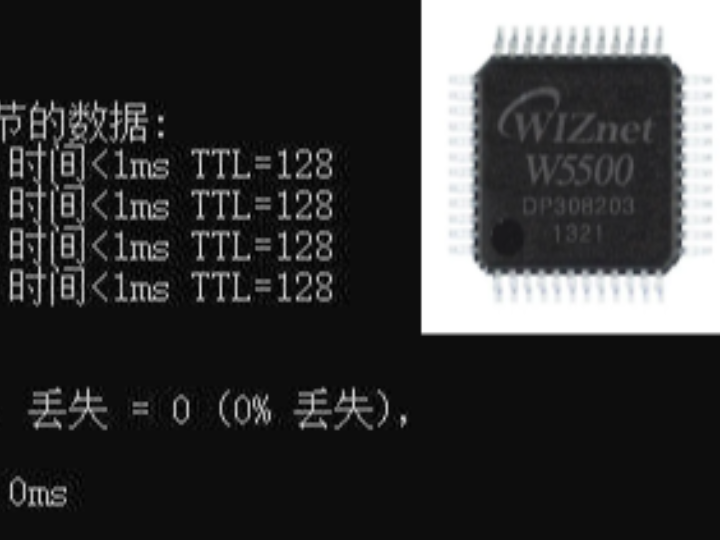
3.2. Ping network

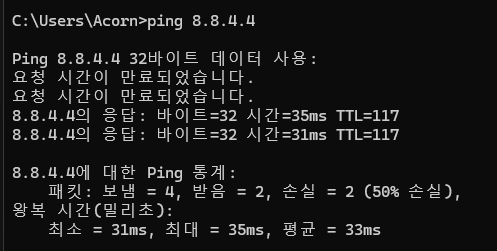
Above: Results of posts on the blog
Below: Results of running ping 8.8.4.4 using cmd on my computer.
As a result of testing Google's sub DNS address 8.8.4.4 through ping, some packet loss occurred, but the test was conducted by finding the DNS address itself.
3.3. Capture by wireshark

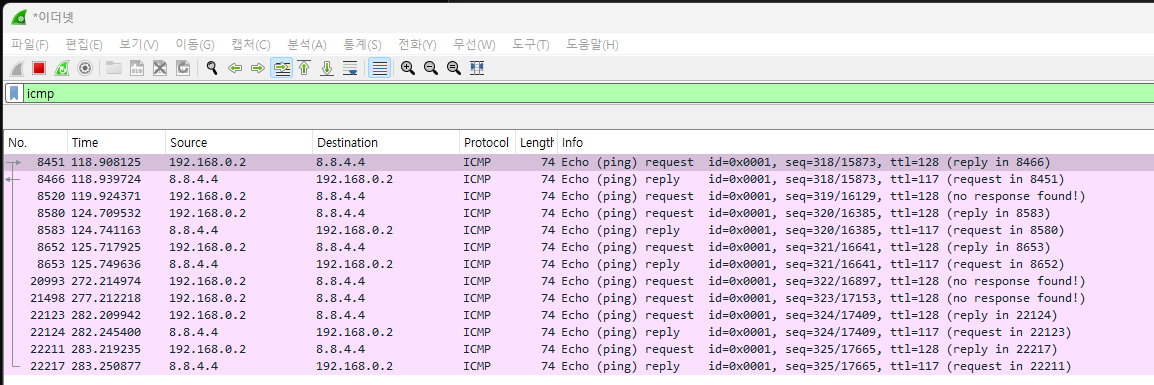
Above: Results of posts on the blog
Below: Result of packet capture using wireshark on my computer
Since we conducted a ping test, we can check ICMP in wireshark.