Add reset switch to W5100S-EVB-Pico
By adding a reset switch to W5100S-EVB-Pico, reset is possible without disconnecting the cable.

Summary
아래 요약내용은 블로그 포스트를 ChatGPT를 통해 요약한 후, 재가공한 내용입니다.
This blog post describes adding a reset switch to the W5100S-EVB-Pico to simplify the firmware upload process. Typically, uploading firmware involves pressing the BOOTSEL button while connecting the device via USB, which is cumbersome. The post involves using a Tact switch connected to the RUN pin, enabling firmware uploading without disconnecting the cable.
Contents
Approximately two months have passed since the W5100S-EVB-Pico was released. I don't know yet how many units have been sold and delivered over the past two months, but I'm going to write about it because I've received feedback from people who used the W5100S-EVB-Pico that it would be nice to see improvements.
That is to add a reset switch to W5100S-EVB-Pico. To upload the firmware UF2 file to W5100S-EVB-Pico, press the BOOTSEL button and connect to the PC with a USB cable. The moment power is supplied to the W5100S-EVB-Pico, the BOOTSEL button must be pressed for it to be recognized as a removable disk on the PC. That's why you have to keep unplugging and plugging in the USB cable every time you upload firmware. It was quite annoying, so I tried to find out how to do it easily.
Raspberry Pi Pico Reset
I thought it would probably be a good idea to combine reset and BOOTSEL, so I searched for information about resetting the Raspberry Pi Pico and was able to quickly find it. ah! The reset of the Raspberry Pi Pico is the RUN pin.
It seems that many people were uncomfortable uploading firmware like this. A method to upload firmware without disconnecting the cable is shared in the news category of the Raspberry Pi official site. The link is below: raspberrypi.com

If you configure the circuit as shown in the picture above, you can upload firmware by just pressing a switch without disconnecting the cable. Because the RUN pin of the Raspberry Pi Pico acts as a reset, the Tact switch is connected to the RUN pin. When you press the Tact switch connected to the RUN pin, the RUN pin is connected to GND. When you press the switch with your hand, GND is connected to the RUN pin, the operation of the Raspberry Pi Pico stops, and when you release the switch, the GND connection is disconnected and the Raspberry Pi Pico is reset. And when the Raspberry Pi is reset and the BOOTSEL switch is pressed, firmware upload becomes possible.
So, if you press the RUN switch and the BOOTSEL switch and then release the RUN switch first, the Raspberry Pi is reset, and since the BOOTSEL switch is pressed at this time, the firmware can be uploaded.
Then, let’s apply this to W5100S-EVB-Pico.
W5100S-EVB-Pico Reset Switch
Since the W5100S-EVB-Pico was designed based on the Raspberry Pi Pico, the arrangement and location of all external pins are the same. Therefore, you can just apply the circuit as above.

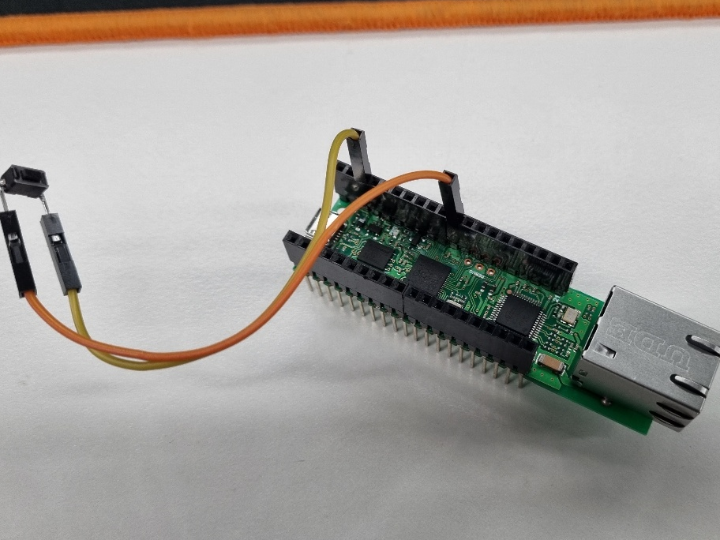
The circuit was configured as shown in the photo below. One side of the switch was connected to GND and the other side was connected to RUN.

The switch I had didn't plug into the breadboard, so I tried connecting it by soldering jumper wires.
In this state, I connected it to the PC with a USB cable, pressed the RUN switch and the BOOTSEL switch, then removed the RUN switch first and then the BOOTSEL switch. So, the PC recognized it as a removable disk and I was able to upload the firmware.
Organize
- Connect to PC with USB cable
- Press the RUN switch and the BOOTSEL switch.
- Release the RUN switch.
- Release the BOOTSEL switch (You can release it at any time after step 4. Even if you do not release it, you can proceed to step 5)
- Firmware upload mode, recognized as a removable disk by PC.

