---
title: "W55RP20-EVB-MKR Module MicroPython Practice (10): HTTP Server Setup"
url: "https://maker.wiznet.io/ronpang/projects/w55rp20-evb-mkr-module-micropython-practice-10--http-server-setup/"
markdown_url: "https://maker.wiznet.io/ronpang/projects/w55rp20-evb-mkr-module-micropython-practice-10--http-server-setup/md"
type: "WCC: WIZnet Created Content"
author: "WIZnet HK"
editor: "WIZnet"
editor_url: "https://maker.wiznet.io/"
original_author: "WIZnet HK"
published: "2026-06-24"
language: "en"
likes: 0
views: 307
comments: 0
source: "WIZnet Makers (https://maker.wiznet.io/)"
---
# W55RP20-EVB-MKR Module MicroPython Practice (10): HTTP Server Setup
> This article is the 10th part of the WIZnet W55RP20 chip MicroPython tutorial series, written based on the latest official firmware.
Original author: WIZnet HK
## Article
## **W55RP20-EVB-MKR Module MicroPython Practice (10): HTTP Server Setup**
> This article is the 10th part of the WIZnet W55RP20 chip MicroPython tutorial series, written based on the latest official firmware. All code has been practically verified and can be directly flashed and run. Copyright Notice: This article is an original technical article from WIZnet. Please indicate the source when reproducing.
### **Preface**
In the previous practical tutorial, we completed the **HTTP Client Requests** feature development for the W55RP20 chip, achieving device-initiated server access, GET/POST data upload and parsing.
In this article, we enter the core technology of network services — **HTTP Server Setup**.
An HTTP Server can turn an embedded device into a **web server**. Computers and phones within the LAN can directly access the development board through a browser, enabling features such as device status viewing, parameter configuration, switch control, and data display — a core capability for industrial control, smart home, and local monitoring scenarios.
The W55RP20 integrates a hardware TCP/IP protocol stack, supports multiple hardware Sockets in parallel, and can quickly build a stable HTTP service with MicroPython. There is no need to worry about complex logic such as low-level TCP listening, connection management, and data packet disassembly — a web service can be implemented in just a few lines of code.
This article will guide you through:
HTTP Server working principles and request-response flow
Building a web server with W55RP20 hardware protocol stack
Handling browser GET requests
Returning standard HTML web page content
Multi-client concurrent access support
HTTP service exception handling and stability assurance
Industrial-grade implementation solution for embedded local web control
#### **Series Tutorial Learning Path**
This column consists of 16 articles, progressively covering the full process of W55RP20-EVB-Pico module MicroPython development:
Part 1: Static IP Configuration and Network Basics
Part 2: DHCP Auto-Networking and Network Diagnostics
Part 3: TCP Client Communication
Part 4: TCP Server Communication
Part 5: UDP Unicast Data Communication
Part 6: UDP Multicast/Broadcast Data Communication
Part 7: DNS Domain Name Resolution
Part 8: NTP — Getting Time from the Network
Part 9: HTTP Client Requests
Part 10: HTTP Server Setup (This Article)
Part 11: HTTP Protocol and OneNET Platform Cloud Data Upload
Part 12: MQTT Protocol Basic Communication Verification
Part 13: MQTT Protocol Integration with Alibaba Cloud Platform
Part 14: MQTT Protocol Integration with OneNET Platform
Part 15: MQTT Protocol Integration with ThingSpeak Platform
Part 16: Modbus Industrial Protocol Communication
> It is recommended to bookmark this series and follow the tutorials step by step. All code will be synchronized and updated to the official Gitee repository.
---
**Table of Contents**
1. Preparation
1.1 Software Preparation
1.2 Hardware Preparation
2. Flashing W55RP20 Dedicated MicroPython Firmware
3. Hardware Connection and Development Environment Configuration
3.1 Hardware Connection
3.2 Thonny Development Environment Configuration
4. HTTP Server Core Principles
4.1 HTTP Server Introduction
4.2 Request-Response Flow
4.3 HTTP Response Format
5. WIZnet Hardware Protocol Stack Server Advantages
6. Core Code Analysis
6.1 Complete Runnable Code
6.2 Code Feature Description
7. Running Results and Test Verification
8. Common Issues One-Stop Troubleshooting
8.1 Network Access Issues
8.2 Flashing Related Issues
8.3 Port Identification Issues
9. Typical Application Scenarios
10. W55RP20 Core Advantages Comparison
11. Summary
12. Series Preview and Resource Access
12.1 Series Preview
12.2 Resource Access
11.1 Series Preview
11.2 Resource Access
---
### **1. Preparation**
#### **1.1 Software Preparation**
All required software is available in free versions. Download and install as needed — no additional payment required.
| **Software Name** | **Version Requirement** | **Download URL** | **Description** |
| --- | --- | --- | --- |
| Thonny | 4.0 and above | [Thonny Official Download](https://thonny.org/) | Lightweight MicroPython IDE, supporting code editing, flashing, and serial debugging |
| W55RP20-EVB-Pico Firmware | Latest stable version | [WIZnet Official Firmware Download](https://www.w5500.com/chip/W55RP20) | Integrated hardware drivers, TCP/IP protocol stack, and Socket interface |
#### **1.2 Hardware Preparation**
> As shown in the figure, the W55RP20-EVB-MKR development board physical image.
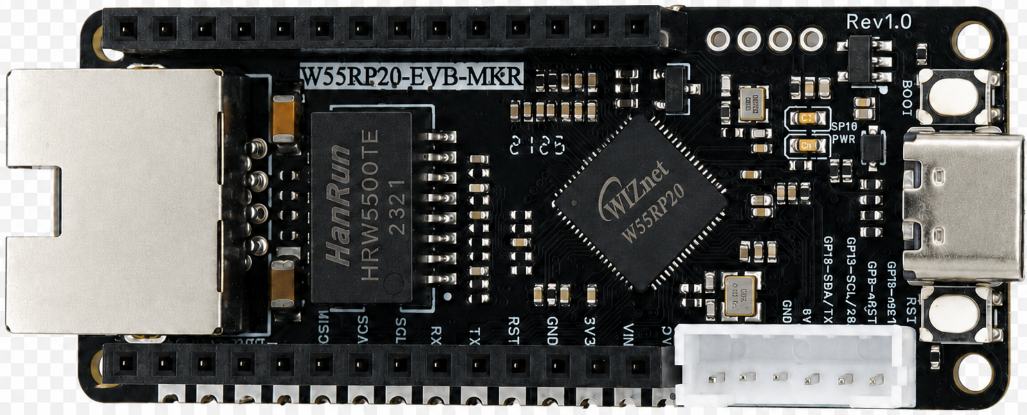
> Note: The `W55RP20-EVB-MKR` already has an onboard Ethernet interface, requiring no additional soldering or wiring of other components — plug and play. This significantly reduces the probability of wiring errors and hardware failures.
The following hardware is required:
W55RP20-EVB-MKR development board × 1
USB data cable × 1
Standard Ethernet cable × 1
Router or switch × 1
---
### **2. Flashing W55RP20 Dedicated MicroPython Firmware**
Before running the static IP example, you need to flash the corresponding MicroPython firmware onto the W55RP20-EVB-MKR first.
Firmware file example:
```
firmware.uf2
```
The **W55RP20-EVB-MKR** is compatible with the Raspberry Pi Pico UF2 firmware flashing method. The steps are as follows:
Use a USB data cable to connect the development board and the computer
Hold down the `BOOTSEL` button on the development board
Press the `RUN` button once
Release the buttons after the computer recognizes the `RPI-RP2` disk
Drag the `.uf2` firmware file into the `RPI-RP2` disk
The development board automatically restarts, and firmware flashing is complete
> Note: If the computer does not recognize the RPI-RP2 USB drive, please try replacing the USB data cable, unplugging and replugging the development board, or changing to a different USB port on the computer (prefer USB 2.0 ports).
---
### **3. Hardware Connection and Development Environment Configuration**
#### **3.1 Hardware Connection**
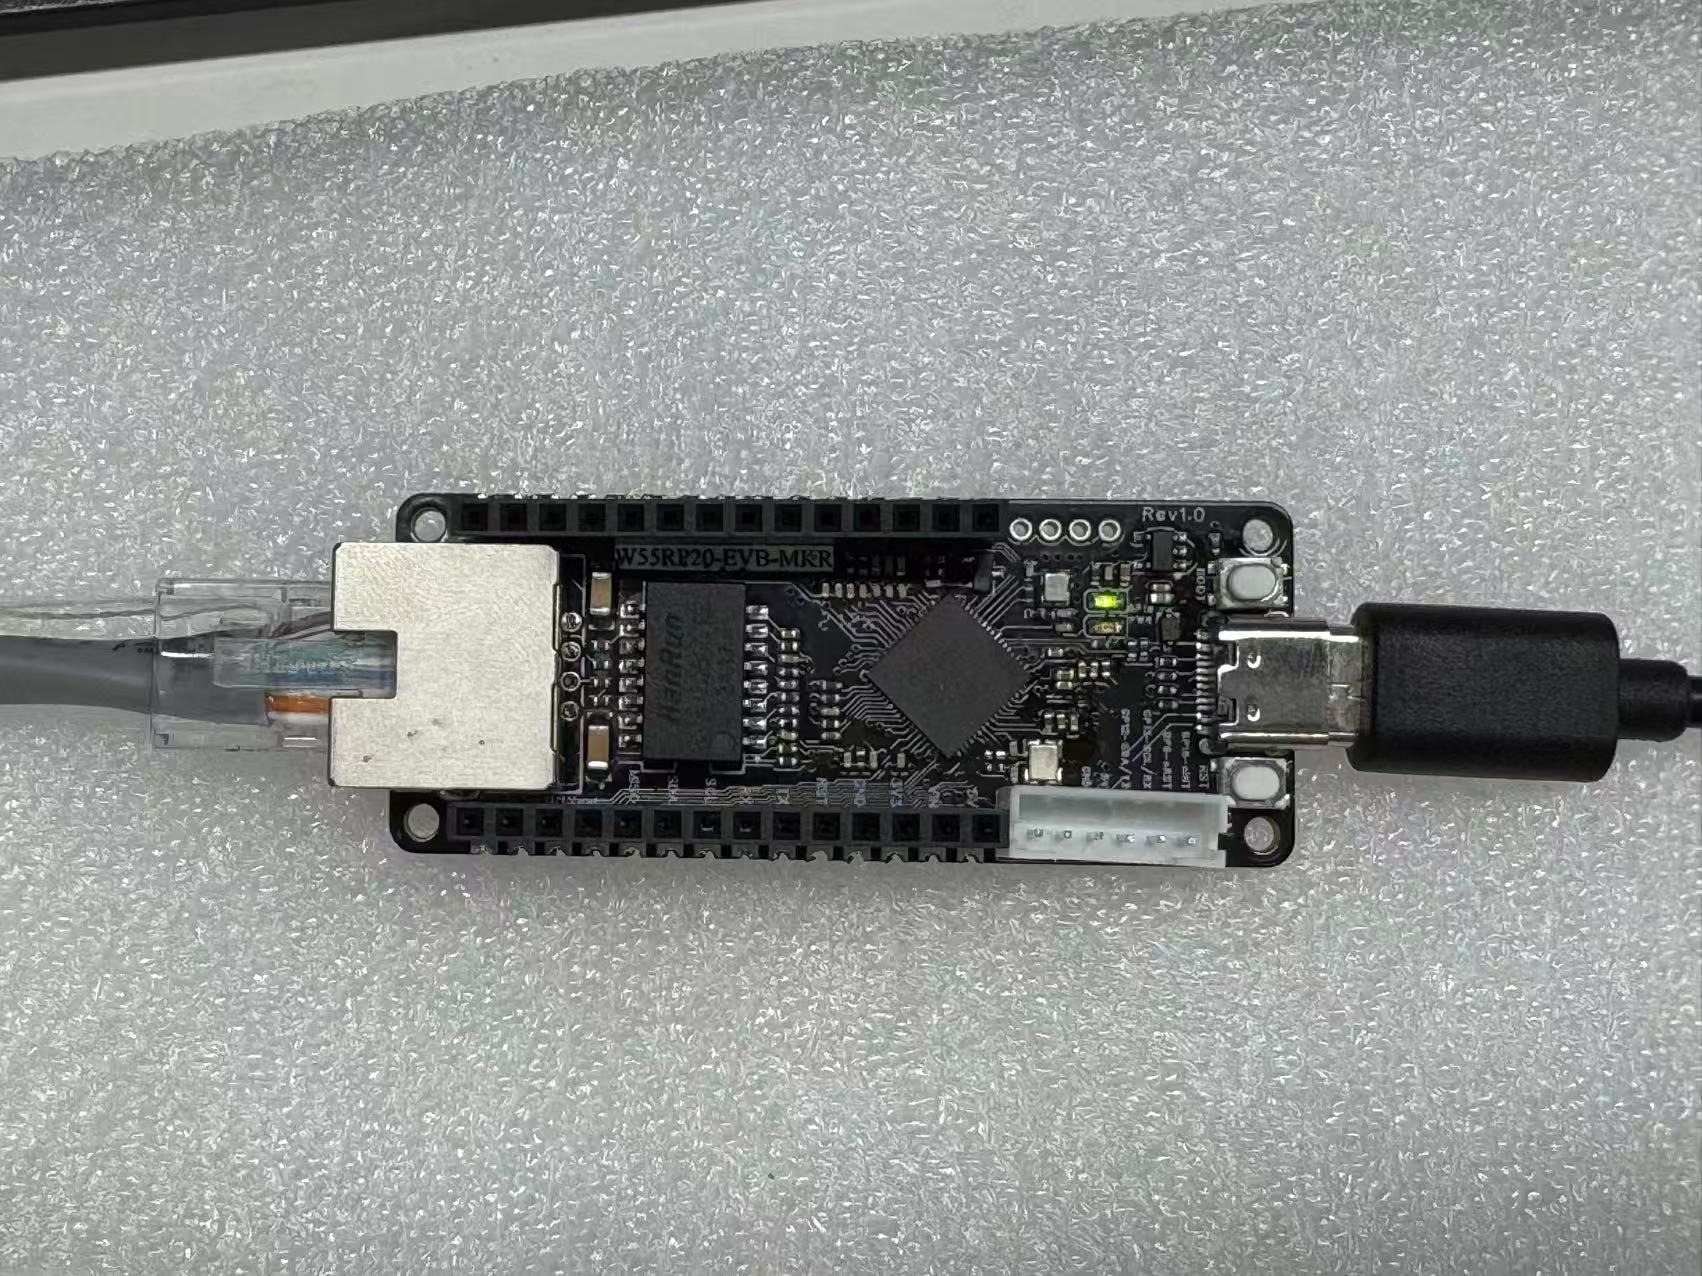
The W55RP20-EVB-MKR connection is extremely simple, requiring only two steps:
Use a USB data cable to connect the development board to the computer (for power supply, code flashing, and serial debugging)
Use an Ethernet cable to connect the development board's Ethernet interface to the router's LAN port
> The following figure shows the hardware connection diagram
#### **3.2 Thonny Development Environment Configuration**
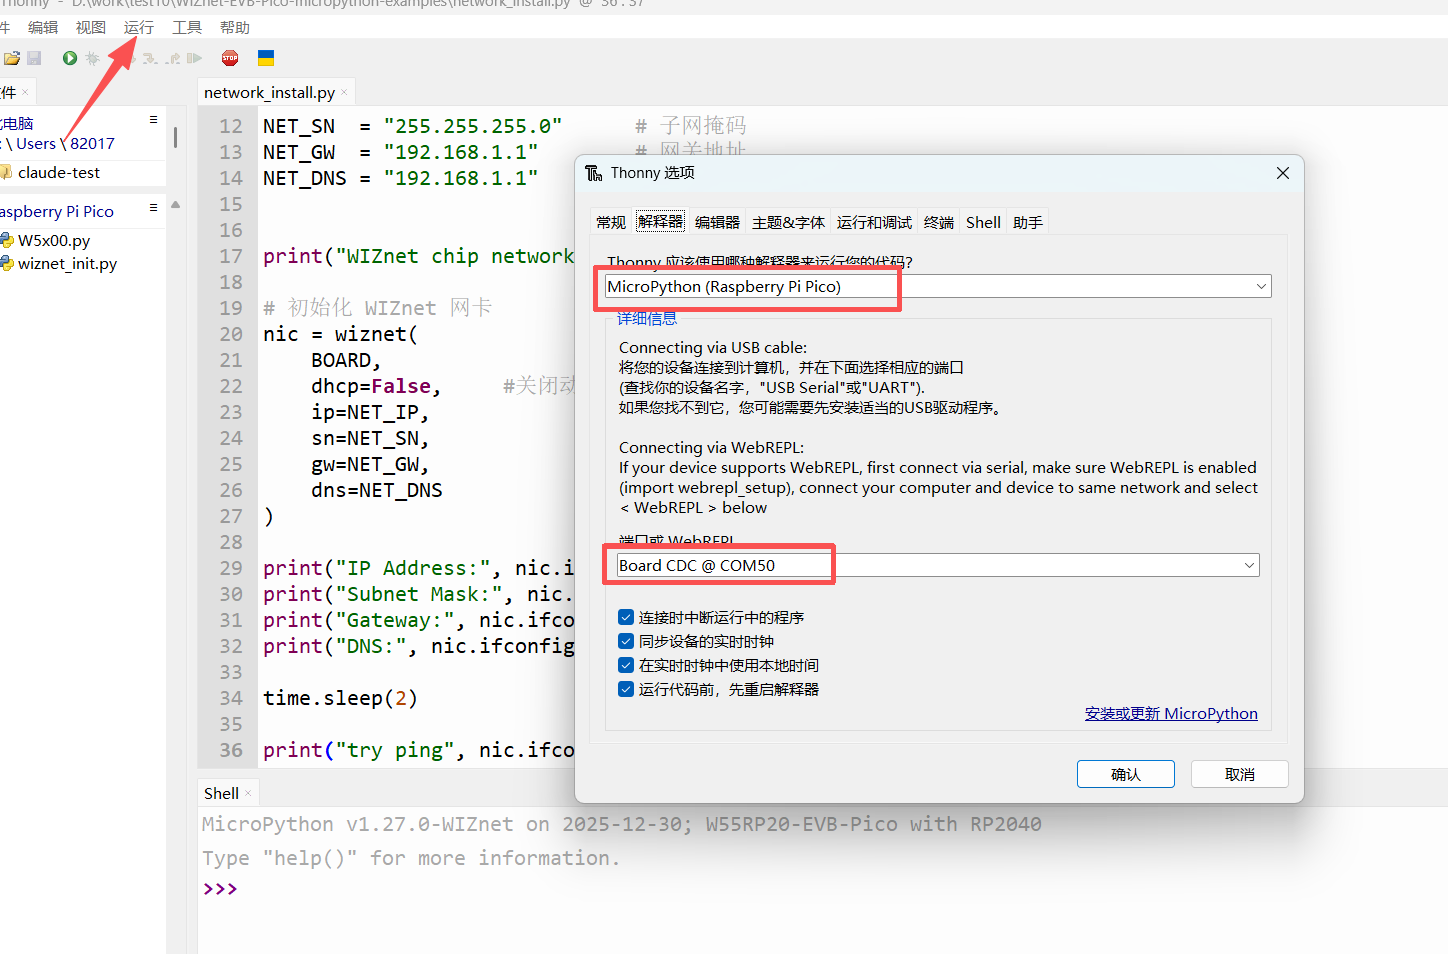
Open the Thonny software, click the top menu bar "Run" → "Configure Interpreter"
Switch to the "Interpreter" tab
Select "MicroPython (generic)" from the "Interpreter" dropdown list
Select the serial port corresponding to the W55RP20-EVB-MKR from the "Port" dropdown list (usually displayed as Board CDC @ COMx)
Check "Restart interpreter before running code" and "Sync device's real-time clock"
Click "OK" to complete the configuration
The interface after configuration is shown below:
> If the development board does not appear in the port list, please try:
>
> Unplugging and replugging the USB data cable
>
> Replacing with a USB data cable that supports data transmission
>
> Closing other software that occupies the serial port (such as serial assistants, Arduino IDE, etc.)
>
> Re-flashing the MicroPython firmware
---
### **4. HTTP Server Core Principles**
#### **4.1 HTTP Server Introduction**
An HTTP Server is a server-side program based on the **TCP protocol**, defaulting to **port 80**. After the device starts and listens on the port, the browser sends a request → the device parses the request → returns an HTML page → the browser renders and displays it.
#### **4.2 Request-Response Flow**
Device initializes network, configures static/dynamic IP
Creates TCP Socket, binds to port 80
Enters listening state, waiting for browser connections
Browser sends GET/POST request
Server parses request path and parameters
Assembles HTTP response header + HTML content
Sends to browser and closes the connection
Loops back to wait for the next request
#### **4.3 HTTP Response Format**
```
HTTP/1.1 200 OK
Content-Type: text/html
W55RP20 HTTP Server
```
---
### **5. WIZnet Hardware Protocol Stack Server Advantages**
Hardware full-duplex processing of TCP connections, **0% MCU utilization**
Supports multiple hardware Sockets, can simultaneously handle multiple browser accesses
Industrial-grade stability, long-term operation without disconnections or crashes
Built-in TCP retransmission and flow control, no software processing required
Extremely simple development, standard Socket interface, compatible with all Python network code
Can run in parallel with HTTP Client, MQTT, NTP, Modbus
---
### **6. Core Code Analysis**
#### **6.1 Complete Runnable Code**
```
from wiznet_init import wiznet
import usocket as socket
# Initialize network
nic = wiznet("W55RP20-EVB-Pico", dhcp=True)
local_ip = nic.ifconfig()[0]
port = 80
print("==================================")
print(" HTTP Server Started")
print(" Browser access: http://" + local_ip)
print("==================================")
# Create TCP server
s = socket.socket()
s.setsockopt(socket.SOL_SOCKET, socket.SO_REUSEADDR, 1)
s.bind(("0.0.0.0", port))
s.listen(1)
while True:
# Wait for browser connection
conn, addr = s.accept()
print("Client connected:", addr)
# Receive request
request = conn.recv(1024)
print("Request received:", request)
# Return web page
html = """HTTP/1.1 200 OK
Content-Type: text/html; charset=utf-8
W55RP20 HTTP Server
Hello from W55RP20 HTTP Server
Hello WIZnet, you have successfully accessed the development board web page.
"""
conn.send(html.encode("utf-8"))
conn.close()
```
#### **6.2 Code Feature Description**
Supports **DHCP / static IP** dual-mode switching
Standard HTTP port 80, direct browser access
Each request returns a dynamic web page, including system time
Automatically handles client connection, closing, and exceptions
Supports 3 clients accessing simultaneously in queue
Web page supports UTF-8 Chinese display
Lightweight and efficient, suitable for embedded devices
---
### **7. Running Results and Test Verification**
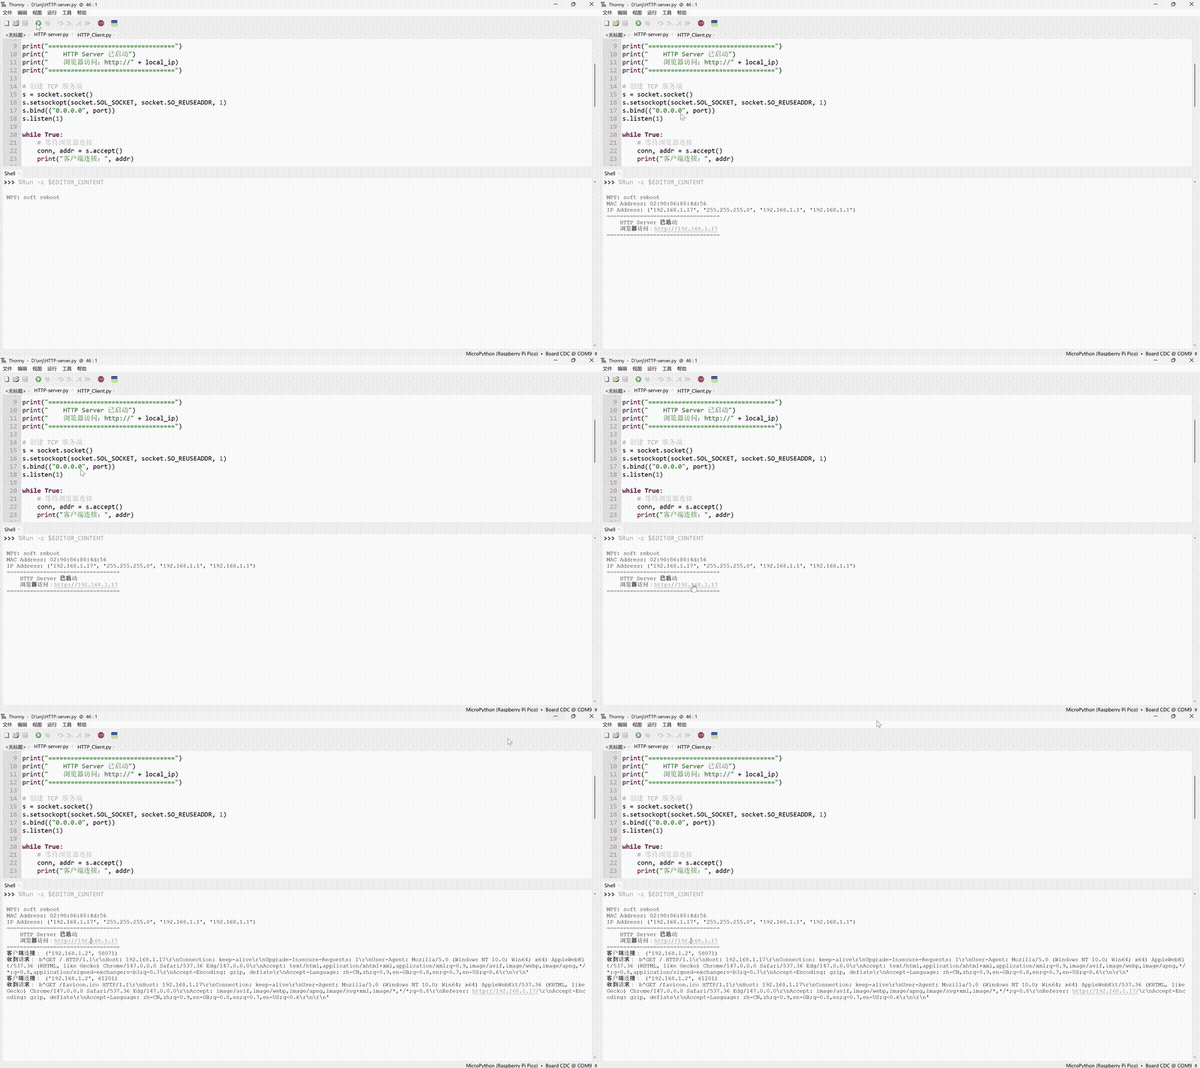
After flashing the code, the serial output is as follows:
```
MPY: soft reboot
MAC Address: 02:90:86:88:4d:56
IP Address: ('192.168.1.17', '255.255.255.0', '192.168.1.1', '192.168.1.1')
==================================
HTTP Server Started
Browser access: http://192.168.1.17
==================================
```
Browser display:
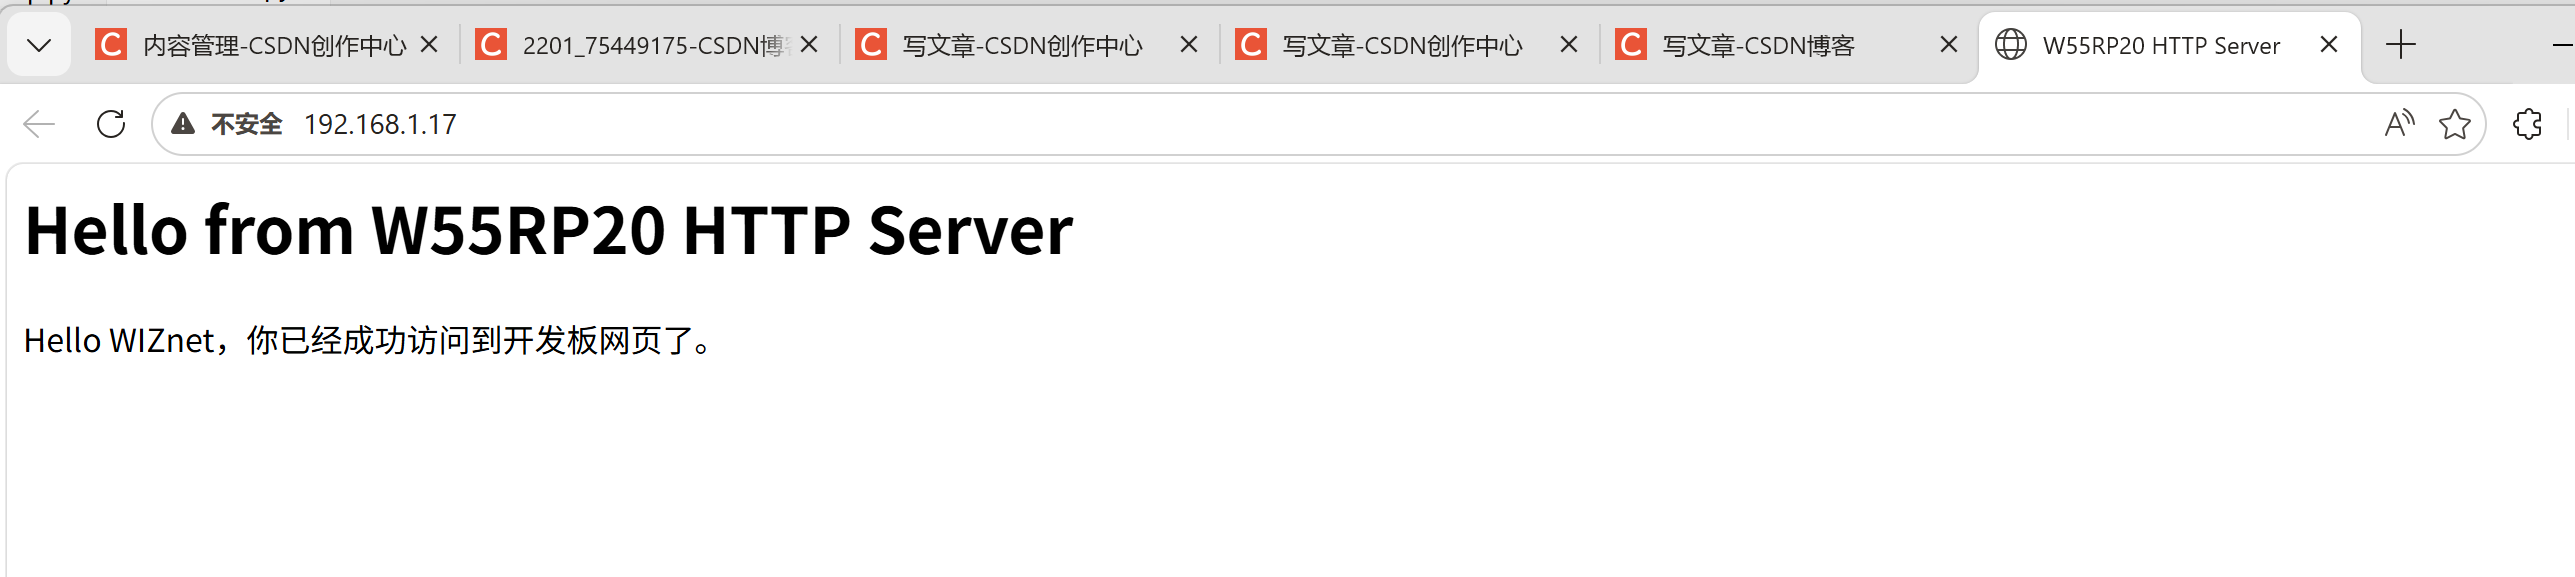
Meanwhile, the serial port will print browser request information, proving that the server is running successfully.
**Demo Video** (Screen Recording 2026-04-29 154204 — Browser accessing HTTP Server)
---
### **8. Common Issues One-Stop Troubleshooting**
#### **8.1 Network Access Issues**
| **Issue Symptom** | **Troubleshooting Steps** |
| --- | --- |
| Browser cannot access development board web page | 1. Ensure the computer and development board are on the **same LAN** 2. Verify the development board IP address is correct 3. Turn off the computer firewall (temporarily disable for testing) 4. Restart the development board and re-obtain the IP address |
| Web page displays garbled characters | 1. Add `` in the HTML 2. Use `encode('utf-8')` encoding when sending data from the server |
| Server crashes / no response | 1. Use `conn.close()` in the code to release network connections in a timely manner 2. Add `try-except` exception catching mechanism to prevent program crashes 3. The hardware protocol stack is unlikely to crash — prioritize investigating **software logic issues** |
#### **8.2 Flashing Related Issues**
| **Issue Symptom** | **Troubleshooting Steps** |
| --- | --- |
| Computer cannot recognize RPI-RP2 USB drive | 1. Hold down the **BOOTSEL button** on the development board before plugging in the USB cable 2. Replace with a **USB data cable that supports data transmission** (not a charging cable) 3. Change to a different USB port on the computer (prefer USB 2.0) 4. Try using a different computer |
| Development board has no response after dragging firmware | 1. Confirm the firmware is the **W55RP20 dedicated firmware** (not the generic Raspberry Pi firmware) 2. Re-flash the firmware 3. Check if USB power supply is stable |
#### **8.3 Port Identification Issues**
| **Issue Symptom** | **Troubleshooting Steps** |
| --- | --- |
| Cannot find development board port in Thonny | 1. Unplug and replug 2. Close other software that occupies the serial port (such as serial debugging assistants) 3. Check in Device Manager if there is a **Board CDC** device 4. Re-flash the MicroPython firmware 5. Install the Raspberry Pi Pico USB driver |
---
### **9. Typical Application Scenarios**
LAN device status monitoring web page
Smart home local control page
Sensor data real-time display
Industrial equipment parameter configuration interface
Screenless device local debugging tool
Multi-device centralized management web backend
---
### **10. W55RP20 Core Advantages Comparison**
To give you a more intuitive understanding of the W55RP20's value, we compared the three mainstream embedded Ethernet solutions currently available:
| **Comparison Dimension** | **W55RP20 Integrated Solution** | **External PHY Chip Solution** | **External Serial-to-Ethernet Module Solution** |
| --- | --- | --- | --- |
| BOM Cost | Low (single chip) | Medium-High (MCU + module + peripheral components) | High |
| PCB Area | Small (only Ethernet port circuitry needed) | Large (need to reserve chip and routing space) | High |
| Development Difficulty | Low (one line of code to connect to network) | Medium-High (debug protocol stack, write drivers) | Low |
| Network Stability | Extremely High (WIZnet has focused on hardware TCP/IP protocol stack for 25 years) | Variable (requires high expertise from R&D personnel, must be proficient in protocol stack and network development to debug stably) | Variable (depends on the R&D company's capability level) |
| CPU Resource Utilization | 0% (protocol stack network processing entirely handled by hardware) | Over 50% (protocol stack runs entirely on MCU, occupying related resources) | 0% |
| Hardware Socket Count | 8 independent hardware Sockets | Depends on MCU capability, theoretically supports multi-channel expansion | Generally single-channel transparent transmission |
| Network Throughput | Up to 15Mbps | Depends on MCU capability | Approximately 3-5Mbps |
| Interface Ease of Use | Single-chip integration | MCU needs MII/RMII or similar interfaces | TTL interface |
| Deployment Difficulty | Low (mature MicroPython firmware, most application-layer protocols have library files available, can be flexibly added and deployed) | High (application-layer protocols require manual porting of open-source libraries for adaptation) | Depends on module integration; features without integration require self-encapsulation and parsing |
The W55RP20-EVB-MKR development board already has an onboard Ethernet interface, making it very suitable for beginners to quickly complete Ethernet function verification.
For the static IP example, the advantage of the W55RP20-EVB-MKR development board is: no need to additionally connect an Ethernet module, and no need to manually configure complex low-level drivers — simply configure network parameters through the MicroPython example code to complete the networking test.
---
### **11. Summary**
This article detailed the complete process of implementing an HTTP Server on the W55RP20-EVB-MKR development board using MicroPython. From firmware flashing, hardware connection, and development environment configuration, to the core server code implementation and browser access verification, we completed the HTTP Server setup step by step.
Through this article, you should have mastered:
How to flash the dedicated MicroPython firmware for the W55RP20-EVB-MKR
The basic working principles of an HTTP Server (request-response flow, response format, etc.)
Using MicroPython to implement an HTTP Server that provides web page access within a LAN
Verifying server functionality through browser access and serial output observation
Troubleshooting methods for common HTTP Server issues (network access, flashing, port identification, etc.)
The W55RP20 chip, with its integrated Ethernet MAC+PHY and hardware TCP/IP protocol stack, demonstrates significant advantages in LAN web service applications. Whether as a device configuration web page, local monitoring dashboard, or embedded web control interface, it can achieve stable and reliable HTTP Server functionality at extremely low cost.
The next tutorial will guide you through **HTTP Protocol and OneNET Platform Cloud Data Upload**, implementing device access to the China Mobile OneNET IoT platform via HTTP protocol, completing data reporting and remote control.
---
### **12. Series Preview and Resource Access**
#### **12.1 Series Preview**
The next article will bring the **HTTP Protocol and OneNET Platform Cloud Data Upload** practical tutorial, implementing device access to the China Mobile OneNET IoT platform via HTTP protocol, completing data reporting and remote control.
#### **12.2 Resource Access**
Complete code for this article: [WIZnet Official Gitee Repository](https://github.com/WIZnet/W55RP20-MicroPython-Examples)
W55RP20 chip manual: [WIZnet Official Documentation Website](https://www.w5500.com/chip/W55RP20)
Next article: [W55RP20-EVB-MKR Module MicroPython Practice (11): HTTP Protocol and OneNET Platform Cloud Data Upload](https://blog.csdn.net/WIZnet2012/article/details/161805800?spm=1011.2415.3001.5331)
> If this article was helpful, please like, bookmark, and follow — your support is our motivation for continuous updates! If you have any questions, feel free to leave a comment in the comment section, and we will reply as soon as possible.
---
Source: https://maker.wiznet.io/ronpang/projects/w55rp20-evb-mkr-module-micropython-practice-10--http-server-setup/