[AIoT] Voice controlled Home Automation (Web-Based)
Voice controlled home automation is an IoT-based project in order to control home appliances through voice commands.
COMPONENTSHardware components
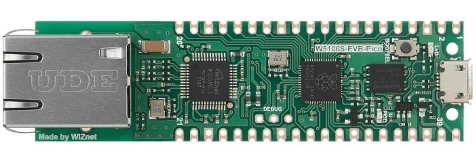
WIZnet - W5100S-EVB-Pico
x 1
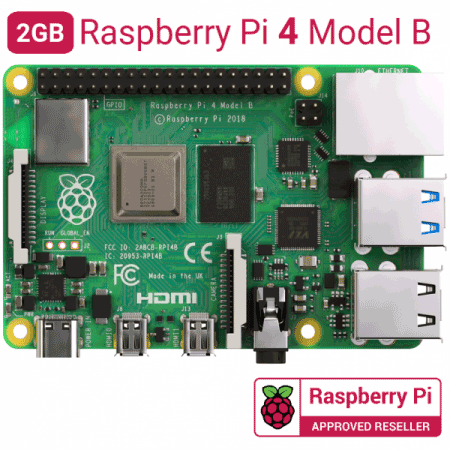
Raspberry Pi - Raspberry Pi 4 Model B
x 1
Software Apps and online services
microsoft - VS Code
x 1
Arduino - Arduino IDE
x 1
mqtt - MQTT
x 1
PROJECT DESCRIPTION
HOME AUTOMATION
Voice-controlled home automation is an IoT-based project in order to control home appliances through voice commands. IoT or internet of things is an upcoming technology that allows us to control hardware devices through the internet. Here we propose to use IoT in order to control home appliances, thus automating modern homes through the internet using voice commands. Our user friendly interface allows a user to easily control lights, fans, TV, fridge and AC pump. The home security system has become vital for every house. It is important. Here we propose to use AI and IoT to assist users for improvement of the door security of sensitive locations by using face detection and recognition.
COMPONENTS
● W5100S-EVB-Pico
● Laptop to run Django server
● Raspberry pi to run MQTT server
● Relays,lights,fans and any other electronic components
SOFTWARE
● VS Code
● Arduino IDE
● Django Server
● MQTT Server
PROBLEM STATEMENT
Voice based Home automation systems involve making homes even smarter.Small things at home will be controlled through voice commands and smartphones. This will make daily life simpler. The users will be able to add or remove new electronic devices through web applications according to their requirements.
Nowadays, the home security system is a crucial issue. Indeed, this system is to ensure properties and loved ones are always safe and protected.It is important to own a reliable security system that can secure our assets as well as to protect our privacy. The traditional security system needs an individual to use a key, identification card or password to access an area such as home and workplace. However, the present security system has many weaknesses wherever it is simply cast and taken. Most doors are controlled by persons with the employment of keys, security cards, countersign or pattern to open the door.Using AI and Iot to assist users for improvement of the door security of sensitive locations by using face detection and recognition.
COMPONENTS
● W5100S-EVB-Pico :
W5100S-EVB-Pico is a microcontroller evaluation board based on the Raspberry Pi RP2040 and fully hardwired TCP/IP controller W5100S – and basically works the same as Raspberry Pi Pico board but with additional Ethernet via W5100.
● Raspberry Pi 4 Model B :
The Raspberry Pi 4 Model B is the first of the fourth generation of Raspberry Pi computers. The latest model brings with it a more powerful Broadcom BCM2711B0 quad-core ARM processor and the 4K-capable Broadcom VideoCore VI video processor, along with the move to faster USB 3.0 ports and USB Type-C for power.The number Pi 3 denotes which generation it is and will include improvements to both processing power and the layout of the board. The Model B is the standard, general-use single-board system.Model B and has a smaller footprint,which offers a good processor and capabilities.
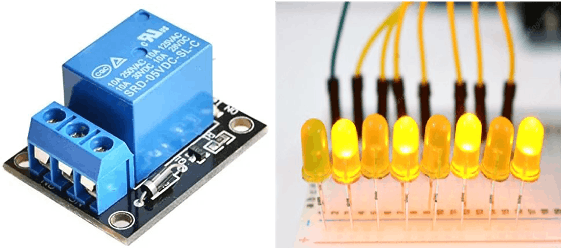
● Relays,lights :
Relay provides complete isolation between the low-voltage circuit on Arduino side and the high-voltage side controlling the load. It gets activated using 5V from Pico, which, in turn, controls high voltage electrical appliances like fans, lights and air-conditioners.
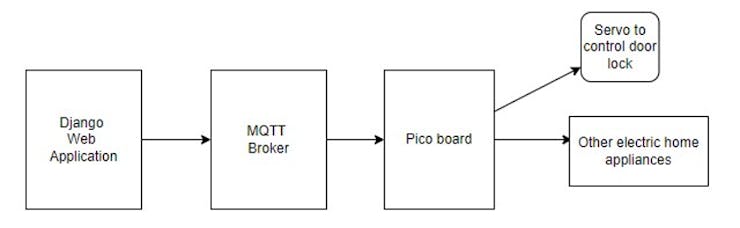
BLOCK DIAGRAM
Working:
In this project the django web server hosts a web application that allows users to control the electronic devices in their home. When users sign up, they are asked for a “Smart home code”. This code is unique for each Pico board and it’s the topic that the board is subscribed to in the MQTT server. The Pico board listens to messages posted by the django server for this topic and hence it is made to be unique for each home. Server stores the information about the user and the topic in the database.
The users can add or remove new devices and connect the relay of that device to any available pin on the pico board and register the device through the web application and give the device a name and the user will be able to turn the device on or off by giving voice commands through the web portal.
When the user sends a command to the server, it fetches the details about all the devices registered by the user. It gets the information about the MQTT topic where the message to control the device is to be published, the pin number to which the devices are connected and the device name. The command sent by the user may not be accurately what the user said due to the inaccuracies of the speech to text conversion API hence we make use of a python library called FuzzyWuzzy which can compare two strings and give a ratio between them. We can generate two dictionaries “turnOnRatios” and “turnOffRatios” with device names as the keys and the ratio between message and “turn on/off” + deviceName. This helps the server to pick the device based on the ratio and the server can return back an error message if the command does not contain the keywords turn on/off or does not have a device name that is in the database. Each user can register multiple devices.
The web application also provides an interface for the user to save their photos with their faces when they sign up for the first time and the user can unlock the door. When the user visits the web application and clicks on the “Unlock Door” menu, the camera is opened and the user can click a picture and click on the Unlock button. The picture is sent to the server and the server runs it through the face recognition AI algorithm that detects the face, extracts the features and compares it with the features of face in the media/images/known_images/username.jpg and if there is a match, then it returns the name of the user and if it matches then the Django server publishes a message on the MQTT server in the user’s board topic and the Pico can receive the message to unlock the door using servo.
SET UP INSTRUCTIONS
Softwares required : Windows, Anaconda, Arduino IDE, VS Code, Git
Step 2 : Open the repository in VS Code (prefered)
Step 3 : Open terminal in the directory of the Repository create a anaconda virtual environment using the commands conda create -n home python==3.8.3 conda activate home
Step 4 : install the dlib package using the command cd Server
pip install dlib-19.19.0-cp38-cp38-win_amd64.whl
Step 5 : Install the other required packages using command pip install -r requirements.txt
Step 6 : Open the main.ino file in Arduino IDE and change the topic in line number 75 to
anything of your choice. Compile and upload the program to pico board
Step 7 : Install and run MQTT broker on a raspberry pi and connect the computer which is running django server, Pico board and Raspberry pi to the same ethernet network.
Step 8 : Run the django server using command python manage.py runserver 0.0.0.0:8000
Any device connected to the same network can access the webpage using the ip address of the django server in the browser allowing the users to access all the features provided by the system.
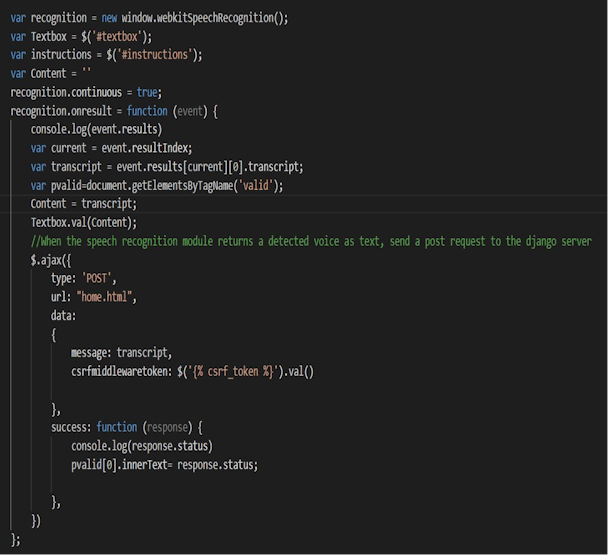
SPEECH TO TEXT MODULE (JavaScript):
The Following program creates the webKitSpeechRecognition object recognition which can listen to the user's voice and get a result in text. When the text result is received then the recognition.onresult is called. In the onresult method, we send a post request to the django server using ajax and pass the detected text as a “message” field. Then the django server processes the message and returns a response which is handled by the success function inside the ajax block.
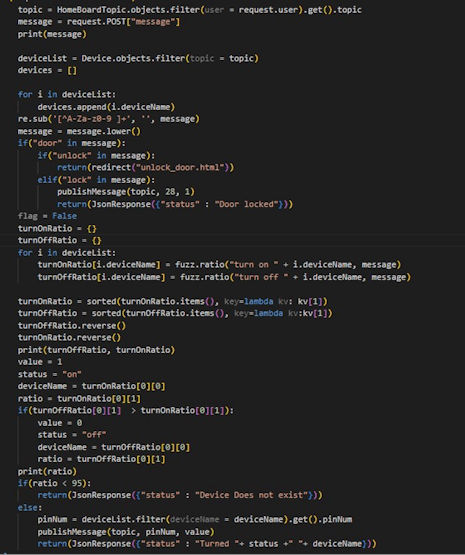
PROCESSING THE MESSAGE FROM CLIENT:
When the django server receives the post request, the following lines of code will be executed. First we fetch the MQTT topic of the user from the database and store it in the topic. The message in the post request is retrieved by request.POST[“message”] and stores it in the message variable. Now the server processes the message to determine what action is to be taken. The server can only handle the messages of the format “turn on X” or “turn off Y” where X and Y are the devices owned by the user. So first we retrieve all the device objects stored by the user and store it in the variable deviceList. Each Device object in this list has a deviceName and pinNumber. Now we compare the message with all names of all devices and using the library fuzzywuzzy we can create 2 dictionaries turnOnRatio and turnOffRatio which have the device name as the key and the ratio between “turn on X” (where X is the device name) and the message as the values in the turnOnRatio dictionary similarly we store the ratio for “turn off X” (where X is the deviceName) and sort both the dictionaries according to the ratios. Now we can check the highest ratio from the dictionaries and find the device name(Key with the highest value) and action to be performed (if turnOnRatio has the highest ratio then the action to be performed is ON and if the turnOffRatio has the highest ratio then the action is OFF).
Now we have the pinNumber of the device and the value to be put on the pin, we can simply post the message on MQTT topic for the Picoboard of the user which can read the message and do the requested action and status success is returned to the client. If the ratios are not above
95% for any action or for any device then the message is considered to be invalid and a device does not exist status is sent back as a response to the client.
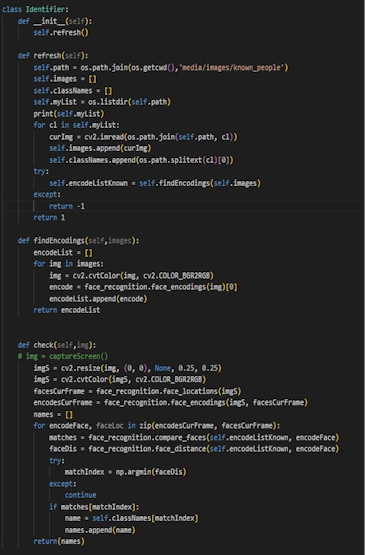
IDENTIFYING FACES:
The class Identifier in identifier.py file contains the code to detect and recognize faces by using the face_recognition library. When the object is created, the constructor calls the refresh function which loads all the images in the /media/images/known_people and creates a list of encodings and associates the file name (which is username) with the encodings. It will be stored in the class variable classNames and the encodings are stored in the variable encodeListKnown. When the views calls the check function and the image is passed, this function finds the faces in the image and the face encodings in the image. If the encodes match with any of the encodings in encodeListKnown then the name of the known encoding from the classNames is returned. If none of the encodings match then an empty list will be returned which will imply that the user is not in the image and the access should be denied to unlock the door.
This returned list will be handled by the views.py to perform the required action.
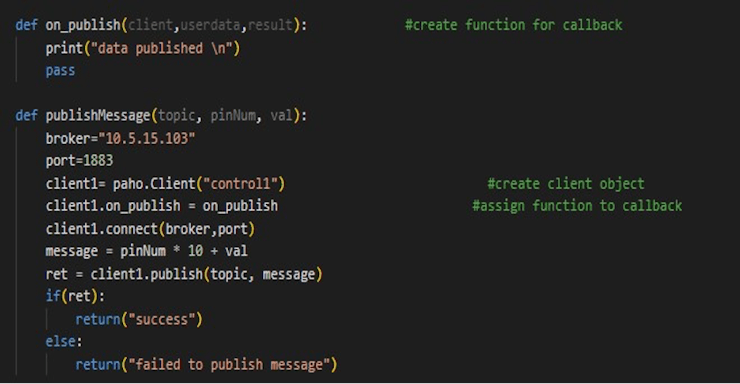
PUBLISHING MESSAGE TO THE MQTT BROKER:
We use the python library paho-mqtt to publish the message on the MQTT broker which can be read by the pico board. The on_publish method is called when the message is successfully published on the MQTT server. The function. The function publishMessage takes in the pinNum, val which will be encoded into a message that can be understood by the PicoBoard. The message format is (pinNum * 10 + val) this will give a 3 digit number. First two digits give the pin number and the last digit gives the value to be posted on the pin of PicoBoard. A paho-mqtt client object client1 is created witht broker at the given ip address of the MQTT server at the port 1883 and a connection is established with the MQTT server using client1.connect function. And then the message can be published using client1.publich. If the message is published successfully then the function will return the message “success” and if there was any failure in publishing then a failure message will be returned.
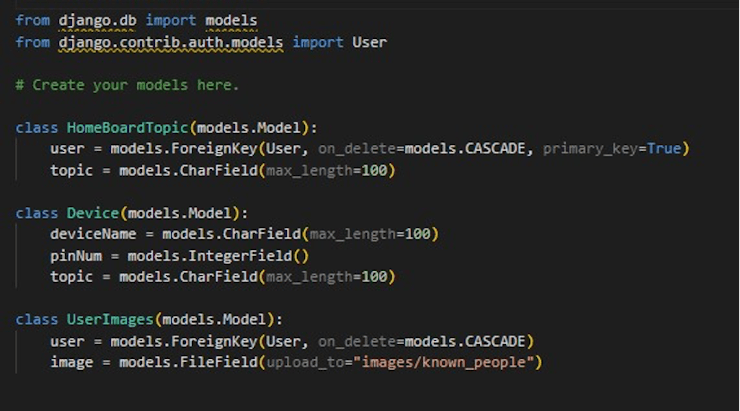
DATABASE MODELS:
The project needs things like device details and the topic of the PicoBoards and the images in the database. To facilitate this, we create the django models which represent the tables in the database. We need the database tables HomeBoardTopics which associate the user and the the topic (MQTT topic which to which the PicoBoard of the user is subscribed)
The table Device stores the deviceName and the pinNumber to which the device is connected and the MQTT topic to which the PicoBoard of the user is subscribed.
UserImage has associates the user with the path to the image in the media directory.
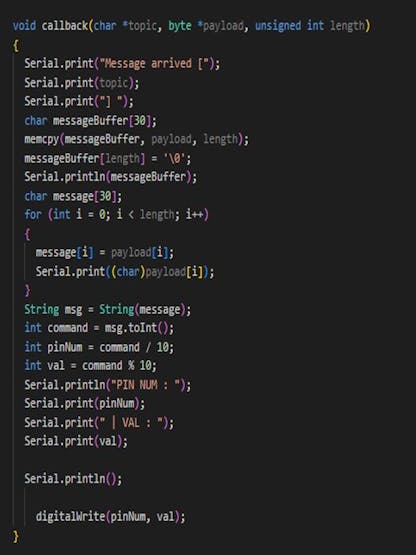
READING THE DATA FROM MQTT IN PICOBOARD:
Each Picoboard is connected to the MQTT server and is subscribed to only one topic. The topic must be registered by the user and the django server sends a message to the MQTT server on the topic if the user sends any commands. After the PicoBoard is connected to the MQTT server, it continuously listens to the server to check if any message is published in the server for the topic it is subscribed to. If there are any messages, then the message will be handled by the function callback the message is in byte array format which we first convert to a string msg using the function String(message). Then we convert the message into an integer command. From the previous explanation of the message format, we can extract the pinNum by dividing the command by 10 and taking the quotient. The remainder gives the last digit which is the value to be written on to the pin.. Now we can simply call the digitalWrite(pinNum, val) function to turn the device on or off.
SCREENSHOTS
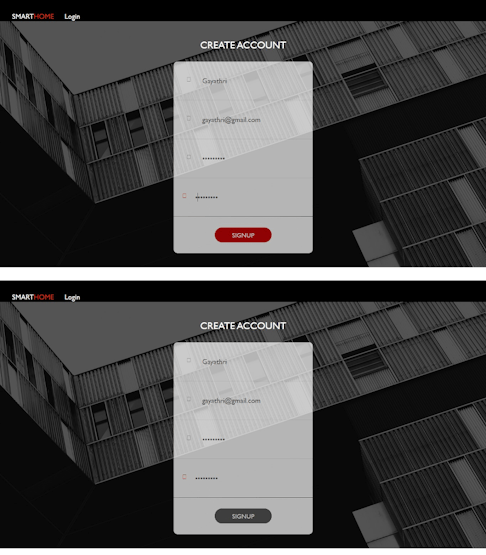
Registration Page
The registration page is where the user can create an account to get access for different features of SmartHome.
SignIn
The above screenshot is the signIn page where the user can login through their username and password.The user should always logIn to give voice commands to control their stored devices.
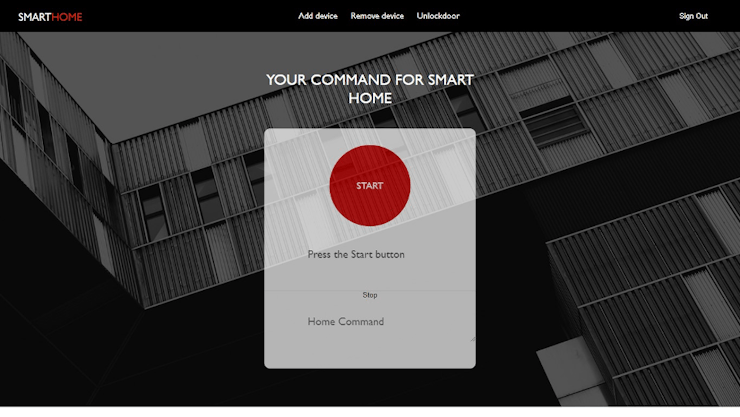
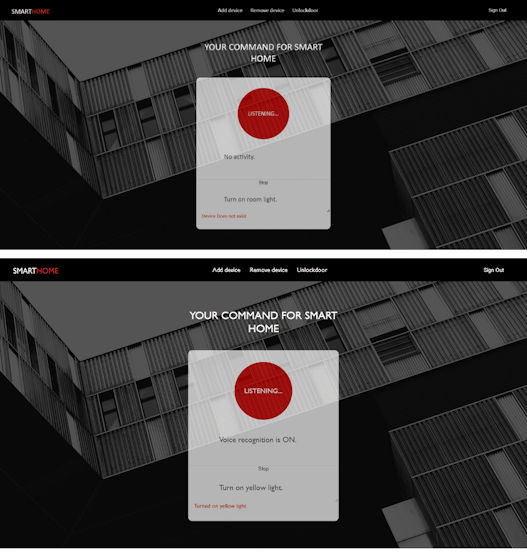
Speech Command page
The above web page is the home page where the user lands on once they login. In this page the user can give voice commands to turn on/off their devices and lock the door.
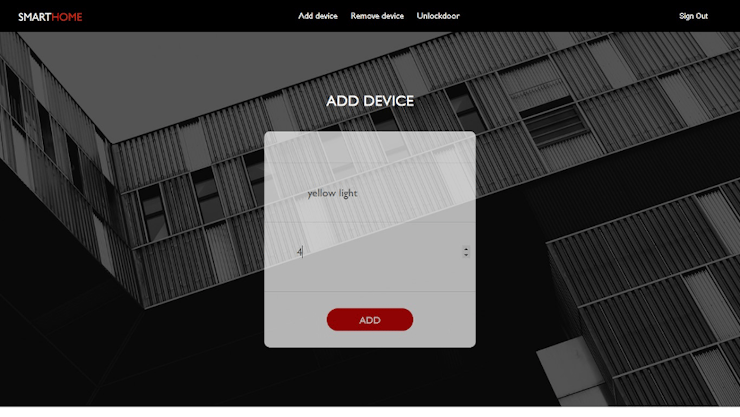
Add new device page
The add new device page is the page where the user can add different devices to control them through voice commands.
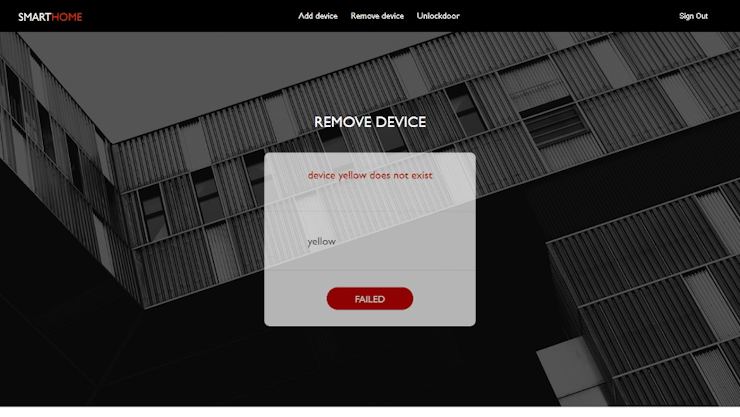
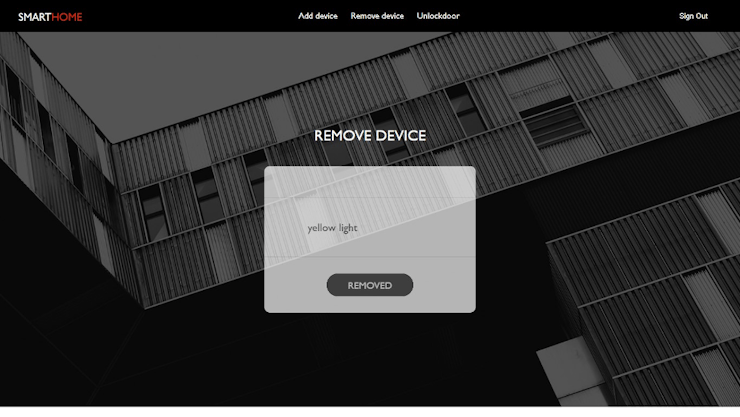
Remove device page
The remove device page is the page where the user can delete or remove the devices which are added by the user.The user can only remove the device by the device name.If the device name does not match a message will be displayed saying that the device does not exist.
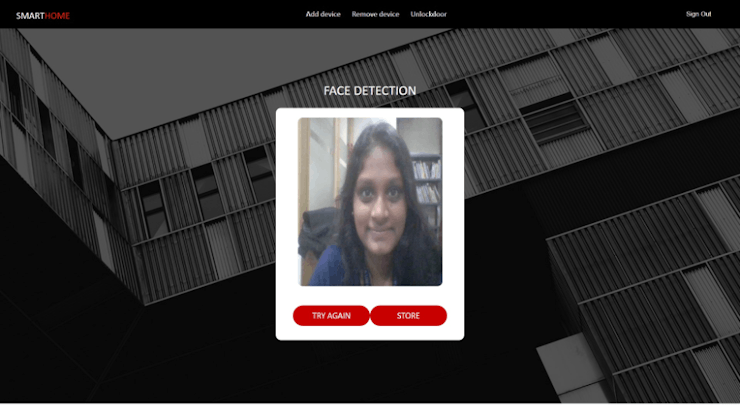
Store Users Image for Door lock
The above page is to store the user's image to unlock the door when needed.
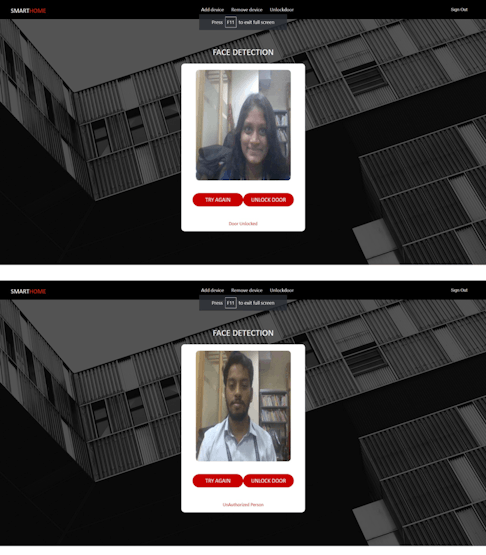
Face recognition in door unlock page
The above page takes the picture of the user and matches the image with stored image.If the image matches then the door gets unlocked.If it does not match then a message will be displayed saying that the user is unauthorized.
The user should create an account by registering.Once the registration is complete he can register their devices code.Each pico board will have a unique code through which the server can communicate with the pico board in the network.After logging in the user is asked to take a picture for the door to unlock, register their board code and add their device.He has got the privilege remove the devices that added.After the devices are added the user can give voice commands to switch on/off any device and can also lock the door through voice command.He can unlock the only through facial recognition.The user should take the picture of his face and click on unlock door button to unlock the door.
REFERENCES
1) Paho-MQTT for django to MQTT communication : https://pypi.org/project/paho-mqtt/#usage-and-api
2) Face recognition for face unlock
https://pypi.org/project/face-recognition/
3) Speech to text web API https://developer.mozilla.org/en-US/docs/Web/API/Web_Speech_API/Using_the_ Web_Speech_API