
Computer Running Status Monitor(Raspberry Pi Pico & WizFi360 & AIDA64)
Use Raspberry Pi RP2040 & WizFi360 to display your computer status(AIDA64) on the screen(GC9A01)
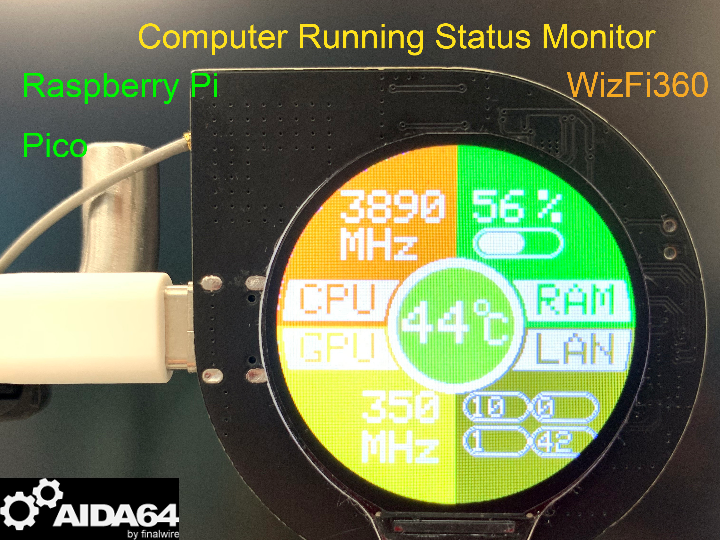
I want to display the current status of my computer on a screen, such as CPU usage, memory usage, current temperature, fan speed and other information.
In this project, I useAIDA64 to collect computer information.

AIDA64 is a system information, diagnostics, and auditing application developed by FinalWire Ltd (a Hungarian company) that runs on OS operating systems. It displays detailed information on the components of a computer on pc or webpage. The content and format of the information displayed on the web page can be customized. Of course, the web page format is useless for our application. We only need the pc runtime status parameters.
I use wizfi360 as http client to visit this webpage and get parameters. WizFi360 is a WiFi module, which can connect to WiFi through commands and perform TCP or TSP (SSL) connections. I have used it many times and it is very convenient.
RP2040 acts as an MCU, after obtaining the pc runtime status parameters from wizfi360, it performs data processing and displays the content on the screen.
This project is divided into three steps:
Step 1: Set AIDA64 so that the running parameters can be obtained through http;
Step2: Install library files and board support in the Arduino IDE
Step 3: Get parameters from http through WizFi360, and parse the parameters;
Step 4: Displays the computer's running status on the screen(GC9A01);
The following are step by step instructions.
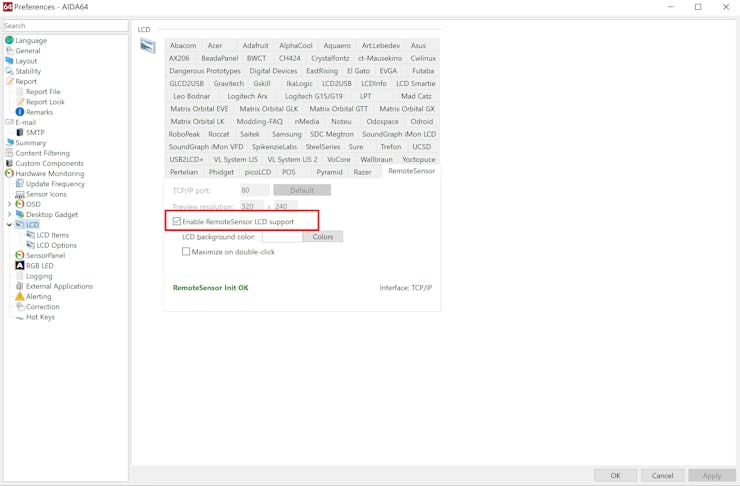
Step 1: Set AIDA64 so that the running parameters can be obtained through http;
open Aida64 and goto "File">>"Preferences">>"LCD".then tick"Enable Remotesensor LCD SUPPORT".
Goto "LCD Items" and add the running parameters that need to be added to be displayed on the LCD.
You need to record the "Label" and "Uint" of the added parameters, which will be used later on the Arduino IDE.
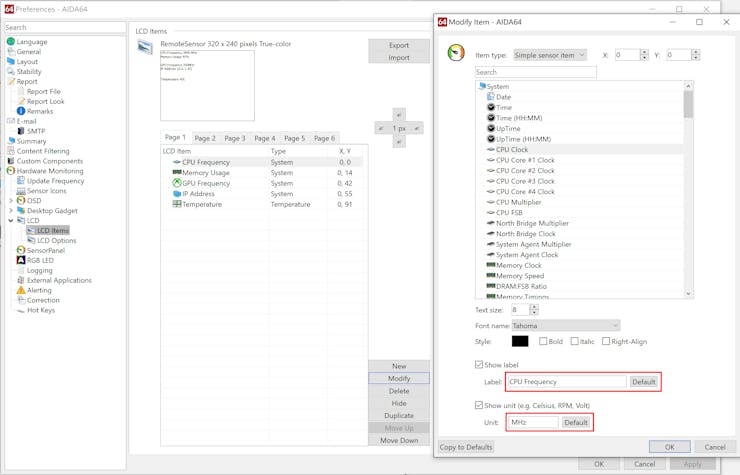
I added the following parameters respectively:
CPU Frequency
Memory Usage
GPU Frequency
IP Address
Temperature
“Apply” and “OK” to save.
Step2: Install library files and board support in the Arduino IDE
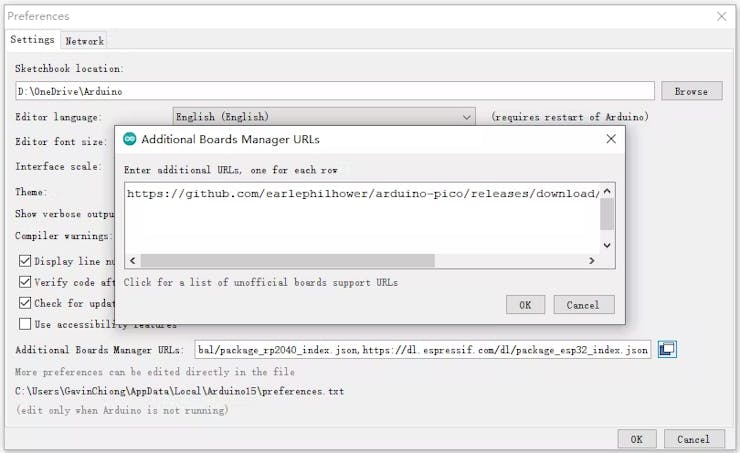
Add "WIZnet WizFi360-EVB-PICO" support to Arduino IDE
Open up the Arduino IDE and go to File->Preferences.
In the dialog that pops up, enter the following URL in the "Additional Boards Manager URLs" field:
https://github.com/earlephilhower/arduino-pico/releases/download/global/package_rp2040_index.json
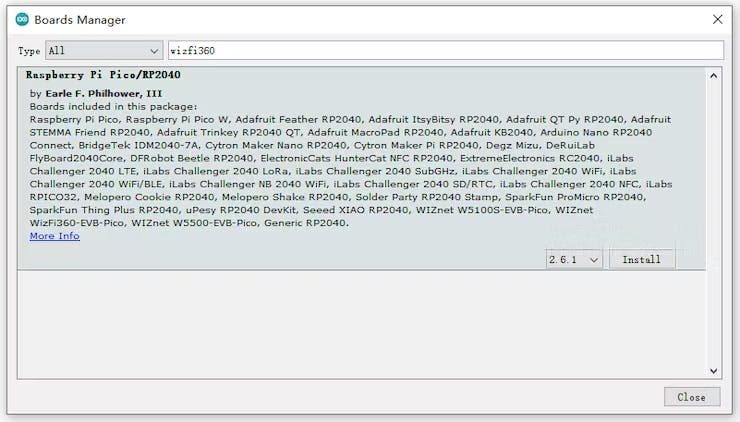
Search "WizFi360" and Install Board support by "Board Manager"
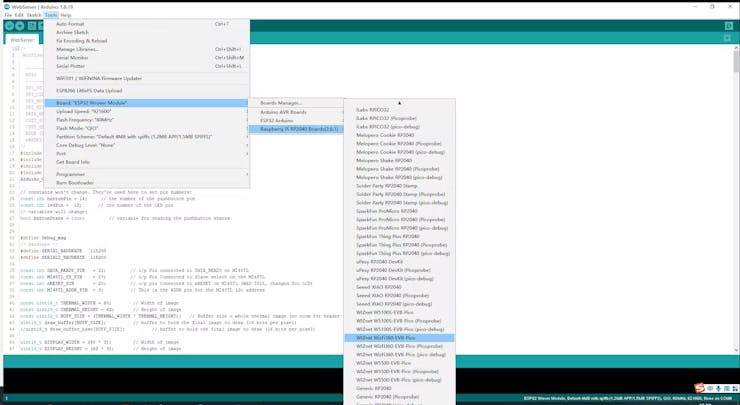
"Tools->Board:"***"-> Raspberry Pi RP2040 Boards(2.6.1) " Select “WIZnet WizFi360-EVB-PICO”.
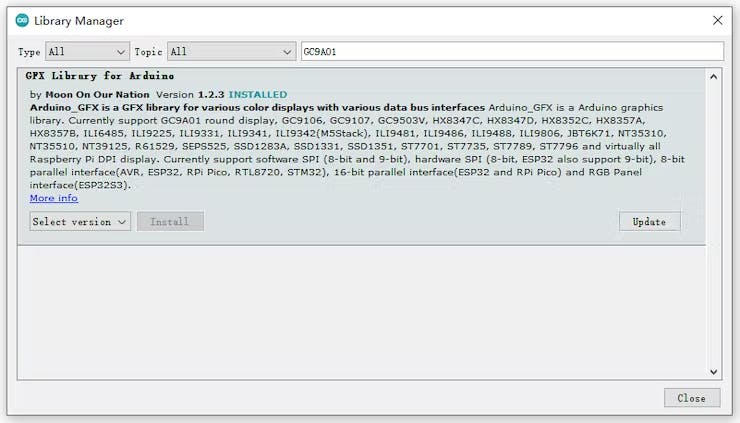
Add “GFX Library for rduino”, this library support the round screen GC9A01.
Step 3: Get parameters from http through WizFi360, and parse the parameters;
Thermal viewer software works as a TCP client with port 5051.
#include "WizFi360.h"

// Wi-Fi info //
char ssid[] = "WIZNET_test";       // your network SSID (name)//
char pass[] = "********";          // your network password//
int status = WL_IDLE_STATUS;       // the Wifi radio's status//
WiFiServer server(5051);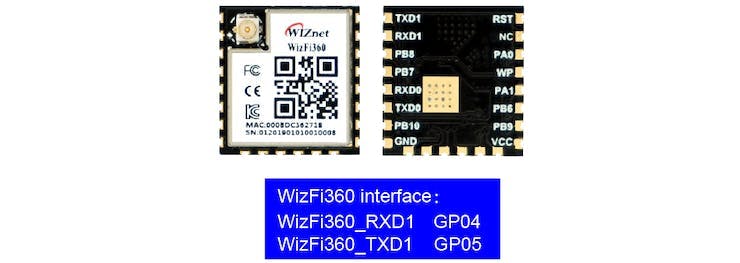
Initialize serial port for WizFi360 module and change the baudrate to 2000000bps(MAX baudrate for wizfi360).
The first initialization is 115200, and then setting the baud rate (2000000) is added to the initialization part of the WiZfi360 library, and the second time is changed to 2000000bps.
// initialize serial port for WizFi360 module//
#if defined(ARDUINO_WIZNET_WIZFI360_EVB_PICO)
  Serial2.begin(2000000);
  WiFi.init(&Serial2);
  Serial2.begin(2000000);
#endif
Check the wizfi360 Link status of wifi in the “void setup()”
// check for the presence of the shield//
  if (WiFi.status() == WL_NO_SHIELD) {
    Serial.println("WiFi shield not present");
    // don't continue//
    while (true);
  }
  // attempt to connect to WiFi network//
  while ( status != WL_CONNECTED) {
    Serial.print("Attempting to connect to WPA SSID: ");
    Serial.println(ssid);
    // Connect to WPA/WPA2 network//
    status = WiFi.begin(ssid, pass);
  }
  Serial.println("You're connected to the network");
Create a TCP Socket on port 80 of the computer to get the running status of the PC.
// if you get a connection, report back via serial
        if (client.connect(Aida64IpAddr, 80)) {
          Serial.println("Connected to server");
          // Make a HTTP request
          client.println(String("GET /sse HTTP/1.1"));
          client.println(String("Host: ") + (String)Aida64IpAddr);
          client.println("Connection: close");
          client.println();
          data_now = 0;
          json_String = "";
        }
After obtaining the data, analyze the Header information of the HTML, and store the parameter status in a String ‘json_String’.
while (client.available()) {
            myBuffer.push(client.read());
            data_now =1;
          }
          if(data_now)
          {
              json_start = false;
              while (myBuffer.pop(value)) {
                Serial.print((char)value);
                if(json_start)
                {
                  json_String += (char)value;
                }
                if(value == 10) //ascii "\n"
                {
                   if(find_n == true)
                   {
                      json_start = true;
                      find_n = false;
                   }
                   else
                   {
                      json_start = false;
                      find_n = true;
                   }
                }
                else
                {
                    find_n = false;
                }
            }
            Serial.println("json_String:");
            Serial.println(json_String);
The HTTP data is as follows:
HTTP/1.1 200 OK
Content-Type: text/event-stream
Cache-Control: no-cache
Access-Control-Allow-Origin: *
Access-Control-Expose-Headers: *
Access-Control-Allow-Credentials: true

data: Page0|{|}Simple1|CPU Frequency 3890 MHz{|}Simple2|Memory Usage 56%{|}Simple3|GPU Frequency 350MHz{|}Simple4|IP Address 10.0.1.42/{|}Simple5|Temperature 48C{|}
What we need is the "data" part, and the relevant parameters can be decomposed by judging by the following procedure.
uint16_t dataStart = 0;
            uint16_t dataEnd = 0;
            String dataStr;
            //json_String = "data: Page0|{|}Simple1|CPU Frequency 998 MHz{|}Simple2|Memory Usage 43%{|}Simple3|GPU1 Usage 0%{|}Simple4|GPU2 Core Frequency 350 MHz{|}Simple5|IP Address 10.0.1.42/{|}Simple6|Motherboard Temperature 47{|}";
            dataStart = json_String.indexOf("CPU Frequency") + strlen("CPU Frequency");
            dataEnd = json_String.indexOf("MHz", dataStart);
            dataStr = json_String.substring(dataStart, dataEnd);
            Cpu_frequency = dataStr.toInt();
            Serial.print("CPU Frequency:");
            Serial.print(Cpu_frequency);
            Serial.println("MHz");

            dataStart = json_String.indexOf("Memory Usage") + strlen("Memory Usage");
            dataEnd = json_String.indexOf("%", dataStart);
            dataStr = json_String.substring(dataStart, dataEnd);
            memory_usage = dataStr.toInt();
            Serial.print("Memory Usage:");
            Serial.print(memory_usage);
            Serial.println("%");

            dataStart = json_String.indexOf("GPU Frequency") + strlen("GPU Frequency");
            dataEnd = json_String.indexOf("MHz", dataStart);
            dataStr = json_String.substring(dataStart, dataEnd);
            GPU_Frequency = dataStr.toInt();
            Serial.print("GPU frequency:");
            Serial.print(GPU_Frequency);
            Serial.println("MHz");

            dataStart = json_String.indexOf("Temperature") + strlen("Temperature");
            dataEnd = json_String.indexOf("C", dataStart);
            dataStr = json_String.substring(dataStart, dataEnd);
            Temperature = dataStr.toInt();
            Serial.print("Temperature:");
            Serial.print(Temperature);
            Serial.println("C");

            dataStart = json_String.indexOf("IP Address") + strlen("IP Address");
            dataEnd = json_String.indexOf("/", dataStart);
            dataStr = json_String.substring(dataStart, dataEnd);
            Serial.print("IP Address:");
            Serial.print(dataStr);
            Serial.println("/");

            dataEnd = dataStr.indexOf(".", 0);
            ip_uint8[0] = (dataStr.substring(0, dataEnd)).toInt();
            Serial.println(ip_uint8[0]);
            dataStart = dataEnd+1;
            dataEnd = dataStr.indexOf(".", dataStart);
            ip_uint8[1] = (dataStr.substring(dataStart, dataEnd)).toInt();
            Serial.println(ip_uint8[1]);
            dataStart = dataEnd+1;
            dataEnd = dataStr.indexOf(".", dataStart);
            ip_uint8[2] = (dataStr.substring(dataStart, dataEnd)).toInt();
            Serial.println(ip_uint8[2]);
            dataStart = dataEnd+1;
            dataEnd = dataStr.indexOf(".", dataStart);
            ip_uint8[3] = (dataStr.substring(dataStart, dataEnd)).toInt();
            Serial.println(ip_uint8[3]);
Here we use the keywords "Label" and "Uints" recorded earlier, as the beginning and end of the parameters respectively, so as to separate "data" into a single running parameter.
- CPU Frequency MHz
- Memory Usage %
- GPU Frequency MHz
- IP Address /
- Temperature C
At this point we have completed the acquisition of parameters.
Step 4: Displays the computer's running status on the screen(GC9A01);
#include <Arduino_GFX_Library.h>
Arduino_GFX *tft = create_default_Arduino_GFX();
define of pin which is used by GC9A01 in the "libraries\GFX_Library_for_Arduino\src\Arduino_GFX_Library.h"
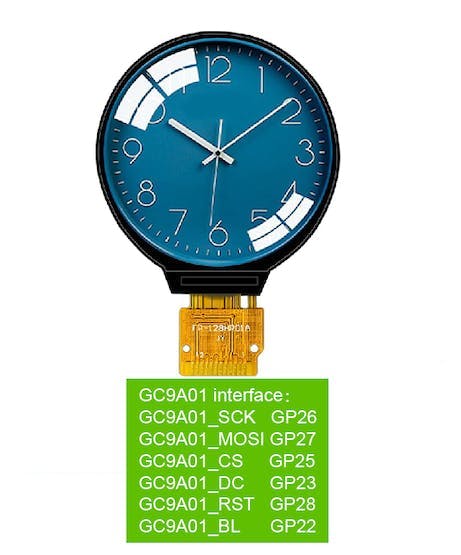
#elif defined(ARDUINO_RASPBERRY_PI_PICO)||defined(ARDUINO_WIZNET_WIZFI360_EVB_PICO)||defined(ARDUINO_WIZNET_5100S_EVB_PICO)
#define DF_GFX_SCK 26
#define DF_GFX_MOSI 27
#define DF_GFX_MISO GFX_NOT_DEFINED
#define DF_GFX_CS 25
#define DF_GFX_DC 23
#define DF_GFX_RST 28
#define DF_GFX_BL 22
Initialize the screen and open the backlight of the screen in the “void setup()”
tft->begin();
tft->fillScreen(BLACK);
pinMode(22, OUTPUT);
digitalWrite(22, HIGH);
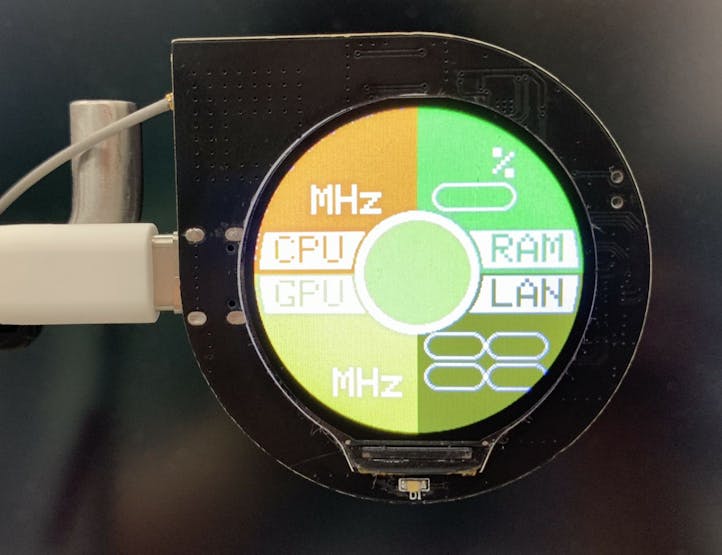
Display_Begin();In order to display the interface beautifully, we write the framework of the interface during "Setup()".
void display_dashboard()
{
  tft->fillArc(120,120, 46, 120, 0, 90, OLIVE);
  tft->fillRect(150,123,100,27,WHITE);
  tft->setTextColor(OLIVE);
  tft->setCursor(175, 125);
  tft->setTextSize(3);
  tft->println("LAN");
  tft->fillArc(120,120, 117, 120, 0, 90, OLIVE);
  tft->fillArc(120,120, 46, 48, 0, 90, OLIVE);

  tft->fillArc(120,120, 46, 120, 90, 180, YELLOW);
  tft->fillRect(0,123,100,27,WHITE);
  tft->setTextColor(YELLOW);
  tft->setCursor(15, 125);
  tft->setTextSize(3);
  tft->println("GPU");
  tft->fillArc(120,120, 117, 120, 90, 180, YELLOW);
  tft->fillArc(120,120, 46, 48, 90, 180, YELLOW);

  tft->fillArc(120,120, 46, 120, 270, 360, GREEN);
  tft->fillRect(150,90,100,27,WHITE);
  tft->setTextColor(GREEN);
  tft->setCursor(175, 92);
  tft->setTextSize(3);
  tft->println("RAM");
  tft->fillArc(120,120, 117, 120, 270, 360, GREEN);
  tft->fillArc(120,120, 46, 48, 270, 360, GREEN);

  tft->fillArc(120,120, 46, 120, 180, 270, ORANGE);
  tft->fillRect(0,90,100,27,WHITE);
  tft->setTextColor(ORANGE);
  tft->setCursor(15, 92);
  tft->setTextSize(3);
  tft->println("CPU");
  tft->fillArc(120,120, 117, 120, 180, 270, ORANGE);
  tft->fillArc(120,120, 46, 48, 180, 270, ORANGE);

  tft->drawRoundRect(126,165,45,20,10,WHITE);
  tft->drawRoundRect(127,166,43,18,9,WHITE);
  tft->drawRoundRect(126,188,45,20,10,WHITE);
  tft->drawRoundRect(127,189,43,18,9,WHITE);
  tft->drawRoundRect(171,165,45,20,10,WHITE);
  tft->drawRoundRect(172,166,43,18,9,WHITE);
  tft->drawRoundRect(171,188,45,20,10,WHITE);
  tft->drawRoundRect(172,189,43,18,9,WHITE);

  tft->fillArc(120,120, 39, 45, 0, 360, WHITE);
  tft->fillCircle(120,120,39,GREENYELLOW);

  tft->setTextColor(WHITE);
  tft->setTextSize(3);

  tft->setCursor(43, 55);
  tft->println("MHz");
  tft->setCursor(175, 30);
  tft->println("%");
  tft->setCursor(58, 192);
  tft->println("MHz");

  tft->drawRoundRect(132,55,60,20,10,WHITE);
  tft->drawRoundRect(133,56,58,18,9,WHITE);
}
At this time the screen displays as follows:
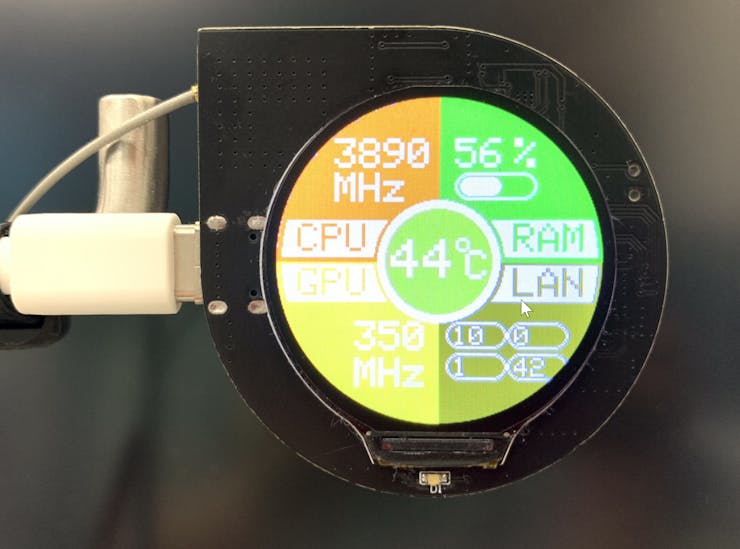
After obtaining the parameters in STEP3, through the following processing, update the screen display as the operating parameters of the PC.
          if(Temperature < 60)
          {
            tft->fillCircle(120,120,39,GREENYELLOW);
          }
          else if(Temperature < 85)
          {
            tft->fillCircle(120,120,39,ORANGE);
          }
          else
          {
            tft->fillCircle(120,120,39,RED);
          }
          tft->setTextColor(WHITE);
          tft->setCursor(85, 104);
          tft->setTextSize(4);
          tft->println(Temperature);
          tft->setCursor(140, 112);
          tft->setTextSize(3);
          tft->println("C");
          tft->setCursor(133, 99);
          tft->setTextSize(2);
          tft->println("o");

          tft->fillRect(43,30,70,25,ORANGE);
          tft->setTextColor(WHITE);
          tft->setCursor(43, 30);
          tft->setTextSize(3);
          tft->println(Cpu_frequency);

          tft->fillRect(132,30,35,25,GREEN);
          tft->setTextColor(WHITE);
          tft->setCursor(132, 30);
          tft->setTextSize(3);
          tft->println(memory_usage);

          tft->fillRoundRect(136,58,54,14,8,GREEN);
          uint8_t memory_uint8 = memory_usage*54/100;
          tft->fillRoundRect(136,58,memory_uint8,14,8,WHITE);

          tft->fillRect(31,165,80,25,YELLOW);
          if(GPU_Frequency>=1000)
          {
            tft->setCursor(43, 165);
          }
          else
          {
            tft->setCursor(58, 165);
          }
          tft->setTextSize(3);
          tft->println(GPU_Frequency);

          tft->setTextSize(2);
          tft->setCursor(131, 168);
          tft->println(ip_uint8[0]);
          tft->setCursor(176, 168);
          tft->println(ip_uint8[1]);
          tft->setCursor(131, 191);
          tft->println(ip_uint8[2]);
          tft->setCursor(176, 191);
          tft->println(ip_uint8[3]);
Done.
-
CODE

-
Schematics