
[AIoT] Robot Hand with Hand Gesture Recognition
Creating a remotely controlled mechanical arm with hand gesture recognition application using WIZnet Pico board and Raspberry Pi.

WIZnet - W5100S-EVB-Pico
x 1
Introduction
This project implements a remotely controlled mechanical arm with a hand gesture recognition application using the WIZnet W5100S-EVB-Pico board and Raspberry Pi.
Hardware Components:
- Wiznet W5100S-EVB-Pico x 1
- Raspberry Pi model 4 B x 1
- 16-Channel 12-bit PWM/Servo Driver - I2C interface - PCA9685 x 1
- Servo Motors x 5
- 5V 3A micro USB power converter to VCC and GND x 1
- Arducam OV2640 Camera Module x 1
Softwares:
- Raspbian OS (Debian 10 Buster)
- Thonny for Circuit python
Semantics Circuit Diagram:
PCA9685 with Raspberry Pi
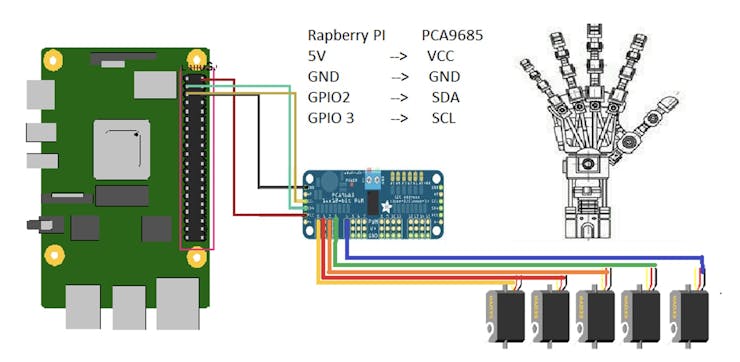
Following is the circuit diagram for making the connection. The PCA9685(servo motor driver) is connected to the raspberry pi and 5 servo motors are connected to the PCA9685 from 0 to 4thPin. And each finger of the mechanical hand is connected to the individual servo motors. Connect an external 5V, 3A power source to PCA9685.
Arducam OV2640 Camera module connected to the W5100S-EVB-Pico Board
The ArduCam provides a document and an example source code "SPI Camera for Raspberry Pi Pico" and it uses SPI0 port to connect to a Raspberry Pi Poco board as below.

However, the WIZnet W5100S-EVB-Pico board uses default SPI0 for the internal ethernet chip W5100S. It uses GPIO pins 21-22 and 24-27. To avoid conflict, this project uses SPI1 for the ArduCam OV2640 Module.
ArduCam OV2640 Module requires CS, MOSI, MISO and SCLK pins for SPI connection, and SDA, SCL pins for I2C connection. This project modified the source code of ArduCam to use SPI1.
SPI1 configuration for ArduCam OV2640
- CS --> GPIO 13
- MOSI --> GPIO 11
- MISO --> GPIO 12
- SCLK --> GPIO 10
I2C configuration for ArduCam OV2640
- SDA --> GPIO 8
- SCL --> GPIO 9

Steps to make it work
- Get the hardware described above and connect the following as shown in the schematics diagram.
- Get an Ethernet connection to both Raspberry pi and W5100S-EVB-Pico board over the same network using LAN cables.
- Install the required software and libraries in the Raspberry Pi for running the Google Mediapipe and OpenCV hand gesture recognition code, and also install libraries for controlling the servo motors.
- Use Thony IDE to run the Circuit python code to stream the video from the W5100S-EVB-Pico board
- Connect the Raspberry Pi to a monitor and run the code for controlling the mechanical hand.
Setting up the Raspberry Pi:
Installing Mediapipe and OpenCV
(Reference for technical details: https://google.github.io/mediapipe/solutions/hands.html)
Open a Raspbian OS terminal and execute the following commands
Note: Raspbian OS – Debian 10 Buster is required for the setting up of the Mediapipe.
Installing Mediapipe in Raspberry Pi
Use the below command to install MediaPipe on Raspberry Pi 4:
sudo pip3 install mediapipe-rpi4If you don’t have Pi 4 then you can install it on Raspberry Pi 3 using the below command:
sudo pip3 install mediapipe-rpi3Installing OpenCV on Raspberry Pi
Before installing the OpenCV and other dependencies, the Raspberry Pi needs to be fully updated. Use the below commands to update the Raspberry Pi to its latest version:
sudo apt-get updateThen use the following commands to install the required dependencies for installing OpenCV on your Raspberry Pi.
sudo apt-get install libhdf5-dev -y
sudo apt-get install libhdf5-serial-dev –y
sudo apt-get install libatlas-base-dev –y
sudo apt-get install libjasper-dev -y
sudo apt-get install libqtgui4 –y
sudo apt-get install libqt4-test –y
After that, use the below command to install the OpenCV on your Raspberry Pi.
pip3 install opencv-contrib-python==4.1.0.25Installing thePCA9685 driver for Raspberry Pi
Configuring Your Pi for I2C
Note: Enable I2C in the preferences in your Raspberry Pi. In the latest OS symbus is not needed
Enter the following commands to add SMBus support (which includes I2C) to Python
sudo apt-get install python-smbus
sudo apt-get install i2c-tools
Testing the I2C is on port 1:
sudo i2cdetect -y 1This will search /dev/i2c-0 or /dev/i2c-1 for all address.
Using the Adafruit Library: It's easy to control servos with the Adafruit 16-channel servo driver. There are multiple CircuitPython libraries available to work with the different features of this board including Adafruit CircuitPython PCA9685, and Adafruit CircuitPython ServoKit. These libraries make it easy to write Python code to control servo motors.
Python Installation of ServoKit Library
You'll need to install the Adafruit_Blinka library that provides the CircuitPython support in Python
sudo pip3 install adafruit-circuitpython-servokitSetting up the W5100S-EVB-Pico board with Arducam OV2640 and Ethernet for video streaming:
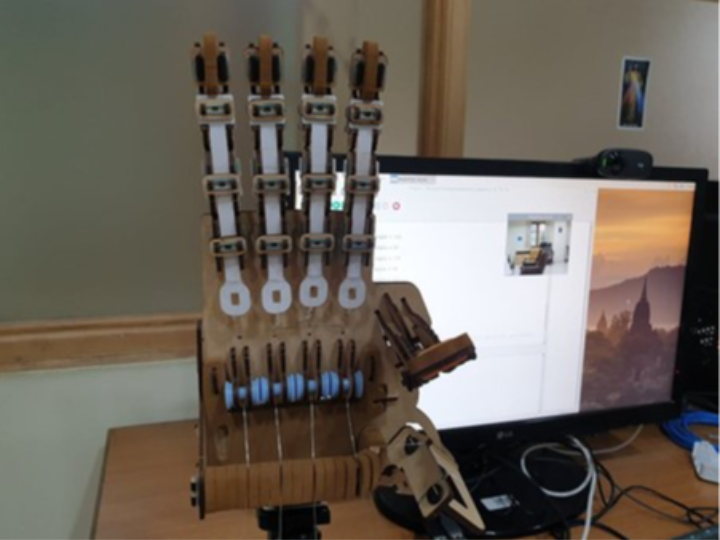
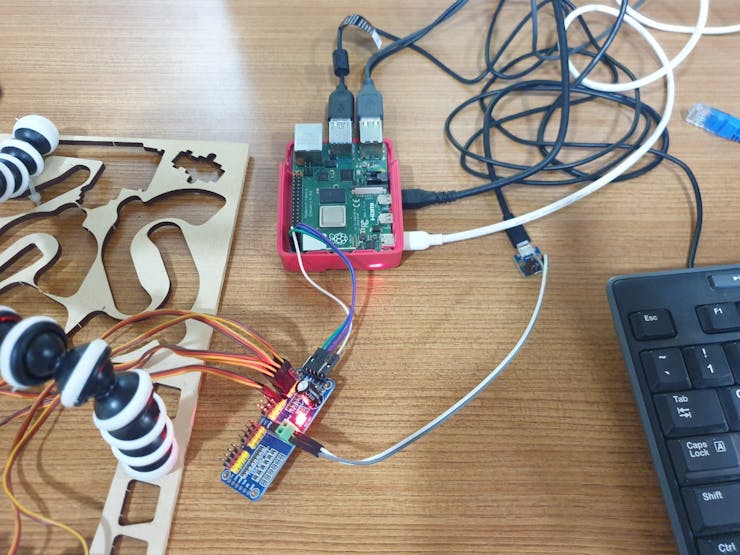
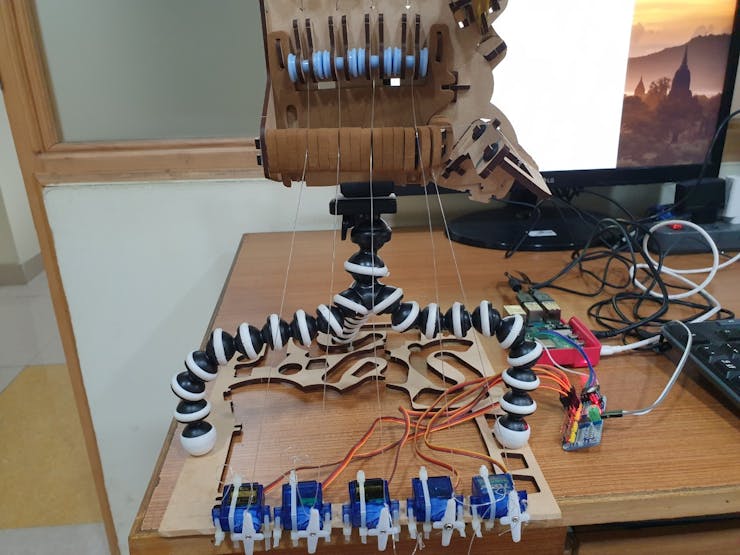
Both Raspberry Pi and W5100S-EVB-pico board is connected to the same network. On the Raspberry Pi side, 5 servo motors are connected to the PCA9685 servo motor driver. This servo motor driver is connected to the Raspberry Pi. Raspberry Pi is connected to an external monitor for viewing the output. For the W5100S-EVB-Pico board, Arducam OV2640 camera module is connected using SPIs connection and powered using the POE (Power Over Ethernet) cable.
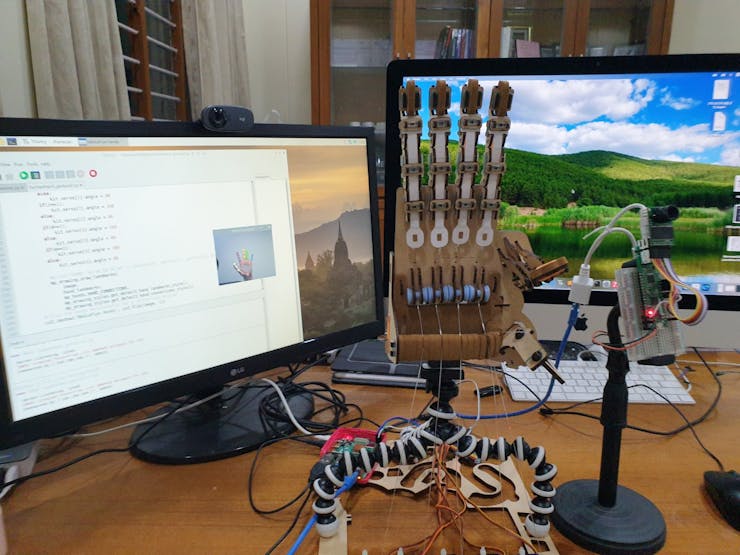
Secure the mechanical hand in a stand and connect each finger to servo motors with a thin nylon string.
Code explanation:
Source file: humanhand_gesture_ArduCam.py
cv2 is the module import name for OpenCV-python. MediaPipe offers cross-platform, customizable ML solutions for live and streaming media. accelerated.png, for cross_platform. Mediapipe is imported as ‘mp’. Adafruit_servokit is imported and ServoKit class is initialized. Next, we must specify the number of channels available on board. The breakout has 16 channels, so when we create the class object, we will specify 16 channels as in line 6 of the code. the function CamReceiver defined in the CamReceiver.py file is imported, and then functions are called later in the code for receiving video stream over Ethernet.
The pipeline is implemented as a MediaPipe graph that uses a hand landmark tracking subgraph from the hand landmark module and renders using a dedicated hand renderer subgraph. The hand landmark tracking subgraph internally uses a hand landmark subgraph from the same module and a palm detection subgraph from the palm detection module.
In our project hands detection model is used and the very first step is to initialize the model with valid parameters as media pipe provides other applications also. First initializing class of drawing utils and drawing_styles for the landmarks drawing on the hand with variables. The use of mp.solutions.drawing_utils will be responsible to draw all the hand’s landmarks points on the output image which were detected by our Hands function. Then we initialize the class of hands by mp.solutions.hands with a variable mp_hands as shown in the code.
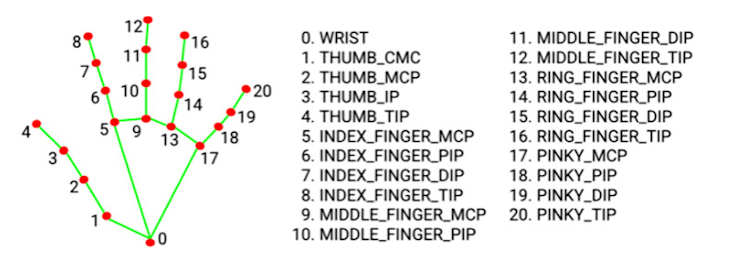
Defining a function get_finger_gesture() for obtaining the binary values for finger position as an array. Information can be passed into functions as arguments. For the get_finger_gesture three arguments are passed as an input. Landmarks, w and h values are taken as an argument for the function. The list is a non-homogeneous data structure that stores the elements in a single row and multiple rows and columns and the finger_pos List is created for storing the values of the finger landmarks. landmark model performs precise keypoint localization of 21 3D hand-knuckle coordinates inside the detected hand regions via regression. Each finger has 4 landmark points and is shown in the hand landmark figure.
A gesture array is created and the values for each finger will be either ‘1’ or ‘0’ in the gesture array. For all the fingers there are two knuckle points used for comparison. In order to obtain whether the figure is closed or opened, we will see the position of the tip of the figure with the last landmark point of the finger i.e. (Name of finger*_finger_ MCP). We take Z-value from the image depth map. If it exists per corresponding coordinate and compares it to the position. If the tip position is below finger_PIP values, then the value in gesture is stored as 1 or the value is 0. For all fingers, this is done at a time and the gesture values are returned as 5 array element values.
For the webcam input:
In order to take the input of the streaming video over the Ethernet passed by the Wiznet W5100s ECB-pico board, the following code is used. First, we define the parameters of the width and height of the frames i.e. 320X240 in our case. CamReceiver() is called for passing the width and height values and storing them in the cam variable. And cam.start() method is called. Both of these method descriptions are explained in CamReceiver.py code explanation.
After this we are going to create an object of class Hands, so we can process the image. We are going to wrap the creation of this object on a statement, to ensure the resources are freed after the usage of the object. As the input of the constructor of this class, we are going to pass the video stream as an input. When we don’t define any parameters for the image, the images would be treated as a video stream, meaning that after a successful detection of hands, it localizes the hand landmarks and in the subsequent image it simply tracks those landmarks without invoking another detection, until it loses track of any of the hands.
Note: When we are going to pass the static_image_mode parameter as True, this indicates that the images it processes should be treated as unrelated, meaning that the hand detection should run on every input image. If this parameter was set to False (i.e. no parameter set as true), then the images would be treated as a video stream.
Note: The constructor supports some additional parameters that we will leave with the defaults. These parameters are as follows:
- min_detection_confidence, this argument provides us with the flexibility that how much rigidity we want from our detection model and in that case it provides the threshold value of the level of confidence. The ideal range of minimum detection confidence is [0.0, 1.0] and by default, it remains 0.5 which means that if the confidence level drops below 50% then the hands will not be detected at all in the output image.
- min_tracking_confidence, the Minimum confidence value is between 0 and 1 for the hand landmarks to be considered tracked successfully. Defaults to 0.5.
Inside the with block, we will define a while loop for reading the video stream. This loop will keep running until we press Esc Key. ASCII values of Esc is 27. This while loop is true until any interrupt from the keyboard is detected and written in the code line 53. Then we are checking if the vales of the frames are empty or not using the cam.empty() defined in the CamReceiver.py file. The continue statement is used to skip the rest of the code inside a loop for the current iteration only. By calling the cam.get() function defined in CamReceiver python file, we will be able to read the camera frame values and store them in the image variable.
It is important to take into consideration that the process method receives an RGB image but, when reading images with OpenCV, we obtain them in BGR format. As such, we fill convert our original image first to RGB, with a call to the cvtColor function from the cv2 module, and pass the result to the process method. Setting the image.flags.writable flag to false.
Note: that we need the image in RGB format just for the landmarks estimation process since we are going to display the result in an OpenCV window, which will display the image correctly in BGR format.
First, we will set image.flags.writeable equal to true so that using the draw methods of the Mediapipe we can annotate the figure landmarks when displaying the video stream. After the process is completed the image is in RGB format, we convert our processed image to BGR, with a call to the cvtColor function from the cv2 module for annotating landmarks and displaying the video stream. The landmarks estimated per each detected hand can be found on the multi_hand_landmarks field of the NamedTupled we just obtained. We will iterate through each element as an array by calling the hand_landmarks in the results values of the multi_hand_landmarks function. gesture variable with hand_landmark, image_width and image_height arguments are used for calling the get_finger_gesture function. The returned values are in an array with 5 elements. These five elements are either 1 or 0 and are stored in a separate variable. Will compare each element in the array with ‘1’ or ‘0’ to control servo motors. If the values of the array elements are equal to ‘1’ then the corresponding servo motor is made to rotate up to 180 degrees. Each servo motor is connected to the individual fingers of the mechanical hand.
We then draw the landmarks with a call to the draw_landmarks function from the mp.drawing method. In the first image, input is passed with where we want to draw the landmarks. As second input we pass the list of hand landmarks of the hand with the default styles.
Cv2.imshow is used for displaying the image with the annotated landmarks on the image in a separate window
Note: Each element will contain the landmarks for that detected hand (so, you can think of the multi_hand_landmarks as an array of arrays.
Source file: CamReceiver.py
Datetime is imported to work with dates as date objects. The imported socket module provides access to the BSD socket interface. the socket() function returns a socket object whose methods implement the various socket system calls. OpenCV is a huge open-source library for computer vision, machine learning, and image processing and it is imported into our project. NumPy is imported and offers comprehensive mathematical functions and is also used for handling the arrays. The imported Image module provides a class with the same name which is used to represent a PIL image. The io module provides Python's main facilities for dealing with various types of I/O. There are three main types of I/O: text I/O, binary I/O and raw I/O. The multiprocessing module uses Process and queue APIs which do not have analogues in the threading module. In multiprocessing, processes are spawned by creating a Process object and then calling its start() method. The process follows the API of threading. And also Queue is used for python threads, treading is imported for supporting this multiprocessing. (Line 1 - 8)
CamReceiver class has 6 methods. The methods are __init__(), cam_server_proc(), start(), stop(), get() and empty(). And explanation for each method is as follows.
__init__ (self, width=320, height=240):
The __init__ method is similar to constructors. Constructors are used to initialising the object’s state. Like methods, a constructor contains a collection of statements (i.e. instructions) that are executed at the time of object creation. It runs as soon as an object of a class is instantiated. Class methods must have an extra first parameter in the method definition. And all the values are provided by the python when it is defined. The used parameters for the method are width, height, HOST, PORT, ACK, frames and two flags is_connected and process. Width is defined with a value equal to 320 and height equal to 240.
cam_server_proc(self):
In the cam_server_proc(self), self represents the instance of the class. By using the “self” we can access the attributes and methods of the class in python. In line 25 global is_connected, is_connected() returns True when the connection is available, False otherwise.
socket.socket() creates a socket object that supports the context manager type, so you can use it in a statement. The arguments passed to socket() are constants used to specify the address family and socket type. AF_INET is the Internet address family for IPv4. SOCK_STREAM is the socket type for TCP, the protocol that will be used to transport messages in the network. From the socket libraries, some of the APIs are used to set the IP address and port and other protocols use the values defined for setting up to receive the streamed image. The s.bind() method is used to associate the socket with a specific network interface and port number. The values passed to s.bind() depend on the address family of the socket. In this example, we are using socket.AF_INET (IPv4). So it expects a two-tuple: (host, port). The IP address 127.0.0.1 is the standard IPv4 address for the loopback interface, so only processes on the host will be able to connect to the server. the port represents the TCP port number to accept connections from clients. It should be an integer from 1 to 65535, as 0 is reserved. Some systems may require superuser privileges if the port number is less than 1024. When everything is completed with the setup it starts to listen using the socket and is_connected flag is used for indicating it.
Note: Host can be a hostname, IP address, or empty string. If an IP address is used, the host should be an IPv4-formatted address string.
When it is connected s.accept() function in line 36 returns a socket descriptor that is connected to your TCP server. In this case, it returns a tuple of objects. The first parameter, conn, is a socket object that you can use to send data to and receive data from the client that is connected. The second parameter, addr, contains address information about the client that is connected (e.g., IP address and remote part). And print() prints the address it is connected. (Line 35 - 37)
When it is connected, a chunks array is created and conn.send() sends an acknowledgement i.e to send ACK values. Data variable is created to receive the values using the conn.recv(1024), this will read at most 1024 bytes, blocking if no data is waiting to be read. If something is present in data, it is updated in chunks as a list value. In line 49 and we are checking the last two values to see the End of the frame. The index value of -1 gives the last element, and -2 gives the second last element of an array. Checking if the last array value is 0xD9 and the second last element is 0xFF, we will end that array and view those values as images using the next set of codes.
From line 52 to 56 the code is used for storing the values of the image as a raw image value. Stream variable is used to store the value as bytes, it is obtained by converting the chunks to bytes using io.bytes() method. Cv2.cvtColor is used for converting the values into a NumPy array with BGR image values. Io and cv2 libraries are used for getting the proper image with each received chunk of data as a frame. Four functions are defined for executing the camera receive protocols, these are for starting, stopping, getting frames of images and lastly empty is used to empty the frames which are not used in our work and can be called.
start(), stop(), get() and empty():
The start() starts the thread’s activity. It must be called at most once per thread object. It arranges for the object’s run() method to be invoked in a separate thread of control. This method will raise a RuntimeError if called more than once on the same thread object. The self.process turns your string into a list of characters, passing them to the processLine function. The start() method creates and starts the thread on line 60. The thread executes the cam_server_proc() method.
This function continuously runs a while loop that reads a frame from the video stream and stores it in the class instance’s frame attribute, as long as the stopped flag isn’t set.
The stop() stops the thread’s activity. is_connected flag is set False to stop the connection and its defined on line 65. The get() is defined to get and return the camera values as a frame when the cam is started it is defined in lines 68 and 69. The empty() is used to empty the values of the received frame and it is defined in lines 71 and 72.
-
Robot Hand using Hand Gesture Recognition

-
WIZnet-EVB-Pico-ArduCam
-
Diagram