
Gas Leakage Detection with Telegram Alerts
Monitor gas levels using sensors & MQTT. Alerts via Telegram for high concentrations. Swift action for safety.

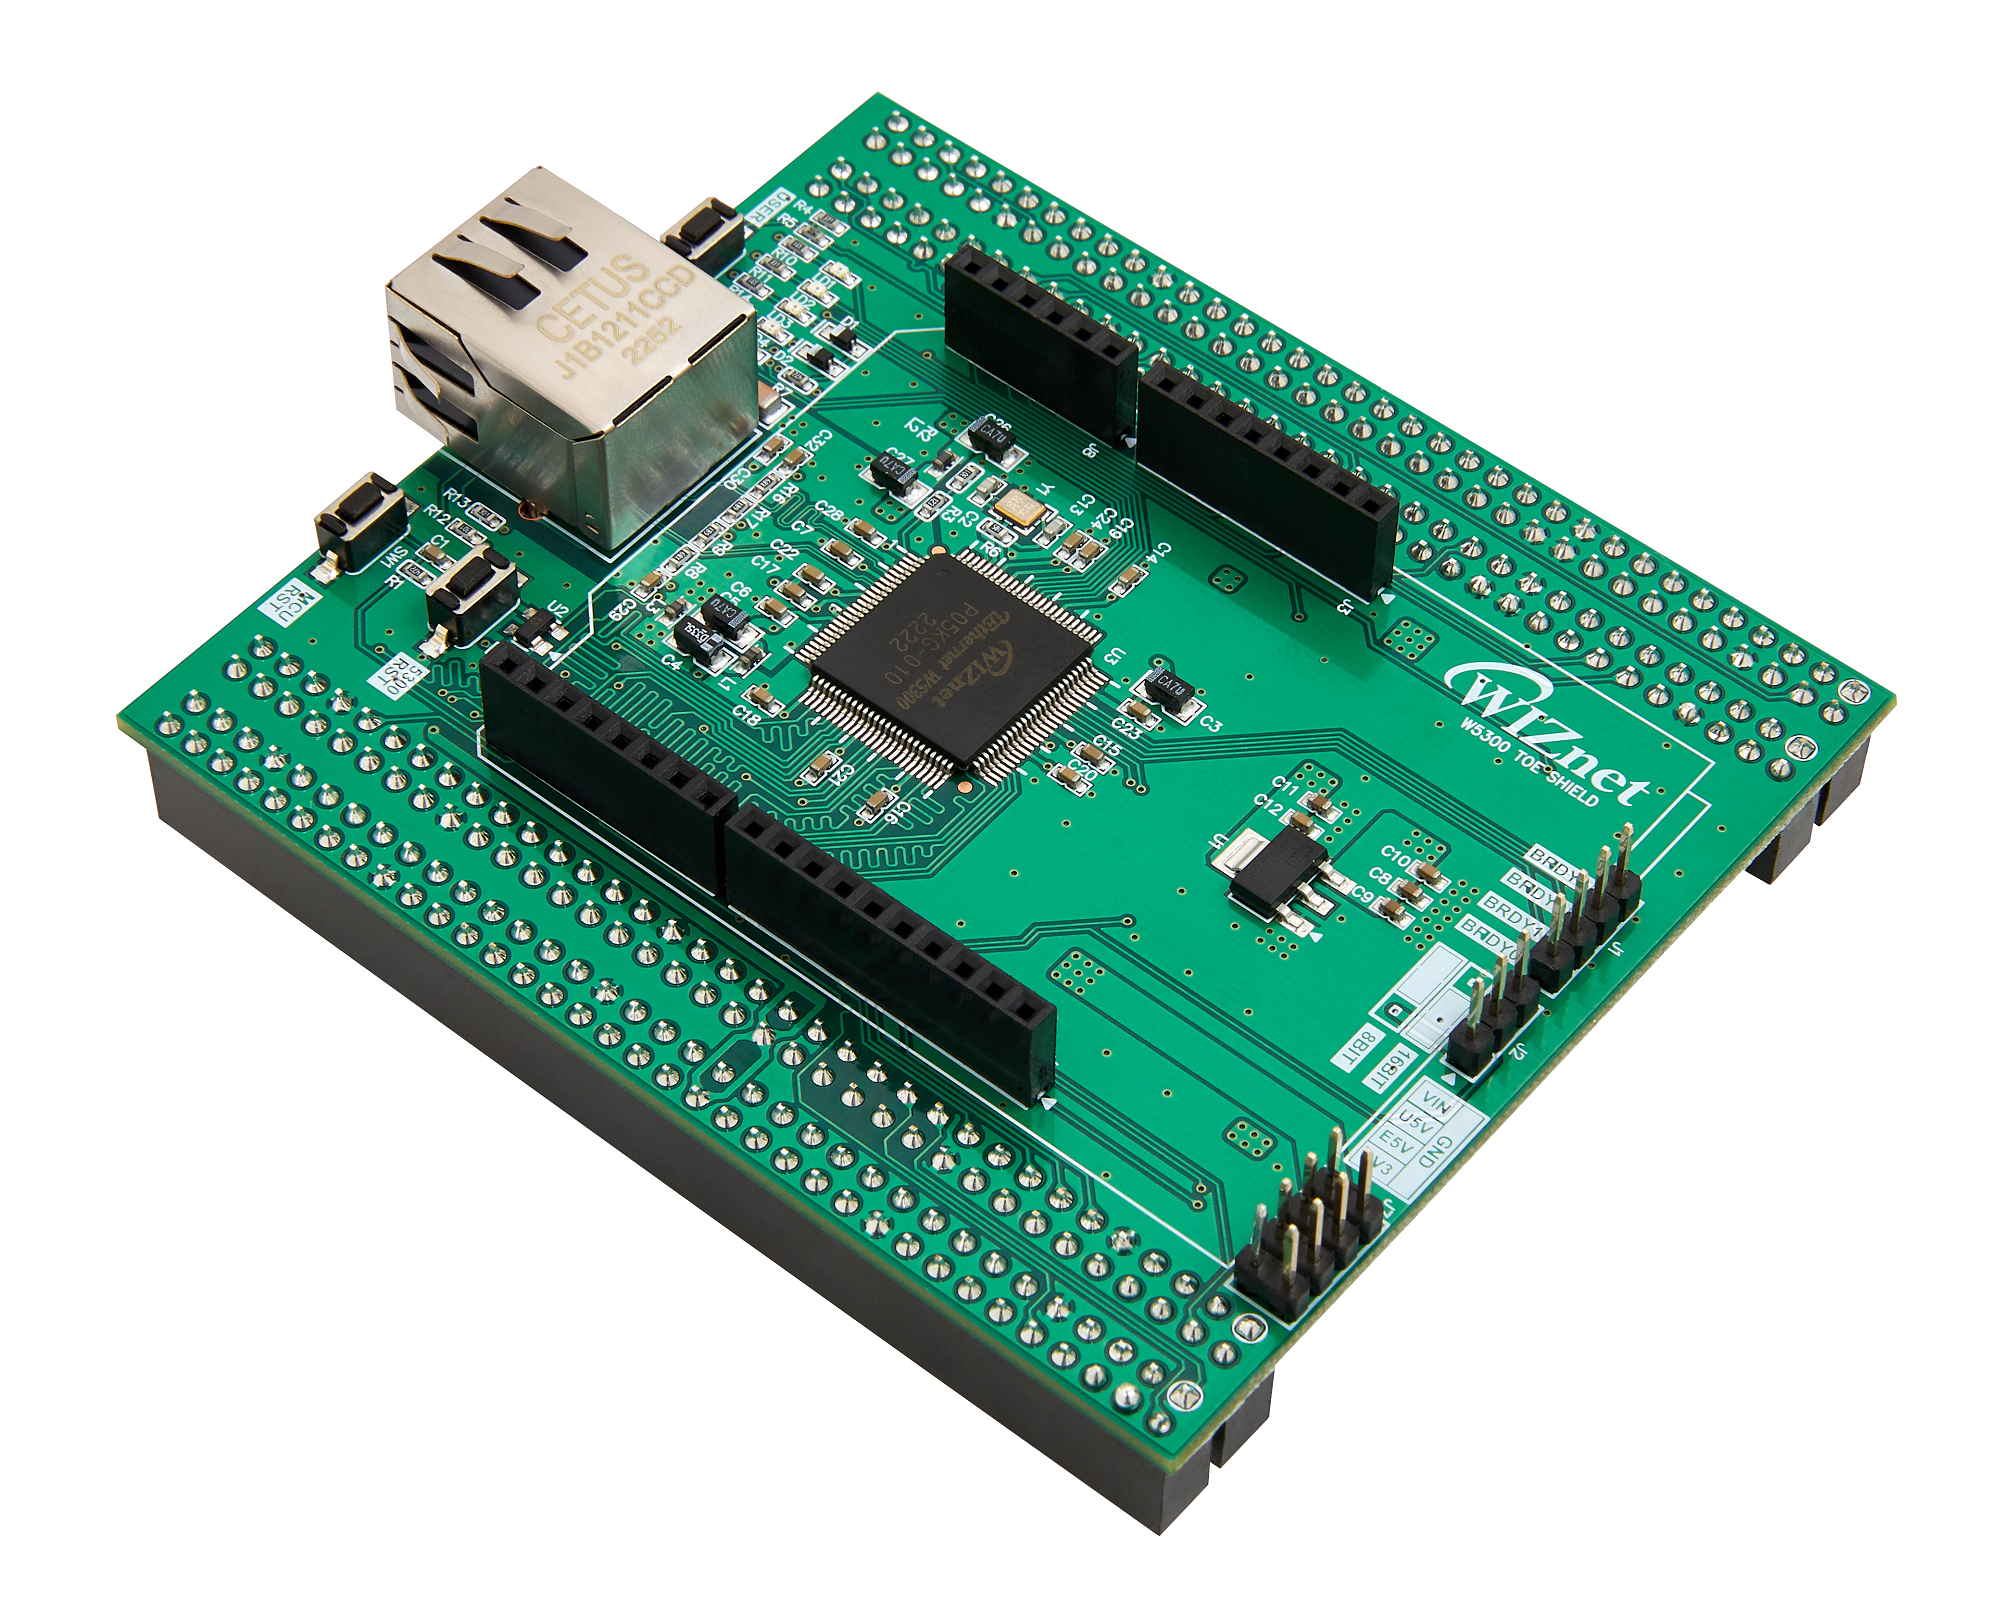
WIZnet - W5300-TOE-Shield
x 1
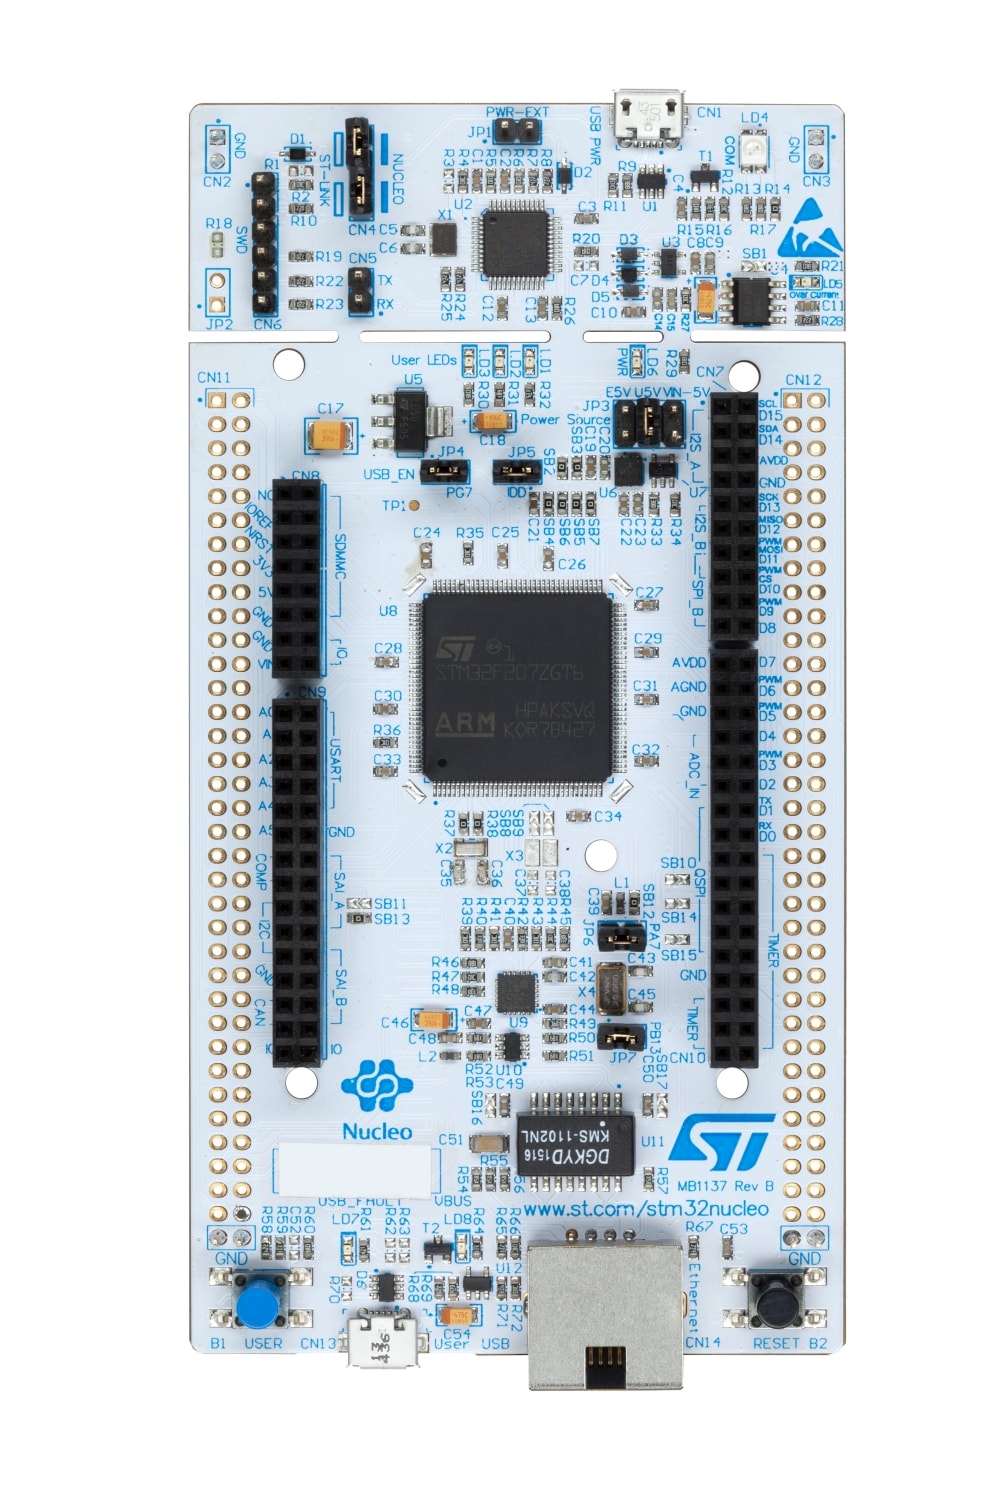
ST - NUCLEO-F429ZI
x 1

dfrobot - Carbon Monoxide Sensor (MQ7)
x 1

DFRobot - Gravity: Analog Alcohol Sensor (MQ3) For Arduino
x 1

DFRobot - Gravity: Analog CH4 Gas Sensor (MQ4) For Arduino
x 1

DFRobot - Gravity: Analog CO/Combustible Gas Sensor (MQ9) For Arduino
x 1
PyCharm - Pycharm
x 1

Arduino - Arduino IDE
x 1
Eclipse - Paho MQTT
x 1

InfluxData - InfluxDB
x 1
Gas Leakage Detector with Telegram Alerts
Overview:
The Gas Detection System with MQTT, InfluxDB, and Telegram is a project designed to monitor and analyze gas concentration levels in real-time. The system utilizes MQTT as the communication protocol to receive data from gas sensors and an MQTT broker. The system calculates the average gas concentration over a specified period using the obtained data and stores it in the InfluxDB database for further analysis. To ensure user notifications, the system integrates an automated Telegram bot, which provides real-time gas concentration updates and receives the average values. The bot sends alerts if the average concentration exceeds a predefined threshold, indicating a potential gas leak. The system's seamless integration of MQTT, InfluxDB, and Telegram guarantees timely alerts, efficient data storage, and informed decision-making, making it a powerful solution for gas detection and safety applications. MQTT is a lightweight publish/subscribe messaging tool, InfluxDB is a time-series database, and Telegram is a cloud-based instant messaging app. The integration of these technologies ensures timely alerts, efficient data storage, and informed decision-making.
Things used in the project:
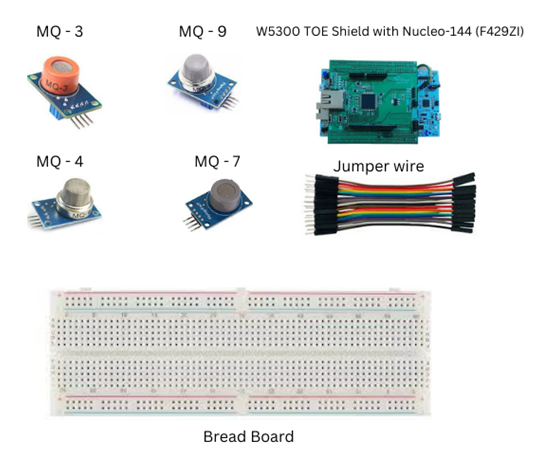
Hardware:
- W5300 TOE Shield with Nucleo- 144 (F429ZI)
- MQ-7 Gas sensor (Sensor for detecting Carbon Monoxide)
- MQ-9 Gas sensor (Sensor for detecting Carbon Monoxide)
- MQ-3 Gas sensor (Sensor for detecting Alcohol Vapor)
- MQ-4 Gas sensor (Sensor for detecting Methane (CNG) gas)
- Jumper wires
- Bread Board
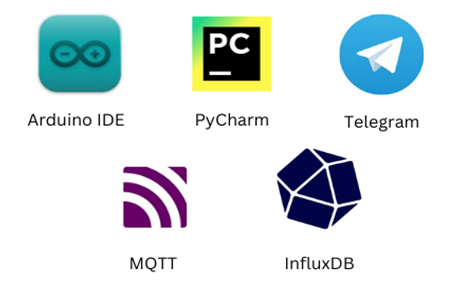
Software apps:
- Arduino IDE
- MQTT
- PyCharm
- Telegram API
- InfluxDB
Introduction:
The Gas Detection System with MQTT, InfluxDB, and Telegram is a cutting-edge project designed to monitor and analyze gas concentration levels in real-time. It utilizes MQTT as the communication protocol to receive data from gas sensors and an MQTT broker. The system calculates the average gas concentration over a specified period using the obtained data and stores it in the InfluxDB database for further analysis.
To ensure user notifications, the system integrates an automated Telegram bot, which provides real-time gas concentration updates and receives the average values. The bot sends alerts if the average concentration exceeds a predefined threshold, indicating a potential gas leak. The system's seamless integration of MQTT, InfluxDB, and Telegram guarantees timely alerts, efficient data storage, and informed decision-making, making it a powerful solution for gas detection and safety applications.
Block Diagram:

- Gas sensors continually collect vital data on gas concentration levels, generating analog outputs that correspond to the presence of specific gases like carbon monoxide, methane, and alcohol.
- This data is transmitted via MQTT to an intermediary MQTT Broker, which efficiently stores it in an InfluxDB database.
- Meanwhile, a Telegram bot operates as a real-time alert system, promptly notifying users if gas concentrations surpass predefined thresholds.
- This integration of data acquisition, storage, and alerting ensures proactive safety measures and timely responses in scenarios involving potentially hazardous gas concentrations.
Flow Chart:
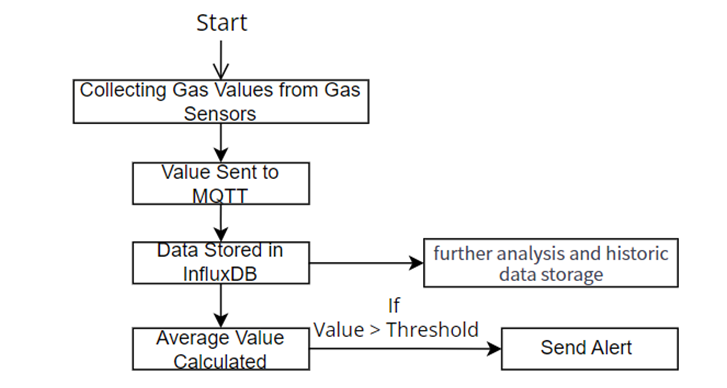
- Gas sensors continuously collect gas concentration data.
- The data is sent to the MQTT Broker through MQTT.
- The MQTT Broker receives the data and stores it in the InfluxDB database.
- The Telegram bot sends real-time alerts to users if the gas concentration exceeds predefined threshold values.
Getting Started:
The configuration of MQTT in Arduino IDE:
- Install PubSubClient Library:
- Open the Arduino IDE.
- Navigate to "Sketch" > "Include Library" > "Manage Libraries..."
- In the Library Manager, search for "PubSubClient" and click the "Install" button to install the library.
- Define Constants for MQTT Broker: In this part of the code, you need to define specific constants required to connect to the MQTT broker. These constants include the broker's IP address (e.g., 172.16.0.100), the port number (e.g., 1883), and the MQTT topics (i.e., GS-1, GS-2, GS-3, GS-4). The MQTT topics act as unique identifiers for different gas sensors, allowing the Arduino board to publish data to and receive data from the broker.
- Create EthernetClient and PubSubClient Objects: The code creates objects for the Ethernet client (ethClient) and the PubSubClient (client). The Ethernet client is responsible for handling the network communication, while the PubSubClient facilitates the MQTT communication with the broker. These objects are essential for establishing the connection to the MQTT broker and handling the communication.
- Connect to the MQTT Broker: To establish a connection with the MQTT broker, the reconnect() function is called. This function continuously attempts to reconnect until a successful connection is made. The successful connection enables the Arduino board to interact with the MQTT broker, sending and receiving data.
- Publish Data to MQTT Broker: If your Arduino board is collecting gas concentration data or any other sensor data, you can use the publish() method to send that data to the MQTT broker. By publishing data to specific MQTT topics, other devices or systems subscribed to those topics can receive and process the data. This functionality allows real-time monitoring and data sharing across devices.
- Loop and Maintain Connection: In the Arduino sketch's loop() function, you should call the loop() method of the MQTT client (PubSubClient). This allows the Arduino board to maintain the connection with the MQTT broker and handle incoming messages. The loop() function is essential for keeping the communication active and ensuring the board continues to publish data and receive any updates from the MQTT broker.
The Configuration of MQTT in PyCharm:
- Install necessary library:
- Open your PyCharm project: Launch PyCharm and open your Python project.
- Open the Terminal: Go to "View" in the menu bar, then click on "Tool Windows," and finally select "Terminal."
- Install paho-mqtt: In the terminal window, type the following command and press Enter: pip! Install paho-mqtt
- MQTT Broker Setup: The code sets up the MQTT broker settings with the mqtt_broker_url(broker.emqx.io), mqtt_port(1883), and mqtt_keepalive(60). These settings define the address of the MQTT broker (domain name or IP address), the port number for the MQTT communication, and the keepalive interval for the MQTT connection.
- MQTT Client Setup: The code creates an MQTT client object using the mqtt.Client() function. The MQTT client is the main interface through which the Arduino board communicates with the MQTT broker. The on_connect and on_message callback functions are assigned to the client to handle the connection and incoming messages, respectively.
- MQTT Connection: The mqtt_client.connect line establishes a connection with the MQTT broker using the specified broker URL, port, and keepalive interval. The MQTT client will attempt to connect to the broker, and if successful, it will call the on_connect callback function.
- MQTT Callbacks: The on_connect callback function is defined to be called when the MQTT client successfully connects to the broker. In this function, the code subscribes to the desired MQTT topics for each gas sensor specified in the gas_sensors list. Subscribing to a topic allows the Arduino board to receive gas concentration data from the corresponding sensors.
- MQTT Publishing : The client.publish(topic, payload) method is used to publish data to the MQTT broker. Inside the loop() function, the code reads sensor values (in this case, gas concentration values) from different sensors and publishes them to their respective MQTT topics ("GS-1", "GS-2", "GS-3", "GS-4"). Each sensor value is converted to a string format (payload) before being published to the broker.
- MQTT Loop: The mqtt_client.loop_start() line starts a background loop for handling incoming MQTT messages. It allows the Arduino board to continuously listen for incoming messages from the broker while still executing other tasks in the main loop.
Configuration of Telegram-Bot in Python:
- Install necessary library:
- Open your PyCharm project: Launch PyCharm and open your Python project.
- Open the Terminal: Go to "View" in the menu bar, then click on "Tool Windows," and finally select "Terminal."
- Install requests: In the terminal window, type the following command and press Enter: pip! Install requests
- Install Telegram: In the terminal window, type the following command and press Enter: pip! Install telegram
- The requests library is a popular Python library used for making HTTP requests and interacting with web services, including APIs like the Telegram Bot API.
- Telegram Setup: The code defines a function called send_telegram_notification(message) responsible for sending Telegram notifications. To use this function, you need to obtain a Telegram Bot Token from the Telegram BotFather and replace the value of telegram_bot_token(6535063345:AAHun_...........) with your actual bot token. Additionally, you need to specify the telegram_chat_id(1063……..) to determine the recipient of the notifications. The telegram_chat_id represents the ID of the user or group that will receive the notifications.
- Telegram API URL: The telegram_api_url(https://api.telegram.org/bot) is set to the Telegram Bot API endpoint for sending messages. The code constructs the API URL using the bot token obtained earlier and the sendMessage method. This URL will be used to make an HTTP POST request to the Telegram Bot API in order to send messages.
- Sending Telegram Messages: The send_telegram_notification(message) function takes a message as input and constructs the necessary data for the Telegram API request. It then sends an HTTP POST request to the Telegram API using the requests library to send the message to the specified telegram_chat_id.
- Usage in Code: The function send_telegram_notification(message) is called at various points in the code to send Telegram messages. For example, if the average gas concentration for a specific gas sensor exceeds a threshold, the function is called to send a notification indicating the detected "LEAKAGE."
Configuration of Influxdb in Python:
- Install necessary library:
- Open your PyCharm project: Launch PyCharm and open your Python project.
- Open the Terminal: Go to "View" in the menu bar, then click on "Tool Windows," and finally select "Terminal."
- Install influxdb_client: In the terminal window, type the following command and press Enter: pip! Install influxdb_client
- InfluxDB Initialization: The code defines a class called InfluxDB, which serves as a wrapper to interact with the InfluxDB database. The constructor __init__(self, bucket="AIoT") initializes the InfluxDB instance with the necessary configuration. It sets the InfluxDB URL, token, organization, and the default bucket for data storage.
- self.url= "http://10.21.70.16:8086"
- self.token="4SCyOmTPUhSgUiUSf0A8Fn31keTgErGXCoxo…………”
- and self.org=" Christ"
- Writing Data to InfluxDB: The method write_data_to_influxdb(self, measure, field_name, value) is responsible for writing gas concentration data to the InfluxDB database. It takes the measure, field_name, and value as parameters. The measure = "_measurement1" , the field_name = "gas_concentration_" + sensor["name"].
- InfluxDB Query: The method query(self, measure, start) is used to query data from the InfluxDB database. It takes the measure and start time as parameters. The method constructs a Flux query to fetch data from the specified measurement (measure) starting from the provided time (start). The query result is returned as tables.
- Calculating Average: The method query_mean(self, measure, start) is similar to the query() method but includes a mean() function to calculate the average value for the queried data. It helps in calculating the average gas concentration over a specified period.
- Usage in Code: In the on_message() function, the received gas concentration data is written to InfluxDB using the write_data_to_influxdb() method. Additionally, in the main loop, the query_mean() method is used to fetch the average gas concentration for each gas sensor over the last 2 minutes ("-2m"), and the process_gas_sensor() function processes the data and stores it in InfluxDB.
Methodology:
- Overview of Methodology
The Gas Detection System with MQTT, InfluxDB, and Telegram involves several essential phases to efficiently gather real-time gas concentration data, provide timely alerts, and store the collected information for further analysis and monitoring.
Circuit Diagram:

- MQ-7 Gas Sensor:
- VCC: Connect to an external 5V power supply's positive terminal.
- GND: Connect to the ground (GND) of the power.
- AO: Connect to pin D11 on the WIZnet Shield.
- VCC: Connect to an external 5V power supply's positive terminal.
- MQ-9 Gas Sensor:
- VCC: Connect to an external 5V power supply's positive terminal.
- GND: Connect to the ground (GND) of the power supply.
- AO: Connect to pin D13 on the WIZnet Shield.
- VCC: Connect to an external 5V power supply's positive terminal.
- MQ-3 Gas Sensor:
- VCC: Connect to an external 5V power supply's positive terminal.
- GND: Connect to the ground (GND) of the power supply.
- AO: Connect to pin D14 on the WIZnet Shield.
- VCC: Connect to an external 5V power supply's positive terminal.
- MQ-4 Gas Sensor:
- VCC: Connect to an external 5V power supply's positive terminal.
- GND: Connect to the ground (GND) of the power supply .
- AO: Connect to pin D15 on the WIZnet Shield.
- VCC: Connect to an external 5V power supply's positive terminal.
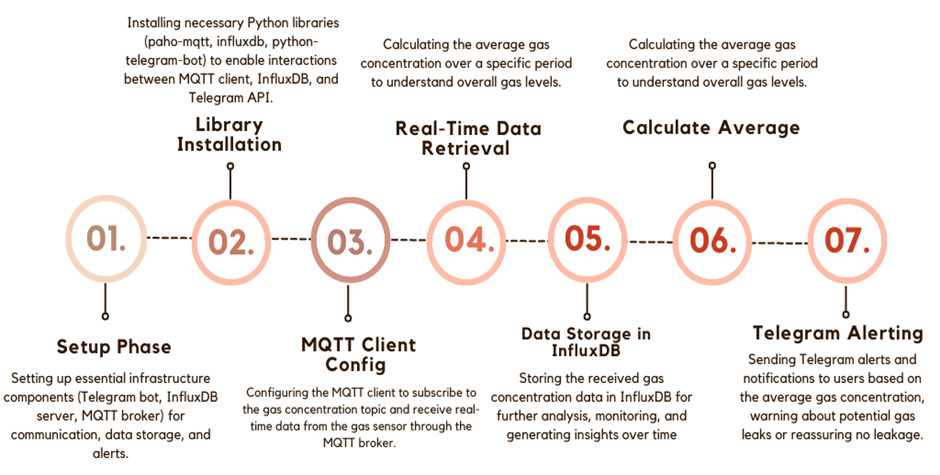
Setup Phase:
- In this initial phase, we create the necessary infrastructure to facilitate communication and data storage.
- We start by setting up a Telegram bot, an InfluxDB server, and an MQTT broker. These components will play crucial roles in the functioning of the Gas Detection System.
- The Telegram bot will be used to send notifications and alerts to users based on the gas concentration data.
- The InfluxDB server will serve as the database to store the gas concentration data received from the MQTT client.
- The MQTT broker facilitates communication between the MQTT client and the gas sensor, enabling the transmission of real-time gas concentration data.
Library Installation Phase:
- Once the infrastructure is in place, the next step is to install the required Python libraries using pip. These libraries will enable seamless interactions between the MQTT client, the InfluxDB server, and the Telegram API.
- Necessary libraries might include 'paho-mqtt' for MQTT communication, 'influxdb' for interacting with InfluxDB, and 'python-telegram-bot' for interacting with the Telegram API.
MQTT Client Configuration Phase:
- After installing the required libraries, the MQTT client is configured to subscribe to the gas concentration topic. It establishes a connection with the MQTT broker and waits for incoming messages containing real-time gas concentration data from the gas sensor.
- The client ensures that the environment is properly configured, including providing the appropriate credentials and settings to connect to the MQTT broker.
Real-Time Gas Concentration Data Retrieval Phase:
- The Gas Detection System employs an MQ-7, MQ-9, MQ-3, MQ-4 Gas Sensors connected to the WIZnet W5100S Pico Board to provide the MQTT client with real-time gas concentration data.
- The gas sensors communicates gas concentration information through analog voltage values.
- Upon receiving messages from the sensor, the MQTT client processes the incoming data and stores it for further analysis.
Calculation of Average Gas Concentration Phase:
- To assess the gas concentration over a specific period, such as 2 minutes, the Gas Detection System implements a method to gather received data for that duration.
- The system computes the average gas concentration based on the collected data, providing a more comprehensive understanding of the overall gas levels during that period.
- The average gas concentration is then saved in a list for further use.
Gas Range for Different Gas sensors:
| MQ – 7 , MQ – 9 | MQ – 3 | MQ – 4 |
Normal Range | 0-9 ppm | 0-1000 ppm | 0-500 ppm |
Dangerous Range | > 9 ppm | > 1000 ppm | > 500 ppm |
Telegram Alerting Phase:
- The Gas Detection System utilizes the Telegram API to send alerts and notifications to users based on the estimated average gas concentration.
- If the average concentration exceeds a specified threshold, the system sends a Telegram message warning users of a potential gas leak, prompting them to take appropriate actions.
- Conversely, if the average concentration falls below the threshold, the system sends a message indicating no leakage and providing reassurance.
Data Storage in InfluxDB Phase:
- The final step involves ensuring that all gas concentration data received is stored in the InfluxDB database for further analysis and monitoring.
- The system utilizes the InfluxDB client library to implement a method that efficiently writes the received data to the InfluxDB server.
- By storing data in InfluxDB, users can perform data analysis, generate visualizations, and gain insights into gas concentration trends over time.
Code Explanation:
- Arduino Code:
#include <Ethernet.h> #include <Wire.h> #include <PubSubClient.h> #include <ArduinoJson.h> #include "HardwareSerial.h" |
- These are the libraries that are used in this code. Ethernet, Wire, PubSubClient, and ArduinoJson libraries are included to enable network communication and JSON handling. "HardwareSerial.h" is included for serial communication.
const char* device_unique_id = "GasLeakageConcentration_" __DATE__ "_" __TIME__; |
- This line creates a unique identifier for the device using a combination of the current date and time, which is useful for MQTT client identification.
#define SERIAL_OUTPUT #ifdef SERIAL_OUTPUT #define PRINT(x) Serial.print(x) #define PRINTLN(x) Serial.println(x) #else #define PRINT(x) #define PRINTLN(x) #endif |
- This code sets up conditional printing to the serial console. If SERIAL_OUTPUT is defined, PRINT and PRINTLN macros will print messages to the serial console. Otherwise, these macros will be empty.
byte mac[] = { 0xDE, 0xAD, 0xBE, 0xEF, 30, 0xF7 }; IPAddress ip(192, 168, 0, 77); IPAddress server(44, 195, 202, 69); IPAddress myDns(192, 168, 0, 1); |
- These lines define network configuration parameters. mac is the MAC address of the device, ip is the assigned IP address, server is the IP address of the MQTT server, and myDns is the IP address of the DNS server.
EthernetClient mqttClient; PubSubClient mqtt_client(mqttClient); |
- It define an object of the EthernetClient class and an object of the PubSubClient class. The ethClient object is used for communicating with the Ethernet shield and the client object is used for publishing and subscribing to MQTT topics.
const int Sensor1Pin = D11; const int Sensor2Pin = D13; const int Sensor3Pin = D14; const int Sensor4Pin = D15; |
- The Sensor1Pin, Sensor2Pin, Sensor3Pin, and Sensor4Pin constants represent the pins on which the gas sensors are connected.
const char Sensor1Topic[] = "GS-1"; const char Sensor2Topic[] = "GS-2"; const char Sensor3Topic[] = "GS-3"; const char Sensor4Topic[] = "GS-4"; |
- These lines define MQTT topics to which sensor data will be published.
void callback(char* topic, byte* payload, unsigned int length) { String message = "";
for (int i = 0; i < length; i++) { message += (char)payload[i]; } } |
- It defines a function called callback() which will be called when a message is received on a subscribed topic. This function reads the message payload and stores it in a string variable.
void reconnect() { // Loop until we're reconnected while (!mqtt_client.connected()) { PRINT("MQTT: Attempting MQTT connection..."); // Attempt to connect if (mqtt_client.connect(device_unique_id)) { PRINTLN("MQTT: connected"); // ... and resubscribe mqtt_client.subscribe("MQTT-W5300"); } else { PRINT("MQTT: failed, rc="); PRINT(mqtt_client.state()); PRINTLN(" MQTT: try again in 5 seconds"); // Wait 5 seconds before retrying delay(2000); } } } |
- It defines a function called reconnect() which will be called when the client loses its connection to the MQTT broker. This function attempts to reconnect to the broker until it is successful.
void setup() { // Open serial communications and wait for port to open: Serial3.setRx(PC11); Serial3.setTx(PC10); delay(50);
// Serial.println("pinMode..."); pinMode(Sensor1Pin, INPUT); pinMode(Sensor2Pin, INPUT); pinMode(Sensor3Pin, INPUT); pinMode(Sensor4Pin, INPUT);
// Open serial communications and wait for port to open: Serial.begin(9600); while (!Serial) { ; // wait for serial port to connect. Needed for native USB port only } // start the Ethernet connection: PRINTLN("Initialize Ethernet with DHCP:"); if (Ethernet.begin(mac) == 0) { PRINTLN("Failed to configure Ethernet using DHCP"); // Check for Ethernet hardware present if (Ethernet.hardwareStatus() == EthernetNoHardware) { PRINTLN("Ethernet shield was not found. Sorry, can't run without hardware. :("); while (true) { delay(1); // do nothing, no point running without Ethernet hardware } } if (Ethernet.linkStatus() == LinkOFF) { PRINTLN("Ethernet cable is not connected."); } // try to congifure using IP address instead of DHCP: Ethernet.begin(mac, ip, myDns); } else { PRINT(" DHCP assigned IP "); PRINTLN(Ethernet.localIP()); } // give the Ethernet shield a second to initialize: delay(1000);
mqtt_client.setServer(mqtt_server, 1883); mqtt_client.setCallback(callback);
// give the Ethernet shield a second to initialize: delay(1000);
} |
- It defines a function called setup() which will be called once when the Arduino board is powered on or reset. This function initializes serial communication, initializes Ethernet, sets up pins for gas sensors as input pins and sets up objects for EthernetClient and PubSubClient classes.
String valstr = "";
void loop() {
if (!mqtt_client.connected()) { reconnect(); } mqtt_client.loop();
// Read sensor values int Sensor1Value = readSensor1(Sensor1Pin); int Sensor2Value = readSensor2(Sensor2Pin); int Sensor3Value = readSensor3(Sensor3Pin); int Sensor4Value = readSensor4(Sensor4Pin);
float ppm1 = convertSensor1(Sensor1Value); float ppm2 = convertSensor2(Sensor2Value); float ppm3 = convertSensor3(Sensor3Value); float ppm4 = convertSensor4(Sensor4Value);
valstr = ""; valstr += Sensor1Value; PRINTLN(valstr); mqtt_client.publish(Sensor1Topic, valstr.c_str());
valstr = ""; valstr += Sensor2Value; PRINTLN(valstr); mqtt_client.publish(Sensor2Topic, valstr.c_str());
valstr = ""; valstr += Sensor3Value; PRINTLN(valstr); mqtt_client.publish(Sensor3Topic, valstr.c_str());
valstr = ""; valstr += Sensor4Value; PRINTLN(valstr); mqtt_client.publish(Sensor4Topic, valstr.c_str());
// Adjust the interval between readings and publications delay(3000); } |
- Declares a variable valstr to store sensor readings as strings before publishing.
- Checks if the MQTT client is connected to the server. If not, attempts to reconnect using the reconnect() function. Then, allows the MQTT client to process any incoming messages or maintain the connection.
- Reads analog sensor values from four different pins (Sensor1Pin, Sensor2Pin, Sensor3Pin, Sensor4Pin).
- Converts the raw sensor readings to parts per million (ppm) values using functions like convertSensor1, convertSensor2, convertSensor3, convertSensor4.
- Prepares the valstr string with the raw sensor value, prints it to the serial console and publishes it to the MQTT topic associated with Sensor 1 (Sensor1Topic). This process is repeated for Sensors 2, 3, and 4.
- A delay of 3000 milliseconds (3 seconds) before the loop restarts. This controls the interval between sensor readings and MQTT publications.
- Python Code:
The code begins by importing necessary libraries to enable communication, logging, data storage, and other functionalities. We will be analyzing the code and its functionality.
import paho.mqtt.client as mqtt import logging import requests import time from influxdb_client import Point, WritePrecision from influxdb_client.client import influxdb_client from influxdb_client.client.write_api import SYNCHRONOUS from influxdb_client import InfluxDBClient |
- paho.mqtt.client: This library provides an MQTT client implementation for Python, allowing the system to interact with the MQTT broker and subscribe to topics.
- logging: The logging module is used to set up logging for potential errors or informative messages.
- requests: This library is used for making HTTP requests, but it is not used in the code snippet provided.
- time: The time module is used for time-related functions and is likely utilized for timing or delays in the program execution.
- influxdb_client: This library enables interaction with the InfluxDB database.
- Point, WritePrecision: These are classes from the influxdb_client library that are used to define data points and specify the precision of data writes to the InfluxDB database.
- InfluxDBClient: This class allows the code to connect to the InfluxDB database.
logging.basicConfig(level=logging.INFO) |
- The code sets up logging to provide insights into any potential errors or relevant information during the program execution. The logging level is set to INFO, which means that informational messages and higher-level messages (e.g., WARNING, ERROR) will be logged. This helps in debugging and monitoring the system.
mqtt_broker_url = 'broker.emqx.io' mqtt_port = 1883 mqtt_keepalive = 60 |
- mqtt_broker_url: This variable holds the domain name or IP address of the MQTT broker that the Gas Detection System will connect to.
- mqtt_port: This variable specifies the port number on which the MQTT broker is running. The default MQTT port is 1883.
- mqtt_keepalive: This variable defines the maximum time interval (in seconds) that the system will allow between communications with the broker. If no messages are sent or received within this interval, the system will send a "ping" message to keep the connection alive.
def on_connect(client, userdata, flags, rc): if rc == 0: print("Connected to MQTT broker") for sensor in gas_sensors: client.subscribe(sensor["topic"]) # Subscribe to the desired MQTT topic for each gas sensor else: print(f"Connection failed with code {rc}") |
- This function is called when the MQTT client successfully connects to the MQTT broker. It subscribes to the desired MQTT topic for each gas sensor listed in the gas_sensors list. If the connection fails, it prints an appropriate error message.
def send_telegram_notification(message): # Telegram Bot token and chat ID telegram_bot_token = 'Your_Telegram_Bot_Token' telegram_chat_id = 'Your_Telegram_Chat_ID'
# Telegram API URL telegram_api_url = f"https://api.telegram.org/bot{telegram_bot_token}/sendMessage"
# Data to send in the POST request data = { "chat_id": telegram_chat_id, "text": message, } try: response = requests.post(telegram_api_url, data=data) response.raise_for_status() # Raise an exception if the response status is not 2xx (indicating success) print("Message sent to Telegram successfully") except requests.exceptions.RequestException as e: print("Error sending message to Telegram:", e) |
- This function sends a notification message to Telegram using the Telegram Bot API. It takes the message as input, along with the Telegram bot token and chat ID. The function constructs the API URL and sends the message using a POST request to the Telegram API. It also handles exceptions in case there is an error in sending the message.
def on_message(client, userdata, msg): global send_mqtt_messages
# Decode the payload of the MQTT message payload = msg.payload.decode('utf-8') print("Received MQTT message:", payload)
# Find the corresponding sensor based on the topic for sensor in gas_sensors: if msg.topic == sensor["topic"]: # Write the received value to InfluxDB with the unique field name field_name = "gas_concentration_" + sensor["name"]
ts.write_data_to_influxdb(sensor["measure"], field_name, float(payload)) # Call the function to perform some action after writing data to InfluxDB ts.after_writing_to_influxdb() # Set the flag to True after writing to InfluxDB send_mqtt_messages = True break |
- This function is called whenever a new MQTT message is received from the broker. It decodes the payload of the message and prints the received MQTT message. It then finds the corresponding gas sensor based on the topic and processes the received data.
- If a sensor's average gas concentration value exceeds 30, it sends a Telegram notification with the sensor name and the average value, indicating a gas leak. It also writes the average value to InfluxDB with a unique field name for each sensor.
def process_gas_sensor(sensor): # Calculate the average of the received values if len(sensor["mqtt_values"]) > 0: average = sum(sensor["mqtt_values"]) / len(sensor["mqtt_values"])
field_name = "gas_concentration_" + sensor["name"] # Generate unique field name for each sensor
if sensor['name'] == 'Sensor1' and average > 9: send_telegram_notification(f"{sensor['name']} - Average value: {average:.2f} LEAKAGE DETECTED!!!") elif sensor['name'] == 'Sensor2' and average > 9: send_telegram_notification(f"{sensor['name']} - Average value: {average:.2f} LEAKAGE DETECTED!!!") elif sensor['name'] == 'Sensor3' and average > 1000: send_telegram_notification(f"{sensor['name']} - Average value: {average:.2f} LEAKAGE DETECTED!!!") elif sensor['name'] == 'Sensor4' and average > 500: send_telegram_notification(f"{sensor['name']} - Average value: {average:.2f} LEAKAGE DETECTED!!!") else: print(f"{sensor['name']} - No Leakage")
print(f"{sensor['name']} - Average value: {average:.2f}")
# Write the average value to InfluxDB with the unique field name ts.write_data_to_influxdb(sensor["measure"], field_name, average)
else: print(f"{sensor['name']} - No Leakage")
# Clear the list for the next interval sensor["mqtt_values"].clear() |
- This function processes data for a specific gas sensor. It calculates the average of the received values and checks if it exceeds the threshold value (indicating a potential gas leak). If it does, it calls the send_telegram_notification function to send a warning message to Telegram with the sensor name and average value. It also writes the average value to InfluxDB with a unique field name for each sensor.
- The function clears the list of received values for the next interval.
# Create MQTT client mqtt_client = mqtt.Client()
# Set callback functions mqtt_client.on_connect = on_connect mqtt_client.on_message = on_message
# Connect to MQTT broker mqtt_client.connect(mqtt_broker_url, mqtt_port, mqtt_keepalive)
# Start MQTT loop in the background mqtt_client.loop_start() |
- The code then creates an MQTT client and sets its callback functions. The on_connect function is called when the client successfully connects to the MQTT broker, and the on_message function is called when a new message is received. It then connects the MQTT client to the MQTT broker and starts the MQTT loop in the background to handle incoming messages.
class InfluxDB: def __init__(self, bucket="AIoT"): # InfluxDB configurations self.token = "Your_InfluxDB_Token" self.org = "Your_InfluxDB_Organization" self.url = "http://10.21.70.16:8086" # Replace with your InfluxDB server URL self.bucket = bucket self.client = influxdb_client.InfluxDBClient(url=self.url, token=self.token, org=self.org) self.write_api = None self.delete_api = None self.query_api = None |
- The InfluxDB class is designed to manage interactions with the InfluxDB database. It is initialized with a bucket parameter, which specifies the name of the InfluxDB bucket to which data will be written. The class sets up the necessary configurations to connect to the InfluxDB server using the provided URL, token, and organization.
- token: The authentication token required to access the InfluxDB server.
- org: The organization to which the InfluxDB belongs.
- url: The URL of the InfluxDB server.
- bucket: The name of the InfluxDB bucket where data will be written.
- client: An instance of the InfluxDBClient class, which connects to the InfluxDB server using the provided configurations.
- write_api, delete_api, query_api: These attributes store instances of the respective APIs (write, delete, and query) for InfluxDB. They are initialized to None and will be created when needed.
def delete(self, measure, start, stop): if self.delete_api is None: self.delete_api = self.client.delete_api()
# start = "1970-01-01T00:00:00Z" # stop = "2100-01-01T00:00:00Z" return self.delete_api.delete(start, stop, "_measurement=" + measure, bucket=self.bucket, org=self.org)
def write_data_to_influxdb(self, measure, field_name, value): # Write the received gas concentration data to InfluxDB if self.write_api is None: self.write_api = self.client.write_api(write_options=SYNCHRONOUS)
point = (Point(measure).field(field_name, value))
try: self.write_api.write(bucket=self.bucket, org=self.org, record=point) print("Data point written to InfluxDB:", point.to_line_protocol()) except Exception as e: print("Error writing to InfluxDB:", e) def after_writing_to_influxdb(self): print("Data written to InfluxDB. Perform desired action here.")
def query(self, measure, start): if self.query_api is None: self.query_api = self.client.query_api()
query = f"""from(bucket: "{self.bucket}") |> range(start: {start}) |> filter(fn: (r) => r._measurement == "{measure}")""" tables = self.query_api.query(query, org=self.org)
return tables
def query_mean(self, measure, start): if self.query_api is None: self.query_api = self.client.query_api()
query = f"""from(bucket: "{self.bucket}") |> range(start: {start}) |> filter(fn: (r) => r._measurement == "{measure}") |> mean()""" tables = self.query_api.query(query, org=self.org)
return tables |
- delete(self, measure, start, stop): This method is used to delete data from the InfluxDB database. It takes the measure (measurement name), start (start time of data to delete), and stop (end time of data to delete) as inputs. It returns the result of the delete operation.
- write_data_to_influxdb(self, measure, field_name, value): This method writes a data point to the InfluxDB database. It takes measure (measurement name), field_name (the field name for the gas concentration value), and value (the actual gas concentration value) as inputs. It writes the data point to InfluxDB using the synchronous write API. The Point class from the influxdb_client library is used to define the data point.
- after_writing_to_influxdb(self): This method is called after writing data to InfluxDB. It is a placeholder for performing any desired action or additional processing after the data has been successfully written to the database. The method currently prints a message indicating that the data has been written.
- query(self, measure, start): This method is used to query data from the InfluxDB database based on the specified measure (measurement name) and start (start time of the data range to query). It constructs an InfluxQL query to fetch data from the specified bucket and organization, and returns the query result in the form of tables.
- query_mean(self, measure, start): Similar to the query method, this method performs a query to calculate the mean value of the specified measure within the specified data range (based on start). It returns the query result in the form of tables.
gas_sensors = [ { "name": "Sensor1", "measure": "MQ-7", "topic": "GS-1", "mqtt_values": [] }, { "name": "Sensor2", "measure": "MQ-9", "topic": "GS-2", "mqtt_values": [] }, { "name": "Sensor3", "measure": "MQ-3", "topic": "GS-3", "mqtt_values": [] }, { "name": "Sensor4", "measure": "MQ-4", "topic": "GS-4", "mqtt_values": [] } ] |
- The code defines a list gas_sensors that holds information about different gas sensors and their settings. Each sensor is represented as a dictionary with the following properties:
- name: A descriptive name for the gas sensor.
- measure: The measurement name that will be used in InfluxDB to store data from this sensor.
- topic: The MQTT topic to which the sensor is subscribed to receive gas concentration data.
- mqtt_values: A list that stores received MQTT values from the sensor. This list will be used to calculate the average gas concentration for each sensor.
if __name__ == '__main__': ts = InfluxDB(bucket="AIoT") |
- The program initializes an InfluxDB object ts with the specified bucket parameter as "AIoT." This object will be used to interact with the InfluxDB database and perform data operations.
try: while True: # Set the flag to False at the start of each iteration send_mqtt_messages = False
# Query data for the last 2 minutes for each sensor for sensor in gas_sensors: tables = ts.query_mean(sensor["measure"], "-2m")
# Calculate the average of query results for each sensor for table in tables: for record in table.records: value = record.get_value() sensor["mqtt_values"].append(value)
# Process data for the current sensor process_gas_sensor(sensor)
# Wait for 2 minutes before calculating the next average time.sleep(120)
except KeyboardInterrupt: # This block will execute when Ctrl+C is pressed print("Script terminated by user.") # Optionally, you can send a final message to Telegram notifying the script termination send_telegram_notification("Script terminated by user.") |
- The program initializes an InfluxDB object ts with the specified bucket parameter as "AIoT." This object will be used to interact with the InfluxDB database and perform data operations.
- The main loop runs indefinitely and continuously monitors the gas concentration data from the gas sensors. It performs the following steps in each iteration:
- Querying Data and Calculating Average:
Within the loop, for each gas sensor in the gas_sensors list, the program queries the InfluxDB database for the average gas concentration over the last 2 minutes. It uses the ts.query_mean method from the InfluxDB object to perform the query. The query result is a list of tables, and the program extracts the average value from each table and stores it in the corresponding sensor's mqtt_values list.
- Processing Gas sensors:
After calculating the average for each sensor, the program calls the process_gas_sensor function for the current sensor. This function calculates the overall average of the received values and compares it to a threshold of 30. If the average exceeds 30, it sends a Telegram notification to warn about a potential gas leak. It also writes the average value to the InfluxDB database using the ts.write_data_to_influxdb method.
- Sleep and Repeat:
After processing data for all sensors, the program waits for 2 minutes (120 seconds) using time.sleep(120) before starting the next iteration. This allows the program to collect new data points for the next 2-minutes interval and calculate the averages again.
- Keyboard Interupt handling:
If the user presses Ctrl+F2, the program will catch the KeyboardInterrupt exception and execute the code in the except KeyboardInterrupt block. This will print a message indicating that the script has been terminated by the user and, optionally, send a final message to Telegram notifying the script termination.
Output:
- Data Visualization:
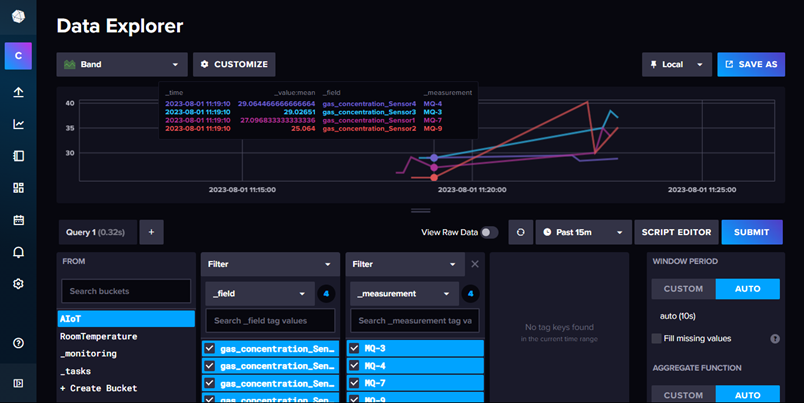
- X-Axis: Represents time or timestamps, showing the duration over which, the gas concentration data was recorded.
- Y-Axis: Represents the gas concentration values recorded by the sensors.
- Lines: Multiple lines on the graph, each representing a different gas sensor’s reading. Each line represents the gas concentration values recorded by a specific sensor at different points in time.
- Legend: A legend indicating the colour used for each gas sensor on the graph. It helps identify which line represent which sensor.
- Trend Analysis: Observing the graph over time, you may be able to identify trends or patterns in the gas concentration levels recorded by each sensor, such as spikes, fluctuations, or consistent levels.
- Leakage Alerts:
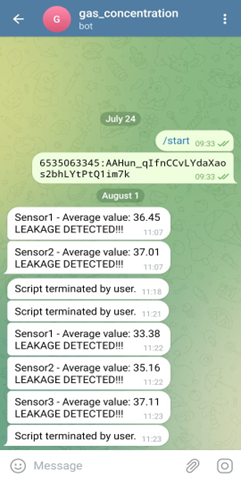
- Telegram Alerts: These are notifications sent via the Telegram messaging platform to inform users about the gas concentration readings from different sensors.
- Gas Concentration Readings: The messages contain gas concentration readings for each sensor. Each message begins with "SensorX" (where X is the sensor number) to indicate which sensor's data is being reported.
- Average Value: The messages include the average gas concentration value for each sensor over a specific period. The average value gives an overall indication of the gas levels recorded by that particular sensor during the monitoring period. If the average value exceeds the predefined threshold of 30, indicating a potential gas leak or elevated gas levels.
- LEAKAGE DETECTED!!!: The presence of this text indicates that the average gas concentration value has exceeded a predefined threshold or limit, suggesting a potential gas leak or elevated gas levels. The "LEAKAGE DETECTED!!!" alert warns users about the hazardous condition.
- Script Terminated by User: The appearance of this text suggests that the gas concentration monitoring script or system execution was manually terminated or stopped by a user after the detected leakage was repaired or was taken care of.
-
Arduino Code

-
Python Code
-
Code Explanation
The explanation to the code is given in detailed format in the document attached.