
AIoT-_Smart-Clock-System
Smart Clock System: Voice-controlled time management solution using speech recognition, tts, and MQTT for interactive user experience
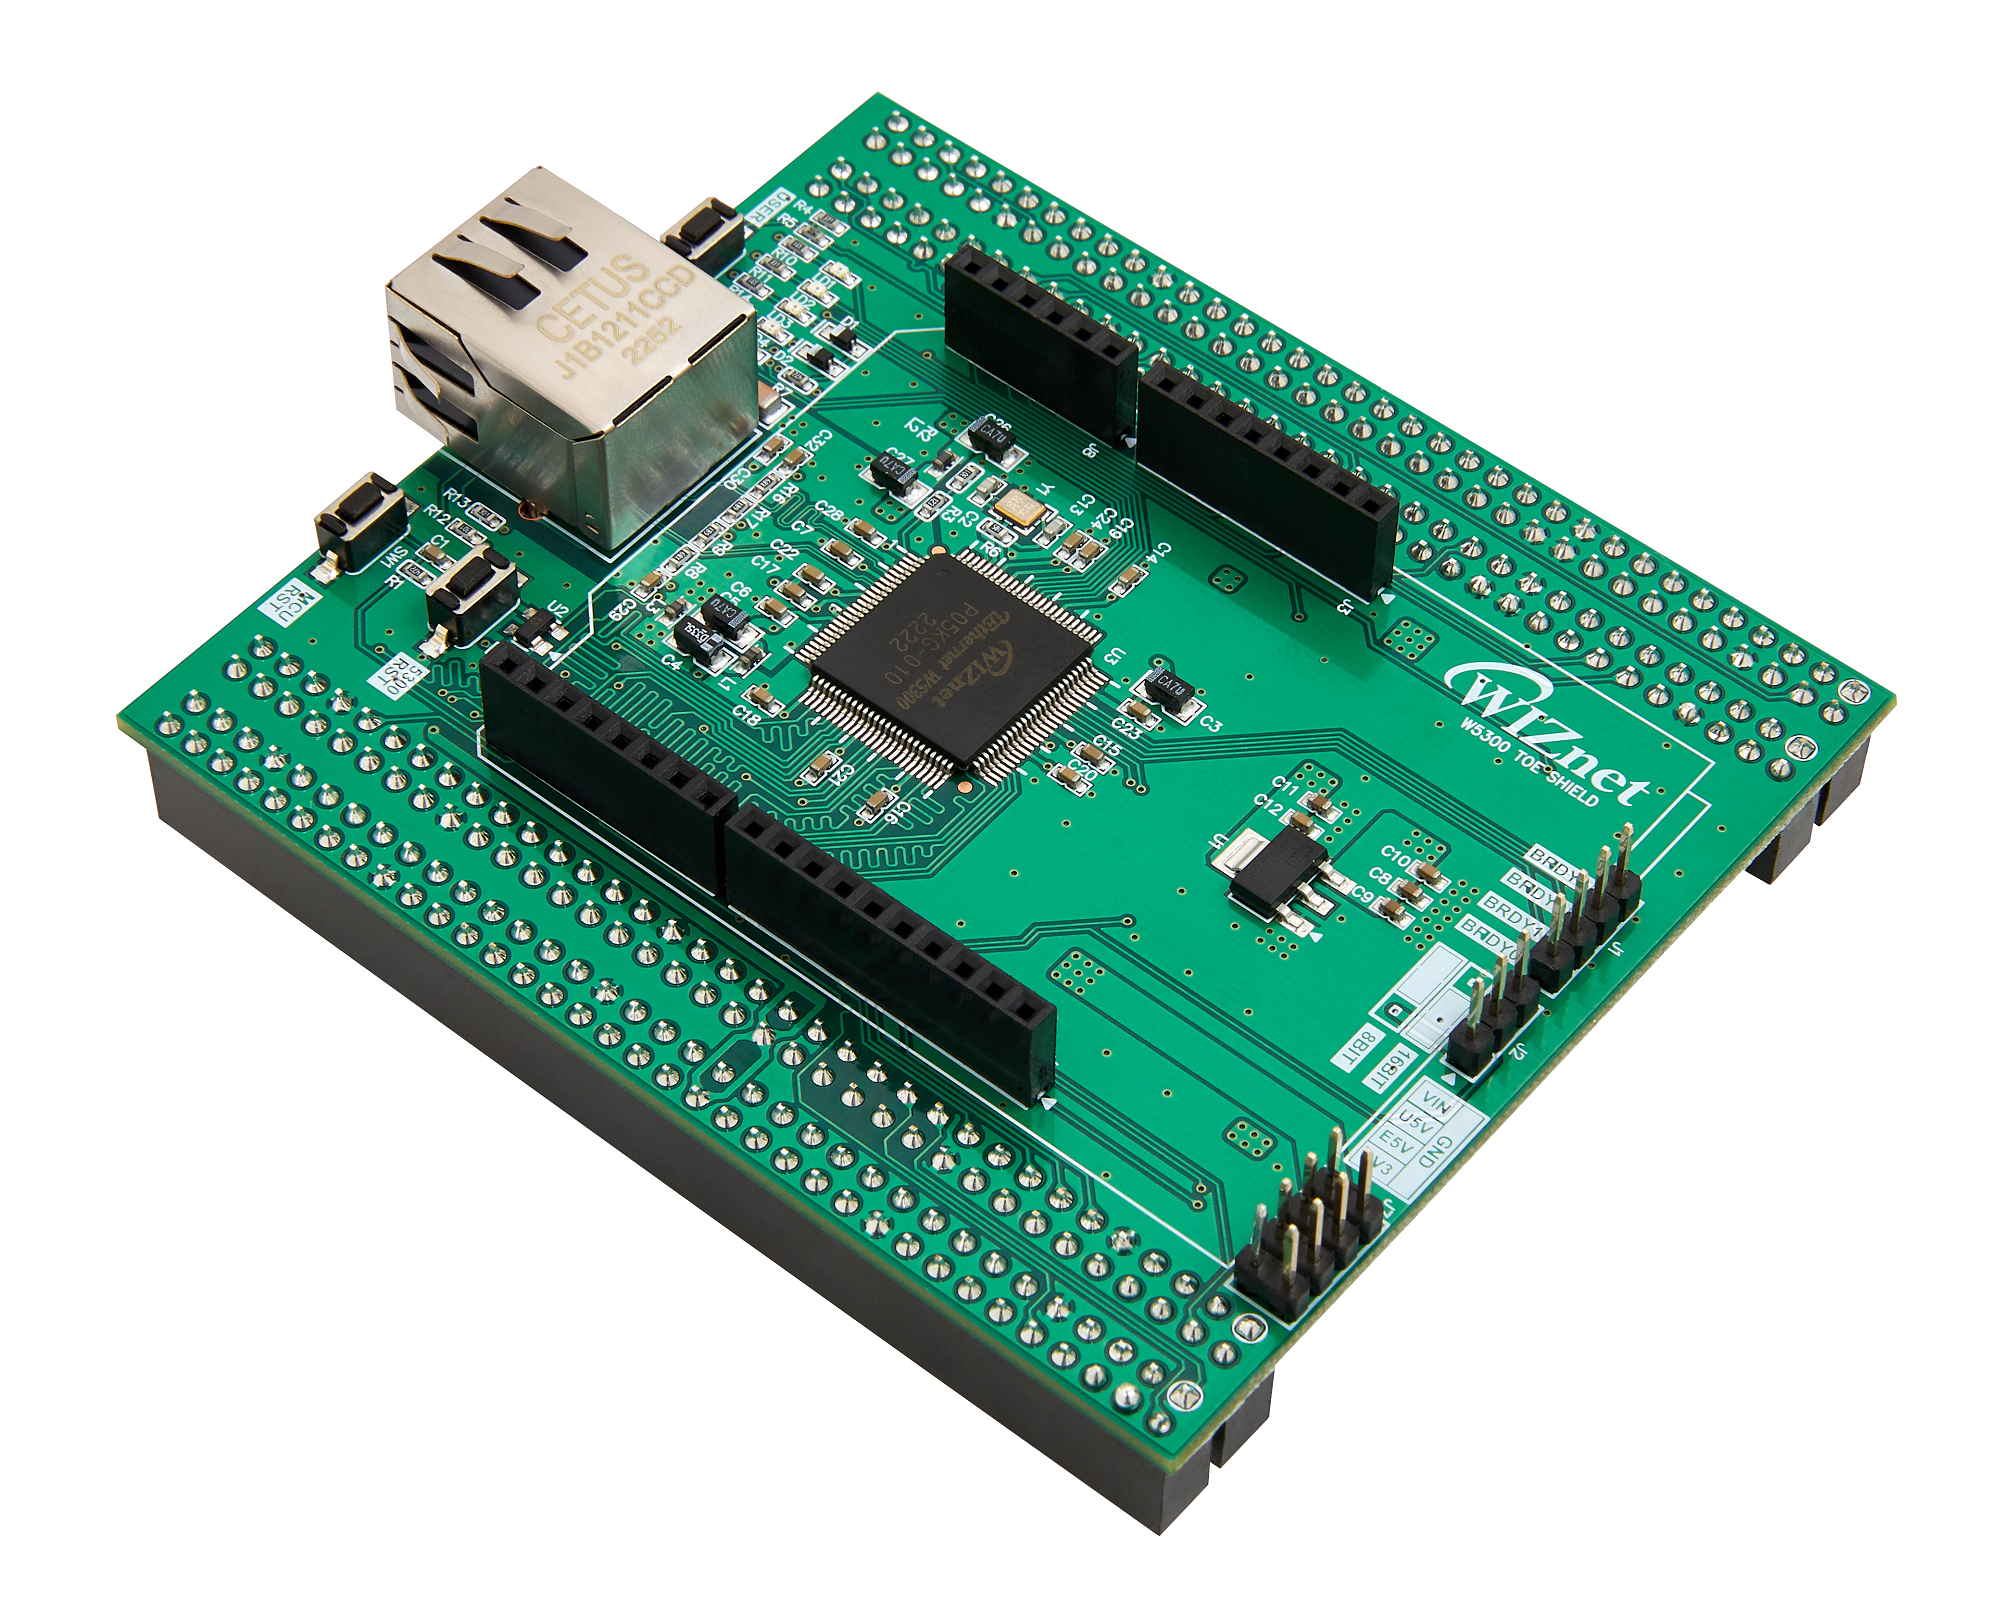
WIZnet - W5300-TOE-Shield
x 1

Arduino - Arduino IDE
x 1
PyCharm - Pycharm
x 1
Eclipse - Paho MQTT
x 1
[AIoT]Smart Clock System+ Voice-Recognition + TTS
TABLE OF CONTENTS:
- INTRODUCTION
- HARDWARE USED
- SOFTWARE USED
- PROGRAMMING LANGUAGES
- WORKFLOW
- SETTING UP WITH PYTHON
- OUTPUT
- CONCLUSION
- INTRODUCTION:
The Smart Clock project is a remarkable embodiment of modern technology, seamlessly integrating voice recognition with a range of indispensable functions to enhance everyday life. This innovative clock not only displays the current time but offers an array of versatile features that elevate its utility. With its vibrant OLED screen, powered by the advanced Wiznet pico connection, the clock provides an intuitive visual interface, ensuring a user-friendly experience.
The clock's voice recognition capabilities make it a truly hands-free device, allowing users to effortlessly set timers, activate the stopwatch, access world clock information, set alarms, and create reminders. Imagine effortlessly starting the stopwatch with a simple command, and watching the precise timing displayed on the crisp OLED screen. Need to stay organized? The clock's reminder function will keep you on track, displaying important alerts right on the screen.
Whether you're a multitasker in need of precise time management or someone who values convenience and efficiency, this Smart Clock is designed for you. Its seamless integration of voice commands and visual display ensures that accessing its functions is a breeze. The clock doesn't just tell time; it becomes a reliable companion, helping you navigate your daily tasks effortlessly while adding a touch of elegance to your living space. Experience the future of timekeeping with our innovative Smart Clock
- HARDWARE USED:
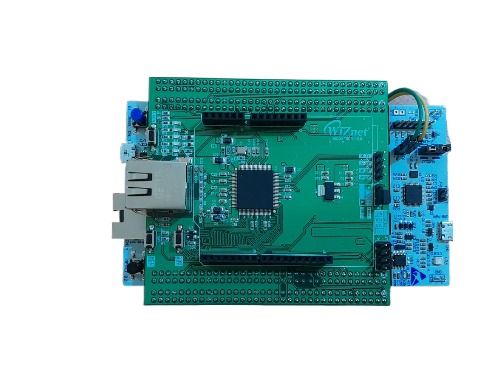
- WIZnet-W5300 TOE SHIELD + STM32-F429ZI board
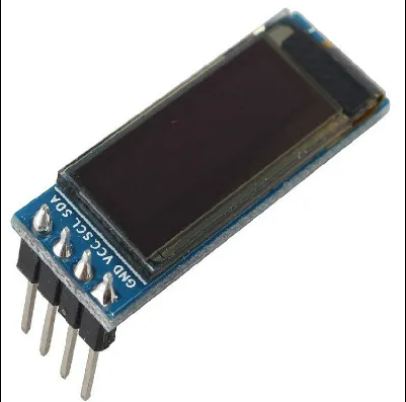
- OLED SCREEN 128*32
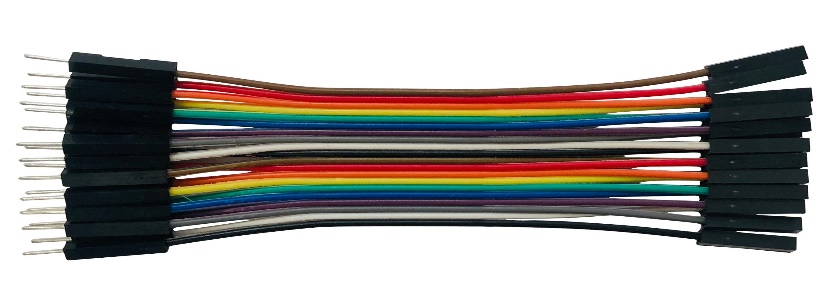
- JUMPER WIRES
- BREAD BOARD

- USB MICROPHONE

- SOFTWARES AND SERVICES USED
- MQTT SERVICE
- ARDUINO IDE
- PYCHARM
- PROGRAMMING LANGUAGES
- C++
- PYTHON
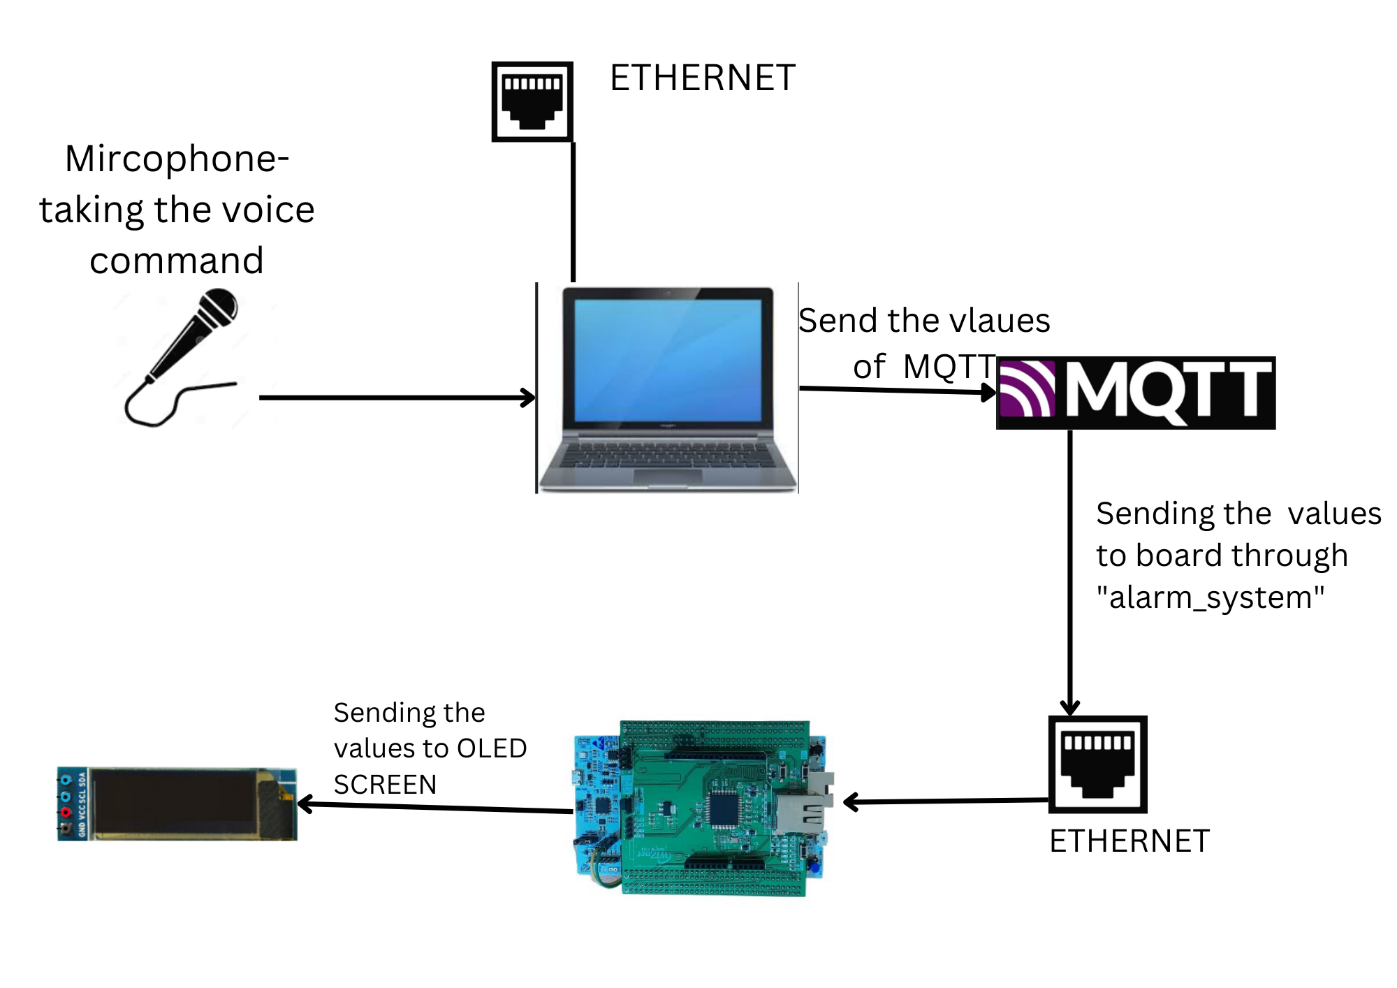
MQTT-BROKER:
MQTT acts as a broker, facilitating communication between Python and Arduino. Python sends values via MQTT to the Arduino. Arduino, configured to receive MQTT messages, and print them to the connected OLED SCREEN accordingly. This enables seamless remote control of the OLED SCREEN using MQTT protocol, bridging Python and Arduino for effective IoT applications.
GOOGLE TEXT TO SPEECH:
recognized_text = recognizer.recognize_google(audio)
this code snippet utilizes the Google text-to-speech API service through the recognize_google function provided by the SpeechRecognition library in Python. This function sends the recorded audio data to Google's servers for speech recognition processing, and then it returns the recognized text back to your Python program. In this case, the recognize_google function is using the Google Web Speech API to perform the speech-to-text conversion, allowing you to transcribe spoken language into written text.
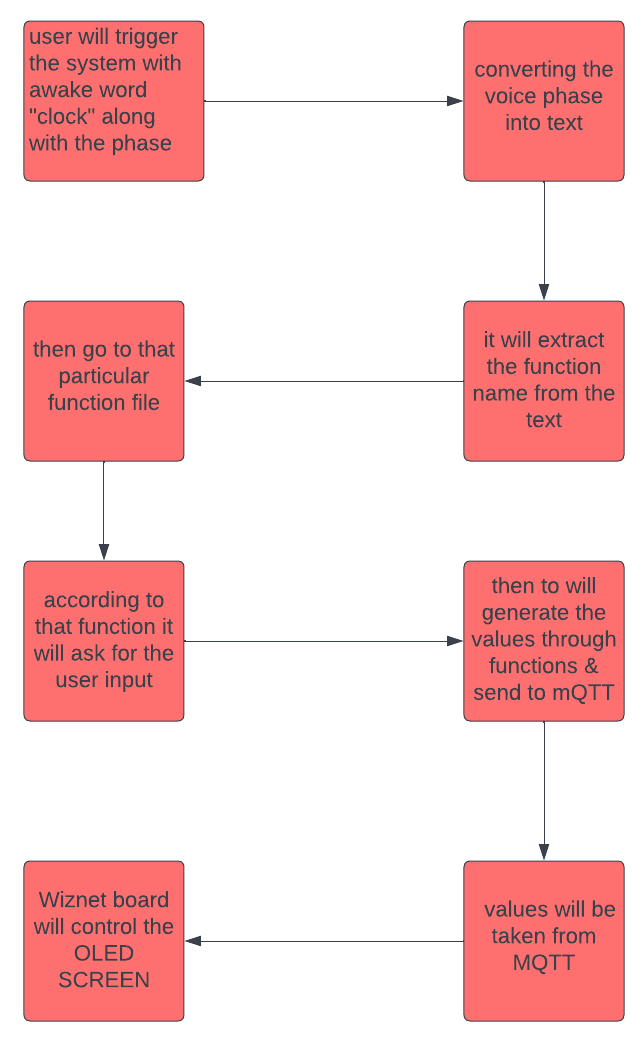
- WORKFLOW
The Smart Clock project has a well-defined workflow that begins with a welcome message and operates through a series of voice commands, with the wake-up word "clock." Here's a breakdown of the input function and several key functions:
1. **Input Function**:
- Upon program start, the Smart Clock welcomes the user with a friendly message, setting the stage for interaction.
- The user's input is primarily in the form of voice commands, initiated by saying the wake-up word "clock" followed by specific commands.
2. **Set Timer**:
- Command: "clock set timer."
- Function: The user can set a timer for a specific duration(in seconds) using this command.
- Interaction: The Smart Clock responds by asking the user to specify the time for the timer, and the clock starts counting down.
3. **Set Stopwatch**:
- Command: "clock set stopwatch."
- Function: The user can initiate a stopwatch using this command, there are three command start, stop,exit.
- Interaction: The Smart Clock acknowledges the command and starts the stopwatch, displaying the time on the OLED screen.
4. **Set Alarm**:
- Command: "clock set alarm."
- Function: The user can set an alarm for a particular time using this command.
- Interaction: The Smart Clock prompts the user to specify the alarm time, and when the set time is reached, the alarm activates with a notification on the screen.
5. **Set Reminder**:
- Command: "clock set reminder."
- Function: The user can create a reminder for a specific event or task.
- Interaction: The Smart Clock prompts the user to input the reminder details, and at the specified time, it displays the reminder on the screen.
6. **Start World Clock**:
- Command: "clock start world clock."
- Function: The user can access the world clock feature to check the time in different time zones.
- Interaction: The Smart Clock displays the current time for various pre-configured world clock locations on the OLED screen.
7. **Start Current Time**:
- Command: "clock start current time."
- Function: The user can request the current local time.
- Interaction: The Smart Clock displays the current local time on the OLED screen.
8. **Turn Off/Exit**:
- Command: "turn off."
- Function: The user can exit the program and turn off the Smart Clock.
- Interaction: The Smart Clock acknowledges the command and gracefully shuts down the program.
The combination of voice recognition, the OLED screen, and these functions creates a dynamic and user-friendly experience, making the Smart Clock an essential companion for time management and daily organization.
FLOW CHART:
SETTING UP USING PYTHON:
Setting up with MQTT:
import paho.mqtt.client as mqtt
paho.mqtt.client: This library provides a client implementation for MQTT (Message Queuing Telemetry Transport), a lightweight messaging protocol widely used in the Internet of Things (IoT) domain for communication between devices. It allows you to connect to an MQTT broker and publish messages to topics or subscribe to topics to receive messages. It's commonly used for real-time data transmission in IoT applications.
Installation: To install the paho-mqtt library, you can use pip, the Python package manager. Open your terminal or command prompt and run the following command:
pip install paho-mqtt
Setting Up with Recogniser:
import speech_recognition as sr
This library provides an easy-to-use interface to work with various speech recognition APIs. It allows you to convert spoken language into text and supports multiple speech recognition engines, such as Google Web Speech API, Microsoft Bing Voice Recognition, and more.
Installation: To install the speech_recognition library, you can use pip:
pip install SpeechRecognition
Setting up with TTS:
import pyttsx3
This library is a text-to-speech (TTS) engine that allows you to convert text into speech. It's useful for applications where you want your computer or device to speak out information to the user.
Installation: To install the pyttsx3 library, you can use pip:
pip install pyttsx3
Another two libraries are used here threading, re. “threading” -- Threads are particularly useful when you want to perform tasks simultaneously without blocking the main program's execution. This can improve the responsiveness of your application, especially for I/O-bound tasks.
“re” -- This library is part of Python's standard library and provides support for regular expressions. Regular expressions are a powerful tool for pattern matching and text manipulation. The re library allows you to search, find, and replace specific patterns within strings.
CIRCUIT CONNECTION:
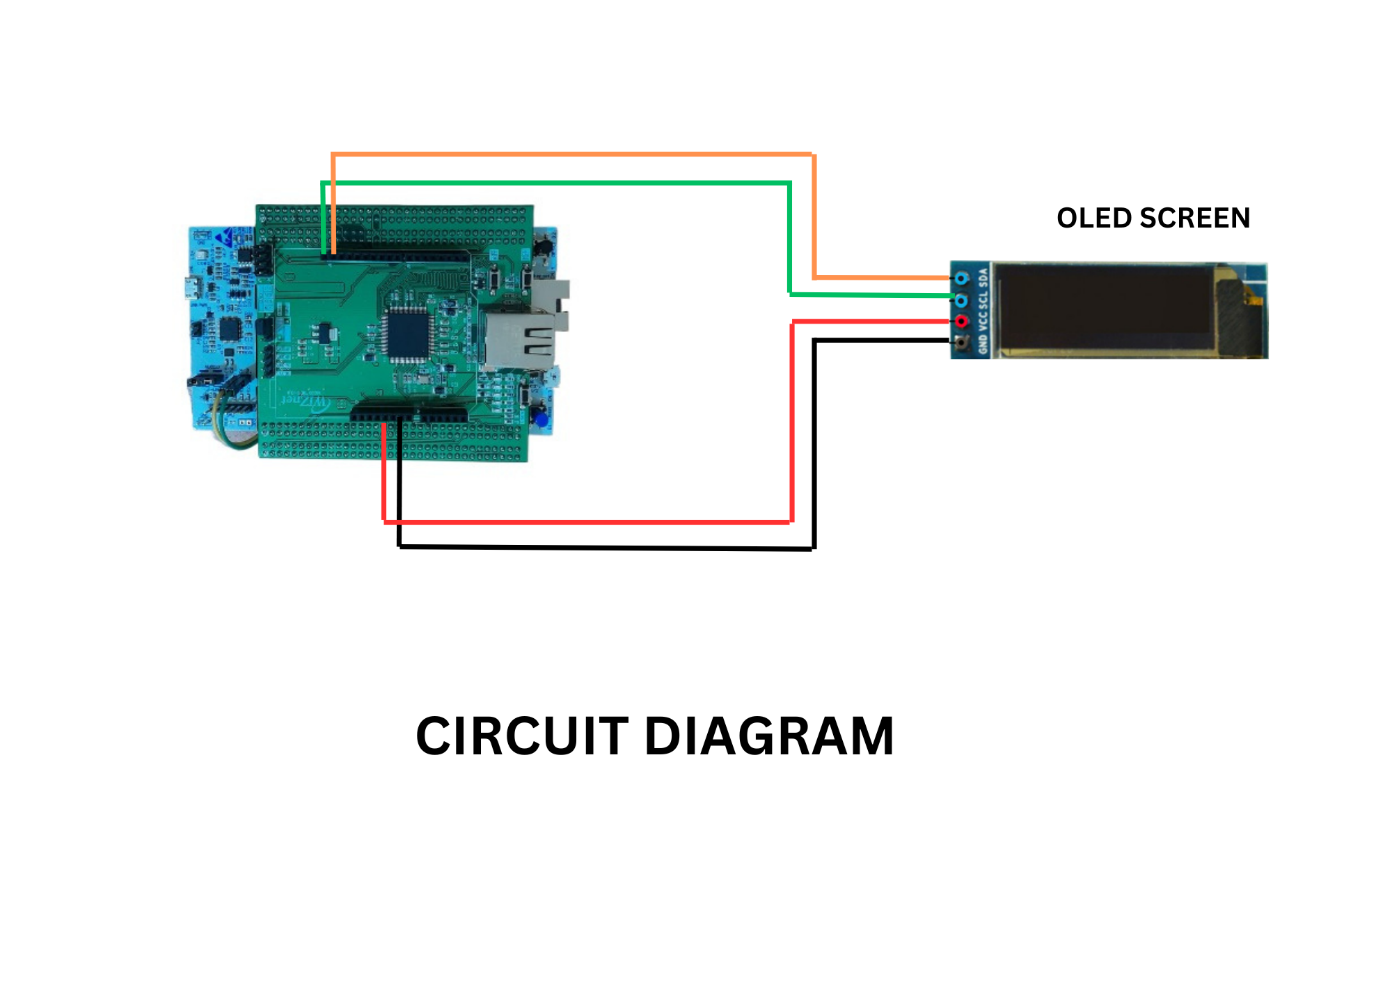
CONNECTION DIAGRAM:
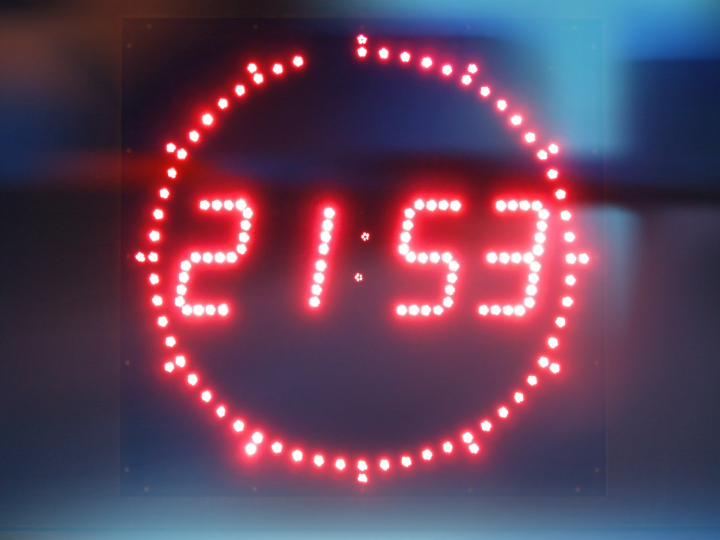
OUTPUT:
CONCLUSIONS:
Certainly! The Smart Clock System project leverages various technologies to create a versatile and interactive time management solution. By integrating speech recognition, text-to-speech conversion, and MQTT communication, the system enables users to control and interact with clock-related functionalities using their voice. Users can set alarms, timers, reminders, and inquire about the current time for different time-zones and countries. The project's architecture empowers users to conveniently interact with the clock functionalities through natural language, enhancing accessibility and usability. The MQTT broker facilitates real-time communication and information sharing between different modules of the system, enabling seamless integration. The project not only offers practical time-related utilities but also serves as a showcase of how emerging technologies can be integrated to create innovative and user-friendly solutions for everyday tasks.
CODE EXPLAINATION:
Explanation for main.py:
Certainly! This code represents a simple voice-controlled smart clock system using Python. Let's break down the different components and their functionalities:
1. **Import Statements:**
- The code begins by importing necessary modules: `pyttsx3` for text-to-speech conversion, `speech_recognition` (often abbreviated as `sr`) for speech recognition, and `importlib` for dynamic module importing.
2. **COMMANDS Dictionary:**
- This dictionary maps recognized voice commands to corresponding module names. Each command is associated with a specific action that the smart clock can perform.
3. **`speak` Function:**
- This function utilizes the `pyttsx3` module to convert text into speech. It initializes a speech synthesis engine, reads the input text, and runs the engine to produce speech.
4. **`get_voice_input` Function:**
- This function handles the process of capturing audio input from the user's microphone using the `speech_recognition` module.
- It uses noise adjustment to account for ambient noise and then listens for audio input.
- The recorded audio is passed to Google's speech recognition service to convert it into text.
- If successful, the recognized text is returned in lowercase; otherwise, an empty string is returned.
5. **`extract_command` Function:**
- This function extracts the command from the user input.
- It checks if the input starts with the phrase "clock" (e.g., "clock set timer"), and if so, it extracts the command from the input.
- The extracted command is then checked against the predefined commands in the `COMMANDS` dictionary.
6. **`execute_module` Function:**
- This function executes the appropriate module based on the recognized command.
- If the command is "exit," the system is turned off with a goodbye message.
- If the command is recognized and corresponds to a valid module, that module is imported and executed using the `main()` function defined in the module.
- If the command is not recognized or the module import fails, an appropriate response is given.
7. **`main` Function:**
- The main function serves as the entry point of the program.
- It starts by welcoming the user and providing a list of available commands.
- It enters a loop where it continuously listens for user input using the microphone.
- If the input contains the phrase "clock," the system extracts the command and attempts to execute it using the `execute_module` function.
- If the input contains "turn off," the system is shut down with a goodbye message.
8. **`__name__` Check and Execution:**
- The script is designed to be run directly. The code block under `if __name__ == "__main__":` ensures that the `main()` function is executed when the script is run as the main program.
EXPLAINATION OF timer.py:
Certainly, here's a brief explanation of the provided code:
1. **Imports:**
- `speech_recognition`: This module provides functions for capturing audio input (voice) and recognizing it as text.
- `pyttsx3`: This module is used for converting text into speech.
- `time`: This standard Python module provides various time-related functions.
- `paho.mqtt.client`: This module facilitates MQTT (Message Queuing Telemetry Transport) communication, commonly used for IoT devices.
2. **MQTT Configuration:**
- The code sets up MQTT parameters: `MQTT_BROKER`, `MQTT_PORT`, and `MQTT_TOPIC`. These are used to communicate timer-related information over the MQTT protocol.
3. **`speak` Function:**
- Converts the provided text into speech using the `pyttsx3` module.
4. **`get_voice_input` Function:**
- Captures voice input from the user using a microphone.
- Adjusts for ambient noise, listens to audio, and uses Google's speech recognition to convert it to lowercase text.
- Handles exceptions for recognition errors or request errors.
5. **`set_timer` Function:**
- Asks the user to provide the timer duration in seconds through voice input.
- Converts the provided input to an integer representing the timer duration.
- Provides feedback to the user about the set timer.
6. **`countdown_timer` Function:**
- Establishes an MQTT client connection.
- Implements a countdown loop, starting from the provided timer duration and decrementing by one second.
- Prints and publishes the remaining time in the countdown to the MQTT topic.
- After the countdown ends, it publishes a "Timer ended" message.
7. **`main` Function:**
- Welcomes the user and initiates the timer-setting process.
- Calls the `set_timer` function to get the timer duration from the user.
- If a valid duration is provided, it calls the `countdown_timer` function.
8. **Running the Program:**
- The script starts by welcoming the user and asking for a timer duration.
- It captures the timer duration using voice input, validates it, and starts a countdown.
- During the countdown, the remaining time is displayed and published to the MQTT topic.
- After the countdown, a "Timer ended" message is displayed and published.
Overall, the code sets up a voice-controlled timer using speech recognition, displays the countdown, and communicates timer-related information using MQTT messaging.
EXPLAINATION OF alarm.py:
- MQTT and Voice Recognition Settings:
- speak Function:
- recognize_time_input Function:
- parse_hour_minute Function:
- MQTT Callback Function on_connect:
- Main Function:
- Alarm Setup and Alert Loop:
- Running the Program:
EXPLAINATION OF stopwatch.py:
- Imports:
- Global Variables:
- speak Function:
- Stopwatch Functions:
- countdown_thread_function:
- Voice Command Processing:
- Voice Recognition and MQTT Functions:
- main Function:
- Running the Program:
EXPLAINATION OF current_time.py:
- MQTT and Voice Recognition Settings:
- speak Function:
- get_voice_input Function:
- tell_time Function:
- MQTT Callback Function on_connect:
- Main Function:
- Time Inquiry and Publishing:
- Running the Program:
EXPLAINATION OF world_clock.py:
- MQTT and Timezone Definitions:
- speak Function:
- get_time_in_timezone Function:
- get_country_time Function:
- MQTT Callback Function on_connect:
- Main Function:
- Voice Recognition and Processing Loop:
- Running the Program:
EXPLAINATION OF reminder.py:
- MQTT and User Input Settings:
- speak Function:
- recognize_speech Function:
- get_reminder_text Function:
- get_reminder_time Function:
- MQTT Callback Function on_connect:
- Main Function:
- Reminder Setup and Publishing Loop:
- Continuation Check:
- Running the Program:
EXPLAINATION OF ARDUINO:
This code is an Arduino sketch that sets up a system to display messages received from an MQTT broker on an SSD1306 OLED display and establish an Ethernet connection for MQTT communication. Let's break down the different parts of the code:
1. **Libraries and Definitions:**
- The code includes several libraries, such as `HardwareSerial`, `SPI`, `Wire`, `SoftWire`, `Adafruit_GFX`, `Adafruit_SSD1306`, `Ethernet`, and `PubSubClient`.
- Some constants are defined: `SCREEN_WIDTH` and `SCREEN_HEIGHT` for the dimensions of the OLED display, `OLED_RESET` for the reset pin of the OLED (set to -1), and `SCREEN_ADDRESS` for the I2C address of the OLED.
- MQTT-related constants are defined, such as `MQTT_BROKER` (the MQTT broker's address), `MQTT_PORT` (the MQTT broker's port), and `CLIENT_ID` (the client's unique identifier).
- MAC address and IP address for Ethernet connection are defined.
2. **Global Variables:**
- `ethClient` is an instance of the Ethernet client for communication over the Ethernet connection.
- `client` is an instance of the PubSubClient library, used for MQTT communication.
3. **Setup Function (`void setup()`):**
- The code sets up serial communication and waits for a serial connection to be established.
- Wire library's SDA and SCL pins are configured.
- The OLED display is initialized using the `display.begin()` function. If the display initialization fails, the program enters an infinite loop.
- The OLED display is cleared, and the text "SMART CLOCK" is displayed in large text.
- Ethernet connection is established using `Ethernet.begin(mac)`. It attempts to configure the Ethernet connection using DHCP and waits until it succeeds.
- After successful Ethernet connection, the Arduino's local IP address is printed.
- MQTT client is configured to connect to the MQTT broker, and the callback function `callback` is set for handling received MQTT messages. The `reconnect()` function is called to establish the MQTT connection and subscribe to the "alarm_system" topic.
4. **Loop Function (`void loop()`):**
- The loop checks if the MQTT client is connected. If not, it calls the `reconnect()` function to attempt reconnection.
- The MQTT client's loop function is called to maintain MQTT communication.
5. **Callback Function (`void callback(char* topic, byte* payload, unsigned int length)`:**
- This function is called when an MQTT message is received.
- The received message's payload is converted into a String.
- The received topic and message are printed to the serial monitor.
- The OLED display is cleared, and the received message is displayed on the screen.
6. **Reconnect Function (`void reconnect()`):**
- This function attempts to connect to the MQTT broker.
- It prints a status message and tries to connect the client with a specific client ID.
- If the connection is successful, the client subscribes to the "alarm_system" topic.
- If the connection fails, the client's state is printed, and a delay of 5 seconds is introduced before retrying.
The main purpose of this code is to display messages received from an MQTT broker on an OLED display and establish a stable connection to the MQTT broker for communication. It integrates Ethernet communication, MQTT messaging, and OLED display functionality into a single Arduino sketch.
-
Python source code

-
Ardunio source code
-
schematics