
Raspberry Pi Pico IoT Demo – W5500 Ethernet + NeoPixel LED
HOWTO: Let's make a simple IoT RGB control project with Raspberry Pi Pico, WIZnet W5500, NeoPixel , WIZNET5K Adafruit lib on CircuitPython
1. Preview
No problem to skip this “Preview” Section, but it’s better to read them for using Ethernet on RP2040 Board.
Need to install CircuitPython on Raspberry Pi Pico board. because we can use WIZNET5K, Adafruit NeoPixel library for Ethernet, RGB control. For more detail, I already upload 2 projects with Raspberry Pi Pico, WIZ850io (W5500), Circuit Python env., Hardware connection, Ping demo example. Please visit the below project first.
- How to add W5500 Ethernet to Raspberry Pi Pico (Python) – 1
- How to add W5500 Ethernet to Raspberry Pi Pico (Python) – 2
2. Simple Install CircuitPython on Raspberry Pi Pico Board
Follow up below steps.
1. Download the below uf2 file link on your computer.
- my github repo – https://github.com/bjnhur/pico-W5500/blob/main/adafruit-circuitpython-raspberry_pi_pico-en_US-6.2.0.uf2
- OR original files from adafruit CircuitPython 6.2.0 – adafruit-circuitpython-raspberry_pi_pico-en_US-6.2.0.uf2
2. Push and hold the BOOTSEL button and plug your Pico into the USB port of your Raspberry Pi or other computer. Release the BOOTSEL button after your Pico is connected.
3. It will mount as a Mass Storage Device called RPI-RP2.
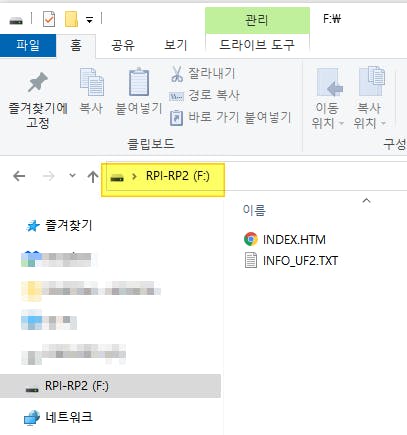
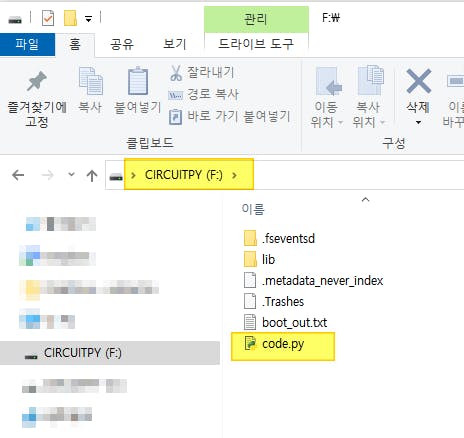
4. Drag and drop the CircuitPython 6.2.0 UF2 file onto the RPI-RP2 volume. Your Pico will reboot. You are now running CircuitPython. If you see “CIRCUITPY” drive volume, you’re ready to enjoy CircuitPython on your Pico board as below pic.
3. Install NeoPixel, W5500 Ethernet libraries
Very Easy. you find “neopixel.mpy”, “adafruit_wiznet5K”, “adafruit_bus_device” and copy the file into lib folder on your Raspberry Pi Pico Board.
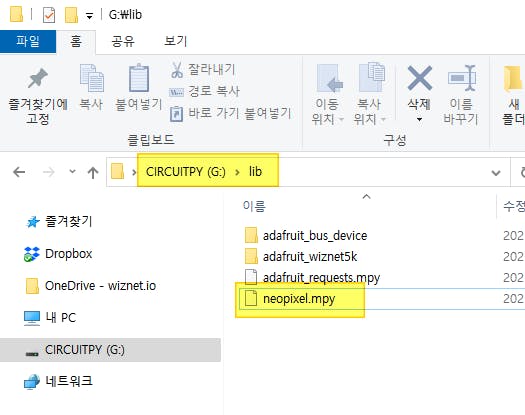
For your installation, I upload the files on my github repo. just download all the files and folders. and then copy them into your Raspberry Pi Pico board.
https://github.com/bjnhur/pico-W5500/tree/main/lib
For more detail information about this libraries, you visit Adafruit pages.
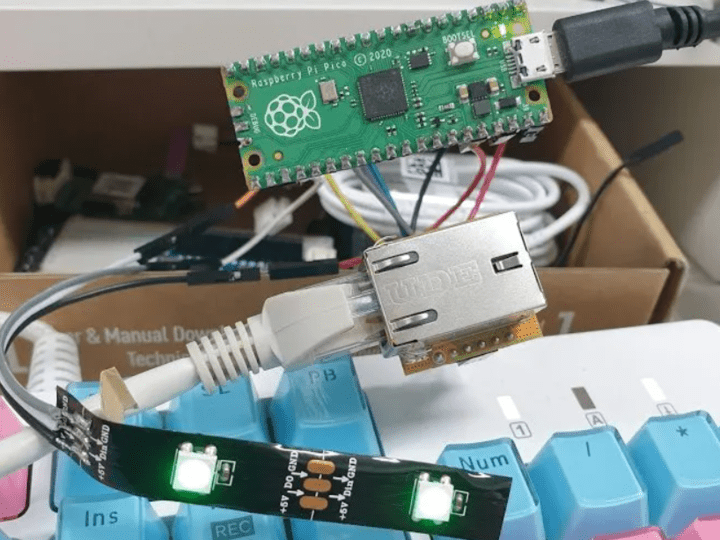
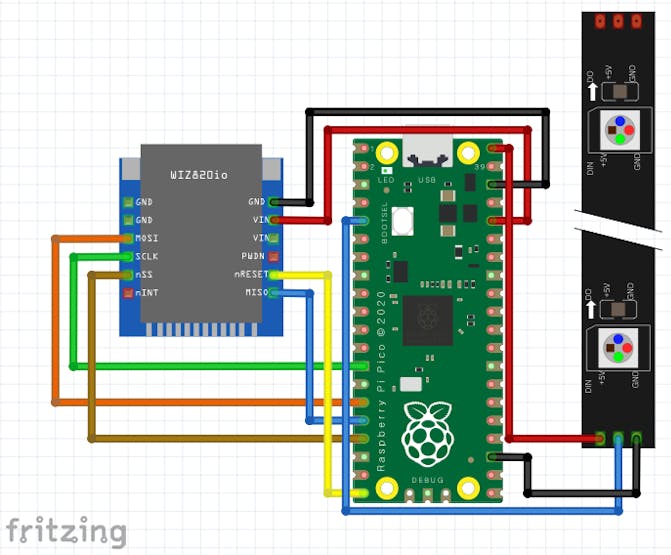
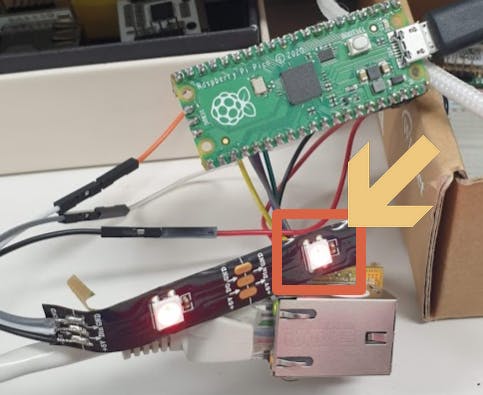
4. H/W Connection
refer the below pic, fritzing file also uploaded in this project
5. Coding – Network RGB Control function
Copy below “Pico_W5500_Neopixel.py” code into your code.py on Raspberry Pi Pico board.
or
- 1. Download the code from GitHub. – https://github.com/bjnhur/pico-W5500/blob/main/Pico_W5500_Neopixel_Demo.py
- 2. Rename filename “code.py”
- 3. Then, copy it into your board volume(“CIRCUITPY”).
Let’s see the main code about Neopixel, Ethernet socket functions:
1. import neopixel lib, and assign Pin number.
import neopixel

pixel_pin = board.GP3
num_pixels = 2
2. init the neopixel lib.
pixels = neopixel.NeoPixel(pixel_pin, num_pixels, brightness=0.1, auto_write=False)3. TCP socket listen & accept
# Initialize a socket for our server
socket.set_interface(eth)
server = socket.socket() # Allocate socket for the server
server_ip = None # IP address of server
server_port = 50007 # Port to listen on
server.bind((server_ip, server_port)) # Bind to IP and Port
server.listen() # Begin listening for incoming clients
print("server listen")
conn = None
while True:
if conn is None:
conn, addr = server.accept() # Wait for a connection from a client.
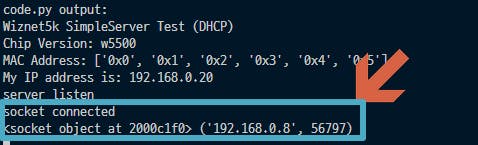
print("socket connected")
print(conn, addr)4. After TCP connection, change the RGB Color from PC data
if conn is None:
    // accept
else :
    if conn.status in (
        SNSR_SOCK_FIN_WAIT,
        SNSR_SOCK_CLOSE_WAIT,
    ):
        print("socket closed")
        conn.close()
        conn = None
    else :
        # print("socket established", conn.status)
        data = conn.recv()
        if data:
            print(data)
            conn.send(data)  # Echo message back to client
            recvStr = data.decode('UTF-8')
            print(recvStr) # expected data format 255,0,0 - (R,G,B)
            color = recvStr.split(",", 2) # split
            print(color)
            if len(color) != 3 or not "".join(color).isdigit():
                pass
            red = int(color[0])
            green = int(color[1])
            blue = int(color[2])

            pixels.fill((red,green,blue))
            pixels.show()
6. Test Result
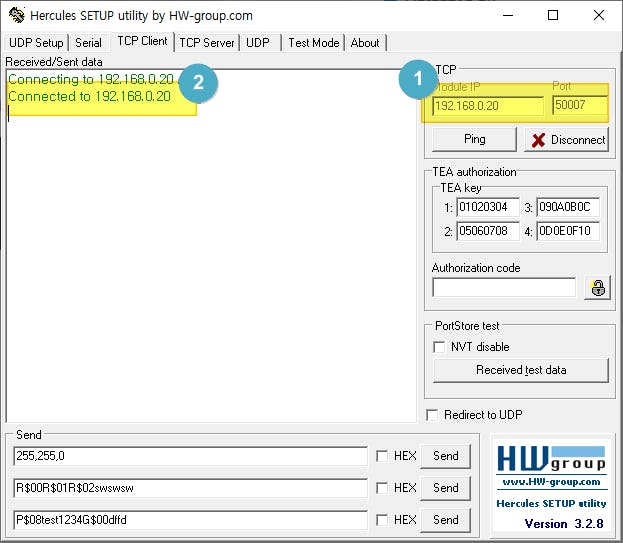
you need simple socket test program like “Hercules”. for more detail about this tool please visit the following site. Very useful socket test tool, UART terminal, Freeware!
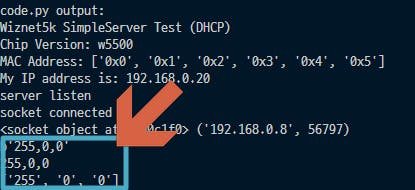
If the code is ok, you can see the below log from REPL of Pico board. (For REPL open, please refer this page “How to add W5500 Ethernet to Raspberry Pi Pico (Python) – 1” – 6. REPL, Open serial terminal for printf() )
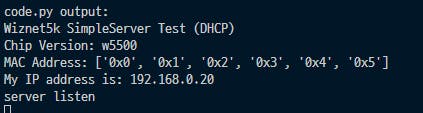
I try to connect the board as below, and connection is ok.
REPL window,
I sent the message (RGB code) as below:
255, 0, 0 <– RED
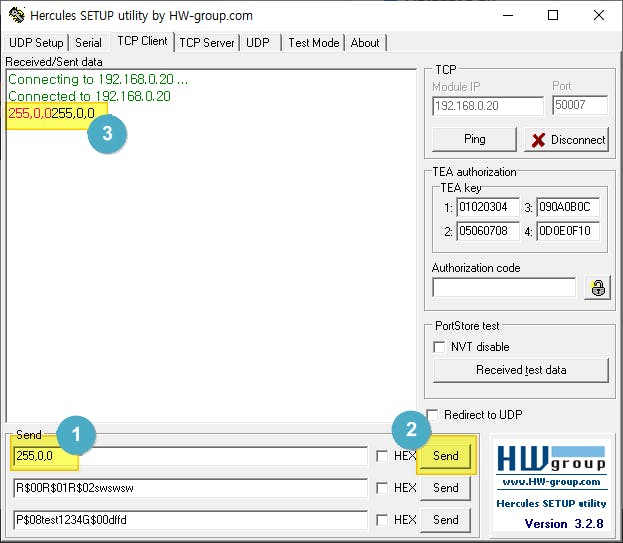
Board echo the data “255, 0, 0” (3 in pic) and see the RED LED.
In REPL window,
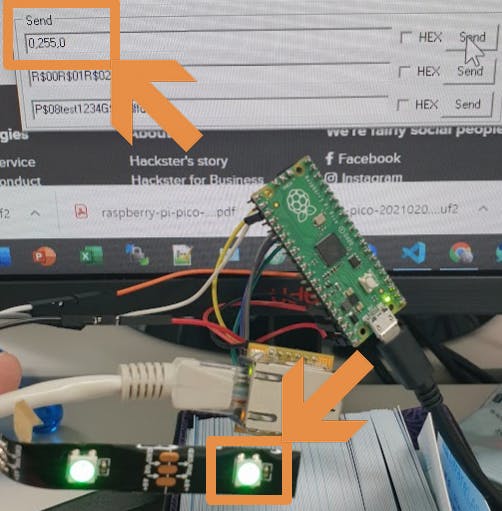
Let’s try to change Green, “0, 255, 0”
Done. Enjoy my demo code~~~