
W55RP20 CAN to TCP Client example
An example of sending and receiving data from CAN to a TCP client using the W55RP20-EVB-Pico.
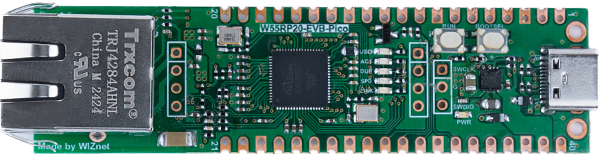
WIZnet - W55RP20-EVB-Pico
x 1
github link : https://github.com/WIZnet-ioNIC/WIZnet-PICO-C/blob/main/examples/can/can_to_ethernet/w5x00_can_to_eth_tcpc.c
RP2040 PIO CAN code link : https://github.com/KevinOConnor/can2040
CAN protocol?
1.Overview
The Controller Area Network (CAN) is a serial communication protocol widely used in automotive, industrial automation, and medical devices. It was developed for real-time data exchange and provides high reliability with robust error detection.
2.Key Features
- Multi-master, message-based communication: Priority-based message transmission between nodes
- High-speed data transfer: Up to 1Mbps (CAN FD supports up to 5–8Mbps)
- Strong error detection: Ensures reliability with CRC, ACK, and error frames
- Cost-effective: Simple 2-wire bus (CAN_H, CAN_L) for easy maintenance
3.Message Frame
- SOF (Start of Frame): Indicates the beginning of a frame
- Identifier (ID): Unique identifier that determines message priority (11-bit or 29-bit)
- Control Field: Contains data length information (DLC)
- Data Field: Actual transmitted data (0–8 bytes, up to 64 bytes in CAN FD)
- CRC (Cyclic Redundancy Check): Checksum for error detection
- ACK (Acknowledge): Indicates successful reception by other nodes
- EOF (End of Frame): Marks the end of the frame
How to test CAN to TCP Client example?
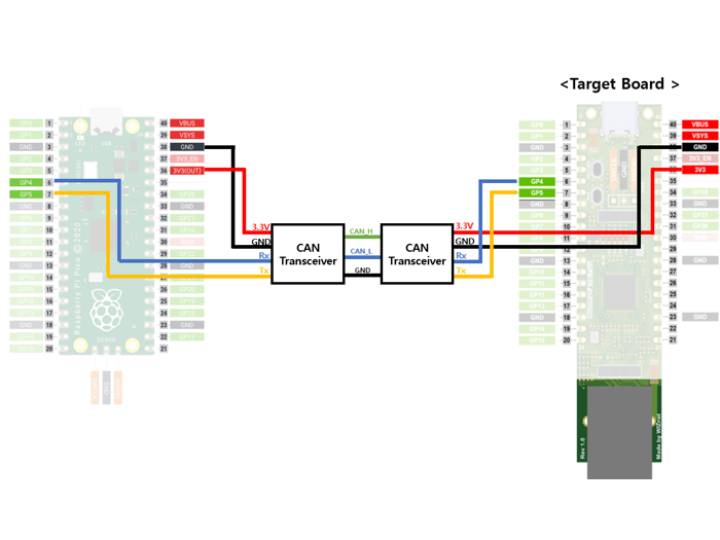
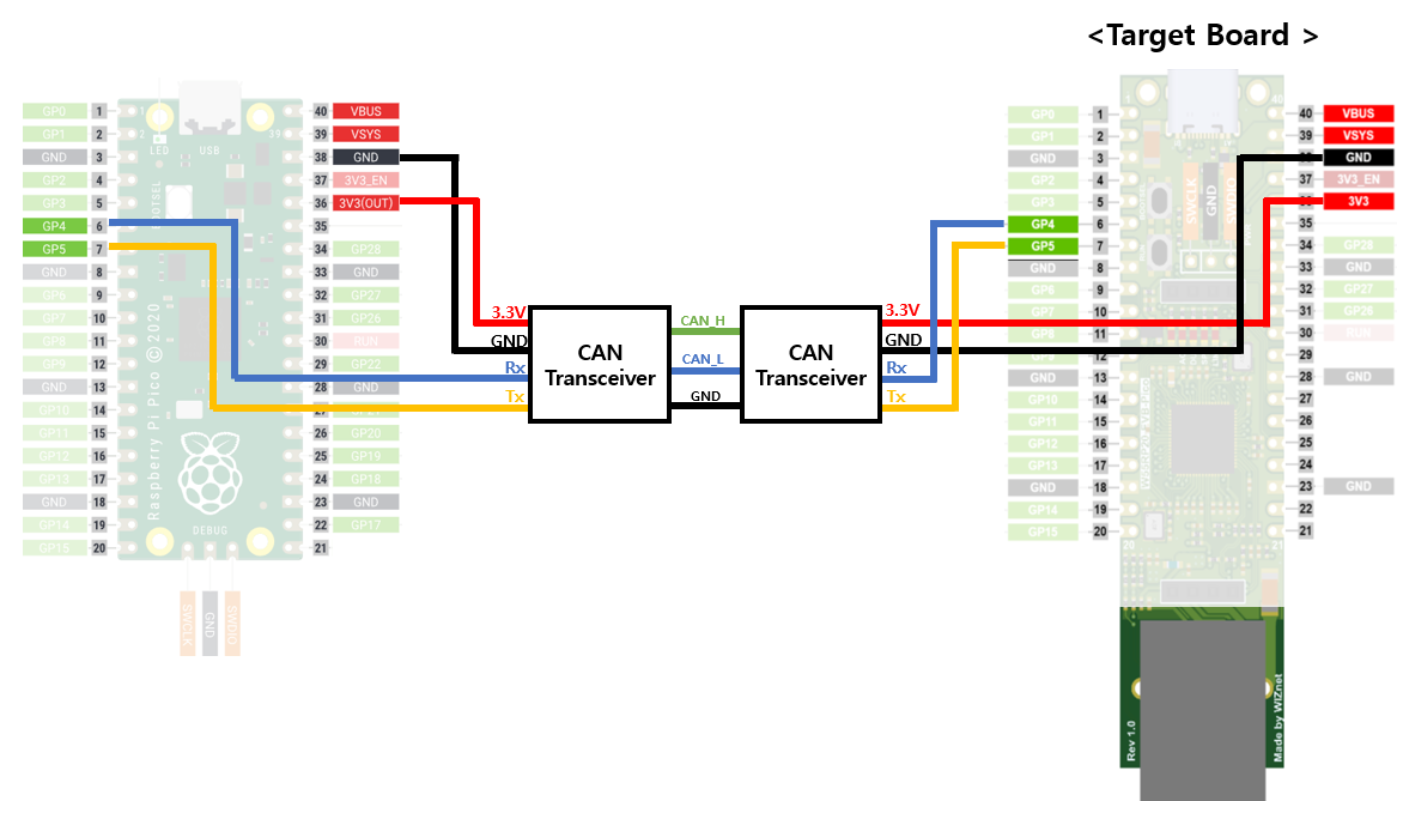
Prepare hardware
Connect as shown in the diagram below, to test the CAN to TCP client example.
Target Board will be W55RP20-EVB-Pico. And target board will operate as a TCP server, receiving CAN data from a Raspberry Pi Pico and transmitting it to a TCP client (etc. PC).
Prepare software
You can use a tool called Klipper to enable the Raspberry Pi Pico to send CAN data. This tool will running on Linux environment.
1.Download Klipper code
# Linux
$ git clone https://github.com/Klipper3d/klipper
$ sudo apt-get update && sudo apt-get install build-essential libncurses-dev libusb-dev libnewlib-arm-none-eabi gcc-arm-none-eabi binutils-arm-none-eabi libusb-1.0 pkg-config
2.Build USB to CAN bus code and Flashing to Raspberry Pi Pico.
# Linux
$ make menuconfig
Select the options as shown in the image and save & quit.
# Linux
$ make
$ make flash FLASH_DEVICE=2e8a:0003
Flashing to Raspberry Pi Pico.
3.Install can-utils tools.
# Linux
$ sudo apt-get install can-utils
$ sudo ip link set can0 up type can bitrate 1000000
If the tools for the test board are installed correctly, the result will appear as shown in the diagram below.

4.How to use can-utils
# Linux


# show can receive message
$ candump can0


# send can message (ID : 123, Data : 0x12 0x34 0x56 0x78)
$ cansend 123#12345678
Setup board configuration
Setup board to W55RP20_EVB_PICO in CMakeLists.txt in WIZnet-PICO-C/ directory.
# Set board
#set(BOARD_NAME WIZnet_Ethernet_HAT)
#set(BOARD_NAME W5100S_EVB_PICO)
#set(BOARD_NAME W5500_EVB_PICO)
set(BOARD_NAME W55RP20_EVB_PICO)
#set(BOARD_NAME W5100S_EVB_PICO2)
#set(BOARD_NAME W5500_EVB_PICO2)
Setup network settings
Setup network configuration such as IP in 'w5x00_can_to_eth_tcpc.c' which is the CAN to TCP Client example in 'WIZnet-PICO--C/examples/can/can_to_ethernet/' directory.
/* Network */
static wiz_NetInfo g_net_info =
    {
        .mac = {0x00, 0x08, 0xDC, 0x12, 0x34, 0x56}, // MAC address
        .ip = {192, 168, 11, 2},                     // IP address
        .sn = {255, 255, 255, 0},                    // Subnet Mask
        .gw = {192, 168, 11, 1},                     // Gateway
        .dns = {8, 8, 8, 8},                         // DNS server
        .dhcp = NETINFO_STATIC                       // DHCP enable/disable
};
/* Socket */
#define SOCKET_TCP 0
/* Port */
#define PORT_TCP 5000Setup CAN to TCP Client example
Setup CAN Configuration and pin in example in 'WIZnet-PICO-C/examples/can/can_to_ethernet/' directory.
/* Can */
#define CAN_PIO_INDEX       0           // !! do not use PIO1 (using in w5x00) !!
#define CAN_BITRATE         100000      // 100kbps
#define CAN_RX_PIN          4
#define CAN_TX_PIN          5
Build & Run
If the CAN to TCP Client example works normally on W55RP20-EVB-Pico, you can see the network information of W55RP20-EVB-Pico and main menu tree.

Connect to the open TCP server using Hercules TCP client. When connecting to the TCP server, you need to enter is the IP that was configured in Step 3, the port is 5000 by default.

( TCP Client -> CAN )
When the TCP client sends a message, you can verify that the board receives it and transmits the message via CAN.


( CAN -> TCP Client )
When the CAN Utils sends a message, you can verify that the board receives it and transmits the message via ETH.


-
W55RP20 CAN to TCP Client example
